How to make leaves from satin ribbon?
Many crafts are made from satin ribbons, but flowers are more popular. With the right approach, they look like natural ones, but to complete the picture they lack leaves, which add a natural look to the work or hide minor imperfections. Having studied the basic rules of the techniques, you can easily learn how to create various leaves with your own hands.
Materials and tools for creating leaves from satin ribbon
Experienced needlewomen prepare in advance the materials and tools that will be needed for the job. For any technology the list is the same:
- sharp scissors;
- tweezers, long with curved ends;
- threads;
- thin and thick needle;
- ruler;
- chalk or soap;
- candle or lighter;
- satin ribbons of various widths.
Having been well prepared, you can safely begin to create.
Important! Many craftswomen use a special soldering iron instead of scissors, which simultaneously cuts and melts the edge.
Photo master class Kanzashi Lily
Before you start this amazingly beautiful master class with step-by-step photos and descriptions, you will need to prepare all the required materials, as well as accessories. And most importantly, be patient and in a good mood, because the kanzashi technique also requires some attention. So here is the list you need:
- satin white ribbon;
- hot glue with PVA;
- fire from a match or lighter;
- semolina;
- dyes of several shades;
- decorative sparkles;
- fishing line with a piece of felt, as well as scissors.
Here are detailed instructions for making a flower that will be understandable even for beginners. The first step is to make patterns for the petals. To do this, take cardboard and cut out a template eight centimeters long and six centimeters wide. Eighteen petals will be used in one bud at once. Five of them should be made with the ends deeply cut.
The petals must be singed one by one over the fire of a candle or lighter. As soon as you have burned one element, immediately begin to pull its ends in different directions with your hands so that they turn out wavy, as shown in the photo.
All that remains is to give the workpieces some texture. To do this, place them on a towel. Then heat the knife over the fire and run the blunt side along the petals, pressing them a little. You should end up with longitudinal stripes that resemble veins. The petals, from which five additional pieces of material were cut out, should be tinted emerald. Food coloring, or rather a few grains of it, will help you with this. Rub these grains into the satin with your own hands, making it as uniform as possible.
Now it’s the turn of the stamens. Cut the fishing line into small lengths of five centimeters. Dip their edges first in glue and then in dry semolina. When the blanks have dried, you will need to dip the stamens in glue again, and then in decorative golden glitter.
We begin assembling the Kanzashi lily. Attach the first tier to felt in the shape of a circle, in which there will be six petals. After the structure has dried a little, proceed to gluing the next tier, which will also have six petals.
Fold the elements that were tinted green in the center. The first row will consist of three pieces, and the second of two. After this, drop a little hot glue into the middle of the bud and immediately attach the stamens. You need to hold the stamens with your fingers until the glue completely hardens.
A chic flower in the kanzashi style is ready. Now it can be mounted on any surface. This could be a hairpin, an elastic band or a headband. Also, such a craft can perfectly replace a brooch. You can make a bud not only white. For example, the Kanzashi lily will look great in both pink and yellow. She will become the central figure of any panel or painting. The main thing is that it will definitely be noticed and appreciated.
How to make leaves for a flower?
There are many types of leaves for flowers: simple and complex, large and small, voluminous and flat. Depending on the style of composition, the technique is determined, colors and quantities of materials are selected. The size of the finished sheet depends on the width of the tape, so tapes of any width are suitable for all methods.
Simple
From the name it is clear that this method is suitable for beginners. Simple petals are used in combination with any flowers. To make them you need:
- cut ribbons 5 cm wide into 10 cm rectangles, the length is equal to the width multiplied by two;
- singe the cuts over a candle;
- bend the top corners to the center of the bottom and secure with a pin;
- At the bottom, place a hand stitch “forward with the needle”, sewing both layers together;
- tighten the stitching and secure it;
- Sew the edges on the reverse side, the leaf is ready.
For a rose
To make leaves for a rose, you will additionally need wire and glue. They look beautiful and natural, and are made easily and quickly:
- cut a 5 cm wide tape into 7 cm pieces;
- coat the wrong side with glue and place a piece of wire diagonally and place a second piece on top;
- smooth out so that the wire stands out well, it will be the middle vein of the leaf;
- when the glue dries, cut out the shape of a leaf and make serifs;
- burn the edges over the fire and while the sheet is hot add curves to it for a natural look.
Important! It is advisable to use transparent glue that does not leave marks on the fabric.
Corrugated
For a textured sheet, a tape 5 cm wide is suitable:
- Cut it into 6 cm pieces and wet it with water.
- Fold it diagonally, inside out, so that the edges are aligned on one side.
- Place this piece between two layers of thin synthetic fabric, such as organza.
- Place a heated iron on top and, pressing it with one hand, roll the fabric under it.
- Then pull out the workpiece, unfold it and cut out the shape of the leaves.
- Finish the edges over the candle.
- The resulting corrugated leaves are used for various flower arrangements.
Important! The finished product should not be wet or wrinkled, otherwise it will lose its relief. To give it an aesthetic appearance, it is periodically sprayed with hairspray.
Big leaf
If you need a large leaf, then use two pieces of 25 mm tape, each 12 cm long. To make it you need:
- fold the two strips right side inward, cut the corner and melt the cut;
- sew a hand zigzag stitch to the bottom;
- pull together to form a tight gather;
- Sew gathered ribbons together along the wrong side and secure at the bottom.
Important! For crafts made from satin ribbons, synthetic materials are chosen so that the cut melts and does not burn.
Spicy
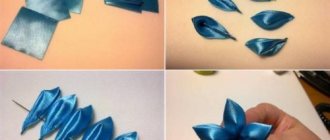
The first master class will tell you how to make a simple sharp petal.
- To make it, you will need a piece of satin ribbon 5 cm wide. The edges must be melted.
- A piece of tape must be folded diagonally, while holding it with tweezers.
- Cut off the corner and base of the triangle. You will get a petal. Burn the cut line so that the thread does not unravel.
In this not very tricky way they make a double or triple leaf. To do this, you need to fold several petals together before trimming. You can use multi-colored pieces of material. Silk thread is used to fasten several products together.
Sharp petals can be used to create a crown or complex compositions based on patterns.
Master class on making flowers
It is better for novice craftsmen to take on the simplest jobs. It must be borne in mind that, for example, manipulating crumpled paper requires some skill, while modular origami also requires precision, perseverance and takes a lot of time. You should thoroughly prepare for working on the chosen version of the water lily (water lily, lotus). Before starting, it is recommended to read the instructions, watch the corresponding video lesson, and print out the necessary diagrams and templates.
Paper water lily
Without much effort, you can make a rather impressive paper water lily with your own hands. Master class on its creation:
- Two circles of different diameters are cut out of a white sheet, for example, 10 and 7 cm.
- Each of them needs to be divided into 8 sectors. It is more convenient to do this if you first fold the circle in half, then bend it twice more through the center of the original circle. After this, the workpiece must be unfolded. You can also draw a circle by drawing 4 lines intersecting in its center.
- According to the folds or pencil markings, each of the circles is cut from the edge, slightly short of the middle.
- Opposite corners of one sector need to be brought together. Along the line of contact between the edges, the paper is fixed with glue. The result is a pointed petal. The rest of the petals are glued together in this way.
- Both pieces processed in this way are turned over, the smaller one is placed on top of the larger one and glued together in the center.
- A leaf is cut out from green cardboard according to the template. A water lily is glued onto it.
- From yellow paper you need to cut out a small circle 1-2 cm in diameter. It is smeared with glue and glued into the middle of the flower. The craft is ready.
Master class of Kanzashi leaves
In this master class I will look at the most popular ways to create leaves for Kanzashi flowers. All examples can be seen in my works.
I took two types of tapes: width 5 cm and 2.5 cm. We will also need tools, a soldering iron or burner, and a needle and thread.
First I will show leaves from a 5 cm wide ribbon.
A. Cut the ribbon 5-6 cm long (how long do you need the leaf).
Fold the ribbon in half and cut out the leaf.
Carefully singe the outline of the leaf.
We received a simple piece of paper. You can leave it like this, and we will move on.
Again, fold it in half and scorch the bend with a lighter or candle, carefully so as not to burn the tape, and squeeze the bend with your fingers.
Next, we also make veins from the middle of the sheet to the center - according to the drawing. We clamp it with tweezers (if you don’t have tweezers, you can make a fold with your fingers, singe it and press it).
Turn the front side towards you, pinch the sheet in the bottom center and scorch it a little, press (not too hard.)
Now we have received the first piece of paper.
B. _ We will make the second leaf using a knife (preferably with a blunt end). We also cut out and singe the outline.
Take a terry towel and place the sheet inside out. We heat the knife over gas or a candle and begin to draw veins.
First the central vein, then according to the pattern from the middle to the edges.
We turn the leaf over and draw two more along the central vein along the edges (you can see it in the photo).
Then again, using a dull hot knife, draw stripes according to the pattern.
We get another leaf. It’s not very visible, the photos are reflected, but this is my favorite leaf, it turns out very beautiful.
B. You can simply draw veins randomly with a hot knife. Fantasize.
G . The third method: cut out the leaf, and do not singe the entire outline at once. 1-2 cm were singed, the edge was carefully stretched to make a wave. And so, along the entire contour of the sheet.
You can leave it like this, or you can make a central vein, and you can decorate the entire leaf with veins. But I like this type of leaf without any veins.
And remember, there are no identical leaves in nature. Therefore, there is no need for templates.
Also, a lot of craftswomen cut out the outline of a leaf in a zigzag and singe the cut. It also turns out to be an original leaf!
We take and make a leaf according to the MK “ Kanzashi master class of a sharp petal from a 2.5 cm wide ribbon .” We make such a leaf (also don’t forget) from 2.5 wide ribbon.
If you collect the bottom of the leaf with a thread, you will get this look.
E. Cut a ribbon approximately 10 cm long (width* 2 times, for example: a ribbon is 3 cm wide, which means the length of the piece will be 6 cm).
Fold in half. We singe the cut or cut it off with a soldering iron, shown in the photo.
Turn it right side out.
We sew along the bottom of the corner with thread and collect it, making a knot.
We got another type of leaf. I mainly use this leaf to create potted flowers or to create fans.
AND . Also suitable for leaves are sharp petals and inverted sharp petals “Kanzashi”.
Tape 2.5 cm.
A. Take a piece of 8-10 cm (it all depends on the length of the leaf).
Fold in half. And cut it off with a soldering iron or burner as in the photo (you can use scissors and scorch the cut with a lighter).
Turn the left side right side out. This is the leaf we use for the buds.
If we straighten the leaf relative to the center, we get another type of leaf. This petal can be used individually and when creating the flowers themselves.
The corner that remains can also be used as a leaf for flowers.
B. _ Now I will show how such a leaf can be decorated. We take identical pieces of different shades of ribbon.
Place one piece on top of the other and fold it in half so that one edge comes out.
We cut it, as in the first method, turn it right side out, our leaf is ready.
B. We cut the ribbon -7 cm and fold it as in the photographs (here is more detailed MK “ Master class of the lush Kanzashi flower” ). At first I wanted to fold and show the finished leaf, then I decided to do it step by step, so the ribbon is crumpled...
We received another piece of paper.
All the leaves at once.
That's all for now.
Chamomile using the kanzashi technique
For those who have just begun to get involved in Japanese art, I advise craftswomen to make a kanzashi daisy. It only has seven petals, no felt base, and the petals are attached with hot glue.
On a daisy, it is easy to master folding the ribbon and fixing it over the fire.
Step-by-step making of kanzashkas - daisies with your own hands:
- Prepare squares of white satin ribbon 5 cm wide;
- Grab the middle of the square with tweezers and fold it in half so that the sides wrap around the tweezers;
- Use your fingers to smooth the folds;
- Using tweezers, grab the workpiece again so that the top is hidden between the tweezer legs;
- Wrap the tweezers around the sides of the workpiece and remove it, holding the tip of the petal with your fingers;
- Gently straighten the top so that the petal is round;
- Holding it with tweezers, cut off the bottom corner and seal it with fire (from a lighter or candle);
- Gather the petals on a needle and thread;
- Glue the petals with hot glue, applying a drop at a time to the side walls, pressing with tweezers until gluing.
The white tape is very capricious, so you need to hold it over the fire for a split second. otherwise black marks will appear on it. In order for the workpieces to fit well, you need to cut off excess material from the wrong side.
Following the example of chamomile, simple and beautiful kanzashi are available for beginning craftswomen; you just need to take ribbons of different colors.
Simple kanzashi leaves
In the first tutorial we will make simple and universal leaves from 2.5 cm ribbons that will suit almost any kanzashi flowers. Let's take a green satin ribbon, I won't cut it into pieces to show that the petals can be made of any size. Turn the ribbon inside out towards you, bend the left edge at an angle of 90 degrees and place the right edge of the ribbon over it. The result is an angular petal.
Let's cut the ribbon and make two folds at the base, fix them by melting them over the fire.
Water lily made from ribbons using the kanzashi technique
Today I will show you how to make a beautiful flower that looks like a water lily from satin ribbons. And then turn it into a brooch. To make a flower in the form of a water lily you will need
: - satin ribbon 5 cm wide and 45 cm long, pink - satin ribbon 5 cm wide, raspberry - orange satin ribbon 2.5 cm wide, 10-12 cm long - threads - needle - scissors - lighter - green satin ribbon 20 cm - green mesh - hair clips or clothespins - pin - glue For the main part of the flower, prepare two pieces of satin ribbon of different colors. I took a raspberry ribbon and a pink one. Approximately 45-50 cm long. We burn the edges of the ribbon so that they do not crumble.
Now let's prepare 4 hair clips or simple clothespins. We will need them to fix the tape. You can, of course, use needles, but in this case there is a chance of snagging the ribbon and making an unsightly puncture in the fabric. Therefore, it is better to use clothespins. So let's get started. Place the pink and raspberry ribbon on top of each other with the inside out. The tape should lie flat and not bunch up.
We measure about 5 cm from the edge and tuck the ends of the ribbon. Then bend the ribbon back and down. We secure it with a clothespin.
Now bend the ribbon back again at an angle of 45cm.
And down. We fix it.
We repeat the same thing until we get a square of ribbons. We cut off the remaining end of the tape. And we seal the ribbon using a lighter.
Now we need thread and a needle. We assemble the tape onto the ribbing (“forward needle” stitch) along the entire circumference of the square.
Gently pull the thread and assemble the square.
We tie a narrow ribbon in a knot.
Fold it in half and place it in the middle of the flower. We burn the ends with a lighter.
Pull the thread tighter, make a knot and cut it.
Now we cut out leaves from a green satin ribbon. We process the leaves over the fire so that the fabric does not fall off.
Cut out 2 circles from the mesh and place them on top of each other.
Sew the leaves and mesh to the flower.
Now we are making a fastening for the brooch. Cut out a circle from the fabric. Unbend the pin and pierce its circle. We bend the pin in the opposite direction so that the pin does not fly off.
Glue a circle with a pin to the back of the flower.
That's all - the brooch with a water lily using the kanzashi technique is ready!
To receive the best articles, subscribe to Alimero's pages on Yandex Zen, VKontakte, Odnoklassniki, Facebook and Pinterest!
Leaves for rose
Cut the satin ribbon into 5x7 cm pieces; 1 sheet will require 2 pieces. We apply glue to the wrong side, I use “Titanium”. Lay the wire diagonally and cover it with a second piece of satin ribbon on top. Smooth out the sheet, carefully highlight the wire, it serves as the central vein. When the glue dries, cut out the shape of a leaf from the workpiece and make notches.
Carefully process the edges of the sheet over the fire and while it is still hot, give it a slightly curved shape. Leaves can be of different sizes, shapes and textures. You can see how to use such leaves in a composition in MK on roses made from satin ribbons.
Kanzashi leaf with folds
Cut off one melted edge of the workpiece and cut the base to create an open part.
We process the edges with a lighter and pull them out a little, resulting in a slight waviness. At the base we also melt the tape with fire.
We make several folds, first on one side, then on the other. We melt the bottom of the leaf and “flatten it” with our fingers so that the base is flat. These leaves look great with strawberries.
Corrugated leaves
Unusual textured leaves from satin ribbons are obtained if it is pre-corrugated. To do this, we use a satin ribbon measuring 5x7 cm, moisten it with water. Fold it diagonally with the front side facing you.
We need thin synthetic fabric, I use a piece of organza. I wrap the piece of tape in it and put an iron on top, heated on the second level. I take the edge of the organza and, pressing on the iron with one hand, I scroll the organza under the iron. As a result of such manipulations, an interesting relief is obtained.
We cut out the shape of a sheet from the blank, make small notches and process the edges with a lighter. The result is leaves that can be used for any kanzashi flowers.
Another option for making leaves for flower arrangements.
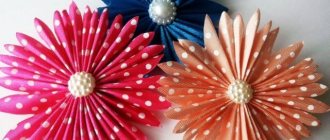
Templates with patterns of flowers and felt petals for cutting.
Templates can be saved to your computer and enlarged to the desired size. From such templates you can make multi-layer flowers by placing one layer on top of another from larger to smaller and fastening them together with threads.
And here is an example of how you can make such flowers step by step.
Or you can make flowers like this, a whole bouquet of felt flowers.
Or here's another interesting option
The next option for assembling felt flowers is a spiral. Using this principle, you can get completely different flowers if you make different spirals. Here are some ideas and ready-made templates on how to do this.
You can also make flowers from individual petals, collecting them all on a string.
Large sheet with folds
We use 2.5 cm tape, 12 cm long; 1 sheet will require 2 pieces. Place the pieces together with the right sides facing inward. Cut the corner and melt the cut.
We will make 5 folds on both sides and secure them with pins. From the wrong side we sew both ribbons.
Fold the sheet at the base and melt it with fire. Iron the leaf so that the folds lie evenly and do not puff up. These leaves are more suitable for voluminous flowers such as chrysanthemums, asters or dahlias.
LiveInternetLiveInternet
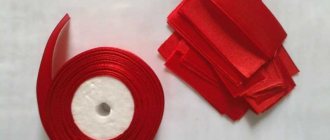
For work we will need: 5 cm ribbon in all shades of autumn, scissors, a candle or lighter, a pistol or “Moment”, tweezers, a piece of cardboard and anything else you want to decorate the centers of your bouquets with.
First you need to cut out a stencil of the future leaf. We cut out the stencil in the shape of a leaf, the size of the leaf is approximately 4.7 x 6.7 cm, the bottom is 2 cm.
Then we cut blanks 7 cm long from our ribbons. The bouquet will have three layers of leaves, each layer has 8 petals, that is, 24 blanks are needed for one bouquet. I have 4 pieces of each color cut, with the exception of burgundy petals, 6 of them are cut. When I was working on the bouquet, I made more blanks than I needed, I just didn’t know how exactly I wanted to combine the colors in the layers, so I made them with extra. Below there will be photos of the bouquet in layers, you can orient the layout of the petals according to them.
We cut our blanks according to the stencil.
Then we scorch the edges of each workpiece with a candle flame or a lighter, while simultaneously stretching the edges, we get waves like this
After this, we put two folds at the base of the petal to add volume, clamp it with tweezers and melt it - our petal is ready.
We do the same with the rest of the petals, as a result we get such a nice bunch of leaves)))
You can start assembling. I use a piece of felt as a base, the diameter of the workpiece is 4 cm. Glue on the first row
Then the second one, the petals of the second row are staggered
And the third row, here the petals already overlap, but are positioned so as to be strictly under the petals of the first row
Here I used an elastic band as a fastening, so at this stage I sew on the elastic
Then I will secure it with additional glue and cover it with a ribbon to match the base. And then we proceed to what will add zest to our bouquet, namely, the design of the middle. In the first case, to decorate the middle, I used golden-colored organza 2.5 cm wide, cut pieces of 4.5 and 4 cm, processed the edges and assembled the inner flower according to the Duchessque principle, added beads (having glued them together beforehand) and stamens and got this result !
The second time I wanted to add autumn gold, I cut blanks of golden brocade 2.5 cm long 6 cm
cut it with a soldering iron
I turned it out and got these leaves.
Then, for ease of gluing into the middle of the flower, I soldered the tips of the leaves, and this is what I got:
Glue the resulting flower into the middle, pour a little glue, sprinkle with microbeads to get a base for securely gluing the beads
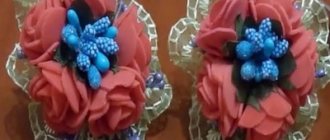
And here is another bouquet ready!!!
AUTHOR MK: Lelishcha source
Leaf for tulips
2.
Take the satin ribbon and fold it right side inward (it turns out to be a square).
3.
Then cut diagonally. We've got our first leaf. Here I used a soldering iron to cut the square, but you can do all this with scissors and a lighter, as you prefer.
4.
In order to save material, I also cut off one triangle and this will be another leaf.
5.
The next step is to cut off the tip of the receding triangle.
6.
Turn it inside out and burn the edges with a lighter.
7.
The leaf is ready)))
What materials will you need?
Water lilies are made of paper. Any one will do - corrugated, crepe, landscape, color or intended for a printer. Color doesn't really matter either. Typically these flowers are made white, yellow or pink. But nothing prevents you from using other shades. Crafts with petals of different colors also look interesting.
Instead of paper, you can use cotton fabric, felt, satin ribbons and other materials. You'll need a few more things to get the job done:
- Scissors. For a child, it is better to take one with rounded ends.
- Glue. It is convenient to use a PVA tube with a brush.
- Yellow and green cardboard.
- Ruler, pencil.
- Table (desk) backing. This could be newspaper, oilcloth or a hot pad.
For one of the water lily models you will also need a piece of yellow foam rubber or a round magnet of small diameter.
Kanzashi maple leaf. Master class with photos
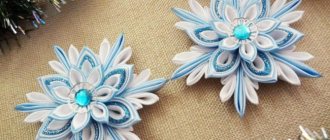
Such a leaf will help create a good mood on gloomy autumn days. This maple leaf can be a wonderful interior decoration, an attribute for autumn dancing, a decoration for a hat or a brooch. For this we need:
Satin ribbon (yellow / red / orange) (width – 5 cm, length – 85 cm);
Brocade ribbon (gold) (width – 5 cm, length – 30 cm) Decorative cord (7 cm) Scissors Pin (for brooch) Ruler Glue (hot gun and glue for it) Bead (for the middle of the leaf) Candle Tweezers Step-by- step process making a maple leaf from satin ribbon
We cut the satin ribbon into squares (5x5), singe the edges over a candle so that they do not crumble
We fold a triangle from a square, 2 corners adjacent to the long side, fold them together... And scorch the folded corner over the candle. You should get 17 satin petals in total. We make the same petals from brocade ribbon (6 pieces)
We take a satin petal and “put” a brocade petal into it. Thus, we get a double petal
For our maple leaf you need to make 6 double petals
Now 6 double petals need to be glued together in a circle. You will get a flower that will be the basis of our leaf. From the remaining satin petals we make 3 “branches”. To do this, glue two petals and glue a third one between them. We proceed to the final assembly of the leaf: glue 3 “twigs” into adjacent spaces between the petals of the base flower. On both sides of the glued “twigs”, between the petals of the flower, glue one satin leaf into the remaining unused one. Glue the gap between the petals of the base flower with a decorative cord that imitates a leaf stalk
If the maple leaf is to be a brooch, then glue a pin on the back side and cover the gluing area with a piece of satin ribbon. Glue a bead into the center of the base flower. Our maple leaf is ready!!!
Airy inflorescence made of satin ribbons
And so to create a lily flower from satin ribbons we will need:
- satin ribbon, 5cm wide
- lighter or candle (optional)
- scissors
- glue "Moment gel"
- tweezers
- stamens
Since there will be 6 petals in the bud, and they must be the same in size and shape, we need to make a small pattern. For this we need a small piece of paper and a pen. Now we draw a petal, 5 cm wide and 10 cm long. Cut it along the contour. Thus, our pattern is ready. Next, we take the tape and measure out a 10 cm segment. Since we will have 6 blanks, we also make 6 segments. We apply the pattern to our segment and cut out the petal along the contour of the pattern. Then we process the contours over fire. If desired, you can wrap them a little in different directions. To do this, without waiting for the edges to cool, we bend some forward, the other back. Then the edges will be a little wavy.
How to make a maple leaf from ribbons step by step
1. Start making your planned autumn kanzashi with triple sharp petals. For them, take red, orange and gold squares with a side of 5 cm.
2. For one petal you need all the squares of the indicated colors. Bend each one diagonally.
3. Place the orange triangle on top of the red one and add a layer of gold between them.
4. Round the multi-layer triangle by closing the sharp corners, singeing them. Trim the bottom of the petal to make it flatter.
5. For the inside of the petals, prepare a gold satin and lurex ribbon - squares with a side of 2.5 cm.
6. Fold the indicated pair in half diagonally.
7. Place the shiny triangle on the satin one and start folding the double corners.
8. Form a diamond with a bright layer in the center.
9. Use a clamp to secure the bottom corners, rounding the top. You should get a golden droplet petal.
10. On the reverse side, the excess edge of the tape should be trimmed.
11. For the central flower, prepare 6 triple petals and the same number of droplets.
12. Make similar details for the outer part of the maple leaf. Form triple petals using orange and gold satin ribbon and gold lurex. Make single kanzashi petals from small red squares.
13. Insert small rounded petals intended for the central flower into the middle of the large ones. Gather the flower on a string. Glue a 1.2 cm red half bead into the center.
14. Make 11 petals for the outer part of the leaf. Insert small red petals inside the triple ones.
15. Leave two petals unchanged and glue small half-beads to them. Glue the remaining 9 into branches, combining 3 parts. Also decorate the resulting blanks with half beads.
16. Glue the resulting branches into the voids between the flower petals.
17. From 2.5 cm gold lurex fabric, make 3 small sharp petals.
18. Small parts are designed to disguise the places where branches are attached.
19. Take wire and thin gold ribbon.
20. Wrap the ribbon around the wire and glue it to the back of the flower. Also glue on the little gold pieces. Cover the entire structure from behind with a felt circle.
The maple leaf made from ribbons is ready. All that remains is to think about the purpose of the product and choose a base. The size of the finished decoration is 8*10 cm without the stem.
Felt water lily
A beautiful flower can be made from felt. For the product you will need white and pink material, as well as scissors, a needle and thread and glue. Work order:
- Felt is cut into small squares. The pink ones should be slightly larger than the white ones.
- Teeth are cut out on one side of each square.
- The corners at the opposite edge are slightly rounded, brought together and fixed with glue to the middle of the cut line. The result is a petal. These manipulations are performed with all workpieces.
- 4-6 tiers are made from the resulting petals. Each of them should be larger in diameter than the previous one. For the top one, it is enough to sew 5 white petals together. For the next tier you will need 6 or 7 of them. This petal layer is sewn on top of the previous one from the wrong side.
- The lower tiers are assembled from pink parts.
- A circle of the required diameter is cut out of felt to cover the junction of the petals on the back side of the flower, its underside.
- An orange felt strip 2x6 cm is cut into fringe. It is rolled up and hemmed to the middle of the front side of the water lily. You can also use beads or pebbles to make the core.
The finished felt water lily can be attached to a hair clip, used as a brooch or a permanent decorative element when finishing clothes, a handbag, or a hat.
There are a lot of options for making water lilies with your own hands. Everyone can find something suitable for themselves. The process of creating flowers is not always easy, but it is addictive. This type of needlework will appeal to both adults and children, and the resulting result will delight the eye for a long time.
Originally posted 2018-08-29 11:30:49.
Master class handicrafts. Ribbon leaves.
Today I will tell you how to make beautiful leaves from satin ribbons. I will show two options for leaves. They are made quite quickly and very harmoniously complement flower arrangements.
I was very interested in flowers and somehow paid little attention to the leaves. But they are the ones who give flower arrangements a finished look. They “revive” and add color to products. And what to be disingenuous - they often hide some defects and the reverse side of the products, as a result of which we get jewelry that is perfect both from the front and from the back.
I use these leaves most often in my products. I offer you a master class - leaves from ribbons.
To make these leaves we will need: 1. Green satin ribbon 2.5 cm wide. 2. Burner or simple kitchen knife 3. Metal ruler 4. Glass or glass cutting board 5. Sewing supplies
Let's get started.
Cut the ribbon into 10 cm long pieces.
Let's put the ribbon on the glass. Next, fold the strips in half, wrong side inward.
Place the ruler on the tape diagonally.
We cut the ribbon along the ruler with a burner or a hot knife.
We have one leaf ready. If desired, the bottom part can be turned out. I prefer to leave these leaves unchanged.
Here is an example of using these sheets. MK flowers can be viewed here.
We still have the top part of the tape. We won't throw it away. We will also make beautiful leaves from it.
We cut off the bottom part with a burner so that it becomes even.
We collect the bottom of the future leaf on a thread.
We tighten the thread, fasten it and cut it. The leaf is ready.
I used these leaves to make a wreath.
Good luck in your creativity and new ideas.
Kanzashi bow
Kanzashi is used not only for decoration or souvenirs. They are good for decorating clothes and hair. For example, children's bows using the kanzashi technique look lovely on children's braids and ponytails, headbands and hairpins.
There are a huge number of photos of bows and kanzashi flowers on the Internet on handicraft resources, you can pick up ideas and implement them in your creativity.
Step by step plan:
- Take a tape 5 cm wide and 10 cm long;
- Fold part of the tape at an angle and secure with a pin;
- Do the same on the other side;
- Glue in the middle, you can decorate with a beautiful bead;
- Trim the ends of the bow with a corner and singe over the fire.
Instructions and diagrams on how to make kanzashi are of the same type; the basis invariably is a petal. By making the required number of petal blanks, you can create a real masterpiece.
Photo gallery of leaves in kanzashi style
Video master class: making leaves for flowers from ribbon
I would like to share with you a master class on making leaves for kanzashi flowers. Using this method, you can make not only leaves, but also various products for decorating gifts, compositions from ribbons and not only from ribbons. I think that this method of making leaves will be useful to you in your creativity. You can find out all the details from this video master class.
Tsumami Kanzashi: traditional Japanese jewelry made from satin ribbons
Story
Kanzashi are decorated hair pins.
Accessories were used by girls to create traditional Japanese hairstyles. In Japan, they believed that metal, pointed at the end, was able to ward off evil spirits, so kanzashi were an integral accessory on major holidays, when it was believed that the girl was especially not protected from the influence of evil forces.
@chocoberry.hk @japanese_pretty_flower
By the decorations on the hair one could find out about the status of the ladies. For example, married women did not wear accessories in abundance, but young Japanese women, on the contrary, welcomed a large number of decorations in their hair.
Nowadays, the classic decoration remains relevant among geishas who still follow ancient traditions. So, for example, kanzashi must certainly be the color of the kimono and match the design of the season.
flickr.com pinterest.ru
As for ordinary girls, this beautiful tradition has always been popular among Japanese brides, and over time it has been appreciated not only in the Land of the Rising Sun, but throughout the world. Japanese and European girls are happy to create their own accessories and decorate their hair with them.
@chocoberry.hk (1,2)
Tsumami Kanzashi
@drdanaelim @eritam8
Traditional Japanese jewelry decorating technique. The name of the technique is translated from Japanese as “pinch.” This is the process of creating flowers from silk ribbons and kimono scraps using the pinching method. Each petal of the product is folded separately by hand, and then combined into an ornament and shapes.
Currently, there are few masters of classical technique left, but needlework has gained popularity all over the world and has changed slightly. Now not only flowers, but also other figures are made using the tsumami technique, and the results of the master’s work are not limited to hairpins.
etsy.com (1,2)
Jewelry using tsumami kanzashi technique
What you will need
@momoveronicapich (1,2)
Traditionally, the tsumami technique involved the use of only silk, but over time, needlewomen allowed themselves to break the customs and began to use a variety of fabrics. The most popular now are satin ribbons; lurex and organza are less common. Thicker fabrics are used infrequently because they are less easy to handle.
Tools
@smile_garden_tsumami815 (1,2)
Tsumami does not require a large abundance of tools, especially at first. To master the technique, tweezers are enough to hold small parts, scissors and a cardboard blank, with which it will be more convenient to cut uniform squares of tape. It is necessary to ensure in advance that there is a fire nearby for gluing the petals and a glue gun for creating a figure. In addition, in their work, craftsmen often use fittings, beads, wires and other materials that will decorate the product.
Where to begin
@hanatsukuri.dolls @namihei25
Before you start creating masterpieces, it’s worth mastering two basic types of petals:
- Maru-tsumami is a round petal.
- Ken-tsumami is a sharp petal.
Check out the available master class on making basic kanzashi petals.
Kanzashi for beginners. Pointed and round petals:
It is not always possible to see both types of blanks in finished works, but the different shapes of the petals give the product greater volume. After we have learned how to make maru - tsumami and ken - tsumami, we can use them to create more complex fragments, for example, multi-layered or spiral petals.
Making spiral kanzashi petals:
With the growing popularity of technology, more and more new types of petals were introduced into it, which are limited only by the imagination of needlewomen. Nevertheless, all options are based specifically on round or sharp petals.
What can be done?
@drdanaelim @chocoberry.hk
Having mastered the technique, you can create complex and unusual products for a variety of purposes. If you want to pay tribute to traditions, we advise you to try to make a beautiful hairpin in the style of those worn by geishas.
Make a hairpin using the tsumami kanzashi technique
Jewelry for children, such as bracelets and headbands, are popular. To make your accessories look more interesting and fun, you can buy funny beads or buttons at a sewing store and even make an interesting detail yourself using the same technique.
@cassablanca_kanzashi @stv2024
How to decorate a headband using the tsumami kanzashi technique
Many needlewomen have moved away from the classic purpose of tsumami kanzashi and create not only accessories, but also interesting interior details.
Making an interior kanzashi ball
As you can see, having mastered this handicraft, you can begin to create a variety of objects. From hairpins and children's toys to panels, the main thing is to give free rein to your imagination.