Paper crafts are an interesting and simple activity for children. Here we will look at how to make a paper car with your own hands. Surely you already have all the materials necessary for the work. Origami paper, glue and scissors for crafts are almost all the tools.
If you've never made a paper machine , you should probably start with a very simple design that uses straight lines. The article presents many options, from the simplest paper cars to three-dimensional 3D models and origami racing cars . Although younger children may need your help, don't limit their imagination. Let them surprise you with their creativity again and again.
Step-by-step execution of an origami machine made from paper:
Folding paper figures attracts people of all ages. Making them is not difficult, the material is always at hand, and the process takes little time.
It is interesting to do origami with children, because folding paper will help develop motor skills of hands and fingers, memory and attention, and accuracy when smoothing out folds. The child will need the skills to study at school, and origami classes are exciting in themselves.
You can play with the completed figurine, make theatrical performances, compose compositions using appliqué, paint them and give them to friends.
In this article we will tell you how to make an origami machine out of paper. The child can be taught to assemble it together with you, repeating each fold sequentially after the sample. Older children can complete the task by following the diagram. It’s enough to show the kids how it’s done, and they can easily assemble an origami machine out of paper on their own.
SUV
To work, take a sheet of thick paper. A square can be made using a ruler, or you can use a sheet of A-4 format, in which one of the corners is connected to the opposite side. Cut off the extra rectangle on the side with scissors. The resulting blank is folded further according to the pattern of an origami machine made of paper.
To make the figure even, pay the child’s attention to accuracy when forming the folds. There is no need to rush to make the machine faster, the main thing is that the fold is correct the first time.
How to read a diagram
If the child knows the numbers, then explain that you need to act in ascending order of the numbers. The arrows show in which direction the folds should be made. The dotted lines explain that the paper must first be folded in a given place and then straightened back out. This is only necessary to clearly define the center line of the figure.
The drawn scissors indicate the line that needs to be cut so that the paper lies flat, without bumps or folds. Next, we’ll take a closer look at how to assemble a paper origami machine step by step using the following diagram as an example.
A car
To assemble our sample, take thick A-4 paper and fold it in half horizontally. Then fold each half in half again. In this case, the inner halves need to be lifted up and placed on the outer parts.
In the third picture of the diagram, see exactly how you need to unfold the workpiece to get a figure consisting of three corners. Rub your finger over the folds to make sure they are as even as possible.
Be sure to keep them parallel, otherwise the origami paper machine will be skewed.
Next you need to make folds along diagonal lines. As you can see, they look dotted in the diagram. This means you need to first bend the paper and then straighten it back out. Along these lines, the paper is pressed inward and the resulting folds are additionally smoothed with a finger.
Similar work is done with rectangles on both sides. All that remains is to shape the wheels. These parts of the figure should be the same height and parallel to the lower part of the body.
Using paper machines
Now you know how to make an origami machine out of paper. A child can play with it after coloring it with markers or felt-tip pens.
Using such figures, you can make a model of a road for an exhibition at school or kindergarten. An applique on the theme “City” or “Road Rules” will turn out to be voluminous.
Having made several crafts of different sizes, you can complete the remaining details with gouache paints or pencils.
You can fantasize in different ways. These cars can be made on the road or at the dacha if a child has forgotten his toys at home. The baby will be happy to play with paper ones. You can even make them from ordinary newspaper or magazine pages.
Source: https://www.syl.ru/article/422258/poshagovoe-vyipolnenie-origami-mashinyi-iz-bumagi
We assemble origami cars according to diagrams and photo-video lessons
Traditionally, it is believed that girls should engage in various types of needlework from childhood.
But this is an erroneous opinion, since making various crafts, drawing, creating panels and other types of creativity develop imagination, fine motor skills, help children learn about the world around them and instill a love of art, regardless of the child’s gender. Of course, it can be more difficult to get boys interested in such activities, but even them can be interested in needlework.
For example, an excellent option would be to invite your child to collect a collection of origami cars from colored paper.
He will definitely appreciate the opportunity to fold the model he likes in any color, especially since in the future you can play with such paper cars in the same way as regular ones.
By following step-by-step instructions and diagrams, even novice handicraft parents will be able to explain to their child the principle by which an origami machine is folded.
Origami racing car
One of the most popular car models in this technique is the origami racing car. The MK below is suitable for school-age children, since it is necessary to carefully monitor the order of folds.
A detailed master class with a step-by-step description of the assembly of this model with photos. Take a sheet of A4 paper and fold it in half lengthwise. Now we create exactly the same folds for the strip as in the diagram below. A double triangle should form on each side of the strip.
Next, along the folds, we fold the ends of the paper blank so that two triangles are formed with the vertices outward. Here we bend the side stripes along the lines towards the center. Now the corners of the workpiece are bent towards its center line.
At this stage you need to be especially careful. We connect the points along the arrow in the diagram, while inserting the corners into the pocket formed at the bottom of the workpiece. After these manipulations, the origami machine should look like this.
Now we mark the folds along the lines. Mark three more folds on the back of the machine.
- We bend all the parts of the origami machine into the desired position.
- In the end, you should end up with a racing car that looks like this.
If you find it difficult to navigate the graphical assembly diagram, we recommend watching a video with a step-by-step explanation of each step.
Video: Making a racing paper car
A simple origami car
We offer another, easier master class, which is ideal for beginning needleworkers. Such a machine can be made immediately from colored paper or painted after.
Instructions on how to assemble a paper model of a car with your own hands. Fold the square sheet in half. Now we unfold the sheet and bend its edges to the resulting fold in the center.
We bend the edges of the sheet again, but in the opposite direction. And bend the sheet in half. We turn the workpiece over and mark two oblique folds, as in the diagram, and then bend the resulting triangles inside the workpiece. The body of an origami machine should look like this. We also bend the triangles sticking out from below inwards.
We bend the sharp corners of the wheels back to give them a more realistic shape and stability. At the same stage, we form the back part of the origami machine by bending the corners on the right side inward as follows. We bend the corners on the other side of the machine to form headlights. Let's straighten these corners. The end result should be a car like this.
You can make figures and models of any complexity from paper. For example, large machines can be assembled using modular origami techniques or using ready-made cut-out templates. Using these methods you can create a fire truck, motorcycle or boat. And various photo and video lessons explaining the assembly process will help you and your child bring such ideas to life.
Video: Origami toy car
We assemble three-dimensional cars from modules according to video lessons
A selection of schemes for folding cars
Source: https://vishivashka.ru/origami/mashinka.php
Origami machine - diagrams, patterns, best models and tips for assembling them yourself (90 photos)
The origami “machine” diagram will help you create beautiful and original crafts from plain or colored paper with your own hands.
You can make a standard passenger car, racing car and volume car. Each option is more difficult than the previous one and will require more attention. The result will make you proud of your own work.
Preparatory actions
Before you learn how to make an origami “machine,” you will need to complete some preparatory steps. The master will need a piece of A4 paper. It is given a special shape in the following way:
- The length of the sheet is folded in half. The corners of the resulting rectangle are bent so that they look like arrows.
- The long side edges bend towards the middle. The previously obtained arrows from the folded corners should cover them.
- After this, the resulting side of the sheet is folded to the opposite edge, threaded into each other.
- A photo of an origami “machine” will help you understand in more detail the technique of folding the craft.
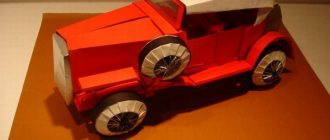
Modular 3D "fire truck"
From individual parts you can create a three-dimensional model of a fire engine. For this, a technique called modular origami is used. This version of the craft is considered difficult, and you probably won’t be able to master it the first time.
A three-dimensional origami “machine” is created from 4,000 small sheets folded in a special way. Each of them is done carefully.
If the dimensions do not match, there is a risk of damage to the entire structure. The method of connecting them does not imply the use of glue.
One part of the overall structure is called a module. Just for one wheel you will need 116 pieces.
A car
An origami “machine” made of paper is created according to the following scheme:
- A square is cut out from a rectangular sheet of A4 format. For each model you will need a new blank.
- The finished square is bent in half along two axes. They will be needed in further design.
- The bottom side of the workpiece is folded to the center line created in the previous step. It turns into transport wheels.
- The edges are folded down from the folded part. It should look like an arrow, the top of which points to the center of the square.
- The upper part of the workpiece is bent in the middle. It should cover the arrow obtained earlier.
- The resulting rectangle turns upward. Its left or right corner bends towards the bottom of the machine. The resulting fold edge should slightly overlap the bottom of the rectangle.
- All that remains is to turn the model over and the vehicle will acquire familiar features.
- The bent corner at point 6 will determine the direction of movement of the resulting vehicle.
Racing car
Origami “race car” is created using a more complex scheme. The finished model differs from the previous version in its attractive appearance. If a person has not previously made paper crafts, it will be problematic to cope with the first time.
We recommend practicing with simple models of passenger cars before starting this technique:
To make this craft you will need an A4 sheet of paper. It is bent longitudinally in half. The upper left corner of the workpiece is aligned with the fold line located in the center.
In the resulting triangle, the bottom vertex is folded upward. Make sure that it does not protrude beyond the top line. A similar procedure is done with the right corner. After which both triangles unfold. The created fold lines will help in further design.
An hourglass shape should form on both sides of the rectangle. They are bent inward so that a large triangle is formed on top.
The remaining long sides are combined in the center. The corners sticking out outside must be hidden under the triangles.
The hood is created. To do this, bend one of the triangles inward. In this case, non-compliance with the uniformity of both folds is allowed. They will help you create unique racing cars.
Racing car assembly
Of course, there are many cars for every taste, but what boy doesn't dream of owning a racing car? You can learn how to assemble a racing car from the diagram. But, of course, for beginners it is better to look at the step-by-step production of a car. Step-by-step instructions 1) Take a regular sheet of paper (in this case, plain white).
2) This machine only requires half a sheet, so you should carefully fold it in half and tear it.
3) It is necessary to bend the corners of the sheet on both sides to obtain the following blank:
4) The side triangles are folded in half on both sides.
5) The sides also need to be folded towards the center. And the closer to the center, the better.
6) Next, small corners are laid inside.
7) The workpiece is folded in half by inserting guides into the openings on the opposite side. And in principle, we already have an almost finished model.
 Well, since we still have to get a racing car, the wing is bent.
9) And all that remains is to decorate the car in the desired color, for example, like this:
For beginners, such a model will be quite enough, but those striving for perfection in making origami machines should additionally watch a video on how to make an origami machine out of paper.
By the way, such a craft can become both a toy for a child and a wonderful gift for a men’s holiday. The car can deliver wishes to the recipient directly on itself. A little imagination and patience - and a paper masterpiece will not keep you waiting. Such a product will not just be a toy or a simple craft, but will also amaze the imagination of others with its versatility.
[custom_ads_shortcode3]
Origami paper machine for children
a paper car for children using origami technique . Most likely, you already experimented as a child, creating racing models and cars. It's time to remember and share knowledge with the younger generation.
Does your child want a new car? You don’t have to immediately run to the store for another toy. Make him a paper craft, or better yet, teach him how to assemble a car so that you can race with friends later.
This activity does not require much time and effort. Any paper will be suitable as materials. In addition, origami:
- will make your fingers obedient;
- will allow you to train attention and memory;
- will develop creative abilities;
- enriches the child’s inner world;
- It will help you calm down.
Choose one of three options and go! You may want to make three models at once.
Volumetric machine
Take a square sheet of any color you like. Fold it in half to mark the center line.
Fold opposite sides of the square towards the resulting center.
Bend half of the pieces in opposite directions.
Turn the workpiece over and bend along the center line. It should look like in the photo.
Place the car sideways in front of you. Mark two symmetrical oblique lines on top and bend the corners along them into the product. The ends of the corners should come out from the bottom. These will be the wheels.
To give the wheel a smooth shape, remove the sharp corners inside. The volumetric machine is ready!
Car on a plane
The second option is perfect for decorating a postcard. The car will look like a real one, which is important for children. And you can do it in five minutes.
On a square piece of paper, mark vertical and horizontal lines connecting in the center.
Fold the bottom side towards the center horizontal line.
Bend the sides down, as in the picture.
- Point the top of the sheet down and secure it.
- Move the upper right corner to the lower area.
Turn the craft over. All that remains is to visually design the car by drawing windows, wheels, and headlights. To prevent the wheels from being triangular, bend the ends down.
Racing car
The most interesting and exciting things are left for last. We have to master the technique of performing a racing model and organize competitions with friends on high-speed cars.
Take a rectangular piece of paper. Bend it in half lengthwise.
- Draw diagonal lines at both ends and fold double triangles.
- Now we connect the sides at the center.
- We bend the outer sides of one of the triangles towards the center.
- We bring the lower triangle with its apex to the center of the machine.
- Bend the side wings upward to form a bumper.
For clarity, a diagram is presented. Feel free to use it and everything will work out.
- This is what a finished racing car looks like.
- If you liked creating with paper, continue your journey into the world of origami on the pages of the site!
Paper race???? do it yourself: how to assemble a racing car according to the diagram
Paper cars using the origami technique are made quickly and easily. To assemble the model you only need one sheet of paper. It's great that your friends can make the same cars, and then you can set up a racing track on the table and compete. If you move from the pilot's seat to the designer's chair and paint the craft to your taste, you will get a cool racing car.
Scheme for assembling a paper origami race
If you choose colored paper, you don't have to color the race. On the contrary, a white paper car can be decorated as desired.
You can make an origami race from a regular notebook sheet if you use it entirely without tearing it. We chose a yellow sheet to demonstrate the machine assembly diagram.
You need to bend it in half along the long side and iron the bend. Note that the ironing operation should be performed carefully and diligently at each subsequent step.
- Now you need to fold any side of the craft into a triangle.
- Then we return the bent part of the sheet to its place, since we only needed to form the bend for the subsequent steps.
- We bend the same part of the sheet in the other direction for the same purpose.
- Now on the other side of the sheet we form a triangle.
- After forming the bend line, we also return it back and then on the left side we bend the corner in the other direction.
- The next step is to straighten the triangle on one side of the sheet and fold it, as in the photo.
- The same operation should be done on the opposite side of the workpiece.
- Now we bend the strip along the workpiece to the middle of the sheet.
- We turn the semi-finished product over and do the same on the other side.
- We bend two corners of one of the triangles to the middle and fold them in half.
- We turn the right side of the sheet in the form of an arrow to the left and put it on the newly formed folds.
- Now you can bend the rear spoiler of the car.
- We bend the triangles on the sides at right angles and get side spoilers.
We carry out restyling and organize racing car competitions
As is customary, any car periodically undergoes restyling, that is, a change in appearance. We will not modernize the yellow car, but will work on the orange one.
On the topmost plane, bend two narrow triangles upward at right angles. In accordance with the aspirations of modern car designers, the car has become more aggressive. Now all other models will be manufactured in this form.
The design of an origami car made from white paper was entrusted to young French designers, and it turned out to be quite expressive.
We managed to collect four races, and we bring them all to the track: the competition begins!
Mobile paper machine
An excellent option that costs several times less than a store-bought machine. To prepare such a machine you will need:
- Toilet paper roll;
- Cardboard;
- Glue;
- Colored paper;
- Toothpicks.
To begin with, take a toilet paper roll and cover it with colored paper for beauty. The axles are made from toothpicks, and the wheels are made from cardboard. All this is attached with glue.
The letter “P” is cut out in the middle and bent upward - this will be the back of the seat. Also, every driver needs a windshield; it can be cut out of cardboard and glued in front of the seat.
Paper machines (diagrams, templates, developments, origami) • DIYpedia
Video instruction:
Paper cars from the times of the USSR:
VAZ 1111 diagram
To save an image of the car, right-click on it and click “Save image as...”.
Interesting facts: Oka was designed as a car for the disabled. At the beginning, they planned to make the car based on a motorized stroller. Produced from 1987 to 2008.
Zhiguli 2101 car template for printing
Facts: The Kopeyka was recognized as the best domestic car of the 20th century according to the results of a 2000 survey conducted by the Za Rulem magazine. From 1970 to 1988, 4.85 million cars were produced.
Car VAZ 2102 (template)
Do you know? Based on the VAZ 2102, from 1980 to 1981, 47 electric vehicles were created, which were called VAZ 2801.
Diagram of the Zhiguli 2103 car
Facts: The car was developed jointly with the Italian company Fiat. The basis of this model was the Fiat 124. The first 518 VAZ-2103 cars were manufactured in 1972, but they did not go into retail sale; they were bought by VAZ employees, as well as employees of other factories that were involved in production. Produced from 1972 to 1984.
Lada 2104 car diagram
Interesting facts: For the first time, the VAZ-2104 introduced an innovation that went into mass production and was available to citizens of the USSR - heated rear window and rear wiper. Previously, this was used only for cars that were exported.
Preparing to make crafts
In fact, to make such a product, very few materials are required. It is enough to stock up on a sheet of paper of any size and color. For the game, for example, you can create different cars by distributing teams according to race colors.
The finished model does not require the use of scissors and is a one-piece design. The only thing is, if you don’t have colored paper on hand, you can use pencils and paint the model as you wish.
[custom_ads_shortcode2]