What's hanging on the walls?
The tradition of decorating walls dates back to the days when people had more or less permanent housing, where they could return after hunting or collecting plants. Drawings by primitive artists are quite common on the walls of ancient caves. Of course, the ancient masters who depicted animals and hunting scenes did not face the problem of how to insert a painting on canvas into a frame, because they had not yet invented either canvas or frames.
You can paint a picture directly on the wall in a modern apartment. However, for the most part, people still post finished works:
- paintings;
- reproductions;
- photos;
- straw panel;
- paintings using floristry techniques;
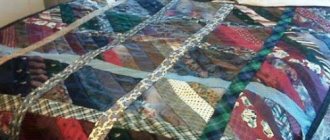
- panels made of scraps;
- artistic embroidery;
- decorative ceramics.
The list is far from complete - in general, many things can serve as decoration. Not all paintings and panels need frames. Most often, the question of how to insert a picture into a frame with your own hands is faced by those who want to hang a painting, watercolor or photographs.
How to hang a picture without a hole in the wall
Most paintings that have to be hung in residential or public spaces are not particularly massive and, even together with the frame, do not weigh more than 3-5 kg. The load from engravings and small photographs sometimes does not reach a kilogram.
Some interesting devices allow you to hang a picture on the wall without drilling.
Special Velcro
Clothing Velcro, designed like a burdock, has become widespread. They consist of two elements: on one there are many tiny plastic hooks, on the other there is a fleecy surface on which these hooks easily cling.
If necessary, by applying a certain force, these parts come apart with a quiet crack, but can be reconnected.
A few simple rules
Regardless of whether you insert the picture yourself or contact a framing workshop, you must follow these simple rules:
- Never wet the canvas before stretching it on a stretcher - such strange handling will deform the canvas and various other troubles may arise, such as the appearance of fungus or rot.
- The canvas threads are positioned parallel to the slats, and not at an angle, so that the material does not stretch arbitrarily.
- The primer is applied to the blank canvas when the future painting is already on the stretcher.
- The picture is inserted into the frame, placing the stretcher on a flat horizontal surface - most often on a table or on the floor, depending on the size.
- If the picture is large, a cross made of wooden planks is placed in the center.
- You can place pieces of thick fabric under the nails so that the threads of the canvas do not stretch or break.
Fasteners
Attaching the fittings to the frame is just one stage of the work. Next, you need to mount the picture on the wall. Here, the material from which the wall is made is of decisive importance, and to be more precise, the ability to make a hole in the wall and the difficulty of completing the task.
Fasteners for concrete and wooden walls are fundamentally different from each other. While you can easily hammer a nail or screw a self-tapping screw into a wooden wall, you will first have to drill a hole in a concrete wall.
Pre-drilling fastening has its pros and cons. The advantages include their reliability and ability to withstand heavy loads. The downside is the fact that not everyone in the house has a suitable tool, and the hole itself does not add aesthetics to the interior.
Thus, the painting can no longer be moved to another place. Those who want to avoid drilling will have to look for alternative options.
- For a wooden wall. If you need to hang a picture on a wooden wall, then in this case there is an “old-fashioned” method, which has not lost its popularity today. To implement it, it is enough to drive a nail at an angle into the wall, and hang the picture on the nail using a pendant and a rope. A nail will easily penetrate even plaster, so this method is suitable for rooms in which the walls are plastered with a layer of at least 1 cm thick. A self-tapping screw is also a good option, and it is considered more reliable. A type of self-tapping screw can be an eye screw or a similar screw with a rod bent 90 degrees. There are no special regulations regarding the thickness of the nail or the thickness of the screw. The master himself must determine the size of the fastener, based on the force that the painting will exert.
- For a concrete wall. Attaching a painting to a concrete wall is the most difficult type of work, especially if it involves drilling. To do this, you will need a hammer drill or at least a bolt (a tube with teeth made of hardened steel). Next, suitable fasteners are selected based on the weight of the painting. A plastic dowel is inserted into the hole, into which a self-tapping screw or bolt hook is screwed. If the painting has a fairly large mass, then you will have to choose a more reliable mount. You can buy an expansion anchor at a hardware store. The diameters of anchor bolts are presented in a wide range, so there will be no problems with the selection of fittings. Many of us remember those times when building materials were in short supply, so instead of dowels they still use wooden “chops”. Their correct name is dowels. But plastic dowels are more reliable and durable, as they do not dry out over time.
- For a brick wall. It is much easier to work with brick than with concrete, since it can be drilled with a regular drill. It is important that the drill has a pobedit or diamond tip. Due to the fact that the brick crumbles, the hole made may be slightly larger in diameter than the calculated diameter of the drill. In this case, the dowel will not fit tightly and will not achieve proper wedging when screwing in the screw. You need to take a larger diameter dowel and hammer it into the hole or use an anchor bolt. Finally, for attaching a picture to a brick wall, a high-strength hardened nail, which is driven in using a mounting gun, is suitable. But this nail can be driven into a brick with an ordinary hammer.
- For drywall. Driving a screw into a sheet of drywall or driving a nail is very simple. But the fragility of the material itself does not allow creating a reliable connection, so such trivial actions are immediately excluded. To attach heavy paintings, you will have to use special anchors. Pictures of small size and weight can be secured using plastic dowels and other spacers. It is important to understand that not even the most reliable fastening will ensure the retention of a painting if its weight exceeds 15 kg. There is a way out of this situation, but it is very time-consuming and costly. You will have to reinforce the load-bearing wall under the plasterboard with a wooden beam, and then screw self-tapping screws into this beam through a sheet of plasterboard.
How to buy a frame?
It is best, of course, to come to the framing workshop with a painting. The master himself will do everything that is needed:
- will select a baguette according to thickness;
- find the perfect subframe;
- choose carnations or ribbons.
But such an opportunity is not always available - you can’t carry a huge canvas covering the entire wall with you. Many people have to do the design of paintings themselves. And it’s better to stick to a certain order:
- Measure the painting - the easiest way to do this is with a measuring tape or tape measure, but a ruler will do. Don't forget to write down the length and width of the canvas.
- Select a frame based on your measurements. It’s better if it contrasts with the main color scheme of the picture. The simpler the frame, the more expressive the picture will look.
Important! If you measure a painting with a tailor's centimeter, apply it with the same side, because in most cases the divisions are made in two different systems of measures.
How to stretch fabric onto a stretcher
The following materials will be required:
- subframe made of slats;
- crosses needed to eliminate distortions and deflections of the main bars, as well as increase the strength of the structure;
- set of staples for stapler.
You will also need the following tools:
- regular roulette;
- hammer (especially if you plan to use nails);
- wood stapler
- special tool for tensioning.
In general, there are two types of stretching and it depends on you which one you have to give preference to: gallery or classic. The first involves frameless design, when the canvas is stretched so that the image continues on the sides. I must say that if it is fixed on the back side of the stretcher and neatly wrapped in the corners, then everything looks great even without a frame. Therefore, today this method is considered very stylish and modern. This kind of design can be found quite often.
There is also a classic type of stretching, when the ends remain white, and the picture itself is prepared for a baguette frame. Like everything classic, this method will always be popular. In any case, it is important that the frame is made exactly to the size of the canvas, and that the timber is dry, without cracks or knots. The fibers should be directed lengthwise.
Something about sizes
The answer to the question of where it is better to buy a frame - in a framing workshop or in a specialized store for artists - depends on what format your painting has. The workshop will make any frame, and the store will offer standard ones:
- 20x25 cm;
- 30x35 cm;
- 40x50 cm;
- 45x60 cm;
- 50x60 cm;
- 60x75 cm;
- 75x100 cm.
The choice is large, but still limited. However, in the best stores you will also find sizes that differ from the standard.
Important! As for fasteners, they are sold in sets - for example, staples in a package of 4 pieces. For a small or medium format picture this is usually enough. Screws are not always installed - most often the picture is attached without them. But there are also screws of several sizes.
Fastening with glue or liquid nails
This fastening method is able to withstand more massive and heavy interior items. To use this method, it is necessary to use only polymer glue, since after its use there are no greasy marks left.
To attach the picture to the wall, you need to apply glue around the entire perimeter and press it firmly against the wall. Note: to achieve the most lasting effect, you can support the painting with a mop. Liquid nails can replace glue.
Their advantage is that they are able to firmly attach even to uneven surfaces. Special attention should be paid to the fact that liquid nails are not afraid of moisture. If the weight of the object is large enough, then you need to maintain the existing effect and renew the liquid nails at least once a year.
As you can see for yourself, there are many ways to attach paintings, also without using a drill. You should select the appropriate mount based on the size and weight of the item, and you should also take into account the surface on which you are going to attach the decorative element. In any business, the main thing is a responsible approach and you will succeed.
What types of frames are there?
Before you fix the picture in a frame, you need to choose the frame itself. Depending on what exactly you are going to hang on the wall, you can choose one of the options:
- classic baguette;
- baguette frame with glass;
- wooden slats;
- metal frame with glass;
- Passepartout.
Let's look at the appropriate option:
- The first option is suitable for paintings made in oil on canvas.
- For works using pastel or watercolor techniques, you need glass, that is, a closed metal or wooden frame.
- Photos framed with a baguette do not look very good; narrow wooden slats or metal strips are more suitable for them, and it is better if there is glass, as for watercolors. The same option is good for panels made of straw and paintings using the floristry technique. Such design not only gives the work a finished look, but also protects it from dust, moisture and mechanical influences.
Important! An edging made of thin slats will also look good. Sometimes just a mat is enough, especially since this option can look very interesting.
Protecting paintings by numbers
Paintings by numbers are painted with paints that can flow if water gets on them. To prevent your creation from deteriorating, it can be protected. But how can you protect painted paintings by numbers?
One of the methods we have already mentioned in passing is glass on a frame. The glass provides reliable protection during normal use, and even during cleaning. The only way to damage a painting under glass is to dip it in water.
If you do not rule out this option, there is another way to protect the painting - varnish. The painting is covered with varnish after it is all painted and has already dried.
It can be scary to apply varnish for the first time - what if everything gets smeared? We will tell you how to apply varnish to a painting by numbers correctly so as not to damage it. You will need:
- fluted brush (wide, like for painting);
- acrylic lacquer.
Thoroughly clean the painting from dust, if any.
Heat the varnish in a water bath to a temperature of 45 degrees - this way it will lie more evenly.
Apply the varnish using wide, parallel strokes. Try to put a little varnish on the brush so that drips do not form. The varnish is placed parallel to the lower border - that is, horizontally relative to the painting.
When the entire painting is covered with varnish, rinse the brush thoroughly and wipe dry. Using a dry brush, go over the varnish again, distributing it evenly. This must be done quickly, since acrylic varnish dries quickly. If the brush sticks, it's time to finish the job.
After 2-3 hours, when the varnish has dried, you can begin framing the painting.
How to paint pictures by numbers, read our article on the website.
We give blog visitors a 5% discount
When placing an order, enter the promo code
BLOG
Classic baguette
Before you frame your canvas, it is important to decide on the dimensions. It is better to order the frame itself from a framing workshop.
The width of the slats depends on the size of the painting - the larger the canvas, the more massive the frame should be. For fastening, a stretcher is used, which is a structure made of wooden slats onto which the canvas is stretched.
This frame does not allow the canvas to deform. It can be secured in three ways:
- using D-shaped plates;
- using Z-shaped plates;
- using tapes.
D-plates
If the subframe protrudes beyond the boundaries of the baguette, use D-shaped brass plates.
Important! Brass is used because the plates must be flexible.
Mounting Features:
- 3 holes are made in each of them.
- They are attached to the frame with two screws.
- If there is nothing of the kind within reach, you can make fastening elements from other materials (for example, tin).
Important! Small nails will work as fasteners in an emergency, but it is better to buy the necessary parts at an art supply store or a framing shop.
Z-brackets
They apply in the following cases:
- for attaching a subframe that does not protrude beyond the boundaries of the baguette to the frame;
- for connecting double frames.
Important! The size of the brackets is selected based on the height difference between the elements. This bracket is screwed in with screws.
Planks
Quite often thin wooden, cardboard or plastic strips are inserted into the gaps to prevent the painting from dangling:
- The best option is wood, it provides the most durable fixation.
- But if you don’t have anything suitable at hand, strips can be made from large plastic bottles. In this case, it does not matter at all whether they are equal in length to the gap or not.
Important! The main task of these elements is to prevent the picture from shaking, and even short pieces of material can ensure this.
Picture hangers
Paintings are different, and here we are not talking about the technique in which it was made, or the plot, but we are talking about its size and weight, as well as the material of the frame.
Let's consider the most popular types of fittings for baguette frames:
- triangular pendants
- eye screw
- crocodile mount
- D-shaped suspension
- 3M Command mount
- various threads, fishing lines and wires
Triangular pendants
Triangular pendants are suitable for attaching to thin picture frames whose weight does not exceed two kilograms. Such fittings are attached to the baguette using small nails. In stores there are various versions of triangular pendants, differing in the width of the base.
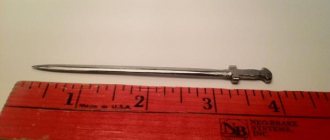
Eye screw
The eye screw no longer needs to be secured to the frame with nails; it is simply screwed into the baguette frame using a screwdriver, having previously made a small hole. These screws are made from a special alloy that ensures their strength and are not intended to be screwed directly into the wall, although at first glance it may seem that they can be used as an anchor bolt with a ring. When choosing the screw size, you must be guided by the width of the baguette, the size of the frame and the weight of the painting. When in doubt, it is better to choose a thicker screw, but also remember that a fastener that is too thick can split the frame.
Crocodile mount
This type of suspension received its name due to the presence of teeth reminiscent of a crocodile. They are not just decorative in nature, but have practical significance: with their help you can adjust the horizontal position of the canvas on the wall. They also help set the angle of the painting for more convenient viewing of the image.
It is used for canvases in wooden frames and gallery-stretched canvases. This suspension is attached using two small screws that are screwed into the baguette. The crocodile mount is convenient to use for modular paintings. With horizontal adjustment, you can correct inaccuracies in wall mount placement and maintain image integrity.
D-shaped suspension
D-shaped pendants are most often made of steel with a brass or nickel plated (accordingly, you can choose a gold or silver pendant).
Such fasteners differ in size: small rings are used for fastening to small frames; they have only one hole, which is attached with a screw to the baguette or to the back of the frame using a special forked rivet.
For heavy frames, the D-rings already have two holes for attaching a screw, ensuring the reliability of the structure.
3M Command Mount
They are adhesive Velcro fasteners; they are very easily attached both to the wall and to the picture itself. A standard pair of Velcro fasteners can withstand a weight of up to 1.8 kg; there are options on sale that can withstand even greater weight. The main advantage of this type of fastening is ease of use, since there is no need to drill or screw anything. If necessary, Velcro can be easily removed from the wall without leaving any marks.
Various threads, cords, fishing lines and wires
A variety of threads, cords, cables, fishing lines and even wire are used as suspension. However, these materials must be carefully secured to the baguette or frame backing, and the ability of the material to support the weight of the picture is assessed. To fasten threads and similar materials, a furniture stapler and various adhesives (for example, epoxy glue) are used.
We insert the picture into the framing frame
The procedure for decorating a painting is quite simple, but it requires attention. It is important for you not to damage the work, which means you need to work carefully. You will need:
- staples;
- thin spatula;
- construction stapler.
Operating procedure:
- Inspect the frame from the back - a loop is usually made there, which at the end of the process should end up on the top bar.
- If there is no loop, make one.
- Place the frame face down.
- Place the canvas on it.
- Secure the canvas into the gaps between the frame and the subframe - this is done with a spatula.
- Check how well the canvas is stretched.
- If necessary (if the thickness of the canvas is much less than the width of the gap), insert thin wooden or plastic strips.
- If you are happy with everything, secure it with staples using a staple gun.
Important! The number of fasteners depends entirely on the size of the canvas and frame. The larger the painting and the heavier and more massive the frame, the more fastening elements there should be.
Optimal placement of paintings in the interior
Mounting for pictures on the wall depends on three parameters:
- Reliability of the wall material.
- The strength of the connection between the mount and the wall.
- Strength of adhesion of the frame or canvas to the fastening.
The wall where the picture is attached can be made of wood, stone materials, plasterboard, lined with ceramic tiles, covered with wallpaper or simply painted.
If you can simply hammer a nail or screw a screw into wood, then with concrete such fixation is difficult or impossible. In this case, wall mounts are used without drilling.
In order to attach 8 pictures to the stand, for example, small engravings, you can use a regular or decorative paper clip or a strip of tape.
To solve the problem of how to hang a picture on a wall of medium size and weight, you will need special fasteners that can withstand a force of 3-5 kg.
Large works (mosaics, panels, bas-reliefs) will require fastenings designed for 10-15 or more kg. And in order to hang a heavy frame with a huge canvas weighing several tens of kilograms, it is necessary to use a special design.
Selecting a location
Placing canvases indoors involves a dual task:
- Convenience of their contemplation for obtaining aesthetic pleasure.
- Complementing and decorating the interior, creating a special atmosphere in the room.
Choosing a place for a painting will be more difficult if there is not one painting, but many. In such cases, it is necessary to allocate special areas for them. At the same time, in order to attach several paintings to a common stand, you have to spend a lot of time and effort so that the composition looks holistic and is in harmony with the rest of the room.
As a rule, paintings are placed in open, visible places. The distance between them and other interior elements is usually selected based solely on the taste of the owners.
The situation is complicated by fasteners, but at the same time made easier by the choice of location, when drawings, photographs, etc. are placed last. Furniture has already been arranged, lamps have been installed, curtains or blinds are hanging. The process of choosing a location boils down to the fact that the masterpiece is alternately placed in different places. They stop at the one that seems most suitable.
It is worth remembering that a large canvas with a massive frame looks ridiculous in a small room. Just like a small picture on a large empty plane.
It is desirable that the plot corresponds to the purpose of the room. Completely different creations are suitable for the interiors of the living room, bedroom, and kitchen.
It is also necessary to take into account that works with landscape orientation, elongated horizontally, visually “eat up” the width of the room, but lengthen the space, while vertically oriented works add height to the room.
Backlight
It is used in cases where the impression of the picture should not depend on the time of day, or when ordinary lighting is not enough. It can work either continuously or turn on as needed.
We fasten the canvas with ribbons
To do this, you will need thick cotton fabric, as well as some tools:
- ruler;
- pencil;
- sharp scissors;
- furniture stapler.
First you need to mark the fabric.
Important! It is very good if you have ready-made cotton tape, but any dense material is quite suitable. How to cut it - along the lobe or on the bias - does not matter in this case.
Operating procedure:
- Draw a template - a strip 7 cm long and 3 cm wide.
- Using the template, cut out the ribbons.
- Find the grooves - the places where the frame touches the picture.
- Nail the strips there with a furniture stapler (this is done in the plane of the frame).
- Place the picture in the frame - the ribbons should be visible between the stretcher and the frame itself.
- Fold the ribbons.
- Pull each one tight.
- Fix it on the subframe in the same way as in the previous case.
- Trim the excess end of the ribbon
Important! For a small picture, four ribbons are enough.
Steps to success
Step-by-step instructions depend on which subframe you are using. If it is modular, then you will need to follow several steps described below.
- Measure the diagonals of the subframe. If they are the same, then you can staple the corners using two staples for each corner. In order for the staples to be driven in well, the stapler must be pressed well and then driven in. It may happen that the staple is not driven in - then you need to twist the round knob on top and thus adjust the stapler. Nails can be used instead of staples. Only they cannot be hammered in completely. You need to hit it obliquely to bend the head to one side, and then the canvas will not fly off the nails in the future. To make sure everything is done symmetrically, after the first staple or nail, turn the canvas upside down, pull it a little and hammer it right in the middle of the opposite side.
- Place the design evenly on the stretcher so that the threads of the canvas are parallel to the edges of the stretcher.
- Using a special tool, staple the canvas on all sides. There is also a faster option: wrap the stretcher in canvas and, stretching it quite tightly, drive a staple in the center.
- Secure the canvas with a stapler every two to three centimeters, moving from the center to the edge. It is necessary that the tool is tensioned with the same force. After this, continue to stretch the canvas, carefully tucking it at the corners and shooting it with a stapler.
- Pull out the brackets that hold the corners of the subframe together. Fold and staple the remaining excess canvas.
- Insert two wooden wedges each into the slots at the corners of the subframe and tap them with a hammer, but carefully.
If you stretch the canvas onto a blind stretcher, then you need to do everything as indicated in the first paragraphs for a modular stretcher. It is important that the canvas is stretched by the tool with the same force and quite strongly. This is necessary, because if the canvas sags, you will have to re-tighten it again. The canvas is also folded at the corners and the stapler is adjusted. Then the excess canvas that you will still need is folded and secured.
The subframe can be secured to the frame using metal corners 13 mm wide and 10 mm high. The corners can be mounted on a subframe or on a frame (depending on whose height is greater - the subframe or the frame). If the subframe protrudes above the level of the baguette, then you can use D-shaped plates to secure it. You can also use Z-shaped brackets (for example, to fasten double frames), which are attached to the frame with screws.
Inserting watercolors into a baguette frame
Watercolor is painted on paper or cardboard, that is, it is fixed differently than a painting. Paintings made using this technique require additional fixation. Provide it:
- glass;
- backdrop
Important! If you ordered a frame from a framing workshop, you should have been given all the necessary components, as well as fasteners - special nails.
Operating procedure:
- Place the frame face down.
- Place glass on top.
- Place the picture on the glass.
- Smooth out the sheet and make sure its edges match the edges of the glass.
- Cover the whole thing with a cardboard backdrop.
- Drive the nails parallel to the edges.
Simple wooden frame
The easiest and cheapest way to frame a painting. Such frames come with glass and a backdrop, or with a subframe, but the first option is more common. You can buy one in an artist supply store or in some photo stores:
- Place the frame with the back side facing up.
- Bend the metal plates.
- Remove the backdrop.
- Place the painting on the glass with the back side facing up.
- Align.
- Cover it with a backdrop.
- Bend the mounting plates.
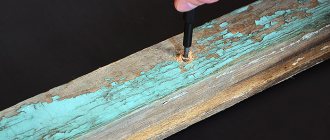
Using a nail or shurpa
The easiest and most inexpensive way. However, not all materials can support the weight of the painting. Wood, for example, can support heavy weight. To do this, you will have to arm yourself with a hammer or screwdriver and hang the picture in its rightful place. To hang the product evenly, you will have to determine the upper and lower boundaries in advance; you can use a pencil and a ruler for accurate measurements.
Most often, brick walls are found in houses. Brick can withstand heavy loads, but its structure is a very fragile and brittle material. To avoid this, before starting the procedure, the finished hole is filled with cement, then the part is secured.
In concrete and brick walls, a hole must be made using a hammer drill or drill. First insert the dowel and then the hook.
When working with drywall, you need to be very careful, since it is not durable and can only be used to hang light weight items.
If the frame is too big
It also happens that it is not possible to select a frame strictly according to the size of the watercolor or pastel. In this case, you will need an additional backdrop. You can make it from cardboard or paper:
- Trace the existing backdrop onto a sheet of thick paper.
- Cut it out.
- Position the picture and try on the frame - the sides of its opening should coincide with the sides of the picture or, at a minimum, be strictly parallel.
- Secure the painting to the additional backdrop using glue or double-sided tape.
- Place your work in the frame.
Methods for fastening light objects without nails
Weightless items such as banners or posters, calendars or daily schedules, photographs without frames and other thin elements can be mounted on the wall most quickly and reliably using the following methods.
No. 1. Double sided tape
Double-sided tape will be optimal solution for placing objects on plasterboard walls . This can be explained very simply - such fasteners do not violate the integrity of the gypsum board, which has a positive effect on its strength indicators. By the way, this figure decreases with each new hole that you make in such a surface.
The most aesthetically pleasing item will look if it is glued along all four edges , which will prevent them from bending. To fix a small strips no more than 1 cm wide along the edges . The larger the format, the longer the pieces of tape should be. Mark the location of the poster on the wall in advance and check its evenness. Neglecting this point and relying “by eye”, you may need to tear off the glued element in order to correct its position. In this case, you can tear both the object itself and tear off a piece of wallpaper or paintwork from the wall.
The protective layer on the second sticky side must be removed immediately before gluing . This way you won’t leave fingerprints on the sticky layer and dust won’t have time to settle on it while you “try on” the photo on the wall. The wall surface must be dry, smooth, clean, free of dust and other particles. If after some time you need to remove a strip of tape from a decent-sized wall without damaging its cladding, you need to carefully peel off a small section , starting from the corner, and slowly pull the rest of the strip down at a 90-degree angle to its orientation.
You can immediately use fabric-based double-sided tape, which can be removed without leaving a trace at any angle and from any surface. There is such a variety as foam tape, which can withstand much greater loads. It can be used to mount small paintings or photographs in plastic frames.
No. 2. Push pins
Push pins are also great for securely attaching lightweight items. There are many types of buttons, the heads of which are decorated. Thus, this visible fastener will not only not spoil the appearance of the poster or photo, but will also help decorate and even complement it. Push pins will adhere well to plastered walls, as well as walls covered with wallpaper, paint or decorative plaster. They are easy to stick into such a surface.
But in the case of concrete walls, difficulties may arise . If the layer of plaster under the wallpaper is already old and begins to crumble, the puncture sites may become too loose, and the buttons will periodically fall out. Take this into account when choosing this method of mounting in the children's room . You may not immediately notice the missing button, but your child can easily prick himself with it.
After dismantling such a fastening, barely noticeable traces will remain in the form of small holes . To remove them, just run your finger over the wallpaper and smooth it out at the puncture site. Thus, buttons are good if a private change of scenery is required.
Now let's get back to the concrete walls. possible to attach the same photo to them using the buttons . You just have to spoil the wallpaper a little. To do this, you need to choose buttons with a flat, thin cap .
Using a stationery knife, you need to make a horizontal cut in the wallpaper , the length of which is equal to the diameter of the cap with a small margin. Now make the same transverse cut . You will get a small cross . Using a knife, carefully separate the wallpaper from the wall and bend the corners. In the resulting free space, lean the button with its cap against the wall, after dropping a drop of superglue on it so that the tip is facing you. Now put a small drop of glue on each corner of the folded wallpaper and fold it back. When the glue dries, you will get a fairly strong fastening in the form of a small point protruding from the plane of the wall. All that remains is to pin the desired element on it. This method is good if you are not afraid of damaging the surface. After installation, you can hide the tip with a ball of foam or a piece of wine cork.
No. 3. Paper clip
A paper clip can also easily and quickly turn into a fastening element for light pictures or frames . To do this, it needs to be slightly altered. We will paste a paper clip under the wallpaper, as in the previous version. Only the cut will look a little different. The horizontal line should be slightly longer than the length of the paper clip, and the perpendicular line should be slightly larger than its width. A transverse cut is necessary to freely insert the paper clip into the wallpaper. You need to bend the edges and peel off the wallpaper from the wall along the entire length of the cut. The paper clip itself must be bent so that it resembles the letter “L”. It's like you used it to fasten a large stack of papers together and then took it off.
Place
one of the edges behind the wallpaper and see if it fits completely into the cut. If everything is fine, take out the paper clip, add a drop of glue , position the paper clip completely and press the wallpaper firmly into place. The glue should fill the entire void and be sure to get onto the paper clip. Leave the improvised fastener to dry for a day , and then feel free to hang the picture on it. The edges of the wallpaper will stick well and traces of the cut will be almost invisible, especially if the wallpaper has a texture.
At first it may seem that such fasteners are not particularly reliable , but in practice you will be pleasantly surprised . If you still have doubts, you can make several of these hooks. If the moment comes when you have to remove the paper clip, you don’t need to pull it out along with the wallpaper. Just bite it off at the very base with sharp nippers. Using the same principle, you can use a fishing or clothing hook . All stages of work will be similar.
No. 4. Sewing pins
Sewing pins are one of the neatest methods of fastening, which causes the least damage to the surface of the walls. Lean the photo against the wall and pierce it with a pin at a slight angle to the plane of the wall. Her leg should go behind the wallpaper, but not stick into the wall. Instead of pins, you can use a regular sewing needle. It will be less noticeable. Such fasteners can withstand weight up to 500 grams .
No. 5. Decorative tape
Decorative tape or decorative cord can also be used as a fastening element. With its help, you can arrange small paintings or photos in a more original way. In the desired place you need to make one of the above hooks .
Take a ribbon with finished edges, fold it in half and tie it on a hook . You will have two ends hanging freely. We will place the paintings on them. If you don’t really like the knot in the middle of the wall from an aesthetic point of view, you can tie a neat bow and another knot so that the bow does not come undone under the weight of objects. You can fasten the bow separately and then simply glue it onto the knot.
options for decorating the place where the ribbon is attached, ranging from artificial flowers to beautiful beads. Start from the general interior.
To secure the paintings to the ends of the tape , you need to apply a little glue to their reverse side . And for reliability, you can cut strips of thick paper and additionally glue them over the tape. By alternating the height of the decorative elements, you can create a very unusual collage.
In these simple ways you can attach small plates made of lightweight materials, photo cards or small paintings in plastic frames. If you make several fasteners of the same type on one line, and on the back side of the picture stretch a fishing line or nylon thread into the ears along the edges , then by hanging it in this way on all fastenings at the same time, you can significantly increase the strength of the fastening , and the permissible weight will increase several times.
Mounting features
If you are putting a painting into a frame for the first time in your life, pay attention to a few points:
- Pay attention to the design of the subframe - the back side of it has bevels and slightly protruding parts, they are always on the back side, so don’t get confused.
- Regardless of how you attach the picture, it must be carefully smoothed and correctly positioned relative to the sides of the frame.
Important! If you start fastening the canvas with staples, do not touch the nails, because you only need to use one type of fastener.
Fastener installation procedure:
- To ensure even tension on the canvas, it is better to drive the nails in a certain order.
- After placing the painting on the stretcher, drive in several nails in the central part - this is especially true if the painting is large.
- Check how well the canvas is stretched.
- While slightly stretching the canvas, drive in a few more nails on one side and the other from the center, placing them symmetrically.
- Gradually drive in all the nails, remembering to monitor the tension.
- If at the end of the process the picture is stretched evenly, there are no waves or folds at the edges - you did everything right.
- If folds form, unfortunately, everything will have to be redone.
Fastening in “serious” ways
In this paragraph we will look at ways to fasten objects or a series of objects that have significant weight, without using nails. It is worth noting that dismantling some elements will be difficult and will leave behind characteristic marks . In this regard, it will be necessary to update the wall covering.
No. 11. Picture board
This method is used when you don’t mind the floor and ceiling , but you do mind the walls. Please note right away that if you have a suspended or suspended ceiling, then this method is not for you . Unless, of course, this was foreseen in advance. It is worth noting that using an entire separate wall to place objects will help achieve unique interior solutions.
Such a board can become the center of the room and set the rest of its furnishings. Compositions that are designed to tell about something look more harmonious and thoughtful. For example, a series of landscape photographs taken at different times of the year, which convey the brightest moments of each month and tell the story of the decline and rebirth of nature. Or a series of black and white portrait photos of a married couple, which depict the story of their acquaintance and the most significant moments. Or the story of a person dear to you growing up. to highlight such an element using spot lighting . And it’s even easier to build such a structure. You can use real wooden boards, knocked together into a single sheet of the required size. More affordable options involve the use of laminated or sanded chipboard or MDF.
You can paint the surface yourself in a suitable color. For fastening, you need special brackets , which are sold at any hardware store.
- You immediately need to mark the floor , and then transfer it using a plumb line or laser level to the ceiling . This way you will avoid distortion.
- Now you need to make holes in the floor and ceiling . They do not have to be located opposite each other.
- Dowels are inserted into the holes and a pin is screwed in . You need to screw the bracket onto it. The brackets must be able to be adjusted in thickness using a clamp.
- Now insert the sheet into all the brackets on the floor and ceiling at the same time. At this stage you will need an assistant. While one person holds the sheet, the second should clamp it in the brackets.
- Then you need to check the deviation of the plane from the vertical position using a level.
It is best to place 5-10 cm from the wall in order to emphasize the individuality of this object and direct maximum attention to it. If you have already decided on the order in which objects will be placed on the board, then it is better and more convenient to make fastenings for them before installation. If not, you will have to use the stairs.
Pictures on the wall
Framing your work isn't everything. It needs to be beautifully placed on the wall. And here several rules apply:
- The plot should not be aggressive or cruel.
- The viewer should pay attention to the picture, not to the frame.
- If you want to highlight a corner on the wall, place one picture there.
- You can also create a composition, and there are quite a lot of options: small works of the same size can be hung in rows, if there is a large one, it can be in the center or on the side, and small ones next to it.
- The picture must be firmly fixed to the wall; this is best done with one or two dowels.
Rail mounting
Art galleries often use this method of displaying paintings. At home, rails are attached to the ceiling itself or to the border of its connection with the wall using special brackets. The ceiling cornice also looks beautiful. A small hook is inserted here, onto which a transparent fishing line or other fastening rope is suspended. The method is convenient because you can move the paintings along the wall and adjust the height of their placement.
There are many ways to hang a canvas in a room. The key point in choosing fasteners remains the weight of the photo frame or picture, the type of material with which the walls are treated. You can choose both the most original and the simplest method. It all depends on the design of the room and your imagination.