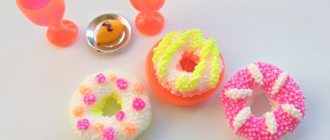
Donut
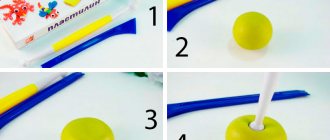
You will need: plasticine of bright colors, a stick, a plastic spatula.
Master Class
- Roll out a ball of yellow plasticine.
- Flatten the workpiece and press the center with the round tip of the stack-bulk.
- Trim off excess plasticine from the back side.
- Make a cake from pink plasticine.
- Attach the doughnut to the donut base and make a hole in the center.
- Roll plasticine flagella in bright colors.
- Place the flagella in the freezer for 5 minutes.
- Remove and cut the frozen flagella into small pieces.
- Decorate the donut by adding sprinkles.
The plasticine donut is ready!
Husky
You will need: plasticine of gray, white, black, blue, red and yellow, toothpick, stacks.
Master Class
- Roll a ball of gray plasticine.
- Stack 2 triangles at the top of the ball.
- Attach 2 flat triangles of white plasticine.
- Cover the bottom of the ball with white plasticine.
- Roll out an oblong oval from white plasticine and attach it as a muzzle.
- Roll the nose out of black plasticine and attach it to the muzzle.
- Make eyes from blue, black and white plasticine and attach them to white triangles.
- Make a tongue out of red plasticine and secure it.
- Make the lower part of the mouth from white plasticine and attach it under the tongue.
- Make 2 triangles from gray plasticine and attach them as ears.
- Work out the features of the muzzle with a stack.
- Make a body out of gray plasticine, insert a toothpick and secure the head.
- Cover the dog's belly with white plasticine.
- Roll 2 sausages from gray plasticine and attach them as front legs.
- Make 4 white plasticine cakes and attach them to the paws as shown in the image.
- Roll a sausage out of gray plasticine and mold a crescent-shaped tail.
- Stack the ponytail, adding fluffiness, then attach it.
- Make a collar from blue plasticine, and make a clasp from yellow plasticine, then make holes with a toothpick.
- Draw the ears, muzzle and paws with a stack.
Plasticine husky is ready!
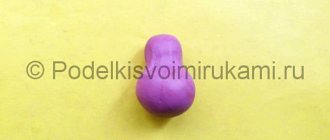
A pineapple
You will need: yellow, green, dark green and any color plasticine, stack, toothpick.
Master Class
- Roll a ball of brown plasticine (you can use leftover plasticine of any color for the base).
- Give the ball a pear shape and make the base stable.
- Roll out a ball of dark green plasticine, then roll it into an oval shape.
- Make a larger cake from yellow plasticine.
- Combine the green and yellow cakes, then roll them out.
- Turn the workpiece over with the yellow side up and draw a grid with a stack.
- Wrap the brown pineapple with a yellow tortilla.
- Trim off excess plasticine and smooth the joints with your fingers.
- Make oblong leaves from green plasticine and cut out the jagged outline.
- Stick the leaves to the top of the pineapple as shown in the image.
Plasticine pineapple is ready! Also check out the champagne and candy pineapple.
Children's master class “Plasticineography “Autumn Tree”
Irina Wunsh
Children’s master class “Plasticineography “Autumn Tree”
Goal: Create an image of an autumn tree using the technique of plasticineography .
Stages of work:
1. Let's prepare the necessary material:
-plasticine
-lid (I took a large lid from a bucket; they bring cottage cheese kindergarten food-grade plastic => ; safe).
2. Prepare the background ("Smearing" technique)
The child seems to “paint over”
the base with plasticine . Below is green - grass, above - blue - sky. The layer should be thin and even, leaving no gaps. excess plasticine with a stack .
3. Then we start sculpting the tree , first the trunk, then the branches, the plasticine needs to be flattened a little, thereby making the trunk wider at the bottom (at the base of the tree )
.
4. We attach thin branches to the tree , also flattening them a little in the place where they are attached to the trunk.
5. Next we make the foliage. We roll small pieces of plasticine into balls , then attach them to the wood and press them a little . We use several colors of plasticine (you can use dry leaves, crush them in advance and pour them onto plasticine , secure them by pressing with your palm. It turns out unusual and beautiful).
When the child masters this technique, you can complicate the work: knead the balls in the form of a circle, bend the ends inward and you will get a leaf.
The work on the tree is finished , you can add an image of birds and clouds in the sky from the flagella.
Master class “Applique using torn paper “Autumn tree” Master class. Application using torn paper “Autumn has come.” "Autumn has come." Autumn has come, our garden has turned yellow. Children's master class, plasticineography “Aquarium with fish” Plasticineography is one of the most interesting, bright and simple types of children's creativity. This type of work can be done even with children. Children's master class on creating a collective application-painting "Tree" in the preparatory group. The onset of spring is always accompanied by a festive and fairy-tale atmosphere. That's why painting and applique work is done at this time of year. Children's master class “A mermaid sits on the branches” - plasticineography, mosaic of sequins (preparatory group for school) Excerpt from the poem “Ruslan and Lyudmila” There is a green oak near the Lukomorye; The golden chain on that oak tree: Day and night, the learned cat keeps walking around on the chain; Children's master class. Plasticineography “Butterfly” I wanted to touch the most beautiful flower with my hands. And he, waving his petals, took off and flew away under the clouds. Continuing. Master class on 3D applique made of colored paper “Autumn Tree” The master class is designed for children of middle preschool age, teachers and parents. Purpose: decoration of a kindergarten group, crafts. “Autumn tree” made of cardboard and colored paper. Master class Autumn is a very beautiful time of year and therefore you want to remember the autumn colors for a long time. We conduct a lot of different excursions with children. Master class “Plasticineography” Master class Isoecology Topic: “Plasticine miracle. Plasticineography - an unconventional modeling technique" Performed by: Repeshevskaya V. P.
Panda
You will need: black, white and green plasticine, toothpicks, stacks.
Master Class
- Roll a ball of white plasticine.
- Push through two holes for the eyes.
- Roll balls of black plasticine, then attach and flatten them.
- Roll out a flat oval of white plasticine and attach it to the bottom of the head.
- Attach the black spout.
- Make eyes from white, green and black plasticine, then attach them.
- Make black ears and attach them to the top of the head.
- Roll out a roll of black plasticine, flatten it in the center and bend the ends.
- Roll a ball of white plasticine and glue it to the black blank.
- Connect the workpiece and the head using a toothpick.
- Mold and attach the black lower legs.
- Roll balls of white plasticine and attach them as pads to the paws.
- Draw in eyebrows with a toothpick.
- Roll a ball of black plasticine and attach it in place of the tail.
- Make a bamboo stick from green plate and attach it to the panda’s body.
The plasticine panda is ready! I recommend watching this video!
We sculpt Smesharik Krosh from plasticine. Cartoon. Kikoriki made of plasticine.
We sculpt from plasticine, craft step by step
If all the materials are prepared, you need to sit comfortably at the table with your baby. We create animals from the material in stages, duplicating the child’s manipulations to show him an example.
We take a piece of any color, preferably dark (which the child will like) and make a couple of details.
At the same time, we learn how to sculpt the lightest plasticine figures:
- The oval is large for the body;
- Four small ovals (or sausages) for our paws.
- A small oval (or rolled into a rope) for the tail.
- We create a ball for the head and extend it a little on one side for the trunk;
- We make two small balls and flatten them (these will be ears).
- After this, we slowly assemble the main particles of the figure, that is, we attach the legs and head to the body.
- Attach the ears to the head and the tail to the body.
Next you need to sculpt the eyes, eyebrows, and claws for the animal. But mommy should take into account the age and capabilities of the child. A very small child will not be able to create too small details. That’s why we create them ourselves from plasticine and help the child place them correctly on the figure.
Modeling from plasticine for children 2 and 3 years old
At the age of two to three years, the baby still cannot cope with normal material, so it is worth taking special soft plasticine for small children.
Crafts from polymer clay for beginners, sculpting products with children, photos DIY salt dough paintings What can be made from airy plasticine Making a cat from plasticine, how to make a cat step by step, sculpting a cat step by step
Children are still learning how to control their hands and find it difficult to learn modeling. We select tasks that are not difficult for the child so that he can cope with them, this will make him happy, give him self-confidence and he will want to continue to engage in this interesting type of creativity.
By the age of three, the baby will already be able to:
- Tear off pieces from plasticine.
- Create balls from them.
- Flatten the material.
- Attach the material to the paper and roll it out.
- Crush the balls with your hands.
- Create sausages.
- Roll the sausages into rings.
- Combine all components into one piece.
- The parents' task is to teach their child this.
Show your child:
- How to cut a sausage and get rings.
- How to cut out shapes from a flat cake.
- How to cut dough into squares, triangles and other shapes.
- How to stick different objects onto plasticine smeared on cardboard, for example, seeds, beads, cereals, pasta.
The duration of modeling lessons for children aged 1-3 years is fifteen minutes and depends on the child’s mood and desire to work with this material.
For this age, it is advised to take plasticine only in important colors, so as not to overload the child with too much variety and not distract from the modeling lesson itself. In addition, if you want, the colors can be mixed to create new shades.
Modeling from plasticine for children 4 and 5 years old
At the age of five, a child already knows how to handle a modeling knife, his hands are already stronger and he can work with simple plasticine.
Children of this age know how to roll balls and sausages, and now it will be more important for them to create more complex and unique crafts themselves.
Invite your child to create a mushroom clearing or forest lawn with bushes and trees around. Maybe the child wants to make something of his own, don’t stop him from doing this. On the contrary, it is wonderful and improves his independence.
Also, the mother can make one piece of the composition, and the child the second, then combine everything into one part. So, the baby will feel responsible for his share of the work.
A child at this age can make simple figures of animals, plants, birds, and food for dolls. The time of working with plasticine is from ten to twenty minutes; if the child is very enthusiastic, it can be extended a little, depending on the perseverance of the child. And with older children, you can try modeling from playdough plasticine; video tutorials from the Internet will help you understand the topic. So we figured out how to make artistic or professional works from plasticine. If you know which figure to start with, choose a cow, a goat, or if you have more experience, make a beautiful cartoon character.
Apple
You will need: red, green, black, white and brown plasticine, stacks, toothpick.
Master Class
- Roll out a ball of red plasticine.
- Shape the ball into an apple shape.
- Prepare a strip of brown plasticine and cut fine fringe.
- Make a small indentation in the apple for the stamens.
- Cut a small piece of the stamens, twist them and attach them to the apple.
- Make a stalk out of brown plasticine as shown in the image.
- Make a small indentation in the apple and stick the stem.
- Make 2 leaves from green plasticine and draw lines using a stack and a toothpick.
- Stick the leaves to the base of the cutting, then give them a curved shape.
- Make a droplet of white plasticine, flatten it and stick it to the apple as a highlight.
- Roll 5 balls of green plasticine and form a caterpillar.
- Roll 2 very small balls of black plasticine and stick them on as the caterpillar's eyes.
- Stick the caterpillar to the apple.
The plasticine apple is ready!
How to teach children to sculpt
Emphasizing the importance of the individuality of a small person, many parents and teachers are of the erroneous opinion that given the texture of a material such as plasticine, a small child will learn and create a sculptural object on his own. Great idea, but unfortunately this is not the case and is largely up to parents and teachers to provide adequate stimulation or motivation based on the child's own experiences
First of all, when we sculpt with plasticine with children, we teach how to form their basic shapes:
- ball;
- egg (ellipsoid);
- hemisphere;
- cake;
- sausage;
- cylinder;
- cone;
- brick;
- tourniquet;
- spiral.
After they master these forms and the names for each of them, it is easier for us to give instructions on how to sculpt figures, animals, fairy-tale and cartoon characters, for example, fixie, and so on, then gradually move on to compositions. A child, depicting the volume of an object (and its other features), gets an idea of such a concept as proportion. Modeling, for example, a snowman or a Smesharik, the child understands that the object is round and to create it you need to roll balls. In this way, the ability to generalize objects and form develops.
Age 2-3 years
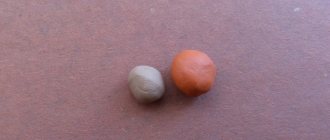
This age group gets excited when they see bright plasticine and what can come out of it. What do we sculpt from plasticine with 2-year-old children? Little explorers can be offered simple artistic objects; make, for example, a bright green-brown caterpillar.
- Cut out a leaf shape from a sheet of white paper. We ask the little one to color it.
- Together with the baby, you need to make balls from green and brown plasticine, which we collect together.
- Let your child try to roll two or three balls and connect them on his own.
- Using yellow and black plasticine, we make the eyes and mouth of the caterpillar on the first ball, and from red plasticine we roll out two small sticks for the antennae, which we place on the head.
We place the molded caterpillar on a form cut out of paper so that it appears to be crawling along a sheet
It is important to accompany the modeling process with songs, rhymes or an interesting story corresponding to the theme
What do we sculpt from plasticine with 3-year-old children? They have already acquired a certain linguistic vocabulary and you can teach them to sculpt Smesharik, Losyasha, Krosha or Nyusha, explore a shape such as a cone and make ice cream out of plasticine. Other ideas for sculpting: any animal, hare, cat, even a beetle or spider; food, such as a fruit platter or pizza.
Modeling in this age group usually takes no more than 20 minutes.
Children 4-5 years old
At this age, children are actively interested in the world around them.
Modeling from plasticine is an excellent way to develop children and, for this age group, it can already be divided into subject, plot (logical composition of different figures), and decorative features. When a child forms a figure, he actively uses his imagination. What do we sculpt from plasticine with children aged 5? Ideas:
- mushroom meadow (a sheet of cardboard will serve as the basis for placing the composition);
- lawn with lake;
- fruit basket (make a small basket from flagella, then fill it with tiny fruits, using basic shapes and plasticine of different colors: apple, melon, banana);
- a fairytale house with tiny furniture;
- a composition with “fake snow” (made of cotton wool) and “fake ice” (made of foil), in which to place fur seals or walruses molded from plasticine;
- a “game board” for tic-tac-toe in the shape of a pond made of blue plasticine, on which “draw” four thin sausage rollers; "Tic Tac Toe" in the shape of 10 green turtles. For each figure, roll a large and a small ball, flatten them on one side and connect; roll out the sausage roller and cut it into four short pieces for the legs, which are attached to the body of the turtle. Make eyes from yellow plasticine. Use yellow to make 5 “X”s and 5 “Os” and stick them on the backs of the turtles.
- compositions combining various objects with plasticine (straws, buttons, shells, pebbles) - ideas designed for middle and older ages.
When depicting objects, children reproduce not only shapes, but their characteristic features, firstly, color.
Chamomile
You will need: white, yellow and green plasticine, stacks, boule, skewer.
Master Class
- Make a drop of white plasticine, then flatten it into a petal shape.
- Draw a stack of lines.
- Make 20 white petals.
- Roll up the yellow center of the flower.
- Prepare a strip of yellow plasticine and cut through the fringe.
- Stick a strip around the circle of the yellow center.
- Stick the white petals in a circle, placing them in a checkerboard pattern.
- Cover the skewer with green plasticine, leaving the tip free.
- Make a cake from green plasticine and sculpt a receptacle.
- Stick the bud to the receptacle.
- Draw a mesh texture on the yellow center.
- Make a leaf, draw the texture and stick it to the stem.
The plasticine chamomile is ready!
What to make
Before starting a lesson, every parent thinks about what can be made from plasticine. Imagine a little, imagine yourself as a child, think about what will interest your son or daughter most. Children's crafts may involve the use of many additional materials, which include: flowers, leaves, acorns, cones, and chestnuts.
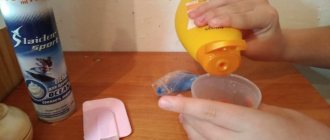
It is equally important to choose high-quality plasticine, for example, Hey Clay Zalipaki . It differs from the usual one in that it does not stick to hands or furniture, and is much brighter and easier to mold. After 24 hours it hardens and becomes a toy. Includes a free application for step-by-step modeling training.
Ideas for what can be molded from plasticine:
- Animals and birds. Interesting and funny hedgehogs, bunnies, and turtles will delight your little one. In addition, such plasticine crafts for children are made very quickly and simply.
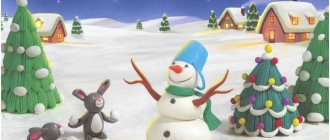
- Thematic figures. Undoubtedly, for every child the New Year is a special, long-awaited event, because it is associated with toys and various gifts. Simple crafts made from plasticine in the form of a Christmas tree decoration, a snowman and, in fact, the Christmas tree itself will lift your spirits on the eve of the holiday.
- Flowers. Mesmerizing compositions made with a child will look as if they were alive. Depending on the age of the baby, you can make flowers with a minimum number of details, as well as more complex volumetric compositions.
- Trees. Having mastered easy crafts from plasticine, you can move on to more complex figures. Of course, a child will not be able to mold a tree on his own; he will need the help of an adult. But after taking a few steps in creating a craft, the child will be able to easily complete the job he started.
- Vegetables, fruits, sweets. Even novice craftsmen will be able to master the process of creating miniatures of their favorite delicacies. Select the necessary colors of plasticine, then you can safely start creating.
Isn't it fun and interesting to make crafts from plasticine with your own hands? Let's get started with this exciting activity right now. Prepare plasticine, glass, cardboard and some available materials and you can start working. We will teach you how to make a wide variety of crafts from colored plasticine; such an activity for kids will be entertaining and will cause a lot of positive emotions. Well, let's get down to business?
Pendant "Snowman"
You will need: a sheet of cardboard, a simple pencil, scissors, string, tape, plasticine in white, orange, brown, black, blue, purple and green, skewer, stack.
Master Class
- Draw a circle on a piece of cardboard, then cut it out.
- Cover one side of the circle with white plasticine.
- Make oval legs from purple plasticine, then attach them to the bottom of the circle.
- Roll out an oval nose from orange plasticine, then attach it.
- Make eyes and a smile for the snowman from black plasticine.
- Roll 2 buttons from blue plasticine, attach them and use a skewer to make 2 holes in the buttons.
- Roll the purple and blue plasticine into sausages, then form a hat as shown in the image.
- Roll a ball of white plasticine and attach it as a pompom, then use a skewer to create a “fluffy” texture.
- Make stick handles from brown plasticine, then attach them to different sides of the circle.
- Make highlights on the nose and eyes from white plasticine.
- Draw a knitted pattern onto the hat using a skewer.
- Draw lines on the legs as shown in the image.
- Make 3 leaves from green plasticine and roll 3 orange berries, then decorate the hat.
- Attach the string to the back using tape.
The plasticine “Snowman” pendant is ready!
Ice cream
You will need: plasticine of bright colors, a spatula, a stack, a wooden skewer, beads and rhinestones.
Master Class
- Roll a ball of brown plasticine.
- Flatten the ball into a flat cake.
- Draw lines with a stack, creating a waffle texture.
- Twist the workpiece to form a cup, then secure the edges.
- Roll balls of bright colors of different sizes.
- Use a skewer to process the halves of the balls as shown in the image.
- Place the balls into a waffle cup.
- Decorate the ice cream by attaching beads and rhinestones.
- Make a cherry and attach it to the top of the ice cream.
Plasticine ice cream is ready! I recommend watching this video!
DIY Making Play Doh Ice Cream Popsicles
Crocodile
You will need: green, dark green, white, black and red plasticine, a glass stack, a toothpick, a napkin with a pattern.
Master Class
- Roll a sausage out of green plasticine.
- Cut the blank in half and create three parts from green plasticine: a carrot, an oblong oval and a ball.
- Take the green oval and make a cut, forming the mouth of a crocodile.
- Slap red plasticine into the mouth.
- Roll the sausage out of white plasticine, flatten and cut the cloves, then attach them to the red plasticine.
- Roll 2 green balls and make eyes by attaching white and black plasticine, then attach the blanks to the crocodile's head.
- Treat the body and head of the crocodile with a napkin, giving it a patterned texture.
- Connect the body and head of the crocodile using a toothpick.
- Roll 4 balls of green plasticine and attach them to the paws.
- Make notches on the paws with a stack.
- Roll a sausage from dark green plasticine, flatten it, cut the teeth and attach it to the back of the crocodile.
- Attach highlights to the eyes using white plasticine.
The plasticine crocodile is ready!
Grape
You will need: purple, brown and green plasticine, glass stack, thin wire.
Master Class
- Make a rope from purple plasticine.
- Cut it into pieces.
- Roll each piece into balls.
- Make a cone out of purple plasticine.
- Cover the cone with grapes, leaving the top part free.
- Prepare a piece of thin wire and cover it with brown plasticine, as shown in the image.
- Draw the lines to create a branchy texture.
- Attach a wire twig to the top of the grape, then stick the grapes around it.
- Make a cake from green plasticine.
- Outline the outline of the leaf and cut it out, then draw the texture.
- Roll out a thin strip of green plasticine, carefully twist it and stick it to the grapes.
Plasticine grapes are ready! I recommend watching this video!
Air plasticine for children, learning to sculpt roses
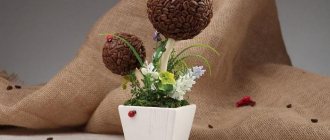
Fox made of pine cones and plasticine
You will need: pine cone, orange, green, white and black plasticine, stack, autumn leaves.
Master Class
- Make ears and an elongated muzzle from orange plasticine, roll up a black nose and attach all the parts to the pine cone.
- Make a tongue out of orange plasticine, then attach it.
- Make crescent-shaped eyes from white plasticine and attach green pupils.
- Make eyelashes from cuttings - the tails of leaves.
- Attach the eyes to the pine cone.
- Mold 2 legs and a tail from orange plasticine and make cuts with a stack, as shown in the picture.
- Attach the paws and tail to the pine cone.
- Lay out the leaves and plant the fox.
The fox made from pine cones and plasticine is ready!
Autumn painting made of plasticine
Let's start with the most difficult, and at the same time, the most exciting task - sculpting an autumn landscape. To do this you need to prepare in advance:
- a thick sheet of cardboard, preferably blue, which in the picture will depict a blue autumn sky and the same blue autumn distances;
- plasticine of various colors;
- stack (this, if anyone doesn’t know, is a special knife for cutting plasticine, which is usually sold along with a package of plasticine);
- a smooth board without roughness or burrs for rolling out plasticine;
- paints and brush (optional).
Let's start creating.
- From plasticine of all autumn colors (yellow, brown, red) we roll out sticks of different thicknesses and lengths.
- Having prepared plasticine sticks, we begin to make autumn leaves from them. Of course, fashioning a piece of wood from plasticine is a difficult task, but in this case it is not necessary. We make spirals from plasticine sticks (aka “snails”). To do this, the stick needs to be rolled into a spiral - a task that any child can easily cope with.
- Having made a sufficient number of spirals, we begin to stick them to the cardboard, forming the crown of the tree. What exactly the crown should look like in terms of size, contours and color palette depends entirely on the child’s imagination.
- Having finished with the crown, we begin to make the trunk and branches of the tree. We roll out sticks of different lengths and thicknesses from black or brown plasticine. These are fragments of tree trunks.
- By the way, about the color scheme. It is not at all necessary that the trunk be exclusively black or brown. Maybe the child is an impressionist or abstract artist at heart, and sees the autumn forest in his own way - in some other colors. Well, so much the better, and there is no need to convince him of anything.
- We begin to form a tree trunk from the bundles. Of course, it should be below, under the crown. We stick several flagella to this place from top to bottom. We try to keep them parallel to each other. Several flagella under the crown are already a full-fledged trunk.
- We make many more flagella of different colors. Roll them into spirals. These are fallen autumn leaves. We place them below under the tree.
- In this way you can sculpt one tree. Or maybe several at once. You will get a full-fledged plasticine grove.
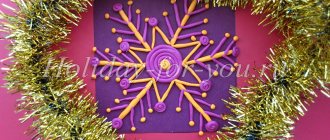
- We make a circle and thin sticks from yellow plasticine. This is the autumn sun and rays. We stick them on top of the picture.
- If you have the desire and ability, we paint the space between the trees or around the tree in autumn colors. It will turn out great - both plasticine and paint.
- Finally, we prepare a frame for the picture (what is a picture without a frame?). To do this, we make long plasticine strips of any color and paste the picture along the contour. You can do this using simple plasticine strips, or you can weave several strips in the shape of a braid - it will be even more beautiful.
The result will definitely be a highly artistic product - a real autumn plasticine landscape. For example, like the one in these photos.
This video will tell you how best to make a picture from plasticine.
This video will teach you how to sculpt a beautiful autumn tree from plasticine.
Each tree consists of fragments: trunk, crown, individual branches, berries and leaves. They also need to be able to sculpt beautifully. How to do this better, look at another video.
Crow
You will need: plasticine, toothpick, glass.
Master Class
- Roll a small ball of dark gray plasticine.
- Roll a smaller ball of light gray plasticine.
- Flatten the light gray ball into a flat cake.
- Make cuts in a circle.
- Cut off pieces of plasticine to make a star.
- Connect the ball with the star.
- Using a round stack, press 2 holes on the ball.
- Make an oval-shaped bird's body from dark gray plasticine.
- Make the wings of the bird in the shape of flattened drops of dark gray plasticine.
- Make a wavy outline on the wings using a stack.
- Attach the wings to the body.
- Make the crow's paws and attach them.
- Make 3 thin little sausages and attach them to the top of the bird's head.
- Make the eyes of a crow from black and white plasticine.
- Draw the eyebrows of the crow in a stack.
- Attach a small tail to the crow.
- Make a toothpick pattern on the raven's neck.
The plasticine raven is ready! I recommend watching this video!
WE MAKE iPhone X - iPhone 10 FROM PLASTICINE | Video Modeling
Plasticine applications for kindergarten
Plasticine applications for children are primarily aimed at developing fine motor skills of the fingers.
Children under three years old are restless, so it is not so easy for them to immerse themselves in the creative process. On the other hand, it is easy for them to get carried away by new interesting activities.
But they themselves are not yet able to come up with a topic for a creative assignment. If they are not given a clear task from the height of adult authority, they will quickly lose interest in creating an application.
Control on the part of the teacher should be aimed at developing accuracy in work and consistency in actions.
Instead of just giving children a modeling task, you need to try to interest them. For example, you can come up with a fairy tale for them and ask them to sculpt an object involved in the events of the story told. It should be something simple, like a pot, a ring or a star.