What are modular paintings
A modular painting is several canvases that are combined into one composition.
There are many options for the arrangement of elements:
- symmetrical arrangement in the horizontal plane;
- displacement and asymmetry horizontally and vertically;
- mixed vertical-horizontal;
The most popular are variations with symmetrical and asymmetrical offsets - they literally change the space of the room. It’s amazing how using this design technique you can achieve a visual increase in space. This is very important for arranging the interior of a small room.
Depending on how many parts the overall picture consists of, they are distinguished:
- diptych – 2 canvases;
- triptych – 3 canvases;
- polyptych - more than three canvases.
There are no strict rules for interior design using modular paintings. In addition, with the current capabilities of printing, you do not need to be an artist to make such a composition with your own hands. Isn't this a challenge for a truly creative person?
Ways to hang photo frames
Now that you know how to make your own photo frames, you have several options for hanging them to display your memories. Since these cheap photo frames are easy to make, you can create a wall filled with different photos.
To give cohesion to all the different frames, use just a couple different base colors and keep the design consistent. Another fun photo framing idea is to turn your crafts into photo frame decorations.
To make photo frame decorations, simply glue a small loop of string to the back of the frame. These photo frame ideas will not only allow you to surround yourself with your favorite memories, but they are also great gift ideas!
Required materials and tools
The main part can be made from a variety of materials. These could be images on paper that were printed in fragments on a regular home printer, paper with pictures from a printing house, wallpaper with a design you liked, fabric with a print, and so on. The material from which the frame will be made depends on the selected front part. A wooden frame is ideal for fabric, photo wallpaper is best glued to foam sheets, and paper attaches well to chipboards.
So, to make from wallpaper or other material you will need the following:
- Printed images.
- Thin wooden slats, polystyrene foam, chipboard and so on.
- PVA glue.
- Tape measure or meter.
- Construction stapler.
- Pencil, marker, chalk, soap.
- Scissors.
Three simple picture frame materials
Working with wood is difficult, but working with plastic is impossible. Therefore, enthusiasts began to look for materials that are found in every home, are suitable for processing and are easily deformed to obtain a specific shape.
Among such materials were identified:
- Paper;
- Cardboard;
- Skirting board.
The corresponding "troika" is available and may be needed for practice in making picture frames. Once your hand is full, you can move on to wood.
Types of modular paintings
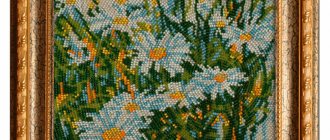
Modular painting made of fabric
Those who don’t know how to make a modular painting themselves should understand the types, or rather, the materials from which the canvas can be assembled. Types of materials for paintings:
- Textile.
- Wallpaper, possibly photo wallpaper.
- Photo.
- Colored paper.
The canvases look good if you draw them with your own hands, using canvas and gouache, but this requires a good master, which a class can demonstrate. Without artistic skills, the product cannot be made. Making a modular painting is not difficult, so anyone can make a similar decoration for their home, even without creative inclinations.
Types of modular paintings
The main component when working with finished paintings is accuracy in work. The object can be placed diagonally, along certain lines, or abstractly. The module and its shape will create a certain effect. They are divided into:
- Square.
- Round.
- Arbitrary.
Of course, the easiest way to create a segment is the correct geometric shape, namely rectangular.
Choosing a form and plot
Before you start working, you need to decide on the theme of the image. What do designers advise?
Universal solutions for the living room - landscapes, abstractions or views. For those who love calm tones, photo wallpapers depicting an old city or a cozy fireplace will be an excellent choice. Those who prefer dynamics should pay attention to scenes with cities at night, roads and skyscrapers of megacities or cars. As for the color palette, the main thing is that it fits harmoniously into the overall concept of the interior.
Floral motifs, sea waves or birds would be appropriate in the bedroom.
If you want to make a modular picture for a children’s room with your own hands, then choose images in soft warm tones. This could be a plot with your child’s favorite cartoon or fairy-tale character, butterflies or cute animals (for example, a friendly little kitten).
When deciding on the shape of the segments of the future painting (rectangular, triangular, square, wave-shaped fragments), keep in mind that it is rectangles that will most advantageously emphasize the vertical space and improve the perception of the finished work.
Making modular paintings with your own hands
Before starting work, we will need to prepare a small arsenal of materials and tools that can be found at home or at the nearest hardware store. The canvas itself with the image can be printed on your own printer or ordered from a printing house. Many people make a picture frame themselves from bars and fasteners, but we recommend purchasing a ready-made one for the first time.
We prepare everything you need
First of all, choose a canvas: print, write or use photo wallpaper. Next, you will need to choose what the image will be attached to.
- Make a frame from timber.
- Buy a ready-made stretcher at an art store.
- Use a photo frame.
- Attach the painting to drywall, fiberboard or plywood.
For all options you will need to stock up on the following materials:
- glue - if you use wallpaper or photos;
- stapler - useful for securing the canvas (if you use it);
- scissors - for cropping images.
Now let's move on to a detailed guide on how to make a modular painting with your own hands with step-by-step instructions.
Step-by-step instruction
When you have selected a drawing, prepared the material and frame, you can move on to the step-by-step instructions with a photo example.
- Take a fabric of a suitable size and place the frame on it. Stretch the fabric and leave a couple of centimeters around the edges, and cut off the excess.
- Make sure that the fabric lies neatly and that there are no folds in the design. If you did everything correctly, use a stapler to secure the fabric. If in your case there is paper or a photo, you can glue them.
- The module is ready, now you can hang it on the wall.
This way you can make a picture from modules or divide the photo into several parts, it all depends on your imagination. The main thing is to understand the essence of this DIY, and then it will be easier.
Now you know how to make modular wall paintings with your own hands. We gave an example with classical abstraction, and we suggest you try experimenting with images so that different modules create one picture.
Logarithm of frame manufacturing
Step-by-step instructions will help you figure out how to properly make a picture frame. After all, even a small detail can distance us from the expected result.
- Prepare all the necessary tools and organize a place so that you can craft without worrying about the little things.
- Measure the canvas accurately. An extra centimeter can hide part of the picture, or, on the contrary, reveal corners that have not been drawn.
- Free up time for creativity, because in a hurry, mistakes and sloppiness are possible.
Modular paintings from photo wallpapers
- Several slabs of foam plastic should be prepared.
- Then you need to apply markings on them that correspond to the sizes of future fragments of the composition and cut the material according to it. It is best to use a special thermal cutting machine, but this tool is quite expensive, so it is not advisable to buy it to make one painting. You can take a utility knife and carefully trim the foam.
- Then you need to cut the photo wallpaper, leaving 1-2 cm for overlap.
- At the end, the wallpaper is simply glued onto the prepared base and ironed thoroughly.
You can make a beautiful modular picture from photo wallpaper very simply and without extra financial costs. Creating your own masterpiece is quite simple. Even a novice master can cope with this task; it is only important to follow the above recommendations and act as carefully as possible.
Module design methods
The main thing is to fix the photos on the frames. There are three ways to do this. The first is to design the module like a picture and frame it with a thin, simple frame. Frames can be ordered or made. It will not be easy to buy, since non-standard sizes will be needed. Another option is to split the image to fit the dimensions of the purchased frames.
Make stretchers according to your dimensions and stretch photographs onto them
The other two methods are conditionally frameless. In the sense that there is no decorative frame. The methods have only a slight difference. With frameless stretching, the canvas is wrapped on the back side of the frame and secured there with staples. There is part of the canvas on the sides. This part may be painted over (usually white or black) or may have an image. This is the difference - whether there are images on the sidewalls or not. If you choose the option with an image on the side of the frame, you will need to cut the modules taking into account this “twist”.
How to attach the module to the frame (photo instructions)
The best impression is made by a painting printed on canvas. And so that this impression does not spoil, the canvas must be correctly stretched onto the frame. Frames for modular paintings are usually made from planed wooden planks 20 mm thick.
Modular paintings are stretched onto such frames
It is better to connect the planks at an angle of 45° with glue, but you can also end up by tightening two self-tapping screws. It is important that the angles are 90°. And one more thing - you need to “sink” the heads of the screws so that they do not tear the canvas. If the module is large (at least one of the sides is larger than 50 cm), install additional corners in the corners. If the length/width is more than 80 cm, it is better to make a spacer in the middle of the long side.
Preparing for tension
If the frame is made of a 35*20 mm bar, the stretched canvas must be at least 50 mm larger in size. We lay the frame on the back side of the module so that the edges of the image fit exactly on its edges. You can use a marker or pencil to mark the outlines. We bend the edges of the canvas inward along the contours. All four. Lay out the frame again.
We fix the canvas to the frame using a stapler
Using a construction stapler and staples with a wide back, we fasten the canvas. We place one staple on each side in the center. First from above, then, slightly stretching the canvas, from below. Likewise on the right and left.
Securing the edges
We install more brackets on the sides. We make sure that the canvas does not have folds or creases. We wrap the canvas in the corners so that it sticks out to the sides (as in the right photo above) and install another bracket.
Forming an angle
Place the frame on edge. We bend the upper part of the canvas as in the left photo above. We immediately form a fold from the side “overlap”. The fold should be exactly at the corner of the frame. We stretch the fabric (check that there are no wrinkles on the front part) and fold the fold onto the back side of the frame, securing it with a staple. We repeat similarly with the remaining corners.
Read more about decorative paintings
Decorative paintings usually consist of 2-3 or more canvases, and if you combine them, you get a full-fledged image. They are usually arranged like this:
- horizontal or symmetrical;
- the image can be shifted vertically or horizontally;
- You can also mix them and hang them horizontally or vertically.
We have given small examples of a typical arrangement, but the most important thing is that there is no special rule for how to arrange them correctly - it all depends on your imagination.
Interesting information: modular paintings of two or more canvases visually increase the area of the apartment. Owners of smart apartments can take note.
These images even received certain names, which depend on the number of paintings. For example:
- a couple of modules - a diptych;
- painting of 3 parts - triptych;
- images of 3 parts are called polyptych.
In this direction of decor, you can experiment without boundaries and create canvases in any design.
Types of paintings
Before you make decorative paintings with your own hands, you need to understand what types there are and what material can be used. Let's begin! What can the canvas be made from:
- regular fabric;
- wallpaper: vinyl, non-woven or photo wallpaper;
- printed photographs or drawings (think about the size of the layout in advance and print the images at a printing house);
- colored paper;
- self-painted paintings.
It became popular to paint canvases yourself, decorate them with different decor and give the picture volume. Handmade lovers are experimenting with modular paintings and placing objects along different trajectories: square, round or arbitrary.
Tip: if you are good at Photoshop, you can process each image in advance, including the canvas size. Also in the program you can estimate how the finished modules will look together.
How to make a paper frame?
Paper is the most common and easiest material for thematic production.
If the paper is newspaper, then its frame is suitable for black and white photographs. It’s better to frame children’s art or family photos with colored “papyrus”.
If you are wondering how to make a paper frame for a picture with a good subject, then the finished thematic frame should be painted with quick-drying acrylic paint.
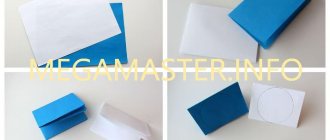
In general, paper frames are made using the folding method (as gift boxes are made) and the woven method.
In the first case, the following operations are performed:
Note!
How to make wooden shelves with your own hands - original design options
Kinusaiga technique for beginners: what is it, a description of creating paintings from threads
- How to weave a figurine from rubber bands: how to learn to weave animals, toys and what you can make from rubber bands on a slingshot
- Use colored paper to mark a cross, the center of which is a square;
- The four protruding stripes of the cross are divided into sections for deflection;
- The cross is cut out to freely bend its protrusions under itself (to make the structure stable, the deflections are fixed with paper glue).
A wicker frame is made from many identical paper tubes. The latter are mounted on a cardboard screen (passe-partout), where there is an internal cutout for the picture.
Installation occurs using glue. To make the tubes fit better, you can tie them around the screen. In any case, the tubes must be clamped with clothespins until the glue dries.
After this, the paper frame can be painted if necessary. When the frame is ready, all that remains is to “plant” it on a paper drawing or canvas.
How to choose a modular painting?
Each room has its own characteristics, its own tasks and goals. The correct choice of decorative elements will highlight all the advantages of the room and minimize the disadvantages.
Living room
An ideal room for experimenting and using bright and rich colors. Designers advise choosing the size of the segments in accordance with the area of the room. For example, small elements can get “lost” on a large empty wall. At the same time, large segments will look ridiculous in a small apartment. Modular paintings above the sofa look great .
Bedroom
The painting for this room should be selected carefully, weighing all the pros and cons. Give preference to calm landscapes or abstract images . They will allow you to escape from worries, relieve stress and fall asleep peacefully. It is best to select an image so that the primary colors intersect with the palette used to decorate the bedroom. This way you can achieve complete harmony and incorporate a modular painting into the interior.
Children's
Don't overload your child's room with bright colors. If there are enough of them in the decoration of the room, then it is better to choose a picture in one color scheme . The baby will be interested in figures of familiar animals , but it is better to avoid abstract patterns.
If a teenager lives in the room, then invite him to make his own choice. Your favorite film actor, musician or athlete may appear on the canvas. Another interesting option is to create a composition from your own photographs .
Hallway
For the hallway, designers advise choosing the simplest images possible . This is due to the fact that people rarely stay in this room. The owners and their guests simply will not have the opportunity to carefully examine a painting with an interesting abstract pattern. Remember that the hallway sets the tone for the entire interior of the apartment, so the design should emphasize the chosen style.
Kitchen
Juicy, bright and stylish - this is the ideal combination for the kitchen. You don’t have to be afraid to experiment, but the image should still be combined with the interior of the room. Modular paintings for the kitchen are best placed on a free wall . If there is not a lot of space, then it is better to abandon the decor and give preference to more functional shelves.
Which paintings are suitable for different rooms
The living room is considered an excellent place for experimenting and combining different light and sunny colors. If there are no specific rules regarding the combination of shades, then the size of the painting should correspond to the size of the room. Oversized modular canvases will look bulky and awkward in a small living room, and small images will simply get lost in a large room.
A modular painting in the living room can be the central element of the room
When making a painting for the bedroom, it is important to remember that this is a place of rest and relaxation, so the image should not have sharp and aggressive lines and colors. For this room, a calm landscape or an abstract image is best suited. It is also very important to choose the shade of the product so that it is in harmony with the decoration of the bedroom, since a sharp resonance will draw too much attention to one detail of the interior.
Paintings in the bedroom should be in calm tones that promote relaxation and rest.
Bright colors are often used to decorate children's rooms, and their number can be very large for one room. Therefore, it is better not to do a modular painting in such colors. Also, a child is unlikely to appreciate abstraction; it is better to choose images of animals, fairy tale or cartoon characters. If a teenager lives in the room, then it is better to give him the choice, and find out in advance whether he even wants to see such a decoration in his room. You can offer several photos with friends (just print them so that one fragment contains parts of two or more photos); images with your favorite actor or musician are also suitable.
A modular painting in a children's room in the style of a child's favorite cartoon will be an excellent decorative solution.
Simple pictures are best suited for the hallway interior. This is due to the fact that residents and guests rarely stay in this room for a long time, so it is not worth spending significant physical and financial resources. But at the same time, it should be remembered that the hallway is the beginning of the home, so the modular picture must correspond to the general design style of the apartment or house.
Modular painting in the hallway
Before you make a modular painting with your own hands for the kitchen, you need to think about whether there is a place for it where the piece of furniture will not get dirty. If the wall area allows for the placement of canvas, then it is better to choose still lifes, since they are best suited for the given room.
Video: DIY modular painting (master class)
Paintings on canvas
Do-it-yourself modular paintings, created as an alternative to original canvases, imply the use of high-quality materials and specific technology. The basis for applying the decorative layer is canvas.
Artist stores offer a wide selection of different blanks, including a durable wooden stretcher with canvas stretched over it. The assortment of such stores often depends on the demand for such products, so finding materials in provincial cities can be problematic. The solution is to search and buy everything you need in online stores.
The selected pattern is applied to the finished base using any available technique (oil, pastel). Such modular paintings, made with your own hands, are a real work of art.
In cases where the image cannot be drawn, it can be applied to the canvas using a special printer. A ready-made base with a subframe will not be suitable for this task. You will need to purchase the canvas and mounting for it separately. Canvas printing is a fairly common service offered by many printing houses.
An important point: before you make a modular picture with your own hands, you should carefully plan the location and boundaries of each of its elements. The canvas with the printed design must be stretched on a stretcher, which means that each element of the composition must be printed separately with a sufficient supply of clean canvas around the edges.
The old fashioned way
Artists painted pictures when there was no trace of mechanization of production and mechanized tools. Since those ancient times, the traditional design of frames for prestigious paintings of high artistic and material value has developed.
The carved wooden frame with the painting is shown in section and from the back in pos. 1 pic:
Traditional expensive picture frame design
Mechanically (technically, structurally) its essence is that the main force load (including from the frame) is borne by the painting’s subframe (a frame made of wooden beams on which the canvas is stretched); The stretchers of large canvases are reinforced with crossbars, steel corner plates or plywood gussets. In the event of a painting falling, the frame acts as a collapsing damper - it falls into pieces, but the canvas (perhaps of immeasurable value) remains intact or, at least, suitable for restoration.
Such frames are made individually for paintings. The stretcher with the canvas is inserted into the frame and secured in it, using traditional technology, with small wooden wedges. The rope suspension is attached to the subframe.
Just because of the carved wooden frame alone, its cost is truly royal. The frame parts are connected by joinery joints, bevel tongue and groove (positions 2 and 3 in the figure on glue, and then the frame is held together in a wedge wedge, position 4. The whole technology requires a well-equipped carpentry workshop and worker(s) with solid carpenter skills -cabinet maker. This did not bother the medieval customers at all, on the contrary - since he can afford to order or buy a painting, then the frame should match it. A unique frame, a work of art in itself, frames the painting of the great master, and this lord (sir , sir, Herr) their owner - isn’t this evidence of nobility and dignity?
The original oil painting is still of great value, but line monochrome images and drawings (engravings, etchings, watercolors) in the old days were quite widespread in the homes of the middle classes and the poor. Works of applied art - embroidery, applique, modular (from real objects) compositions even more; The human attraction to beauty is eternal and ineradicable. Simpler pictures were inserted into cheaper frames made from profiled wooden slats; While there were no wood milling machines, the slats were planed into profiles manually using special planes - zenzubels - with shaped pieces of iron. Slatted picture frames are still in use today, but to make them you still need an equipped carpentry workshop, see for example. video:
Video: simple and durable picture frames (in the workshop)
How to make a modular picture from photo wallpaper
Modular paintings can be made on different bases, depending on the preferences of the person and the requirements of the interior. So with wooden dies the images will be more accurate. If a more voluminous panel is required, foam should be used.
What you will need to create a modular painting:
- photo wallpaper;
- Styrofoam;
- cardboard;
- colored or white paper;
Modular picture from photo wallpaper
- PVA glue;
- threads;
- scissors;
- stationery knife.
- Select photo wallpaper, outline and cut out a fragment of the desired size in a square or rectangular shape.
- Cut the cut fragment vertically into several more pieces. It is best to divide the picture into 3-5 fragments.
- Take a plate of foam plastic, measure out rectangles on it that correspond to the fragments of the picture, cut them out with a stationery knife and sand the edges.
- Glue the parts of the picture onto the foam plates using PVA glue.
- Cover the sides with paper of the appropriate color.
- At the back, using thread and cardboard, make loops for attaching the pictures to the wall.
Advice. Instead of polystyrene foam, you can use plywood, a sheet of chipboard, or thick cardboard. But if you haven’t found the photo wallpaper you need, you can select a suitable image on the Internet and print it on a special printer.
How to make a plinth frame
Many people, after renovation, are left with plastic skirting boards, which are very similar to a wooden molding. If you paint the trim strips brown and their patterns light, you won’t have to wonder how to make a picture frame out of wood.
This is because a wonderful analogue will appear before your eyes. All that remains is:
- Measure according to the area of the drawing or canvas;
- Cut into four fragments so that the ends of the latter are sharp;
- Glue the fragments together and frame the plot with the finished frame.
Skirting boards can also be glued to a mat so that the frame has a back wall, so that it is strong and convenient for attaching a picture, if it is paper.
Modular paintings in the interior
An excellent addition to the design of the room will be original do-it-yourself modular paintings made from wallpaper. The master class for making them, discussed above, will allow you to create unique masterpieces; you just need to take into account that for each room you should select images that correspond to the overall design so that the atmosphere is harmonious.
Paintings for the living room
Paintings with city landscapes will look natural in the living room. Within the framework of modern stylistic trends, it is better to choose monochrome or not too bright color photo wallpapers with skyscrapers, bridges and roads of large cities.
To complement a living room decorated in modern or high-tech style, unusual, abstract or clear geometric images are suitable.
Compositions with various floral prints, as well as photo wallpapers with flowers shot in macro mode or just close-up are quite universal.
Paintings for the bedroom
The main condition for a comfortable stay in the bedroom is to create a suitable relaxing environment. Modular decor for this room should be selected based on the overall design of the room, but be sure to avoid oversaturation with bright shades. Natural landscapes that depict mountains, trees, forests, fields, sea, sunsets are considered universal.
Floral images are also very popular. They can be contrasting or match the overall color scheme of the bedroom.
Paintings for the kitchen
To make it easier to care for a painting in the kitchen and preserve its original appearance for a long time, it is best to place such decor above the dining table, away from the stove and sink. The ideal choice is plot motifs related to food in one way or another.
Most often, the kitchen is decorated with images of fruits, pastries, tea and other drinks. With the correct selection of shades, such paintings fit optimally into the surrounding environment.
Unusual bright scenes made in different styles also look impressive.
An excellent way to diversify the interior and add new interesting accents to it is to use modular paintings created with your own hands from wallpaper.
A master class describing a simple technology for making such decor, discussed in this article, will allow you to make original hand-made creations that can give a particular room a certain zest.
Original paintings on the wall from several parts: photo ideas
Many people spend hours searching for ideas for this or that modular painting. As a non-professional designer, it becomes more difficult to determine which one will fit in one of the rooms. There are also many styles of these bright decorative elements - modern, impressionism, classic, oriental and many others. To choose the appropriate option, look at examples of composite paintings and how they can look in the interior.
Art Nouveau style
If your interior is more fashionable and modern, then you need to emphasize it correctly. Composite paintings designed in the Art Nouveau style will help with this. It does not imply the presence of a plot, but rather carries within it a certain abstraction of lines, figures, patterns and their intertwining.
For kitchen
When choosing an image for a composite picture in the kitchen, keep in mind that its shades should contribute to the digestion process and appetite. It's green and red. For the kitchen, standard options with still lifes, juicy fruits or mesmerizing landscapes are more often used.
Video lessons
As can be seen from the manufacturing algorithm, modular paintings consist of only a few parts: you only need a base and fabric, paper or canvas for the final design. Next, everything needs to be connected correctly - and the picture is ready. For those who prefer things made on their own, such master classes will be especially useful. They are described more clearly in videos, after watching which it is easy to construct any composite picture.