Furniture made from hemp looks organically in a modern home.
Its main place is the interior, decorated in eco-style. Help : eco-design includes not only natural materials in interior decoration.
This also includes recycling or reuse of used items or materials. Eco-style is distinguished by the use of: wood, stone, green plants and ekibana, bamboo and rattan. See also : Ecological interior style. ⇒
How to make a stump with your own hands for crafts
A few simple methods using available materials will help you create a real forest corner in your home.
What can be made from old stumps?
Human fantasy is truly endless! Sometimes you surprise yourself - where do ideas come from? Moreover, even the most ancient thing can be used if desired. So it is with an old stump or snag, which not very enterprising people will most likely throw out or burn. But don’t rush, because you can give it a second life. You ask how? And we will answer - very simply!
An old stump can become furniture, which is so necessary in the garden, or part of it, for example, a chair for children and adults, which depends on the size of the stump. If it is tall, then you can use a chainsaw to cut out a part so that you get a back, and if the stump is also very large in girth, then you can make armrests and you will have a large chair.
Small, low stumps are perfect for the playground. The upper cut needs to be cleaned and sanded; a colored design can be applied on top with paints.
The chair immediately suggests making a table, where it is so pleasant to drink a cup of tea under a spreading apple tree in the shade. Our stump can become both a support for the tabletop and the table itself, if the size allows. In the first case, you must first level the surface of the stump and treat it with special impregnations that will prevent it from rotting.
Then on the sides, parallel to each other, we nail two planks, and on them we nail two more perpendicularly. After that, we knock the boards into a tabletop of any shape you like, and fasten it with nails to the planks below. This is one of many options. To ensure that the product serves you for a long time, coat it with varnish.
You can also make other DIY tree stump crafts that can be used as garden sculptures. For example, a bright fly agaric will become an accent on a green lawn or under a spreading bush.
The stump will be the foot of the mushroom, and make the cap from an old bowl, which must be covered with red spray paint, and when it dries, paint white spots. You can also paint the leg and even draw a face on it and thereby revive the fly agaric. Thus, you can make not only fly agaric, but also other mushrooms.
With a little imagination, you will have a one-of-a-kind stump sculpture.
Also, a stump can become a pedestal for any sculpture, a plant in a tub, and even a barrel of water for watering the garden.
And what beautiful containers for plants can be made from stumps! To get a flower pot, you just need to remove part of the core, add drainage (expanded clay) and fertile soil and plant the plants. The young will look very beautiful, for which about 4 cm of soil is enough.
And if the stump is large, then it can be used as a flowerpot and a pot of flowers can be inserted into it. Or cut out the middle to a depth of 25-30 cm and arrange a real mini-flower bed.
To do this, again make a drainage layer of 5-10 cm and pour about 20 cm of fertile soil. And then you plant various plants.
Climbing species (ornamental strawberries, petunia, nasturtium, etc.) will look beautiful in combination with low-growing annuals and annuals. Such a decorative element will be an excellent addition to larger landscape compositions.
Doll stand
The forest throne for Baba Yaga or Little Red Riding Hood is made from corrugated cardboard, PVA glue, toilet paper, rope or old woolen threads.
- Make a mark on the canvas (you can use a cardboard box) 5–7 cm wide and make notches with scissors without cutting the material all the way;
- Leave a hem at the top and bottom of 2 - 4 cm;
- Cut a round tabletop onto the top of the cylinder, and decorate the bottom with a base resembling rhizomes;
Glass table
If a rough wooden table in a farmhouse style does not fit into the exterior of the site, we suggest you make it lighter and more elegant. To do this, you will need tempered glass or high-strength polycarbonate, from which a round tabletop will be cut. First you need to make a wooden frame, which can be painted in a suitable color, because it will be visible from under the transparent surface.
Decorating a craft made from logs
- Apply acrylic putty to a dry blank. To do this, dilute it with water to the consistency of liquid sour cream. We put two or three layers on top to cut through the “annual rings” of the tree;
- From above, on a still damp surface, we randomly draw a wood pattern with a sushi stick;
- We paint the workpiece with acrylic paints in brown and gray tones;
- Finely chop the green threads and sprinkle on the rhizomes coated with Moment.
When the structure is completely dry, it can be coated with hairspray to better fix the paint.
Master class “How to make a tree stump from cardboard”, watch the video at the bottom of the article
How to treat a stump for the interior
To create a table or cabinet, you need to find a suitable stump and process it correctly. The bark can be removed with a chisel, or you can leave it on.
Cut to the required size
Removing bark from a stump
The sections of the stump should be sanded using sandpaper and then the stump should be cleaned of dust. Treat with a layer of primer and open the stump with several layers of wood varnish.
Sand the stump using sandpaper
Apply water-repellent impregnation
If the future table is intended for the bathroom, you need to apply a water-repellent impregnation.
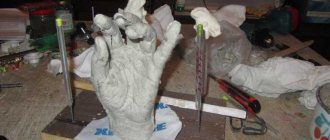
Papier-mâché craft
If there is no corrugated cardboard in the house, plastic bottles or cups are used for the base of the stumps.
You will need: a drawing of a stump, toilet paper, PVA and Moment glue, acrylic paints. And decorative figurines of mushrooms, insects or animals can be made from polymer mass or cold porcelain.
- Make a sketch of your future craft.
- Degrease the plastic base with an alcohol solution or nail polish remover;
- Dilute PVA in a ratio of 2x2 to part water;
- Tear toilet paper (choose the cheapest gray color) into fragments of 20 - 25 cm and dip, one by one, into the adhesive solution;
- Glue the soaked paper pulp onto the base, pressing it with your fingers so that irregularities are formed that convey the structure of the wood. To make the product expand towards the bottom, start working from the bottom;
- Gently press the top edge with your fingers to form a circle.
Increase the volume of the toy with layers of paper so that grooves are formed. To do this, fold the pieces of paper like an accordion and stick the “bark” horizontally.
Mask the joints with a finishing layer of paper around the perimeter.
Note!
How to make wooden shelves with your own hands - original design options
- Kinusaiga technique for beginners: what is it, a description of creating paintings from threads
How to weave a figurine from rubber bands: how to learn to weave animals, toys and what you can make from rubber bands on a slingshot
Making crafts with paper
In this version, they no longer use toilet paper for papier-mâché, but pieces of ordinary newspaper. You can use brewed paste, as in the previously described manufacturing method, or you can do the work using PVA glue, since the bucket remains in the craft forever.
After gluing several layers, let the work dry thoroughly. Then you can paint the stump with acrylic paint or regular gouache.
Cooking cold porcelain
You will need: corn starch, sodium bicarbonate (or baking soda), water, measuring container for bulk products (150g), Teflon-coated frying pan, cutting board.
Step 1
Pour starch and soda in equal proportions into a heated frying pan and pour 200 ml of clean water into the dry mixture.
Step 2
Stir the solution with a wooden spatula until the thickening mixture lags behind the walls of the dish, gradually turning into a dense mass.
Note!
- How to properly make a birdhouse with your own hands from scrap materials: we create an original birdhouse according to sketches
How to make candles with your own hands: instructions for making wax, gel, scented, homemade decorative candles with a wick
What you can make from foamiran with your own hands: we create flowers, Christmas tree decorations, snowflakes, three-dimensional paintings (photo + video)
Don't be alarmed by the fizzing soda, this is a normal process of extinguishing it.
Step 3
Transfer the lump to a cutting board, let it cool slightly, and then knead like dough for 5 to 7 minutes.
Step 4
Wrap the finished ball in plastic wrap and leave in a cool place.
Important! To calculate the density and amount of sculpture material, experiment with a small piece.
Model the figures, and when they are dry, paint them with acrylic paints and varnish them.
Snag - an idea for a sculpture
Branched bends of roots, gnarled stems, powerful stumps - the best material for creating the image of realistic and fictional figures
For some, the curves are wings, while others recognize the silhouette of an animal in them. Do not limit your imagination, use wood in its natural beauty
Have you collected a collection of various branches and twigs? Try creating something more complex like this beautiful stallion creation. Thanks to movement, precise proportions and shapes, the sculpture seems to come to life before your eyes!
Notice the exotic image in the driftwood? Finalize the form, show its character to the maximum, making the figure noticeable to everyone
Old driftwood is an unusual and valuable material for impressive decorative items, furniture, and expressive figures. Most likely, we have not mentioned all the options for their use. Now you!
What other uses for driftwood can you imagine? Or maybe you already have a piece of art made from this original material at home?
Stump in the forest
For little sculptors trying their hand, plasticine can be used for creativity. This material is flexible to work with and allows you to correct mistakes.
First, think about the composition and appearance of the forest inhabitants. There are many interesting pictures of stumps for children on the Internet. Then, decide on the materials.
You will need a set of plasticine (you can use self-hardening mass), cardboard or a thin sheet of plywood for a stand, twigs for decoration, and a set of stacks.
First you need to practice and draw a tree stump and a forest clearing. Once the idea has taken shape, get to work.
DIY rutary in the city
If you don’t have a garden plot, you live in a city, trees have been cut down here, and what’s left are interesting snags and stumps, then you can decorate your yard using this idea. To implement this idea you will need:
- stumps and snags;
- dye;
- tassels;
- seedling;
- fertile soil.
If it is difficult to remove the middle of tree cuts, then just paint them; for others, remove this middle part, fill it with earth, and also paint these blanks so that they look more positive.
In this case, you can use not only white color, but also any others. Make a kind of well from the branches of cut trees, placing four in a row. Also add soil here and plant flower seedlings. If there is little sun in the yard, then use shade-tolerant plants, such as hostas, vines, ivy.
If you have a lot of driftwood, you can make interesting sculptural compositions out of them. For example, these horses. If you know how to carve wood, then try making a rutary with a sculpture of a funny person.
Birch grove
- Roll into a small cylinder from the remaining mixture. There is always little white plasticine, so it can only be used to design blanks;
- Roll the white sausage and flatten it. Wrap the base of the hemp, not reaching the bottom and top by 0.5 cm;
- Form a bark from yellow and brown thin strips: attach the strips tightly to the blank, and then roll on a flat surface to obtain a uniform coating.
Next we arrange the cut of the tree. To do this, roll out two strips, white and black. Place a black ribbon on a white background and twist it into a spiral.
Cool the piece in the refrigerator and cut it into 0.2 cm pieces. Flatten it slightly and secure the top.
Make the rhizomes from white pieces. Make small notches on the roots to make the figure more realistic.
Apply small black dots of plasticine to the bark. Connect the roots to the body.
Make figures of mushrooms or gnomes. Place “Trees” and bushes made of branches on a stand, seat fairy-tale characters around a stump made of plasticine.
flower bed
What could be more beautiful than a bright flowering flower bed in the garden? The stump left from the tree will be an interesting solution for decorating a flower garden.
To do this, make a 10-20 cm recess in the central part of the stump (leaving about 8 cm sides). At the bottom of the recess, at an outward angle, drill several holes for water drainage. Drainage should be placed at the bottom of the depression (fine gravel is fine). Fill the hole with the required potting mix.
Choose plants that suit the style of your garden. These can be either flowering or herbaceous species.
Petunia, nasturtium, ornamental strawberries and other climbing plants are an excellent option for such a flower bed. A young tree or fern will look stylish.
Wildflowers suitable for a “wild garden” are cornflowers, tagates (marigolds), and phlox. If you want to cover the entire stump, you can plant plants around it. Such a flowerbed will not go unnoticed.
Crafts made from natural hemp
Wood is an excellent material for making interior decoration items. Sometimes, looking at old driftwood, you don’t even need to come up with a craft. “Artist – Nature” itself suggests ideas for work.
Look at the interesting ideas for DIY driftwood crafts in the photo.
Master class on making luminous chairs
In this section, we would like to offer you a master class on making a craft from a stump in the form of a glowing seat, which can stand in your yard at the dacha or in the garden. So, to make a decorative, beautiful chair from an old small tree trunk, you will need the following materials:
- old, unnecessary stumps;
- sandpaper;
- luminescent paint (you can use any shade that you like best).
After all the materials have been collected, you can begin to create an interesting craft from a stump. Experts who are involved in garden interior design recommend following this master class on making luminous seats from old stumps:
- First, you should prepare the stumps so that they are the same in height and have a smooth surface.
- Next, you need to clean the top of the old stumps. To do this you need to use sandpaper.
- After this, the surfaces of the stumps need to be painted with paint of any color and wait until the paint dries thoroughly.
Once the fluorescent paint has dried, the stump seats will be ready for use. Remember that this craft glows best at night.
As you can see, creating crafts from stumps with your own hands does not cause any difficulties. Moreover, all the materials for creating a decorative product can be found in any hardware store. Therefore, get creative and try to make original and beautiful crafts from stumps that you can use to decorate the interior of your garden. We are confident that you will succeed and will not stop there.
Lamp from a stump
To make a cozy lamp for your home or garden, you will need dry stump, varnish (best suited is “yacht” varnish, adapted to changes in temperature and humidity), stain, light bulb, socket, and wire.
And also tools: fortune (hand or chainsaw), chisel, sandpaper of various sizes (or grinder), hammer and soldering iron.
Lamp “Black stump”
Hello everyone, I offer for consideration an interesting lamp that you can make with your own hands! It was made from a stump, which was then burned. When the lamp is turned on, it seems as if the stump is still burning in places. If you show a little imagination, you can make more interesting lighting; here the authors used small incandescent lamps.
In the instructions we will look at two ways to make such a lamp, one author uses more brutal and simple tools, and the second uses more modern tools. If the project interests you, I suggest you study it in more detail.
Materials and tools that will be needed to make the lamp:
List of materials: - stump; - light bulb, socket, cable; — touch dimmer; — oil for impregnating wood (or other impregnation); - screws, a piece of plywood and other small things.
List of tools: - a tool for drilling holes in wood (a drill with a feather drill or similar); - router (or hammer, chisel); - gas burner (or fire); - chainsaw (or axe); - clamps (or nails); - brush (for cleaning a burnt stump).
Lamp manufacturing process:
Step one. Cutting out the desired shape First we need to cut the desired shape from the stump, in our case it is a rectangle. Here you can use different tools; for easier and better work, you can use a chainsaw.
You can also do without a saw; one of the authors cut out the desired shape with an ax.
Step two. Hole for socket and dimmer Next you need to drill a hole in the stump for a socket with a light bulb. It is better to make the hole larger so that the light bulb does not overheat the wood.
Of course, if the stump is oak or other hard wood, it will be very difficult to drill it by hand; here we will need an electric drill. To drill holes of the required diameter, we use feather drills.
You will also need to organize a place to install the dimmer. It can be cut out with a chisel. Finally, all that remains is to make a recess in the stump into which the lid will fit. A router works well here, but if you don’t have one, we work the old fashioned way using a chisel and a hammer.
Step three. Holes in the body In order for the lamp to glow, you need to drill holes in the area of the light bulb; it is better to drill them at an angle so that the glowing light bulb is less noticeable from the side of the lamp, and the rays of light will then go in different directions. Here we also need a powerful drill, feather drills, and so on.
Step four. “Mahmoud, set it on fire!” Let's move on to burning the stump. Of course, the easiest way to do this is with a gas torch or a blowtorch. But if such a tool is not at hand, you can use a fire. The author built himself a “burner” from a stump by splitting it, removing the center, and then tying all the parts together with wire. The result is a kind of wood pipe that burns beautifully. Of course, in this case, a fire is much more interesting and romantic; at the same time, you can fry sausages and talk about life, since this process is not very fast.
We burn the stumps well, they should burn out from the inside. Well, then we extinguish, if the stump does not want to extinguish, you can hermetically cover it in a bucket or otherwise block access to oxygen. And when the stump goes out, we clean everything that doesn’t hold well with a brush.
Step five. Impregnation The workpieces must be impregnated so that the coal does not stain your hands and does not crumble. A good option is to use liquid glass; this substance does not burn and protects wood well. You can also use special oils for wood and so on. Please note that charred wood absorbs oil very intensively.
Step six. Assembly We assemble the lamp, install a socket with a lamp inside, as well as a dimmer. You can come up with a contact for the dimmer yourself, it could be a coin, it will look very good in a tree.
That's all, the lamp is ready, one touch of a coin and the lamp is turned on! The homemade product looks quite beautiful and unusual. I hope you liked the project. Good luck and creative inspiration if you decide to do this again. Don't forget to share your ideas and crafts with us!
Preparing the base
Inspect the structure of the stump for chips and depth of cracks, and then proceed to clear the tree of bark.
- Using a chisel or knife, carefully remove the bark from the stump;
- Use a chisel to knock out the middle from the bottom of the stump to install the light source;
- On the sides of the cylinder, make 3 to 5 cuts in a circle;
- The workpiece is cleaned with sandpaper and then treated with stain (it will give a pleasant shade, plus it will disinfect the log);
- Open the lamp with varnish in 2 – 3 layers;
- Insert the lamp with socket into the center of the product and connect to electricity.
Important! Crafts are made only from dry stumps. Otherwise, the durability of the varnish is not guaranteed. And also the “residents” - bark beetles and other tree lovers.
flower bed
What could be more beautiful than a bright flowering flower bed in the garden? The stump left from the tree will be an interesting solution for decorating a flower garden.
To do this, make a 10-20 cm recess in the central part of the stump (leaving about 8 cm sides). At the bottom of the recess, at an outward angle, drill several holes for water drainage. Drainage should be placed at the bottom of the depression (fine gravel is fine). Fill the hole with the required potting mix.
Choose plants that suit the style of your garden. These can be either flowering or herbaceous species.
Petunia, nasturtium, ornamental strawberries and other climbing plants are an excellent option for such a flower bed. A young tree or fern will look stylish.
Wildflowers suitable for a “wild garden” are cornflowers, tagates (marigolds), and phlox. If you want to cover the entire stump, you can plant plants around it. Such a flowerbed will not go unnoticed.
Living flower bed
If there are old or diseased trees left on the garden plot that have not been uprooted, then their stumps can be adapted into an original flower bed, which can become the center of an alpine hill.
When a “vase” for plants is selected, you need to “draw” a stump directly on its surface.
- Step back 5–7 cm from the edge of the surface and draw a circle.
- Mark a hole in a circle with a chainsaw, and then gouge it out with a chisel;
- For 2–3 days, pour saltpeter into the stump. She will “eat out” a place for future landing;
- Add soil mixture and plant the plants.
You can make working with hard materials easier by following simple tips:
- Before working with a chisel, drill as many holes as possible in the center;
- The flower container can be burned out. To do this, saturate the core with gasoline.
Woodcarving craftsmen can show their imagination by cutting out the faces of fairy-tale characters.
How to uproot a stump - the best ways
There are several ways to help remove an old stump. You will choose the one that suits you best - chemical or biological.
Chemical methods of control
First you need to do some preparatory work. The stump is removed at the end of summer, when there is no plant sap flow. First, make holes in it using a drill. Now decide which substance you will choose to remove hemp. You can use saltpeter. Then pour about 2 kg of this substance into these holes, pour in water, and cover with film or plugs.
But you'll have to wait a year. During this time, the substances will penetrate the wood and it will soften. Now it will be possible to pour a flammable mixture onto this object and set it on fire. This treatment will allow you to set fire not only to the stump itself, but also to its roots. After this, only valuable ash will remain, which can be used for gardening needs. But then do not use chemical ignition products.
If we talk about the advantages of this method, then you do not have to spend a lot of physical effort to implement this method.
But saltpeter can negatively affect nearby plants and you will have to wait a year before getting rid of stumps on the site. But if you have such time, then you can use the second method. It is less harmful than the use of saltpeter, since it implies the presence of urea. After you remove the stump from the garden plot in this way, you can plant plants here. The soil will be enriched with nitrogen due to urea and micronutrients, which include ash.
- To implement your plan, you also need to first make holes in the stump, then pour urea into it, cover it with film and wait a year. After this time, you will also be able to set fire to this object.
- If you are thinking about how to remove stumps on your property and want to do it faster, use the following method. You will remove them using herbicides. But there is an important condition here: the stump should not be old, otherwise the method will not work. You will need to apply the herbicide to the fresh cut of the stump as well as the soil around it. After this, you can remove this unnecessary object of nature. But herbicides are quite harmful to surrounding plants. Therefore, you can use a method that is completely safe for them.
- Also, use a drill to first make a hole in the stump, then add table salt here and cover it with film. After a year or a year and a half, the wood tissue will become softer, after which it can be burned.
- There are other ways that will allow you to uproot a stump. You can buy or rent a special grinder that will turn this natural object into sawdust. But it is more advisable to buy such a unit if you need to get rid of several stumps rather than just one. You can cooperate with your neighbors to make the purchase cheaper. Another option is to rent this equipment.
With the help of mushrooms
Here's another way. It is very interesting, as it allows you to turn an unnecessary natural object into a very useful one. In addition, you can get an impressive harvest from it. And the mushrooms themselves will gradually destroy the stump, turning it into dust. To do this, you need to buy oyster mushroom mycelium in the store or collect honey mushrooms in the nearest forest along with bark or sections of stump. When you bring all this to the site, drill holes in your stump, where you will place the resulting mycelium.
You need to water it and cover it with damp moss so that the roots do not dry out. Planting mushrooms is carried out only on a cloudy day, when it is not hot. Within 4 or 5 years you will have the opportunity to collect mushrooms from your plot, and after this time the stump itself will turn into dust, since these mushrooms are parasites for trees and gradually destroy them.
Deep cut
The following method will also tell you how to get rid of stumps on your site. You will need to dig a trench around this natural feature. Then use a chainsaw to cut down this remaining tree so that the cut is 5 cm below the soil level. Now fill it with soil brought from the forest. Take her under the deciduous trees. After all, such soil contains many microorganisms that will accelerate the decay of wood.
If there is no forest near the site, then take leaf humus from your compost pit and add two glasses of nitrophoska to it and put this mass on the cut. Sprinkle garden soil on top.
Planting a young tree
The following method will allow you to use the nutrients from the stump to grow another tree. Buy a seedling. Trim the stump as much as possible, using a chisel and hammer or power tools to hollow out the middle of the stump. Mix the soil with fertilizers and pour this substrate into this recess. Water this makeshift pot and plant a seedling here. It will grow, its roots will gradually penetrate the stump to end up in the ground and destroy it.
But if you want to preserve this natural object, then turn it into an element of landscape design. Check out how to do this.
Pots for flowers
Crafts made from small stumps are in demand among handmade craftsmen. Small flowerpots of different sizes will fit perfectly into an “eco-friendly” interior.
They can be placed on window sills, shelves, or hung on thick ropes or chains.
See the photo for the master class step by step.
Master class on making luminous chairs
In this section, we would like to offer you a master class on making a craft from a stump in the form of a glowing seat, which can stand in your yard at the dacha or in the garden. So, to make a decorative, beautiful chair from an old small tree trunk, you will need the following materials:
- old, unnecessary stumps;
- sandpaper;
- luminescent paint (you can use any shade that you like best).
After all the materials have been collected, you can begin to create an interesting craft from a stump. Experts who are involved in garden interior design recommend following this master class on making luminous seats from old stumps:
- First, you should prepare the stumps so that they are the same in height and have a smooth surface.
- Next, you need to clean the top of the old stumps. To do this you need to use sandpaper.
- After this, the surfaces of the stumps need to be painted with paint of any color and wait until the paint dries thoroughly.
Once the fluorescent paint has dried, the stump seats will be ready for use. Remember that this craft glows best at night.
As you can see, creating crafts from stumps with your own hands does not cause any difficulties. Moreover, all the materials for creating a decorative product can be found in any hardware store. Therefore, get creative and try to make original and beautiful crafts from stumps that you can use to decorate the interior of your garden. We are confident that you will succeed and will not stop there.
Furniture “Three Bears”
Furniture made from sawn wood is very popular. For example, if you screw on furniture wheels and cut out a tabletop from plexiglass, the bedroom will be decorated with two bedside tables or a coffee table.
And chairs made of hemp will fit perfectly into a kitchen in a “rustic” style, which will complement the number of seats when guests arrive.
Stump, as an ornamental material, is very interesting due to its natural properties. It can be decorated to your liking, or you can simply treat it with clear varnish to admire the unique structure of the wood.
Unique designer lamps made of wood that you can make yourself
Wood is an ideal material for all kinds of crafts, which has been popular for centuries. Even in our high-tech age, when solar panels are honored, sometimes you really want the natural warmth that comes from wood.
Lamp made of wooden slats
A wooden slatted floor lamp that will become the centerpiece of your living room.
Curved wooden lamp
A luminaire of a non-standard shape with a thin body made of pressed veneer.
Wood wall lamp
A small wall lamp that you can create with your own hands from cutting a wooden block.
Floor lamp from an old pallet
A simple but original floor lamp that can be made from a sawn wooden pallet and a glass jar.
U-shaped wooden lamp
U-shaped lamp made of wooden slats and covered with thick linen thread.
Lamp made of wooden slats
A lamp that can be made from ordinary wooden slats and will be a real find for a professional designer.
Wooden base for lamp
Old pallets can be used as an original and practical base for small homemade lamps.
Frame for a chandelier in the shape of a box
Wooden frame for a box-shaped chandelier with three frosted glass shades.
Piece of art
Luxurious wooden chandeliers that look like real works of art.
Driftwood lamp
Table lamp made of treated wooden driftwood and a neon stick built into it.
Extraordinary wooden lamp
An unusual wooden lamp with a mechanism for regulating the frequency of light.
Lamp made from untreated stump
A lamp made from an untreated wooden stump that will create light and romantic lighting in any room.
Table lamp that will surprise guests
An original table lamp made from a raw piece of wooden stump that will fit into country and eco-style.
Simplicity and functionality
A simple wall lamp that can be made from two old boards and a glass canning jar.
Multifunctional driftwood
A piece of driftwood that can be used as a candlestick and a small lamp.
High technology design
Stylish wooden wall lamp in high-tech style.
Chandelier in the shape of a bud
A delightful flower-shaped chandelier made from thin pressed wood sheets.
Built-in halogen lights
A massive wooden beam with small halogen lamps built into it.
Lamp on a wooden board
A classic lamp mounted on a regular wooden frame in the form of a treated and varnished board.
Stump: photos of crafts made from natural materials
Please repost
0
Idea #4 – decorate the stump with flowers in pots
We have already told you how you can decorate a stump with flowers that are grown in it, but there is another option for this decoration. If there are several branches left on the stump, you can hang the same flowers on them, but grown in pots. They can look very impressive.
Even if there are no branches, a flower pot can be placed on or around the stump itself, creating a special aura of flowering and ongoing life. Stumps look great as a decorative stand for flower pots with plants, if they are thoroughly sanded, allowing the wood to show its texture.
Despite the simplicity of this composition, it looks very impressive and distinctly rustic: it is perfect for country style
But we should not forget that a tree located in an open area needs protection - impregnations that will resist rotting.