Making a profile ruler with your own hands
The ruler will measure 50 cm in length, and the length of the rods will be 30 cm. This is quite a large size, but using the same principle you can make a smaller ruler.
- Two blocks of dense wood (for example, larch). Bar profile 2 cm / 5 cm, length 50 cm.
- Wooden rods are 30 cm long. Their number depends on how wide they are. Rods can be ordered from a carpentry shop; you can use ready-made ones (bamboo/wooden skewers, cosmetic sticks, etc.). You can also use welding electrodes as rods.
- Felt.
- Glue.
- 2 bolts, 2 nuts, 2 washers.
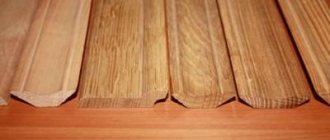
So, two 50 cm bars are, in fact, the basis of our profile line. You need to cut the felt to the size of the bars, leaving 2-3 cm on both sides.
Next, glue the felt to the bars, as shown in the photo. It is better to apply glue to the bars and place felt on top and smooth it out.
Gluing felt onto bars
The next step would be to install amplifiers along the bars, since our line will be quite long. They will strengthen the structure and prevent the bars from bending. To do this, you need to glue pieces of dense wood with a profile of 1.5/1.5 cm, as shown in the photo.
Strengthening the structure with additional bars
Next you need to place several rods between the connected bars, press them down and measure the distance between the edges of the bars. Now you need to saw off two pieces of wood to fit this gap and glue them along the edges of the bars. This will be their support after installing the bolts. This way the clamping force will be distributed evenly between the rods.
Measuring the distance between the bars with inserted rods Gluing the support bars of wood
The next step is to drill holes for the bolts. No need to drill through felt. It is better to drill holes separately on both sides and use something sharp to make a hole in the felt.
Now insert the bolts and place washers under the nuts. With the nuts loosened, insert the rods.
That's it, the profile line is ready! Thanks to the felt, the rods slide easily inside the ruler. Now you can measure the profile and secure the result by tightly tightening the nuts on both sides.
Let's start making homemade products
First of all, we saw off two wooden blocks (it is advisable to use hardwood) 33 cm long.
In each of the blanks we select grooves to fit the dimensions of a metal ruler 30 cm long.
Next, we cut the wooden strip to size and glue all three parts together.
Next, from each wooden block (only from different sides) we cut off a piece 3 cm long. Glue them to the rulers using epoxy glue.
We insert metal rulers into a wooden case. One ruler is inserted on one side, the second on the other.
At the end, all that remains is to drill holes in the bars and install furniture nuts. We screw in the fixing wing screws.
We cover the homemade body with stain and then varnish (or you can use mineral oil for wood).
For details on how to make a ruler for measuring internal dimensions, see the video below. This idea belongs to the author of the YouTube channel Far East Wood
.
Source
Another homemade template ruler
Now let's look at an interesting budget version of the profile line, which is very easy to manufacture.
To make it, we only need corrugated cardboard and bamboo skewers.
Take the corrugated cardboard from the packaging box and cut a piece of the length you need. There is no need to make the cut too narrow. Do something like in the photo above.
The advantage of such a ruler is that it can be made to any length. It can also be easily bent as you need. The rods will not tangle as each has a separate section. The sections of cardboard inside are rough and the rods (skewers) “sit” quite tightly in their places. If desired, you can modify this design. You can increase the rigidity of the cardboard by gluing a denser material onto it. The disadvantage is that the rods cannot be firmly fixed after measurement.
More interesting articles:
Forming the rear window tint film
Ruler with markings from a notebook sheet
When there is a need for certain measurements that allow an error of one or two millimeters, you can quickly make a ruler from an ordinary notebook sheet in a box. As we all know, the length of one cell on a standard notebook sheet is five millimeters. Therefore, two cells will make one centimeter. Mark the required length of the ruler using a pencil or pen and cut the ruler with scissors. Ready. You can use it. Even a child can make such a ruler, as you can see by watching the video supplement to our article.
Ruler made from strips of cardboard
Sometimes it is necessary that the ruler be sufficiently solid and that the markings be present. And it took a little time to make. In this case, cardboard will come to the rescue as the thickest type of paper. You can use a pure white sheet of cardboard, cutting out a piece of the required size from it. You can paint it with non-staining paints or cover it with stickers. The markings are applied to the ruler by combining a ready-made cardboard ruler template with the same checkered notebook sheet.
Closing line: jaskravyjsvit
You can make such a line yourself.
To do this, you need to glue the layout of the divisions onto the primary line. The layout will be lower. Master class with the preparation of the ruler: How to make a cutter's ruler with your own hands in 10 minutes. The cutter's ruler is designed for constructing a pattern to scale, modeling clothes and calculating fabric consumption when cutting. The cutter's ruler, in addition to the usual scale, has a special scale, where each centimeter is divided into several divisions (each division is a centimeter on a scale). The classic ruler of a cutter has a scale of 1:4, but in modern literature there are drawings made on a scale of 1:6, and patterns of small parts (cuffs, collars) in scale 1:3. Therefore, there is a need to have a universal set of scale rules. Making such a set of tailor’s rules is not at all difficult.
Print the pdf file at 1:1 scale (make sure your print settings are set to print sheets at actual size).
Checking the printed ruler
Make sure that the markings on the ruler of the printed sheet correspond to the markings of the stationery ruler.
“Laminate” the ruler with tape
“Laminate” the ruler with tape (in this case we mean adhesive tape).
Carefully cut the ruler with scissors or using a stationery knife.
LiveInternetLiveInternet
–Categories
- ASIAN CUISINE (236)
- ANIMATION (2)
- AIR GRILL (6)
- LIBRARY (45)
- VIDEO (40)
- EVERYTHING FOR YOUR DIARY (54)
- EVERYTHING FOR PC (500)
- EVERYTHING AT YOUR HANDS (81)
- KNITTING (2509)
- DESSERT (1482)
- DESIGN (11)
- HOME BEAUTY SALON (421)
- PREPARATIONS AND CANNED PRODUCTS (110)
- LAW AND ORDER (106)
- CASUAL GAMES (2)
- SEWING & CRAFTS IDEAS (221)
- ISOTERICA (297)
- LEARNING FOREIGN LANGUAGES (171)
- INTERESTING (216)
- INTERIOR (152)
- CINEMA (118)
- CINEMA HALL (66)
- BEAUTY AND HEALTH (1573)
- COOKING (4714)
- CUISINES OF THE WORLD (379)
- LANDSCAPE (4)
- MICROWAVE (106)
- MUSIC (117)
- NEED TO KNOW (292)
- DRINKS (76)
- EDUCATION (57)
- STEAMER (15)
- REmodel (80)
- UTILITIES (839)
- USEFUL AND INTERESTING LINKS (156)
- POLITICS (357)
- JOKES (82)
- PSYCHOLOGY (79)
- TRAVEL (85)
- PATCHWORK (6)
- REPAIR (111)
- HANDCRAFTS (448)
- GARDEN AND VEGETABLE VEGETABLE (55)
- WEDDING (6)
- SCRAPBOOKING (37)
- SOFT (88)
- STYLE AND FASHION (67)
- POEMS (103)
- KITCHEN APPLIANCES (42)
- PHOTO (1)
- PHOTO GALLERY (28)
- FLORICULTURE (122)
- SEWING (866)
-Music
–Search by diary
–Subscription by e-mail
–Interests
– Regular readers
-Statistics
for cutting new and correcting finished products
If you prefer to create or edit ready-made patterns yourself, you have probably noticed that sometimes it is difficult to draw the line of an armhole, sleeve cap, neckline or shaped details by hand without subsequent edits on paper or fabric. Two factors help to avoid adjustments – experience and a convenient pattern. And if experience is gained over time, then a convenient tailor’s ruler will be a valuable acquisition just for a beginner.
What is a universal pattern?
To correctly construct a pattern, various tools are used, including curved rulers, which help to create neat curved lines - sleeve caps, armholes, necklines, curly details and darts. You can purchase a full set - a ruler for each node. Or you can limit yourself to one purchase.
A tailor's multifunctional pattern for cutting is a plastic ruler with one right angle and several curved sides and cutouts. We can say that this is a square with a curved hypotenuse. Additionally, there are holes for convenient marking of loops, buttons and notches for combining cut details. There are also rounded holes for easy drawing out of curves.
Transparent plastic allows you to see the lines on the paper and quickly adjust the drawing. The density of the material is such that you can use a roller or stationery knife to cut out parts, limiting its movement according to the drawing with a pattern.
How to use the multi-tool?
Let's say you have already purchased a multifunctional tailor's pattern for cutting. How to properly use all the functions provided in it is one of the main questions, since the acquisition is not cheap, and you absolutely don’t want it to gather dust while you try to draw the lines of certain nodes by hand, and then edit the finished layout cut.
Pay attention to the internal holes, they have more rounded sides and are convenient for creating the seam of the seat of trousers, the cuff of the sleeves of children's products, the armhole and the output of figured parts.
When rounding the waist dart, changing patterns for flared trousers, as well as smoothly drawing out the hemline, the “hypotenuse” of the ruler will be useful. A smooth bend will help to avoid unreasonably sharp protrusions of the fabric on the product.
Thus, you can use a multifunctional tailor's pattern to cut fabric and create smooth lines on a paper drawing.
Interesting additions
It also happens that the drawing is constructed correctly, the pattern corresponds to the planned product, but during assembly the originally intended chalk lines are erased. This happens especially often during individual tailoring, when it is necessary to carry out a preliminary fitting.
It is not enough to outline the location of decorative details and buttons on the pattern; you need to correctly transfer them to the fabric. And a multifunctional tailor’s pattern can also help with this. Even if you haven’t used it for cutting fabric, this tool is literally indispensable for basting loops and correcting the placement of decorative elements. This ruler will help reduce marking time and make the notches perfectly even. This will help avoid defects in the finished product and reduce the likelihood of stretching parts made from “moving” fabrics.
No less useful will be a multifunctional tailor's pattern for cutting out front details in the case when the chest dart is moved to the armhole. In this case, an incorrect bend line can lead to excessive tension at the center of the chest. Smoothing the edge of the part in this area manually is almost impossible, and the bends provided in the tailor's ruler will turn out to be an invaluable find.
Summarizing
Note that the correct use of universal tools not only greatly reduces the time needed to create a finished product, but also helps to improve the level of your skill.
Types and shape of tailor's patterns
According to their shape, the patterns can be divided into 3 categories: “corner”, “flank” and “armhole”, depending on what nodes of the drawing they allow to construct. Separately, we can highlight a flexible pattern, we will talk about it a little further.
Pattern for corners
Any pattern begins with constructing an angle. If you use unmarked paper to design patterns, you simply cannot do without such a pattern.
Rice. 2. Using the “corner” pattern to create patterns
With its help it is very easy to draw parallel lines, build corners, and the third side of the pattern allows you to draw curved lines on the side and bottom of the product.
Rice. 3. Marking the center of the part using the “corner” pattern
Patterns for a barrel
One of the most popular patterns among tailors is the “barrel” or “saber” pattern. The shape and size of this pattern may vary slightly; in some cases, using an enlarged rounded edge, you can also draw an armhole line. Typically, the ruler starts on the rounded side, which allows you to measure the rounded areas of the pattern. Using this pattern, you can draw side lines, darts, hem and sleeves, relief lines, neckline lines, etc.
Rice. 4. Using the “saber” pattern for the side line
Rice. 4. Using the “saber” pattern to construct a dart
Rice. 5. Constructing a trouser yoke using a saber pattern
Armhole patterns
The “French pattern” is the most popular among craftswomen, since it is with the construction of the armhole line that difficulties most often arise, especially at the initial stage. However, with the help of such a pattern, you can draw not only the armhole line, but also the side, hem and sleeve lines, model cutouts of various depths, mark angles and allowances, as well as the location of loops and buttons in the product. The pattern makes it easy to make adjustments and fit patterns - reduce or increase the depth of the armhole, adjust the waist line, make sleeve piping, etc.
Rice. 6. Constructing an armhole line using a “French pattern”
In Fig. 7. shows how to construct the lower section of the armhole line using a French pattern (Fig. 7).
Rice. 7. Constructing an armhole line using a “French pattern”
Constructing the front neckline using a French pattern (Fig. 8).
Rice. 8. Constructing a neckline using a “French pattern”
How to make a French pattern, a “drop” pattern and a “saber” pattern yourself?
If you have thin plastic, we suggest you make a French pattern and a drop pattern yourself. Download the patterns in full format, print them, transfer the outlines to plastic and cut out the plastic patterns using scissors. Cut out the paper pattern along the contours, stick it on the plastic, and you're done!
Using the “drop” pattern, you can design the bow line of trousers, draw the armhole line, build rounded corners of pockets and collars, mark the diameter of the buttons on the product and their location.
Rice. 9. Constructing the “bow” line of trousers using a “drop” pattern
Rice. 10. Constructing the back seam of trousers using a drop pattern
Rice. 11. Marking the location of loops using a “drop” pattern
Flexible pattern
A flexible pattern is an excellent tool for measuring non-linear sections of a pattern, and it can also be used to draw a curve of any complexity. To do this, just give the pattern the desired shape and it will hold it until you change it yourself. In addition to creating clothing patterns, it is used in quilting (for drawing and measuring curved blocks of any complexity).
Rice. 12. Measuring the sleeve edge using a flexible pattern
Construction of the waist cut of a half-sun skirt using a flexible pattern (Fig. 13).
Rice. 13. Designing the waist cut of a circle skirt using a flexible pattern
Rulers for patchwork
Patchwork is a very labor-intensive process, since it requires cutting out a large number of parts. This is when patchwork rulers come to the rescue. There is no need to mark anything on the fabric; with the help of such rulers you can immediately cut out parts of the required width and length. Marking the corners allows you to cut out parts using an oblique thread from 30° to 90°.
The size of the rulers can be different, depending on the needs of the master. By the way, wide, long rulers for patchwork (for example, 150x600 mm) can be successfully used for drawing right angles and parallel lines when creating clothing patterns.
If you plan to do patchwork on a regular basis, you will need a special healing mat for cutting and a roller blade.
Rice. 14. Cutting rectangular parts of a given size
Rice. 15. Cutting parts at a given angle
You will find even more interesting ideas on the website of Anastasia Korfiati’s Sewing School. Subscribe to our free lessons, sew beautiful things and wear them with pleasure!
DIY profile ruler template
The profile ruler is used for quickly and accurately measuring and duplicating uneven surfaces. You can read about using a template ruler in body repair in this article. Sometimes it is better to buy a tool, but in this article we will look at three options for making a template ruler with your own hands.
Making a profile ruler with your own hands
The ruler will measure 50 cm in length, and the length of the rods will be 30 cm. This is quite a large size, but using the same principle you can make a smaller ruler.
- Two blocks of dense wood (for example, larch). Bar profile 2 cm / 5 cm, length 50 cm.
- Wooden rods are 30 cm long. Their number depends on how wide they are. Rods can be ordered from a carpentry shop; you can use ready-made ones (bamboo/wooden skewers, cosmetic sticks, etc.). You can also use welding electrodes as rods.
- Felt.
- Glue.
- 2 bolts, 2 nuts, 2 washers.
So, two 50 cm bars are, in fact, the basis of our profile line. You need to cut the felt to the size of the bars, leaving 2-3 cm on both sides.
Next, glue the felt to the bars, as shown in the photo. It is better to apply glue to the bars and place felt on top and smooth it out.
Gluing felt onto bars
The next step would be to install amplifiers along the bars, since our line will be quite long. They will strengthen the structure and prevent the bars from bending. To do this, you need to glue pieces of dense wood with a profile of 1.5/1.5 cm, as shown in the photo.
Strengthening the structure with additional bars
Next you need to place several rods between the connected bars, press them down and measure the distance between the edges of the bars. Now you need to saw off two pieces of wood to fit this gap and glue them along the edges of the bars. This will be their support after installing the bolts. This way the clamping force will be distributed evenly between the rods.
Measuring the distance between the bars with inserted rods Gluing the support bars of wood
The next step is to drill holes for the bolts. No need to drill through felt. It is better to drill holes separately on both sides and use something sharp to make a hole in the felt.
Now insert the bolts and place washers under the nuts. With the nuts loosened, insert the rods.
That's it, the profile line is ready! Thanks to the felt, the rods slide easily inside the ruler. Now you can measure the profile and secure the result by tightly tightening the nuts on both sides.
Another homemade template ruler
Now let's look at an interesting budget version of the profile line, which is very easy to manufacture.
To make it, we only need corrugated cardboard and bamboo skewers.
Take the corrugated cardboard from the packaging box and cut a piece of the length you need. There is no need to make the cut too narrow. Do something like in the photo above.
The advantage of such a ruler is that it can be made to any length. It can also be easily bent as you need. The rods will not tangle as each has a separate section. The sections of cardboard inside are rough and the rods (skewers) “sit” quite tightly in their places. If desired, you can modify this design. You can increase the rigidity of the cardboard by gluing a denser material onto it. The disadvantage is that the rods cannot be firmly fixed after measurement.
Manufacturing of marking tools
We cut two pieces of sheet metal and glue them to one of the plates. Then we grind down the edges using a grinder or a grinder.
Place a second metal plate on top and drill a couple of holes. We cut the thread and screw in the two mounting screws.
Then you will need to drill one hole on the other side of the homemade body. We cut a thread in it and screw in a piece of a pin (fix it with glue).
The master makes a homemade wing nut from metal and screws it onto the stud.
After this, we insert a metal ruler into the body and secure it with a wing nut. The homemade product is ready.
You can watch the step-by-step process of making a homemade tool for marking workpieces in the video below.
Source
Profile bending without turning: price, parts, tools
Having decided to make a profile bending machine with his own hands, the master asks himself the following questions:
- Will a lathe be required?
- How much will a homemade product cost?
- Isn't it cheaper to buy a profile bender in a store?
To answer them, we’ll immediately show what portal participant Pin008 did.
And this is an example of work performed by a profile bender.
And this is a video showing the operation of this homemade pipe bender for a profile pipe.
If you are interested in a homemade pipe bending machine Pin008, then to make it you will need:
- bearing unit UCP 204 – 4 pcs.;
- straight channel 8 (shelf base height 8 cm, shelf width 4 cm) – 2 m;
- diamond jack from a passenger car;
- bearing 156704 – 3 pcs.;
- threaded rod M20;
- M20 nuts;
- washers for M20 stud;
- bicycle sprockets - 2 pcs.;
- bicycle chain.
- Bulgarian;
- powerful drill;
- welding inverter.
Next, we will tell you how to assemble a homemade profile bender from these parts.
How to make a ruler to measure internal dimensions
In this review, the master will show you how to make a simple ruler with your own hands for measuring internal dimensions.
For example, such a ruler can be useful when measuring window or door openings, as well as when measuring the internal dimensions of any drawers.
To make a homemade product you will need:
- wooden block - 2 pcs;
- wooden slats - 1 piece;
- metal ruler - 2 pcs;
- furniture nut - 2 pcs;
- wing screw - 2 pcs.
You will also need PVA wood glue and epoxy glue to join the parts.
Manufacturing a machine for bending profile metal pipes
The user divided the work of constructing a homemade product into a number of sequential steps:
- I estimated the dimensions of the profile bender.
- I took the screw part from a car jack to make a pressure screw.
- I tried on the details.
- I assembled the body of a bending machine from a channel.
- Made the videos. The Pin008 axis was made from an M20 threaded rod. To do this, he cut it with a grinder into pieces of the required length.
- Stages of manufacturing a pressure roller.
- Assembling the profile bending frame. The top bar is removable for easy installation of the pressure roller.
The photo below clearly shows how to make a pressure roller for a profile bender.
Next, Pin008 made the locknuts. He did it like this:
- I screwed the nut onto the stud and secured it with a second nut.
- I clamped the workpiece with a clamp, and sawed the nut with a grinder with a thin cutting disc.
Assembled structure.
The sprockets for the Pin008 chain drive were secured to the nuts by welding.
Next, Pin008 assembled the profile bender. I painted it and used it for its intended purpose.
Because Pin008 didn’t make homemade drawings, so to clarify the dimensions of the machine, he attached a tape measure to the profile bender.
I think it’s not worth taking a smaller channel. The weight of the bed will decrease and the machine will stand unstable. The distance between the roller axes should not be less than 300 mm either. Otherwise, the load on the rollers and bearings will increase and their cages will burst. I note that the movement of the clamping screw is so light that it can be turned with one finger.
When making a homemade profile bender, remember that the smaller the axial distance between the rollers, the smaller the radius of the workpiece that is bent on the machine. But the load on the rollers will increase, and hence the bearings. The bend radius is regulated by the amount of lowering of the pressure roller, and it is limited by the height of the central part of the frame and the length of the threaded part of the pressure screw.
Materials for making educational toys
There are a huge variety of materials for making educational toys, most of them are found in every home!
Remnants of fabric
Educational toys are good because you can use leftovers that every needlewoman has for them. For example, the remains of various fabrics, felt, fleece, knitwear. Different textures are welcome!
Want to make your life easier? Use small pieces of fabric that are applied to new suits.
Those who know how to knit can use squares that are knitted to calculate the stitches.
Sewing accessories
Everything is used: laces, ribbons, buttons, beads, zippers, buttons, drawstrings, latches, adhesive tape, buckles and much, much more! And small thermal applications may well play the role of a secret hidden behind a curtain or in a pocket.
Furniture fittings
Latch latches, hooks, keys with locks and threaded screws can be used, for example, when “building” a house.
Rustling elements
The rustling of one or another element is achieved by placing a crumpled cellophane wrapper from tea or a box of chocolates inside.
Rattle elements
The rattling elements provide a huge scope for imagination. Place inside a plastic container from shoe covers or a plastic egg from Kinder Surprise, into which some cereal (rice, peas, buckwheat, small pasta), salt, dry cherry pits or acorns are poured.
Tips for making a profile bender, and how to reduce the cost of its construction
The operation of the profile bender showed that the homemade product was a success and is optimally suited for bending 20x20 mm pipes. For larger pipes, you will have to make changes to the design - increase the width of the working part of the rollers and strengthen the frame. Another point is that users who were interested in homemade products had doubts about the strength and durability of the shaft made from a threaded rod. But 5 years of using the tool have proven that the idea works. According to Pin008, during the entire operation of the homemade product, nothing broke. The only thing he would do is give up the two large washers on the pressure roller. They are simply not needed.
And he would have taken a larger width pressure bearing.
Important nuance! The lower rollers do not rotate relative to the stud , because “tightly” clamped on both sides with nuts. But the shafts themselves rotate in outer races - in bearings located in the frame supports.
This suggested to Pin008 how to reduce the cost of the design.
For the lower rollers, do not buy new bearings, but look for “dead” ones at car services. They still don't spin on the shafts. Ask your friends for the chain and sprockets, in case you have some “unnecessary and superfluous” junk lying around. Buy the stud and channel at metal collection points.
But val-lel, from his own experience, advises looking in car services for discarded timing chains and camshaft sprockets from a VAZ engine. All you need is two identical sprockets and one chain. Even if the sprockets have signs of wear and the chains are stretched, this does not matter for a homemade machine.
You can join the discussion of a homemade machine in the topic Arch profile bending without lathe.
We recommend reading the articles:
- Homemade sawhorses for sawing firewood and a wood splitter: drawings, design, use experience
- Do-it-yourself manual machine for bending reinforcement - the cheapest and simplest options for homemade reinforcement benders
- Helpers in metal work for the home workshop: a circular saw for metal, a circular cutting machine, how to cut metal with a jigsaw
Roll forming machine. What is it for?
Universal production bending machine
The purpose of the roll forming machine is indicated by its name. This is the bending of metal profile pipes in order to obtain a certain radius of curvature in the required area or along the entire length of the workpiece. Using a profile bender, or pipe bender in other words, you can perform several technological operations with rolled metal of various types:
- bending metal rods or reinforcement, including spring steel workpieces;
- bending of profile metal products of square or rectangular type;
- making elbows from round pipes or bending them at the desired angle;
- rounding of parts of any length from rolled products (angles, I-beams, channels).
There are several models of bending machines. Some allow you to apply force only on a certain area of the workpiece. Others roll the pipe between rollers, applying pressure along the entire length. For some reason, it was the latter that received the name “profile benders” from experts, although both of them directly relate to the same type of equipment. By the way, rolling a workpiece allows you to obtain a product of complex configuration without preheating, and bends can be made at an angle from 1° to 360° in arbitrary planes.
Rolling type profile bending
Just like their industrial counterparts, homemade profile benders are electrically driven or powered by muscle traction. Of course, the use of an electric motor not only makes it easier to process workpieces, but also significantly speeds it up.
Materials are selected taking into account their performance. For the base, take beams that are not curved; rust on them can occupy an area of no more than 10%. So that work does not have to be interrupted to search for missing materials, prepare the elements in advance:
- bearing units with pressed rolling rollers;
- channel, it should be taken No. 100 or 80;
- monolithic steel shafts with a diameter of at least 80 mm;
- metal rod with a diameter of 12 mm;
- steel strip with a thickness of 5 mm or more;
- bicycle chain or timing chain from a Zhiguli gear;
- engraving and simple nuts, washers, M20 bolts, the last length is 60 mm.
To make the frame, two pieces of a channel 20 cm long (for transverse guides) and two blanks of 70 cm each (for longitudinal posts) are cut. At the ends of the last two blanks, an angle of 70˚ is formed using a grinder.
Milling ruler
The author shares the secrets of making a table and ruler for a milling machine. With the adjustable pads of a homemade ruler, it is easy to rout straight and at right angles. Its design also includes a pipe for connecting a sawdust extraction system.
HOMEMADE MILLING MACHINE TABLE
Until recently, we could not buy a milling machine that would be convenient for performing various jobs. And although over time, manufacturers have saturated the market with excellent milling machines, there is still, to this day, a reason to discuss the construction or improvement of an old machine, and with your own hands. A homemade milling machine will cost less than a new one and, in addition, you can customize it to suit the use in your workshop.
But all the benefits of your improvement can be realized only with high-quality manufacturing of an albeit not very complex, but effective device. Therefore, you need to pay special attention to every detail.
The determining parameter for the quality of a milling machine as a tool is the accuracy of its working table. Ideally, the table should have a flat top, stable and massive. Therefore, the tabletop must be made from two glued sheets of 20-mm plywood. But there is a nuance here. If the sheets are warped, then there will be troubles when milling not only long, but also medium-length parts.
Table irregularities will raise or lower the part as it passes through the cutter area, resulting in an incorrectly milled profile.
When choosing plywood for your router table, select the flattest sheet you can find and lay it so that the bulge, if there is one, “looks” up. A somewhat convex surface of the table, ensuring full and constant contact of the cutter with the length being processed, is more acceptable than a table that has a downward deflection in the area of the cutter.
MILLING RULER
If the table for your router is successful, then you can think about improvements. For example, the work requires a special ruler that allows you to accurately position the workpiece relative to the cutter. This ruler can also be used on a factory-made machine.
Milling ruler
- This is a useful tool for a milling machine or circular saw. It’s easy to make it yourself by assembling several parts exactly cut from Karelian birch plywood. By changing the dimensions, you can adapt this ruler to any milling machine. Therefore, before starting to make a ruler, measure the distance from the front edge of the work table to the cutter on your machine.
Although the design of the ruler is quite simple, it will somewhat expand the capabilities of the machine and make working on it enjoyable. For novice carpenters, a groove cut into the rear end of the ruler base will be especially convenient, which allows you to quickly release the ruler mount, move it and install it closer or further from the cutter. The pin in the slot serves as a reference point for rotation and lateral movement of the ruler. Tightening the pin handle instantly secures the rear end of the ruler to the router table, and a quick clamp at the front end of the ruler locks it securely in position. What if you need to reduce your drinking a little? You only need to loosen the clamp (this is convenient to do if the clamp is located under your right hand), easily knock or push the ruler in the desired direction and tighten it again.
The ruler also has a dust collector box with a pipe attached to the back side of the ruler. The dust collector not only serves as a trap for sawdust during milling, but also serves as a rigidity element that holds the face of the ruler at an angle of 90° to the table. Although the sawdust storage unit is quite small, in combination with the exhaust system (you can also use a regular vacuum cleaner) it works very effectively.
Finally, the ruler has two separate adjustable pads that allow you to mill parts with high quality. The pads can be brought completely together or moved apart by 100 mm. This will allow you to install any cutter, and then adjust the pads so that they are at a distance of about 3 mm from the surface being processed. This ensures clean and precise milling passes with minimal chipping of the material and improves the selection of sawdust by the suction system. There is a triangular plane on the front pad that serves as a clamping handle and at the same time a good protective guard.
MANUFACTURING A RULER
All parts of the line are made from 6-mm Russian-made Karelian birch plywood. It is sold in sheets of 1500×1500 mm. To make a ruler, start by cutting out (according to the dimensions appropriate for your machine) the ruler itself and its base. Then, from the bottom side of the ruler and the front side of the base, cut out a semicircle with a radius of 50 mm. The centers of both semicircular cutouts should be located at a distance of 300 mm from the right end of each of these parts. At a distance of 85 mm from the left end of the base, cut out a 10×58 mm transverse groove for the pin securing the base of the ruler to the table.
On the ruler itself, at a distance of 38 mm from the bottom edge, cut four slits measuring 6x50 mm. Now you can glue and press the bottom end of the ruler from above to the plane of the base until the glue sets completely. The trick here is to make sure the ruler is connected exactly flush with the front end of the base. Reinforce the joint with a few finishing nails and check that the assembly is square along the entire length of the straight edge.
Then cut out the dust collector parts to size and make a 075 mm hole in the center of the back wall blank. Glue, nail and compress the dust collector housing assembly and allow the glue to set for at least a few hours. Then center the dust collector over the opening at the base of the ruler and attach it as described above, additionally screwing it to the ruler with two self-tapping screws.
Drill holes in the linings for the mounting bolts. Start by drilling 016mm recesses for the bolt heads. Drill these blind holes to a depth of 5 mm, and in the center of them drill 06 mm through holes for the bolt shanks. Drive a mounting bolt into each of them and, putting washers on them, screw in wing nuts. Attach the finished overlays with bolts to the ruler.
To install a ruler on the router table, position it so that the cutter is located exactly in the center of the opening in the ruler. Mark the position of the groove in the base of the ruler relative to the machine table. Using the mark, drill a hole in the table for the threaded rod. Cut the threaded rod to the required length, put two washers on it and screw on two wing nuts. Place the lower nut on the glue, and the upper one serves to tighten or loosen the ruler assembly on the machine table. Place a clamp at the other end of the ruler and you can start milling.
Frames and templates - a tool that makes work easier
Situations where glass has to be cut to specified dimensions more than once are especially common among craftsmen in glass workshops.
In order not to measure the dimensions anew each time, glaziers use frames and templates that have standard adjustable dimensions. This tool saves time and makes work more productive. The rectangular template allows you to adjust the tool to sizes from 15 to 100 mm, some models are equipped with a cutting head. The oval template is used to create ovals of different diameters - for this purpose, the tool has special ring attachments. The speed, productivity and quality of a glazier’s work depends on the choice of a high-quality tool for cutting glass. But this investment will be fully justified for those who want to achieve high precision glass products or will use tools for mass production.
vote
Article rating
Making Instructions: Circular Saw Guide
Anyone who has worked with a hand-held circular saw at least once knows how difficult it is to make a clear and even cut with it. Many solve this problem with the help of simple devices, such as a strip of plywood or plastic, which is fixed to the surface with clamps. However, it is much more convenient to use a special guide rail for this purpose.
Such a device is very rarely included in the package of a hand-held circular saw, and in stores it is offered at a price often comparable to the cost of the saw itself. This seems strange, because it is not distinguished by the complexity of its design. If you have the necessary materials, it is quite possible to make a guide bar yourself, which we will discuss in this article.
What are the technical requirements for the rulers?
The scale starts from the end face. GOST imposes very strict requirements on the location of this face - in relation to the longitudinal side it must be located strictly at a right angle. After the last ten-millimeter digitizing stroke, at least five additional divisions must be applied (division value is 1 mm). Tools with a rounded end are complemented by a special hole for easy hanging.
The hole diameter is 5 mm for a measurement range not exceeding 500 mm, and 8 mm for longer products. If there are two scales on the device, additional millimeter divisions are not applied, and both end faces should not be rounded and should be strictly perpendicular to the longitudinal edge. GOST defines edge straightness deviations as 0.04 mm. For products whose measurement limit is more than 1000 mm, the straightness error may be 0.08 mm. The end faces may have roughness, but its values should not exceed Ra £ 2.5 according to GOST 2789-73.
What it is?
Essentially, a guide bar is a rail that allows a hand-held circular saw to slide forward and backward while preventing the tool from deviating from the cutting line. But a properly designed guide not only ensures an even cut, it also reduces the number of chips where the saw and the material come into contact.
Homemade guides have different designs and are made from different materials. Eg:
- plywood guide;
- rail miter box from a corner;
- aluminum profile tire;
- ruler from the building code;
- external carriage on bearings.
The miter box and remote carriage are the most difficult to manufacture. A plywood guide or profile rail is much simpler in design, but this does not mean that the cut made with their help will not be of such high quality. The difference between these varieties largely lies in ease of use.
What does GOST say about measuring metal rulers?
The production of any instruments is regulated by standards. The metal measuring ruler is no exception; GOST 427-75 strictly defines the requirements for the parameters, dimensions, and appearance of this instrument. In accordance with the standards, it is produced with different measurement ranges: 150, 300, 500, 1000, 1500, 2000, 3000 mm. Tools with a small measurement range are usually used for household needs; large ones can be classified as special devices.
For example, a meter metal ruler is widely used for drawing drawings, architectural and construction plans. The main element of any measuring instrument is the scale. According to GOST, a metal measuring ruler can have one or two scales. Products with two scales can have different digitization - in one or opposite directions. Products of small sizes, as a rule, are produced with one scale. For the convenience of working with devices that have a large measurement range, two scales with multi-directional digitization are used. An example is the simplest metal construction ruler 1000 mm.
GOST determines not only the dimensions and permissible deviations in the measurements taken, but also the distances between strokes and the length of each stroke. Millimeter, five-millimeter, ten-millimeter strokes are applied on the scale. They have different lengths with a difference of at least one and a half millimeters. Strokes of the same name must be of the same length with an error of no more than 0.5 mm. The same applies to the digitization height. The marking of the rulers indicates the measurement limit and the number of scales:
- 500 GOST 427-75 - this marking means that we have a 500 mm metal ruler with one scale;
- 1500 d GOST 427-75 – metal ruler with a measurement limit of 1500 mm and two scales.
The material for production is cold-rolled steel strip. The surface of the product must have galvanic coating (chrome plating). It plays a protective role, protecting the device from corrosion. On the other hand, the presence of a coating minimizes the formation of glare on the metal surface, thereby increasing the accuracy of measurements by the master. Any measuring device always gives an error in measurements. For rulers, such an error cannot be more than 0.1-0.2 mm.
The value depends on the measurement range: the longer the fixture, the greater the deviation. The maximum possible deviation is 0.2 mm per meter of instrument length.
From plywood
This is one of the simplest universal guide options for a hand-made circular saw, and therefore it is most common in home workshops. Let us consider in detail the process of its manufacture and the principle of operation.
Necessary materials
To make such a tire you will need three pieces of plywood 10 mm thick. Their length should be the same and is usually equal to the length of the workbench on which the work will be done. One of the segments should be 25-35 cm wide (it will serve as the base), the width of the other two will be determined during the manufacture of the tire. Also prepare 16 mm wood screws.
Drawing with dimensions:
Manufacturing instructions
When creating a guide, all dimensions must be observed very accurately. Small deviations can lead to a sharp deterioration in the result. If desired, laminate can be used instead of plywood.
The plywood guide rail is made in several steps:
- Measure the distance from the inner edge of the saw blade to the rip guide groove located on the tool support platform.
- Cut one of the plywood strips so that its width is 0.2-0.5 mm less than the distance obtained in step 1. The grains of the top layer of veneer on plywood should be directed longitudinally.
- Using self-tapping screws, screw the resulting strip to a wide piece of plywood (base), precisely aligning their ends. This will be the working edge of the tire.
- Using a caliper, measure the width of the longitudinal cut guide groove.
- Screw the remaining strip of plywood to the base parallel to the first strip. There should be a gap between them, the size of which should be 0.2-0.5 mm less than the width of the groove measured in the previous paragraph.
- To avoid damaging the material being cut, a layer of soft fabric is glued to the finished guide on the bottom side.
Important: before measuring the soleplate of a circular saw, be sure to disconnect it from the power supply!
The homemade guide is ready, all that remains is to prepare the hand saw. To do this, saw off a narrow strip of thick plywood or other sufficiently durable material. The height of this strip should be 8-9 mm greater than the depth of the guide groove on the saw base. The width corresponds to the width of this groove. The length is several centimeters longer than the length of the sole.
The resulting limiter strip should be secured in the guide groove so that it protrudes beyond both edges of the sole.
How to use plywood tire?
To make a cut, you will need two clamps and two flat pieces of wood slightly thicker than the work piece. The guide rail is installed with its ends on these bars so that its working edge protrudes slightly beyond the edge of the workbench table top. In places where the tire rests on the bars, it is tightly fastened with clamps to the workbench.
The workpiece to be cut with a cutting line pre-marked with a pencil is placed under the tire, and the cutting line is aligned with its working edge. Finally, a circular piece with a limit strip attached to it is installed on the tire so that the limiter on the sole fits exactly into the prepared gap. Now you can saw, holding the workpiece with your free hand and lightly pressing the saw towards the workbench.
When there is absolutely nothing at hand
If you have absolutely nothing at hand, you at least have arms, legs and wits. And, although we are all different, on average, some parts of our bodies are quite similar in size.
The English system of length measures is based on this fact, the basic units of which are feet and inches. Inch means "thumb" in Dutch. Look at your fingers: each finger is divided into three phalanges of approximately equal size. So, the length of each phalanx is an “inch”. In different countries, inch sizes vary from 23 (Mexico) to 37 mm (Prussia), but the most common English inch is 25.4 mm.
Measure the nail phalanx of your index finger. I got a standard English inch of 2.5 cm. Here you have a primitive measuring instrument. Of course, calculations using your fingers will be very, very approximate, but it’s still better than nothing.
For longer distances, you have another tool - the foot, which in English sounds like a foot. A foot in the English system is equal to 12 inches. In some systems, a foot is equal to 10 inches (decimal inch). The range of foot lengths in different countries is from 250 (Ancient Roman) to 383 (Leipzig) mm. An English foot is approximately 305 mm. So, if your feet are of average size, you can use this value as a guide.
If you know your height and are not afraid to lie down on the surface being measured, you can measure the distance in “parrots”, that is, in terms of your height, as in the famous cartoon.
Other types
If for some reason the plywood rail does not meet your requirements, you can make the guide of a more complex design. Below are a few more examples of guides for a manual circular saw that anyone can make with their own hands.
Aluminum profile tire
This type of tire differs from a simple plywood tire in that a U-shaped aluminum profile is installed in the guide gap. Its advantage is that the rigidity of aluminum slightly increases the cutting accuracy.
For better sliding of the saw along the bar, as limiters, you can attach not thick plywood to the guide groove of the sole, but a pair of cylinders of suitable height made of fluoroplastic or other material with a low coefficient of friction.
Ruler from a building code
There are long aluminum rules that are used by finishers to level walls. To make a guide ruler with your own hands, rules are suitable, the design of which provides a groove for the free movement of the handles.
The main advantage of such a line is the absence of elements protruding above the surface of the workbench. To do this, you need to take two collapsible clamps and slightly modernize them.
The handles are removed from the rule, and their upper parts from the clamps, which are replaced with polypropylene or fluoroplastic inserts. The profile of these inserts must be T-shaped so that they can be installed with the wide part into the rule groove and be held there.
The result is a ruler that is attached to the workbench only at the bottom. This will allow you to move the saw freely in the work area without fear of getting caught on something.
However, such a tool cannot be called a full-fledged tire. This is the ruler that needs to be adjusted before each cut.
Rail miter box
This device is most often used for cross cutting (trimming) of material.
Usually it consists of two parallel metal corners, the ends of which are rigidly fixed to a plywood or metal base.
The saw platform moves freely along the corners, as if on rails.
The corners are secured with bolts or studs, which are also used to adjust the height of the “rails” relative to the base. The height should be such that the material to be cut fits freely under the corners.
To make the saw movement smoother, the corners on the inside can be glued with a material with a high slip coefficient. For even smoother movement, you can install the saw sole on a platform with metal wheels.
External carriage on bearings
A circular saw on an external carriage is more like a stationary format-cutting machine. This design is highly stable and, accordingly, provides high cutting accuracy.
The remote carriage is made of a metal I-beam, which is firmly attached with its lower plane to the workbench. The carriage itself moves along the upper plane - a platform, the lower edges of which are bent inside the I-beam and are equipped with bearings that allow it to slide freely. These same bearings, tightly pressed to the I-beam axis, eliminate lateral play of the carriage.
The saw sole is attached parallel to the carriage on the external guide. The guide can be made of two parallel angles or pipes - thus, by moving the sole of the saw, you can adjust the size of the cut of the material.
This design is good because the saw support platform is adjacent directly to the workpiece, which means the cutting depth is not reduced.
If you liked the article, recommend it to your friends.
Comments
-3 Olga 03/29/2013 16:32 And why such difficulties? Scale rulers are sold in school supply stores; there are options for combining scale and regular rulers on one ruler.
Quote
+1 Viktorianna. 03/29/2013 16:51 The fact of the matter is that it is not difficult. Manufacturing takes about 15 minutes. And a trip to the store takes much longer. I’m glad that you sell rulers of all sizes, but in my city, I was only able to buy a ruler in size 12, which is not enough
Quote
+1 Gostyushko 03/29/2013 18:44 Thank you! Great idea, it simplifies everything, no need to fuss with cutting unsuitable patterns and re-gluing them to your size!
Quote
+1 Galina 03/29/2013 19:56 Mne nravitcy idea y menay figura ne standartnay I ya dymau eto uprostit moi mycheniay sc vukroikami. Big-Big Thank you!!!!
Quote
+1 tayra 01/21/2015 10:28 It didn’t help me
Quote
+2 Ekaterina 08/02/2016 21:11 Sorry, I don’t understand, is such a ruler needed to create patterns using the radiation method? And should you measure the CHEST CIRCUM? What kind of circumference is 36 cm? Or was it just 36 cm as an example?
Quote
+1 Anya 10/01/2017 12:35 difficult!!!!! You can ask a little more
Quote
0 Rita 02/08/2019 08:06 Thanks for the idea! Need to try ! It looks something like the “golden pattern” method.
Quote
+1 Rita 02/08/2019 18:43 I think that it is not the chest circumference that should be taken, but the semicircle, given that on size 48, 48 parts are 1 cm, and the full size 48 is 96 cm... something like this...
Quote
0 #10 Rita 02/24/2019 09:44 It turns out to be an interesting line. But I have this question - if in the magazine the pattern is given, say, for size 56, and not for 48 dan, and we need a larger size, for example, 68, then the ruler should be divided not into 48 parts, but into 56, to get the right ratio. Or do we still divide by 48? If it's not difficult, please answer.
Quote
0 #11 viktorianna.ru 02/26/2019 08:54 I quote Rita:
It turns out to be an interesting lineup. But I have this question - if in the magazine the pattern is given, say, for size 56, and not for 48 dan, and we need a larger size, for example, 68, then the ruler should be divided not into 48 parts, but into 56, to get the right ratio. Or do we still divide by 48? If it's not difficult, please answer.
It is necessary to divide into 48 parts. In the 48th size, the division is equal to 1 cm. With a smaller size, the division is less than one centimeter, with a larger size - correspondingly more than one centimeter.
Quote Update list of comments RSS feed of comments for this entry
Path Transfer Tool
In this review we will talk about an interesting tool that, first of all, can facilitate the work of laying laminate, linoleum and other floor coverings, as well as in those tasks when you need to transfer complex contours or make precise joints of curved surfaces. The contour transfer tool is suitable for these purposes.
This interesting thing is an assembly of flat lamella strips, which are fixed in a rigid plastic frame:
This tool model contains 90 strips:
Each of them can move back and forth, independently of the others, allowing you to accurately copy the contour around:
For convenience, the strips have a pointed shape; depending on the situation, they can be applied either with the pointed part down or up:
The holding frame is measured in inches and centimeters:
All strips are the same thickness 1.4mm:
Maximum “depth” of measurements:
There are also other options on sale: wider ones (25cm wide) and an option where metal pins are inserted instead of strips:
The overview, in principle, is quite enough for small ledges, door frames and radiator pipes.
The main stages of child development
Before you start making a toy, determine what age it will be designed for. Obviously, a toy for a one-year-old child will not be of interest to a five-year-old. It is also important what the child is interested in. It depends on what shape your toy will be and what plot it will be combined with.
I would like to remind you that everything is individual. Perhaps your child has already mastered some skill ahead of time, perhaps not.
0— 3 months
The child lies on his back most of the time. It is necessary to develop the ability to focus your gaze.
Types of toys:
mobiles, bright rattles, garlands, beads.
Requirements for toys:
different textures, lightness of toys, simple shapes. The colors are bright, but not variegated. Preferably no more than 5 items.