What is papier-mâché
Crafts using the papier-mâché technique are the formation of three-dimensional figures by pasting the base or frame with paper.
Depending on the technique used, the following materials can be used for pasting:
- Ordinary newsprint.
- Cardboard soaked in paste.
- Cardboard egg molds, mixed into a homogeneous mass using a blender.
- Paper napkins of varying degrees of density.
The paste, if used separately from the paper base, can be applied to the mold with a brush or the paper parts can be dipped directly into the adhesive solution.
How to choose material for making papier-mâché
The main “ingredient” is paper or cardboard and is used depending on the desired result:
- gray or white toilet paper and newsprint - for small crafts, since the surface is smooth;
- thick sheets, glossy magazines can be used to prepare paper dough mixed with softer types of paper;
- cardboard is indispensable for creating frame crafts such as boxes and furniture;
- packaging and trays for eggs - for forming large products or for decorative plaster, in these cases the lumpy surface will not be a hindrance.
Egg boxes and trays
Binding components:
- PVA glue should be used in a ratio of 2:1 or 1:1 with water, depending on the thickness;
- It is better to prepare wallpaper glue according to the instructions on the package;
- starch or flour paste: take 4 parts water to 1 part flour or starch, mix until smooth, bring to a boil, stirring constantly and cook until thick.
The result in the finished product will be the same, so the choice of mixture is not important, use the option that is more convenient for you.
Chewed paper pointe shoes
Rules for papier-mâché technique
DIY papier-mâché crafts are a fairly easy task, but they also obey a number of rules:
It is better to use forms for pasting without an abundance of small protruding parts. After drying, the workpieces must be cut to remove the frame, and small parts will make work difficult.
Before applying the paste, the molds must be greased with vegetable oil or wrapped in cling film. With proper care, a frame (vase, plate, toy) can still serve its life.
If you use cardboard mass in your work, you should stir it thoroughly. In this case, the mixture will be easy to apply, and the craft will acquire smooth, beautiful walls.
Thorough drying of the finished product. Paint, varnish, and decorative elements should only be applied to a well-dried product. Drying of the workpieces is carried out in the open air at a comfortable temperature for 3-4 days.
Also, when working, you should use individual gloves to avoid the development of contact dermatitis.
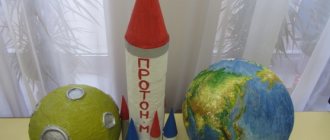
Ideas for crafts from papier-mâché
Using this technique you can make many amazing things for your home:
- pots for house plants of different sizes and designs
- original flower vases
- base for wall clock dial
- candlesticks
- lamp shades
- caskets
- piggy banks
- dishes for fruits and pastries
In addition, papier-mâché can be used to make a beautiful cover for a notebook or diary, bowls for jewelry, and even decorations themselves. Also, many interior designers make shaped moldings on windows, around mirrors and doors from papier-mâché.
Crafts making techniques
Today, there are two main methods for step-by-step production of three-dimensional crafts in the art of papier-mâché:
Pasting the prepared frame-mold with pieces of paper cloth moistened with a paste solution. The selected paper is first divided into small pieces.
Each part is dipped into the adhesive solution and applied to the surface of the base. The parts are applied in such a way that the edges of adjacent workpieces are on top of each other. To create a durable figure, it is necessary to apply several layers of paper.
Forming crafts from cardboard mass. To create a wet base, cardboard is crushed and mixed with a paste solution. Next, the working base is thoroughly stirred, achieving maximum homogeneity.
The prepared mass can be applied to the frame, and integral crafts can be formed from it. The choice depends on the practical skills of the master.
In addition to the presented types of papier-mâché, techniques are divided according to a number of additional criteria. For example, they highlight the internal and external pasting of the mold for creating crafts.
A few hedgehogs for children's creativity
I offer several simple ideas with hedgehogs for fun creativity with children.
Application
1. For the body of the hedgehog, take a square of beige paper measuring 10x10 cm and fold it according to Figure 1. The upper corner of the body can be rounded.
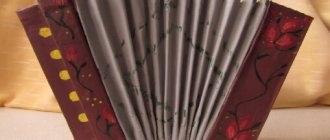
2. For the needles, take a rectangle of black paper measuring 14x27 cm and fold it like an accordion in increments of 1.5 cm (Figure 2). Bend the folded accordion in half and glue the edges of both halves touching each other in the form of a fan. Round the top corner of the accordion.
3. Glue the body of a hedgehog onto the cardboard for the background, add a corrugated part on top and complete the applique with an apple and leaves.
4. For the apple, fold a strip of yellow paper measuring 6x20 cm like an accordion in 1 cm increments and glue the sides of both halves into a circle.
5. For the leaf, fold a rectangle of green paper in half and cut out the blank in the form of a semi-oval. Then make a corrugation by placing zipper folds on it (Figure 3). Unfold the leaf and glue it in the appropriate place.
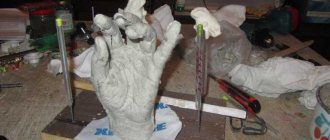
Papier-mâché souvenir
1. Using newspaper and glue using the papier-mâché technique, make a base in the shape of a hedgehog’s body. When the glue has dried, cover the base with wide double-sided tape. Then decorate the back of the hedgehog with needles, and the face with corrugated tubes.
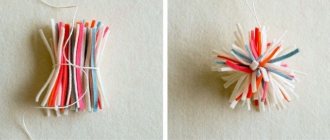
2. Make the needles using the trimming technique. To do this, cut a roll 2 cm wide from a roll of crepe paper, and then cut it into squares measuring 2x2 cm. Place a pencil in the center of the paper square and, rolling it between your fingers, crumple the paper around it. At the border with the muzzle, tear off the protective paper from the strip of tape and press the resulting trim to the body. Next, glue the “end pieces” tightly to each other so that no gaps are visible.
3. For the muzzle, make corrugated tubes. To do this, cut a 3 cm wide strip lengthwise from a roll of crepe paper and cut it into rectangles 15 cm high.
4. Wind the paper onto a thick knitting needle, leaving one edge untwisted. Lubricate this edge with an adhesive pencil and finally tighten the tube.
5. Then place the knitting needle vertically on the table and, holding the top edge of the paper with the fingers of one hand, pull the paper with small movements from top to bottom with the fingers of the other hand until it is all wrinkled. This should be done in small sections, moving your fingers. After this, remove the corrugated tube from the knitting needle and cover the hedgehog’s face with it.
Hedgehog made of cones
1. Cut the neck from the bottle in the shape of a hedgehog’s face and cut a notch in one place so that when the two parts are connected, the neck fits snugly to the body.
Master classes on making crafts
Before starting master classes on papier-mâché crafts, you should prepare a workplace and a set of materials:
- Newspapers, napkins, cardboard to choose from.
- Brushes, paste.
- Watercolors or gouache, transparent acrylic varnish.
- Decor elements.
- Cling film to protect the mold from the paste solution.
- Thin rubber gloves.
Auxiliary materials are a blender, containers for mixing adhesive solution and paper, frame forms for pasting.
Beginning craftsmen should also familiarize themselves with the recipe for making paste:
- Two tablespoons of starch and flour are mixed with 1 glass of water.
- Bring water to a boil, pour in the prepared mixture.
- During the cooking process, the solution is constantly stirred to reduce the number of lumps.
The paste can be used immediately after cooling.
How to make papier-mâché according to the shape of an object
Each of us made crafts from papier mache as children. The master class that we all received back in school consisted of making a plate and then painting it. To repeat the shape of an object:
- you need to take old newspapers or thin paper and tear it into small pieces
- prepare a bowl of glue or paste (a mixture of one tablespoon of potato starch and 500 ml of cold water)
- dip pieces of newspaper into liquid and stick to the selected surface in several layers
- leave the form until completely dry
- carefully remove the form from the resulting object
- open the item with varnish or matte paint
Crafts from papier mache for beginners are most often made in this way. It is difficult to make a mistake in this process and the object always turns out to be the desired shape.
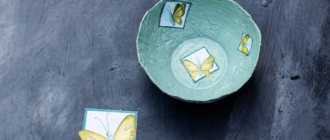
Painted paper plates
To work, you will need a plate of any shape and size, paste, paper or newspapers. Instructions for creating papier-mâché crafts for beginners:
- Grease the plate with vegetable oil.
- Wear rubber gloves.
- Tear newspaper or paper into small pieces. Dip each piece into the adhesive solution and apply to the surface of the plate.
- According to the proposed scheme, apply 4-5 layers of paper.
- Leave the figure to dry.
- After the mass has hardened and completely shrinked, cut the workpiece along one line with a sharp knife.
- Carefully remove the two halves of the future decorative plate from the mold.
- Glue the two halves along the seam with strong glue.
- If the surface has a lot of unevenness, it is worth using a water-based primer, which will eliminate visible defects.
The next stage is decorative painting. It is better for beginning craftsmen to use a template or photo of a beautiful artistic painting.
Autumn Hedgehog made of paper
Another master class for our craft competition from student Victoria Zolotoy, how to make an autumn hedgehog out of paper .
Author: Chelashova Anastasia , 9 years old.
A hedgehog cries in three streams:
- Oh, why am I prickly!
Ugly thorns!
Because of them no one has me
Doesn't pick him up. (Galina Lebedeva)
We suggest making not a prickly hedgehog, but from flowers. It will be very pleasant to hold in your hands.
Materials:
- cardboard,
- newspapers,
- threads,
- paste,
- toilet paper,
- toothpick,
- gouache paint,
- PVA glue,
- eyes for a hedgehog,
- yellow, orange, brown paper,
- universal glue.
Progress.
Roll a ball out of half a newspaper and secure with thread. This is the head. Roll an oval out of a large newspaper to form a body. Also secure with threads.
Draw 4 squares with a side of 6 cm on cardboard. Make cuts on one side of the square, twist, and secure with thread. Do this for all 4 legs.
Using a toothpick, connect the head to the body. Attach the legs, make a small cone (nose) out of cardboard, and attach it to the workpiece.
Tear toilet paper into small pieces and fill with paste. When the paper becomes limp, paste the hedgehog with paper pulp using the papier-mâché technique.
When the hedgehog is dry, paint it with gouache, adding PVA glue so that the toy does not get dirty. You can immediately draw a face.
Cut flowers. Any color can be made. For our hedgehog we used yellow, orange and brown.
Using universal glue, glue the flowers.
And, of course, you can make the hedgehog something that he can hold. It could be a leaf, a fungus, or an apple. Our hedgehog is holding a string with the letters “O S E N B”.
In order not to forget the address of the page and share with friends, add it to your social networks: Do you want to know news about competitions or master classes?
Tags: DIY toys
Attention! It is better to write urgent questions in the comments on the website (form at the bottom of the page) or, better yet, directly by email. There are no notifications about comments from the VKontakte form! This form is more for feedback. 
Discussion: 19 comments
- Olga:
October 20, 2015 at 1:18 amWhat are such long eyelashes made of??????? I have seen various “spare parts” for making dolls and soft toys: eyes for different characters, ready-made eyelashes - but I have never seen such long ready-made eyelashes.....
Answer
- Kiseleva Olga:
October 20, 2015 at 8:48 am
Nastya, I really liked the hedgehog. But the eyelashes could have been made shorter.
Answer
- Albina Nikolaevna:
October 20, 2015 at 9:02 am
Really beautiful and long eyelashes, they hardly make ready-made ones, maybe they are made of tape and varnished. It would be nice if at least the authors of the works entered into a dialogue, questions arise, but we still don’t wait for answers, it would be necessary to include this point in the conditions of the competition, what do you think, dear members of the jury?
Answer
Larisa:
October 20, 2015 at 10:37 am
How can I write this down, Albina Nikolaevna? Whoever does not answer the questions is eliminated from the competition?