A tank is a combat vehicle with armor. It often moves on a caterpillar, with cannon armament, but sometimes with a machine gun. The main task of the tank is direct fire.
There are many computer or tabletop role-playing games. The legendary tank is the Soviet T-34. The medium tank was used quite a few times during the Second World War. It went into serial production in 1940.
Fans of the development of the design bureau of the tank department are happy to play virtual games featuring their favorite structures. Hobbyists are invited to make tank crafts from various materials.
This is precisely the purpose of this article. In the following parts we will look at methods and options for making a tank using paper, cardboard, plasticine and more. Perhaps the most ideal option is creativity from Lego. Original, fast, sustainable.
Crafts using ready-made templates
There are many ready-made models carved from wood or metal that only a high school student can assemble. You can find ready-made drills for making military equipment with your own hands. They need to be printed, cut and glued. This way you can collect a whole collection of different tank models.
How to draw a Tank: draw with paints and pencils
Almost all children dream of learning to draw. Girls draw flowers and dolls, and boys’ favorite themes are tanks, planes, cars. Such skills will come in handy in drawing lessons, or when you want to make a card for dad on February 23rd.
Pencil drawing of a tank for children
There are a lot of tanks and there are quite a few options for how to draw one.
Pictures of tanks with simple details are suitable for kids.
If you draw more details of the tank, you can depict a specific model.
Application for kids
For the youngest children, we offer easy thangka crafts made from colored paper in the form of applique. A piece is cut out of green paper, shaped like a hat or two pieces: a small wide oval (for the tower) and a long narrow oval (for the caterpillars). An equally long oval is cut out of black paper and its inner part is removed, leaving an elongated “donut”. You can simply trace the edge of the caterpillar with a black wide marker.
Three to four circles are cut out of black or yellow paper to represent wheels. The diameter of the circles should be slightly less than the width of the oval. A strip of green paper will represent the barrel. And, of course, we need a red five-pointed star.
We assemble the tank by gluing the parts onto the base sheet. The cabin and tracks, we put the barrel under the cabin. We glue wheels and frames onto the tracks. We complete the craft by gluing the star onto the cabin.
Corps formation
You should begin assembly by bending a sheet of paper in half. Next, you need to mark all the fold lines that are indicated in the drawing, which explains how to assemble an origami tank step by step for beginners. The workpiece is folded along the lines outlined in this way.
A similar method is used to bend the other side. Then you should form the sides of the workpiece so that they have an inclination towards the center.
Plasticine tank
Little children love to sculpt with plasticine, since this material is bright, flexible and can take any shape. Any child, even a very small one, can make a tank craft from plasticine.
To save plasticine, we can use a small box, for example, a match box and a plastic soda cap. They are wrapped in a thin layer of plasticine. Or we fashion all the details from a single piece of green plasticine.
How to make khaki plasticine
As a rule, children's crafts make a tank from bright green or blue-green plasticine. But if we want to achieve greater authenticity, we can mix green and brown plasticine, so we get a military khaki color.
We sculpt the chassis of the tank
First, let's sculpt the chassis of the tank. Let's roll ten identical balls of black plasticine, and four identical smaller balls. We flatten them a little with our fingers, turning them into flat cakes, and with a stack we draw lines, like spokes on wheels. Let's arrange two sets of wheels in one line on the table: five large ones in the center and two small ones at the edges.
Roll a piece of black plasticine into a long sausage and flatten it into stripes. We will wrap this strip around our wheels. You can raise the outer wheels a little to show the tank in motion. You can apply cross strokes in stacks on the finished track part.
We sculpt the base and tower
For the main part of the tank we will need a large piece of plasticine or a matchbox wrapped in green plasticine. You can complicate the part a little by bevelling its front and back surfaces, like a trapezoid.
Note!
- DIY military crafts step by step: 150 photos of the best craft ideas for children for school or kindergarten
- DIY crafts for May 9 step by step: 150 photos of the best crafts for Victory Day
- DIY crafts for February 23rd step by step: master class with photos and descriptions of how to make crafts for Defender of the Fatherland Day
Wrap the bottle cap in a plasticine cake or roll a ball out of green plasticine. It needs to be flattened a little and the “nose” pulled out. We attach the turret to the base of the tank. We attach ready-made tracks to the base on both sides. From a piece of green plasticine we make a long, rather thick sausage for the muzzle. To make the barrel more durable, you can wrap plasticine around a toothpick, match or straw.
Finishing touches
We cut a hatch on the tower with a stack. Behind the turret you can add a rectangular part - a fuel tank. And a small red star on the tower will complete our plasticine tank.
World Of Tanks
The popularity of tanks was enhanced by the popular game World Of Tanks, a simulator in which the creators tried to bring the conditions for controlling and surviving a tank in battle closer to reality. In it you will find models from different countries.
There are both famous Soviet tanks T-34, KV-1, IS-3, and German “tigers”, “panthers” and “leopards”. You can also use models that never participated in real battles due to the fact that the war ended, or they were too heavy to be transported to the battlefield under their own power or by train, for example the German "Maus", the largest, heaviest and armored tank of the Second world.
The audience is growing, and there are more and more fans of this game. Now there are many accompanying products, such as clothing with the game logo, pillows, mugs, notebooks, notebooks, briefcases, computer mice and rugs.
Metal tank models are also in use. Each avid gamer has his own preferences in the game. Some people like self-propelled artillery units, which allow them to wait for the moment and cover enemy equipment with an accurate shot. Some people like anti-tank installations, kind of snipers, not very mobile, but with a long range and damage. With heavy tanks everything is simpler: thick armor, inactive, but in order to penetrate one, you need to try. Light ones are excellent for reconnaissance; they can quickly bypass the enemy, go to the rear, and detect artillery. Every player will be glad to have a beautiful metal model of a Tiger tank or another favorite tank on their table.
Tank made from toilet paper rolls
Toilet paper rolls, which are often used in children's crafts, will be useful when we are thinking about how to make a tank craft. Three bushings are enough for us. Paint the outer and inner edges of the bushings black. We stack them close to each other and wrap them with masking tape so that they stick as one unit. We do not cover the painted edges of the bushings with tape. This is our base of the tank and, at the same time, the tracks. We wrap the central part of the base with a wide strip of colored paper. And we will wrap the edges of the base with a strip of black or silver corrugated cardboard - these are caterpillars.
For the tower, we can use any small box of a suitable size or glue the base of the tower from a strip of thick cardboard. We wrap the base of the tower in colored paper of the same color and glue the boxes onto the base.
To get a strong and long barrel, coat a plastic cocktail straw with glue and wrap it with a strip of colored paper. We will make a small hole in the side wall of the turret and strengthen the gun barrel in it. Such a tank is very easy to make, the child can do it himself and will be happy to please his dad.
Note!
- DIY crafts for March 8 step by step - a review of the most beautiful crafts for International Women's Day (120 photo ideas)
- Diaper cake for a girl - 180 photos of ideas for original diaper cakes + DIY instructions with examples of finished products
- Craft letter: TOP-140 photos and simple diagrams for creating crafts with your own hands. Options for unusual letter ideas + step-by-step master class
Build Methodology
A schoolchild who has shown interest in the question of how to make an origami tank with his own hands must follow the step-by-step instructions developed for this. First, you should select a sheet of colored paper suitable for making an elastic and durable case. As for the tower, it can be made from less dense paper.
Another sheet, but of a much smaller size, will be used to form the cannon. To make an ejector and muzzle brake, you can use thin elastic cardboard, caps of felt-tip pens or ballpoint pens.
Tank them matchboxes
If you want to make a durable cardboard tank with your own hands, it is convenient to use a universal cardboard material - matchboxes. Depending on the desired size, you can assemble the base of the tank from two or four boxes; for the tower you will need another one.
Preparing boxes
Box o
For the tower and boxes
and
for the base, carefully wrap it in colored paper. For the barrel, we use a toothpick, a kebab skewer or a lollipop stick, wrapping it in a strip of colored paper. We pierce a hole in the front wall of the tower with an awl and insert the barrel into it. We glue the tower to the base of several boxes.
Caterpillars
To depict caterpillars, glue black paper circles to the side surfaces of the base; buttons can be used for larger volumes. We wrap the edges of the base with strips of corrugated paper. If you don’t have corrugated cardboard on hand, you can fold strips of plain paper like an accordion.
Rotating tower
If we improve this model a little, we can make a tank with a rotating turret. This tank will be a wonderful craft for school. To do this we need a plastic soda cap and a plastic straw. For perfect execution, instead of a tube, you can choose a bolt and nut of the appropriate diameter.
The plastic cover will serve as a spacer between the tower and the base. We will need to pierce the tower and base through the center; this can be done with an awl or a thick needle. Heat the awl or nail over the fire and pierce the plastic lid. Naturally, work with sharp instruments, and even more so with fire, is best done by parents, or, at least, in their presence.
Now we assemble our structure onto a plastic tube or onto a bolt, securing a nut on the opposite side. To prevent the tube from slipping out, you can melt its end over a fire and cool it, pressing it against the metal, so that a head is formed at the end, like a nail.
Men's hobby
Among the abundance of collectible materials in recent years, tanks have stood out. They appeared in the world during the First World War. At that time it was, rather, a self-propelled machine gun, and it bore little resemblance to modern combat vehicles. Once a month we always hear on the news that the Americans consider their tank to be the best, and Russian military analysts prove that they are not entirely right. And tank biathlon attracts viewers to the TV no worse than the Olympics. All this only adds to the popularity of mobile armored fortresses.
Not a single man can calmly pass by beauty, the beauty of women and the beauty of weapons. We won’t talk about collecting women here, but real weapons, especially a tank, take up a lot of space and are expensive. This is how the models are gaining popularity. What could be better when strength, power and beauty merge into one armored cocktail? Have you heard how a tank fires, what kind of flame it emits and how the target shatters into pieces?
The memory of such impressions is carried in a small, preferably steel model; its pleasant heaviness will add value to it. If you want to give a man, especially one who served in the army, a good gift, give him metal tank models.
Paper tank
For those who prefer elegant, lightweight crafts, we offer instructions on how to make a paper tank. From green paper we cut out two rectangles measuring 5 by 6 cm - this is the bottom and top of the base.
For the tower you will need a rectangle 3 by 8 cm. It must be folded in a special way. We retreat 1 cm from the edges and bend them face to face. We divide the rest into three parts, folding along the lines from inside to outside. Thus, we get a part in the shape of the letter “p” with ears, for which we will glue it.
In the center of one of the side walls we cut a small hole for the gun barrel. The trunk itself is easy to make by rolling up a long tube of paper. Glue a red star to the opposite side wall.
In order to make light but strong tracks, we will glue an oval piece. The tank has two tracks, so two parts will be needed.
Let's turn a rectangle of green paper measuring 5 by 10 cm into an oval, rounding off the smaller sides. Step back 1 cm from the edge and draw a fold line. In order to bend the rounded edge, we will make many notches up to the fold line. Carefully fold the allowance inward, back to back, around the entire circumference of the future track.
Along the entire length of the oval, at equal distances from each other, we glue “wheels” - circles of black paper with a diameter of 2.5 cm. We will need three wheels for each caterpillar.
When the wheels are glued, we carefully press the folds and fix the shape of the caterpillar by wrapping it with a strip of paper 20 cm long, the width of the strip is equal to the width of the allowance - 1 cm. Our caterpillars look like an oval cover.
Let's start assembling the tank. We place the tracks on their sides, with the wheels facing out. Between them we place the lower rectangle of the base, bringing it inside the tracks, and glue it. Place the top rectangle of the base on top of the tracks and glue it. When the bottom of the tank is assembled, we coat the “ears” of the tower and glue it to the base, aligning the edges of the tower with the edges of the base. The tank turns out very neat, and it’s not that difficult to make.
Origami tank
For fans of the art of origami, there are several designed designs for different models of tanks. To make a tank using the origami technique, you will need a sheet of colored double-sided paper and patience. If you know basic origami techniques and have folded three-dimensional models more than once, assembling a tank will not be difficult, following exactly the photo instructions.
Very easy model that can be made with children
A small child often does not know how to independently use scissors, glue, and especially a stationery knife. Therefore, to make a tank, a child should seek the help of adults. But there is a way to make a toy with your own hands without asking mom or dad for help. All you need is paper. Sequencing:
- You will need 2 sheets of paper - large (27 cm by 5) and small (3 by 5 cm).
- The first sheet should be placed in front of you and all sides should be folded to form the letter X.
- Repeat the same with the second side. The result should be a 2-sided pointed arrow. In this case, the ends are directed in opposite directions.
- The upper corners are bent so that a rhombus is formed, folded from 2 corners.
- Next, the bent corner should be unbent and tucked inward. Do the same with the other angle. The result should be a diamond without a cut. This is done with 1 side.
- The product should be bent and the diamonds should be fastened together (they can be inserted into each other). The resulting arc is the base of the tank, and the diamonds fastened on top are its turret.
- A gun is attached to the product. The edges of the base are bent (can be cut) - caterpillars are obtained. The tank is ready.
See also:
How to make a ninja weapon out of paper - step-by-step instructions and tips ⚔
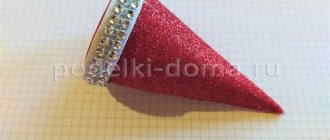
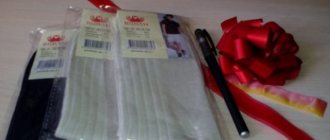
Gift wrapping
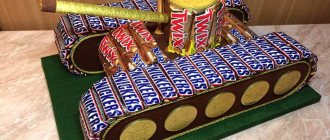
The shape of a tank is often given to gifts for February 23 or May 9. It can be made from several pairs of socks, rolling them into rolls. And if you use your imagination and spend a few hours, you can assemble an original tank from small chocolates and chocolate bars.
When we make gifts with our own hands, we put warmth and a piece of our soul into them. Seeing what emotions they evoke in our loved ones, we are once again convinced that it is not a gift that is valuable, but attention,
Paper tanks are much more interesting to play with
That’s why it’s time to remember that in addition to electronic gaming battles, there are also physical ones. To do this, just study a little origami technique and, using it, build a couple of tank armies out of paper. To get an idea of the possible shapes of hulls, turrets and guns, just study photos of an origami tank published on the World Wide Web.