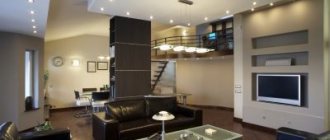
A bed with lighting is not only an original interior solution, but also allows you to create a romantic atmosphere in an adult bedroom or save a child from the fear of the dark when installed in a children's room. What lighting methods exist, how to select the equipment yourself and install it, read on.
Bed complemented by decorative lighting
Backlight types
In the bedroom, the main attribute is the bed. Therefore, lighting should mainly emphasize this piece of furniture. The best option would be to organize lighting in this area. To beautifully emphasize the design, it is necessary to pay attention to such parts as the general outline of the bed and the decorative design of the backrest. It is also advisable to further emphasize the bed linen and bedspread.
When choosing lighting, you should adhere to the following rules:
- exclude the presence of bright light on a smooth glossy surface;
- do not use green and blue colors;
- to make the white light warmer, more muted, you should add a little bright reflection.
There are four types of lighting you can use for your bed:
- backlight made from LED strip, which can be independently attached to any piece of furniture;
- from an LED strip with a built-in wi-fi module, thanks to which the lighting can be controlled using your own smartphone, changing the hue, brightness and many more additional functions;
- bed lighting with a motion sensor, allowing you to turn on the lights if necessary;
- lighting made of duralight, which is a luminous cord.
Each option has its own characteristics and advantages. Each of them can be purchased already built-in with the bed or installed independently.
Recommendations for selection
The bed is the most important piece of furniture for any person. Therefore, you should approach your choice carefully:
the frame is the main part of any furniture, so it is worth choosing it to match the overall interior of the bedroom
It is also worth paying attention to the strength characteristics of this element, since it is on it that the heavy base will rest; the base provides comfortable rest conditions, so it is worth choosing an orthopedic structure made of bent-glued wooden lamellas; the mattress must be made of natural and durable materials. It should also be comfortable; The size of the bed also plays a very important role
When choosing, you should pay attention to the number of people sleeping in the room, as well as their build; The bed lighting must be built in efficiently and safely, and also be in working condition. When purchasing, you should pay attention to the quality of the electrical wiring connection and evaluate its safety.
When purchasing furniture, you should pay attention only to functional models that have a quality certificate and sanitary and hygienic conclusions. This is especially true for children's furniture
It is advisable to entrust the assembly of the structure to qualified craftsmen with good experience.
Locations
The location of the bed lighting depends on many factors: design features, the interior of the bedroom and its parameters, and the personal wishes of the owners. Let us examine separately the lighting features of each part of the structure.
At the head
The head of the bed is most often equipped with lighting. Lighting fixtures that can be used here:
- Spotlights;
- LED bulbs;
- LED Strip Light.
The option of directing flows of white light from the headboard to the top looks beautiful and modern. If you want to add beauty and functionality to this part of the design, you can install mirrors or small shelves.
Often, instead of a headboard, a bedside niche is equipped with additional light. LED lighting is used for this.
From below
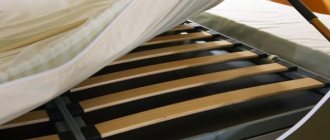
A bed equipped with lighting from below looks luxurious. To make the interior lighter and more modern, you can use a so-called “floating” bed on discreet legs, which is complemented by lighting from an LED strip attached around the perimeter.
In order to connect the backlight with your own hands, you will need to perform the following steps:
- first of all, it is necessary to secure the tape by putting a cap on each end;
- then you should put on the adapters and immediately attach the plugs to them;
- check the operation of the LED backlight;
- Now you can start fixing the backlight. This will require special fastenings that are screwed to the bed with self-tapping screws;
- Once the strip is fully attached, you can plug the strip into a pre-prepared extension cord and enjoy a beautifully illuminated bed.
If you have the skills to work with electrical wiring, you can do everything more carefully by installing hidden wiring with a specially designated switch for lighting.
Illuminated podium
The podium bed looks impressive and stylish. In addition, it helps to significantly save space. And if you add lighting to this furniture, then in the dark a “floating effect” will be created. This is also convenient, since at night the possibility of falling will be eliminated due to the lighting of the step.
In order to organize lighting in this part of the structure, two options are used:
- Spotlights;
- LED Strip Light.
Often, additional storage boxes are built into the podium. Here it is imperative to provide lighting that will help maintain order and create a comfortable environment for the user.
Children's models
For any child, their own room is a space where they can enjoy play, relaxation or their own fantasies. In order to make this world more interesting for a child, you should think about purchasing a children's bed designed in the shape of your favorite cartoon characters.
A wide variety of car beds have been developed for boys that will help the child imagine himself in the role of a racer. The best option would be a bed equipped with lighting. It will be very interesting to sleep in a car with glowing headlights and dimensions.
Car beds have also been designed for girls in a more delicate pink or white design. Additional lighting can be installed in the following areas:
- headlights;
- street racing lower lighting;
- lower contour headlights, which are cilia.
These models are equipped with a remote control that allows you to adjust the lighting from a distance.
Children are often afraid of the dark, so a bed with additional lighting will be a great alternative to a night light. You can arrange additional lighting in the bedroom above the bed, which will make children's sleep more restful. To do this, you can use spotlights or LED strip.
Installation Tips
Before proceeding with the actual installation of the equipment, you need to pay attention to a few more nuances:
- when choosing lighting for cabinets in the kitchen, you should choose white light, since this option will not distort the appearance and color of dishes and products, due to the maximum proximity to natural light;
- if the purpose of installing lighting is to create coziness, then you should opt for diodes with a warm spectrum;
- when installing the tape in the work area, it is worth purchasing not one, but several light sources, since this will help avoid the appearance of shadows;
- The lighting should fit into the overall design of the room.
Selection of cable cross-section
The choice of cable cross-section is a very important point, which allows you to significantly maintain the brightness of the equipment. This will require calculations that require the closest attention.
As a rule, when installing LED backlighting, a cable with a cross-section of 0.5 to 2.5 mm2 is used. But you should not take approximately suitable equipment, but rather make a calculation. To do this, use the following formula: s=(2*I*p*L)/U, in which I is the current strength; p is the resistivity value depending on the material; L – length of the cable used; U is the maximum permissible value of the voltage drop that occurs between the load and the power supply.
The cross-section of the cable directly depends on its length. That is, the longer the cable, the less power will reach the light source.
Choosing a location
As a rule, for the kitchen, additional lighting is most often installed in the work area. But this is not the only option that is applicable in this room.
What other options can be used for LED lighting in the kitchen under cabinets:
- The work surface under the cabinets requires the use of only warm white, as this option will give the dishes a more appetizing appearance.
- The kitchen set can be illuminated in two ways. When installing the lighting from above, you don’t have to worry about moisture exposure and use any type of tape, even the open type. When installing from below, especially if the issue concerns floor-standing cabinets, you will need to select equipment with the highest level of protection, since the first wet cleaning can damage a regular tape.
- The apron can be supplemented with an LED strip, especially if it is made of glass.
- Boxes illuminated with LED strip will look very impressive. It is advisable to select sensor-type equipment that will light up when opened.
Installation
In order to make aesthetic lighting for cabinets in the kitchen, it is necessary to take into account one more important nuance. The tape can be glued to any surface, but will it look decent and neat enough? Hardly. In order to create more pleasant lighting, it is worth using aluminum profiles, which not only have a protective matte cover, but also have a variety of shapes: angular, rectangular, wide or narrow. In addition, glass can be easily installed on the aluminum profile, which will additionally protect the tape from debris and dust.
To install the LED strip, you must perform the following steps:
- Install the power supply and control module. It would be better to hide the power supply from view, so you can make a hole to connect the tape.
- Prepare a place for attaching the tape.
- Secure the prepared aluminum box. If the tape will be installed without a box, then it is advisable to degrease the surface of the cabinet.
- Cut the required length of tape and secure it in an aluminum box or glue it to the surface of the cabinet.
- Solder the edge of the tape to the power supply. Instead of soldering, connectors can also be used.
- Check system functionality.
As it turned out, installing an LED strip is a simple job that does not require special skills. Such lighting will add its own “zest” to any interior.
It is important to think carefully about the placement method, choose the right lighting and the result will certainly exceed even the most seemingly unexpected wishes.
Backlight options
Bed lighting in a bedroom or children's room can be made:
- LED strip;
- from duralight.
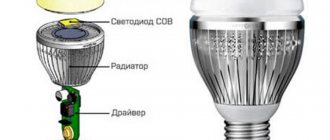
An LED strip is a circuit board on which special light bulbs - LEDs - are located.
LED strip
The advantages of LED strip are:
- diversity of species;
- ease of installation. The tape has an adhesive base that allows you to fix the equipment on any surface;
- long period of use;
- minimal energy consumption;
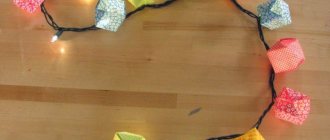
- the ability to create specific effects, for example, a floating bed as in the photo earlier.
The disadvantages of LED strip include:
- higher cost compared to spotlights and other lighting devices;
- low color rendering coefficient.
LED strip allows you to make beds:
- with illumination from below, which can be located around the perimeter or at certain points (picture above);
- with lighting in the headboard. The LED strip can illuminate the headboard, wall, any shelves or decorative elements.
Using LED strip to illuminate decorative elements in the headboard
Duralight is a flexible cord containing incandescent lamps or LEDs.
Flexible glow cord
The advantages of a flexible cord are:
- complete moisture resistance;
- resistance to mechanical stress;
- ability to work in a wide temperature range from -20°C to +60°C;
- duration of use.
Each light bulb installed in the cord is designed for 25,000 hours of continuous use.
The following are produced using duralight:
- lighting under the bed;
- podium made of pallets with lighting.
Bed on a podium made of pallets with lighting
Method N2 – Using duralight
Duralight is a silicone tube in which a set of LEDs is placed. There is a fairly large selection of colors on sale that can be used to decorate the bedroom interior thematically.
However, in comparison with the previous option for illuminating the bed, duralight cannot be cut at your own discretion. The pieces on sale are pieces of a strictly established length (1 - 2 m each), which can be combined using special connectors. Therefore, if any excess length occurs, for example, on children's furniture, you will have to hide it or lay it in two rows.
In addition, to connect duralight there is no need to install a power supply; for it you will only need a small adapter that can conveniently fit even behind the back of a double bed.
To calculate the size of the backlight wire, you need to measure the double bed around the perimeter if you want to make the backlight from below. If you highlight another part of the bed, measure the perimeter or only the length of the headboard, backrests, etc.
Then the largest multiple of duralight is selected to the resulting value. For example, if you need 3.7 m for the size of the mattress, and the LED cord for lighting is cut into 2 m pieces, then you need to use 2 pieces of 2 m each. As a result, the extra 0.3 m will have to be hidden or combined with the main lighting of the bed.
Types of Home LED Lighting
For home interiors, LED strip (LED strip) or duralight are usually used. They are energy saving and durable. But there are some differences between them. To make choosing easier, I suggest you understand their advantages and disadvantages.
Illuminating the bed using duralight
Duralight is a flexible cord with LEDs inside. Its main advantages include:
- protection from any damage;
- resistance to temperature changes;
- waterproofness and strength of the material.
Flaws:
- the price is higher than for LED strip;
- the glow is not very bright.
Arranging a headband for a floating bed
The main part of the floating bed is ready
Now let's move on to another component of it, which is quite important - the headboard. In the case discussed in this section, not just a panel made of wood or chipboard will be created, but a headboard with soft upholstery and several shelves along the edges
Step 1. To begin, attach sheets of plywood or OSB boards to the timber frame. Apply markings under the soft padding of the headband and buttons.
Markings are applied to the OSB sheet
Step 2. Attach foam rubber to the headboard plate with glue, cover it on the outside with padding polyester, and secure it with a construction stapler. Make holes for buttons on the headboard material and its soft filling.
Holes for buttons are marked Holes are made
Step 3. Cover the headboard with fabric or any other material suitable for you over the foam rubber and padding polyester. At the same time, use its sections with a significant margin - this is necessary for subsequent fastening of the upholstery material with construction staples. Through pre-made holes, insert buttons with thick and strong threads into the headboard.
Buttons are inserted into the headboard. Finished headboard with soft upholstery.
Step 4. Connect the headboard with the support and bed frame, complement it with shelves, cabinets and other necessary elements.
The headboard is complemented by shelves
Preparation and installation options
At the preparatory stage, the size of the bed and the location for placing the LED strips and power supply are calculated. To do this, you will have to remove the mattress, find the optimal place to mount the LED strip so that its light is directed downward, and measure the length of all the segments that will be located around the perimeter of the structure. Then you need to select the type of light-emitting chips:
- SMD 3528 IP20 with a brightness of 420 lm, costing about 60 rubles/m;
- RGBW-SMD 5060 IP33 with a brightness of 2000 lm, costing about 200 rubles/m + RGBW controller;
- or some other intermediate option.
After this, you need to purchase an LED strip and a profile of the same length. Why the cost of a profile? Firstly, the LED strip will stick well to the clean and smooth surface of the profile, and secondly, it will serve as a radiator, since it is not recommended to operate fairly powerful LED strips without an additional heat sink. Often the supporting part of modern double beds is made of fibreboard (MDF) or wood, which have extremely low thermal conductivity. But even if the bed frame is made of steel, it is not advisable to glue LED segments to it. Only inside the aluminum profile will the LED strip be reliably protected from any mechanical impact, such as:
- vacuum cleaner tubes during cleaning;
- children's curious hands;
- teeth and paws of domestic animals.
You can use a cheaper option - a plastic cable channel. It costs an order of magnitude less and is sold in every hardware store. But it will no longer be possible to create very bright, let alone RGB, lighting for the bed. Plastic will not be able to dissipate heat from emitting crystals for a long time and effectively, which will lead to their degradation within the first year of operation. For installation in a cable channel, LED strip without silicone coating type SMD 3528 with an element density of 30, 60 or 120 pcs/m of any glow color is suitable.
At the last stage of preparatory work you need:
- cut the LED strip and profile into pieces of the required length;
- degrease the inner surface of the profile for reliable adhesion to the LED segments;
- prepare connecting wires and, if desired, a switch.
Schematic diagram
The electrical circuit of an illuminated bed is extremely simple and consists of only 2 key elements: a power supply and an LED strip. If RGB or RGBW tape is used, then the circuit is supplemented with an RGB or RGBW controller. Below is a lighting diagram using a multi-color LED strip.
Assembling and connecting the bed lighting
Depending on the type of LED strip and the location of the power source, select a cable of the appropriate length and number of wires. For safety reasons, as well as to ensure sufficient load capacity, it is better to use double-insulated stranded copper cable with a cross-section of 1.0 mm2. It is flexible, tins well and calmly (without overheating) passes current up to 6 A.
It is highly undesirable to use twisted pair cables as the power cable for bed lighting. The cross-section of one core is approximately 0.2 mm2, which means it can pass no more than 1.5 A, and then with gradual melting of the insulation from overheating. So to connect powerful RGBW strips you need a more reliable option.
To electrically connect individual lighting areas located around the perimeter of the bed, you can use special connectors with existing wires. This method will speed up the assembly process and allow the structure to be quickly disassembled in the future. If this method is unacceptable, then all sections will have to be soldered together with separate wires.
You can learn how to properly solder an LED strip from this article.
Having all the necessary parts of the LED bed lighting, you can begin assembly in the following sequence:
- glue the LED strip to the profile;
- solder the wires observing polarity or fasten them with connectors;
- connect the power source and perform a test run;
- Fill the soldering area inside the profile with hot glue;
- Attach the finished lighting to the base using standard latches, screws or ties, depending on the type of bed.
For greater lighting effect, one of the 4 LED strips is attached behind the back of a double bed at the headboard, directing the light flux upward. Exposed live parts of the RGB controller, power supply and wires are reliably insulated to prevent fire and electric shock.
A bed with LED lighting will be much more functional if the controller has a built-in wi-fi module. In this version, the backlight can be controlled from a smartphone, easily changing the brightness and color. In addition, the program allows you to set the time to turn on/off the bed lighting, set an alarm with a smooth increase in brightness, and use other useful functions.
How to mount it correctly?
Once the locations for placing the LED strip have been finally determined, you can move on to the crucial moment - installation work. As a rule, LED strip is sold in skeins, the length of which is 5 meters. There are short wires soldered on the sides. Subsequently, they are closed with a special heat-shrinkable tube.
Before installing the LED strip, you need to arm yourself with a tape measure or measuring tape and carefully measure the surfaces on which you want to glue the product. For accuracy, it is better to write down all measurements on paper. Next, you need to take scissors and separate pieces of the required length from a 5-meter skein.
When the segments are ready, they must be connected to the so-called contact pads. Otherwise, the LED strip simply will not work. In order to significantly facilitate the process of connecting diodes to power, experts recommend using the simplest method - mechanical.
The connection process is quite simple. You need to take the contact pads of the existing tape, attach them to the connector contacts and close the cover until it clicks. The only drawback of this connection method is the high cost of the connector.
If you don’t want to spend a lot of money on installing the backlight, then it’s better not to use the mechanical method using a connector. For those who want to save money, it is most rational to use the soldering method. At first glance, this method may seem quite complicated. But if a person has at least some experience in this matter, then soldering the contacts of the LED strip will not cause any particular difficulties. The most important thing is to comply with two important conditions:
- The work must be carried out with a sufficiently heated soldering iron;
- the tool must have a narrow tip - no more than 2 mm.
The number of contacts depends solely on the type of tape. So, a standard RGB device has 4 pins. For correct operation of the tape, a separate conductor should be soldered to each of them
It is also important to use enough solder during the soldering process. Each wire must be tinned first.
Since the voltage at the contacts of the LED strip is low (from 12 to 24 volts), it is not necessary to insulate the packing area. But to be on the safe side and for aesthetic appeal, it is better to wrap this area with insulating tape and also put on heat-shrinkable tubing. At the final stage, it must be warmed up with a hair dryer or a regular lighter.
Before permanently gluing the backlight, you should carefully consider every detail. Otherwise, you will have to dismantle the entire system, and the diode strip after such actions may not be suitable for re-fixation.
A special glue is applied to the tape on the reverse side. Initially, the sticky side is protected with plastic film. It must be peeled off before fixing. The adhesion will be excellent with any smooth surface, but gluing it onto a rough surface can be problematic. In this case, experts offer two options for solving the problem.
- Before attaching the tape, it is recommended to stick a strip of double-sided tape to the surface. This is necessary in order to level the plane as much as possible.
- If you have extra money, you can purchase special metal strips. They are fixed with self-tapping screws. And you can install a backlit tape on them.
Such methods provide reliable fixation. But self-tapping screws are not suitable for any surface, as they will spoil the appearance with the resulting holes.
If you plan to connect the LED strip to the power supply, then it is better not to place this device in the bedroom or children's room, since the noise created will disturb the peace. It is more rational to take the power supply into a separate room.
Bed lighting with LED strip
An LED strip is a board with LEDs placed on it. It also has its pros and cons. The advantages include the following:
- easy installation due to the adhesive layer;
- ease of use, compactness;
- the price is lower than for duralight.
Flaws:
- low moisture resistance;
- lack of protection from mechanical damage.
Most often, LED strip is used to illuminate the bed. Now let's look at the installation methods step by step.
Making lighting using lamps
If the ceiling is made of gypsum board, then illumination with lamps is carried out according to the following scheme:
- production of niches for mounting lamps. To lay drywall, preliminary fabrication of the frame is required;
Frame for niches made of gypsum board
- laying wires for connecting lighting equipment;
Running an electrical cable to connect lamps
- installation and connection of lamps. The method of mounting the lamp depends on the type of device. If the ceiling is made of plasterboard and there is lighting around the perimeter, then you can use external lighting devices, which are attached to the surface of the ceiling, and internal lamps, which are installed inside the cladding.
Installation and connection of fluorescent lamps
Installation of LED strip
- Buy LED strip according to the size of your bed. Use the same principle to select a profile. The LED strip can already be found with an existing power supply, but if you bought the parts separately, then the power supply and other elements are connected using a soldering iron, according to the diagram below.
- Cut the tape and profile into pieces of the required length.
- Install a profile following the instructions in the photo below. Do not forget to degrease the mounting surface of the future lighting.
- If you decide to use RGBW tape, then make sure that there is an RGBW controller in the circuit. If it is missing, buy it separately and connect it using a soldering iron.
- Below is a diagram using RGBW.
- According to the diagram, connect all the elements together and check for functionality.
- Be sure to insulate exposed joints and solder joints.
If you want to add some zest to the design of your bedroom, then using the same principle you can use LED lighting for shelves, headboards, etc. Let me remind you that it is easier to purchase an LED strip with a power supply included if you do not consider yourself a jack of all trades.
This completes the installation of the bed lighting.
From all that has been said, we can conclude that LED lighting is the best analogue to conventional lighting. With the help of such lighting, you can create an unusual bedroom design, with your own hands.
Video instructions
When writing an article, use the following literature:
- G.M. Knorring, I.M. Fadin, V.N. Sidorov “Reference book for the design of electric lighting” 2010
- M.Yu. Chernichkin “All about electrics. Modern illustrated encyclopedia" 2016
- Gutorov M.M. “Fundamentals of lighting engineering and light sources” 1983
- Dorothy Wood, Decorating Your Home. Practical encyclopedia" 2004
- O. Tsvetkova “Bedroom design. Tips for interior design" 2010
Source
How to illuminate a bed with LED strip: step-by-step instructions
Now let's move on to the most important thing and try to talk about how to make lighting in the bed yourself. In fact, there are no special problems in this matter, the main thing is to show a little patience and desire.
- Initially we must determine the length of our tape. Here we need to measure the bed and think about where our tape will be attached. The final length of the tape should differ from your measurements by about 5%, this will avoid possible problems.
- Next, you need to think about how you will connect the tape. This is what the standard scheme looks like, based on which option you chose.
- Now we must determine the place where we will attach our tape. It is optimal to place it at the bottom of the bed, this is what will allow you to achieve optimal lighting. Initially, it is recommended to fasten it with clamps; they will serve for a long time; if the design of the bed does not allow this, read our instructions further.
- The place where you will glue the tape must be degreased. Alcohol or purified gasoline are suitable for such purposes.
- According to the chosen scheme, you need to connect everything together and check its functionality. If everything is in order, then you managed to make the backlight correctly. And so that you don’t make a mistake, we found a few more videos for you on the Internet.
After watching this video, you can effortlessly create high-quality bed lighting in your home.
Note! Instead of the usual LED strip, you can use durlight. It has similar characteristics and is lower in cost. However, the light of its glow leaves much to be desired, so it’s up to you to decide.
Necessary materials
If you want to illuminate your bed with LED strip, then you need to make a choice. To avoid making a mistake here, we recommend reading the article: how to choose an LED strip. In the meantime, we will tell you a few main options:
- You can use LED strip from a 220 Volt network. It has a very low price, however, the brightness of the glow is too high.
- You can also save money if you use ordinary tape. It can be purchased at a regular store. Please note that this type of tape requires an additional power supply.
- If you want to make unusual lighting, then choose RGB tape, it has several shades of colors. Such a tape can be controlled using special controls. In addition to such a tape, you must buy a control panel and an RGB controller.
Please note that each of these options has different costs. However, the higher it is, the better it will look in your interior.
The nuances of working with duralight
In view of the technical features of such a lighting device, several points should be noted that should be taken into account when making lighting from a light cord:
- if you are joining several pieces for a bed, make sure they have the same characteristics;
- connectors are selected according to the shape and number of contacts of the connected cords;
- The connection points must be dry without visible damage to the insulation;
- before turning it on, unwind it and check its functionality, but you can assemble and mount the backlight from duralight only in the switched off state;
- the cord has a special hermetic sheath, which you must keep intact, but if you damage the silicone during the installation process, this place is sealed with insulation;
- If you want the cord to not only light up, but also enter the blinking mode, install the controller along with the adapter.