A swan figurine should be in every home. In the culture of different nations, it is a symbol of fidelity, love, and purity of relationships. A home-made swan helps cleanse the home of negative energy and restore to the spouses the warmth in their relationship that has been lost over the years. It is also good as a gift. A swan couple is given to those who want to start a family, who have been unable to have children for a long time, or who have difficulties with their career.
You can make a swan with your own hands from anything. Any paper will do - both regular and thick cardboard. You can use felt, plastic (bottles, shopping bags, film), natural materials - cones, maple seeds, cereals, car tires. A beautiful bird in the form of an applique or figurine will complement the interior, serve as a landscape decoration, and become the basis of a flower bed.
The simplest techniques
Look at numerous photos of swan crafts on the Internet and you will see how many different techniques and ideas exist. But many of them are too complex, and many, on the contrary, are simple, but do not look as good as we would like.
We have prepared for you a wonderful selection of crafts using techniques that are just right for you. These are proven master classes that will help you make beautiful crafts with your own hands without extra cost and effort. Try it and everything will work out!
How to make modules
To obtain modules, you need to cut a landscape sheet into 32 identical rectangles. The parts will be smooth and neat if you follow the correct technique.
First you need to fold the landscape sheet in half and cut along the fold line. To do this, it is convenient to use scissors or a stationery knife. Bend each resulting part again and cut into halves. Repeat this procedure 5 times in total.
Now you need to form a module from these small rectangles. Fold the part in half lengthwise and fold the resulting strip into a booklet again. Fold the edges towards the center. Here is the triangle. All that remains is to bend the lower part on the reverse side, fold the protruding edges inside and fold the part in half. For the craft you will need a little more than 1500 of these modules. Most of them are white, pink ones only need 180 pieces.
From cardboard
The simplest and at the same time very beautiful DIY swan craft is made from ordinary cardboard for children's creativity.
It is done simply. To begin with, you need to cut out a base from thick blue cardboard - a lake of round or irregular shape. Then we cut out a beautiful white swan using the template and use glue to attach it to the lake in the center. We draw the swan's eyes and nose, and also wings, and decorate individual feathers with a black pen or felt-tip pen.
We come up with decor. You can cut out green water lilies from other shades of cardboard; you can even make reeds and blades of grass from scrap materials or paper. You can also make two swans on the lake, the second one being black!
Wings
Next comes work on the wings. These parts are arranged in a height of 10 rows. Both wings should be formed at the same time. After 10 rows, the number of modules should be gradually reduced.
Each subsequent layer of wings will be one detail smaller than the previous one - this is how a beautiful smooth silhouette is built. The outermost modules should be pink. At the end, there will be one triangle left at the tips of the wings.
The internal design is made by analogy. The only difference is that the circle needs to be formed not from 30 modules, but from 20. The height needs to be made not 10 rows, but 7, the wings are lined up the same way, with pink edging around the edges.
Made from felt - beautiful and original
You can make a very beautiful craft from felt, and it can be used as a hanging decoration or even a brooch. To do this, you just need to attach a ribbon or pin to the finished craft.
Prepare a swan craft template - draw or print the silhouette of a swan in the size you need, preferably small, about the size of a child’s palm. And for a brooch – even less. Cut out this silhouette from thick white felt.
Then paint the swan’s nose with red paint - gouache or acrylic. Glue or sew an eye - a black bead. Then take a piece of white faux fur, you can buy a white fur ball separately (these are sold as bag pendants or key rings).
Glue a fluffy fluff ball onto the swan's body. Add a pin or ribbon and you have a beautiful souvenir!
We recommend reading:
- Craft bullfinch: detailed description of how to make a bird with your own hands (115 photos)
- Crafts from vegetables: 100 photos of the best crafts for children and a review of recipes for adults
- Craft ship: 120 photos, templates, drawings and step-by-step instructions on how to make a boat
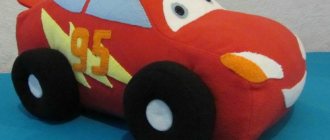
Swan made from plastic bottles
Crafts made from swans bottles are very popular. They can be made for a school or kindergarten, as well as for decorating a home, garden or patio.
For such a craft, it is better to take white opaque plastic bottles (from kefir or milk) in large quantities. You will also need strong glue (you can use hot glue), good sharp scissors, pliers and wire cutters.A large plastic bottle can become the base - the body. It will have to be covered with numerous “feathers” cut from white plastic. The neck can be made from wire and put on many rings from a plastic bottle, and the head can be formed from a small bottle.
For a child, you can make a small swan using one milk bottle as the base of the swan, and from another bottle, cut out feathers and decorate the bird.
Watch the video master classes and choose one of the many ways to make beautiful swans from plastic bottles. It's not difficult at all!
Final design of the pots
After the primer has dried, coat the craft with oil paint. To achieve maximum naturalness, look closely at a photograph of a swan and copy the nuances of the bird's color .
The mute swan has a dark stripe running from its eye to its beak.
The eyes are painted with black paint, and the beak is painted with red or orange.
You can’t take your eyes off the finished pots
After the paint has dried, the sculpture is coated with varnish for exterior use. This will protect the swan from bad weather. You don’t have to paint the bird, but simply coat it with varnish after priming.
A pot with a flower is placed in the finished flowerpot.
Bright flowers look good in a white swan pot
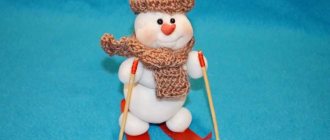
Made of thread and cardboard: a beautiful pendant
Another original and simple way to make a beautiful, stylish swan craft. This could be a hanging decoration, a brooch, a Christmas tree decoration, or just a wall hanging. Choose the size arbitrarily, but the toy should be small and neat.
To begin, cut out the silhouette of a swan from thick cardboard. Then take high-quality white woolen threads, and, coating the cardboard with PVA glue, tightly and carefully wind the threads onto the cardboard figurine. Secure the edge of the thread with hot glue or another quick-drying and strong one. You've got the base, all you have to do is come up with the decor.
You can either paint the nose or wrap it with red thread. The eye is a black bead, and the wing is best made from white feathers, you can buy them at a craft store. Attach the lanyard. Use a ribbon or pin of your choice, and a beautiful handmade craft is ready!
That's not all!
Of course, as many needlewomen as there are, so many ideas. We have offered you the simplest, most popular and “working” methods, but these are not all methods. And the best way you can come up with yourself!
Use your imagination. Choose the technique that suits you and add something of your own to it, imagine and create. After all, in creativity there can be no copies or clear patterns, but there should always be room for inspiration!
What is modular origami?
Modular origami, which originated in the 18th century, remains popular to this day. This type differs from classic origami in the large number of sheets of paper used. Folded into triangles according to the principle of classic origami, the sheets are nested into each other using the construction method, giving unlimited scope for imagination and creativity. When creating complex designs in modular origami, glue is used, ensuring the reliability of the structure. A tightly glued piece will serve as an excellent toy for children.
Photo crafts Swan
0