The time for the New Year holidays is approaching. We are already starting to think about the Christmas decoration of the apartment, and soon we will start choosing a Christmas tree and decorations for it. And you don’t have to run to the store for holiday decor. You can make it yourself from available materials. For example, you can create Christmas tree decorations from old light bulbs, crafts from satin ribbons, and even from fabric. But you can also make Christmas tree decorations from cotton wool that will make you nostalgic and remind you of the New Year’s beauty from childhood.
DIY Christmas tree decorations made from cotton wool - what could be simpler?
The history of the appearance of New Year's toys made of cotton wool goes back to the 30s of the twentieth century . Folk craftsmen created figurines from seemingly very soft and fragile material. But using the means at hand, they managed to make figurines of Father Frost, a snowman, a Snow Maiden, an elf and other characters. When other decorative options appeared on the market, cotton toys faded into the background. But now old traditions are being revived and ancient Christmas tree decorations are again coming to the fore.
Why are Christmas tree decorations made of cotton wool so popular? Thanks to the pliability of the material, you can create sophisticated and beautiful products - from a simple ball to a human figurine. This toy is very light, but holds its shape well and can be painted in different colors.
We offer a master class on how to make Christmas tree decorations from cotton wool, and also show photos and videos with step-by-step production of such decor.
Creating a face for a cotton toy
The master class was prepared by a teacher of additional education at MAOU DO TsRTDIU, Kamensky district, Penza region, Yulia Valerievna Semova.
Materials and tools:
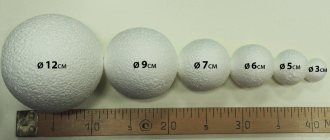
- Face mold,
- self-hardening mass for modeling,
- gouache,
- tassel,
- palette,
- gel pens,
- marshmallow box,
- cotton wool,
- petrolatum,
- white acrylic paint or corrector,
- clear nail polish.
Progress
Faces for cotton toys can be made using purchased molds from ready-made clay or homemade self-hardening mass for modeling (with plaster) and cold porcelain. In the photograph we see faces made from homemade masses.
Upon closer inspection, the difference is visible: a face made of cold porcelain is smoother, without defects. But when it dries, it decreases in size.
Consider the option of creating your own molds for the face of a toy .
We lubricate the doll's face with Vaseline, make a layer from a thick piece of cold porcelain (recipe here), wipe it with starch to make it easier to remove, print it carefully, without moving or thinning in the area of the nose and lips.
You can leave it on the doll for a while, then carefully remove it and dry it on cotton wool in a marshmallow cell, for example (a box with an insert), dry it for several days. Before use, lubricate both the surface of the mold and the surface of the mass with starch. We make an impression.
The drying process takes some time; I dry it in the same box on a convex piece of cotton wool. At first I simply dried it on paper, the faces became flat and deformed during drying.
If there are large defects, we go through with fine sandpaper. Next we prime it with putty, to do this we lay out a little putty and add water to the brushes and go over the surface.
Next, we tint with gouache, on the palette we make a flesh color and a little pink for the lips and cheeks. Dries very quickly. Then we cover the eye area with white acrylic paint or corrector. Faces made of cold porcelain are more alive, not very clear.
After drying, use gel pens to draw eyes, eyebrows and lips, and if necessary, hair. Seal with one or two layers of clear nail polish.
You can sculpt hands for dolls. To do this, a mold is purchased or an impression is made in the same way as from the face.
And here is the result, a cotton toy with a homemade face. Size less than 12 cm.
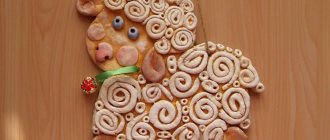
A cow made of cotton wool is a beautiful Christmas tree toy
The symbol of 2022 is the Bull. And the figures of this animal on your forest beauty will be relevant. Make them from cotton wool, for which you first need to make a figurine of the future toy, for example, from wire. After this, it is wrapped in cotton wool and secured with threads. The top layer is glued using PVA glue.
Watch the video on how to make a bull for a Christmas tree with your own hands :
Crafts for kids
The easiest way to teach young children how to create crafts from cotton wool with their own hands is by making vegetables and fruits. It is not difficult to form apples, lemons, oranges, mushrooms, carrots and other vegetables and fruits from cotton wool. One has only to show the child how to do this, how to paint finished products, and he will happily join the creative process and begin creating his own new products.
The tradition of making new and updating old New Year's toys existed in the 17-19 centuries and was passed on from generation to generation. Children were necessarily involved in this process, this instilled in them perseverance and patience, and created a pre-holiday mood in the family. This wonderful tradition is beginning to be revived in our time.
DIY Santa Claus made from cotton wool on a Christmas tree
Using these instructions, you can create not only Santa Claus, but also the Snow Maiden, Baba Yaga and other characters.
You will need:
- cotton wool;
- cardboard;
- PVA glue;
- wire;
- newspaper;
- paints.
How to make a Christmas tree toy with your own hands?
- We cut out the future figure from cardboard, make a loop from wire, which we then fasten to the cardboard.
- We tear the paper into small pieces and glue it to the cardboard for volume.
- We divide the cotton wool into pieces and glue it onto cardboard, creating a silhouette of a figure.
- We dilute the glue with water in a ratio of 1:2 and coat the toy, then leave it to dry.
- Using pieces of cotton wool soaked in glue, we form felt boots, a hat, a nose and other elements of the figure.
- After the figure has dried, we paint it.
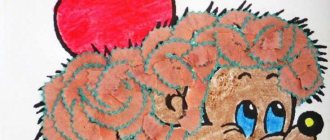
Unusual bird
This master class will require cotton wool in a roll, cotton wool balls, PVA glue, threads, watercolor paints, varnish, cardboard, a sketch of a future toy, and a flat bristle brush.
We cover the toy template with cotton wool on both sides.
We wrap it with thread, and if we see that somewhere there is not enough cotton wool, the layer is thin, we report more.
We form flagella from cotton wool and glue them where necessary. This is the face area, nose, paws.
Dry in a warm place (battery) or at room temperature. The figurine must dry completely. Then we paint it according to the idea.
So you can do something like this:
Or fish.
These hearts can decorate not only, for example, a New Year’s tree, but any corner of your home any day.
New Year's toys made of cotton wool - the best ideas
From this simple material you can create vintage crafts and figurines that resemble old Christmas tree decorations. The simplest ones will be decorated balls, Christmas trees, stars, the moon, houses. But you can also try to make complex toys that will look very beautiful. See the best options.
Plastic and cotton wool
If you know how to work with plastic, then you can make the following toy. First, sculpt a face out of polymer clay (plastic). If your material is self-hardening, then leave it to harden; if baking is necessary, then put it in the oven at the temperature and for the time indicated on the package. Then coat with varnish.
Make a body frame from wire.
Wrap the frame with cotton wool and secure with thread.
Glue the face to the head area and additional details.
We paint as planned.
Here are just a few options for creating toys from cotton wool. They can be small or large, of various shapes and colors, for any event, serve as gift decor or the present itself.
Related article: Do-it-yourself plasticine at home from starch with video
Decorating elements
You can make a scarf and hat for the snowman. To do this, you need to roll a stick out of cotton wool between your palms and, after spreading glue on the surface around your neck, attach a scarf. You can position it in different ways. Cotton wool is a very pliable material, and you can use glue to fix it in the desired position.
Making a hat is similar to modeling from plasticine. A ball of cotton wool is rolled, then it is flattened into the shape of a bowl, put on the head, lubricated with adhesive, and covered on top too. The pompom on the hat is represented by a small ball of cotton wool glued to the top of the snowman's head. After complete drying, the figure is painted with gouache paints. Then you can cover the entire snowman with glitter mixed with acrylic varnish. Then the toy will look shiny and will not stain the child’s hands with paint.
Origin story
The main character of the New Year holiday and Christmas is the sparkling lights, richly decorated Christmas tree. Bright balls, glass beads, tinsel, located on the branches, give others a fairy tale and faith in miracles.
But Christmas tree decorations were not always made of glass or plastic. The first Christmas tree decorations were made from cotton wool and paste.
By decree of Peter the Great, the New Year holidays were moved from September to January. Before the holiday, people decorated courtyard gates, roofs and doors of houses with fir branches; there was no other decoration at that time. The custom of decorating a Christmas tree came to us from Germany.
There was no glass production in Russia yet, so Christmas tree decorations began to be made from cotton wool. Vata has the following characteristics:
- softness;
- durability;
- pliability;
- interaction with other materials.
There were plenty of raw materials for making toys. In factories, craftswomen put their souls into creating Christmas tree decorations.
The first decorations were called "Dresden toys ". They were made from pressed cotton wool by hand, and they looked like flat relief figures. Cardboard was often used as a basis, which gave strength to the product.
Cooking the paste
At a certain stage of creating a toy, we will need something that will give it its final shape, hardness and allow it to be painted. For all this you will need a paste. You can take the easier route and use PVA glue as a fastening base. But such toys will not be highly durable. Therefore, we learn how to cook a strong paste using a simple technology:
What you will need:
- potato starch;
- PVA glue;
- water.
How to do:
- Pour water into a small saucepan and heat to a boil.
- Dilute a little potato starch (approximately 2-3 tablespoons by eye) in cold water and stir thoroughly so that there are no lumps.
- Pour the diluted starch into hot water. Stirring, bring to the consistency of jelly. If necessary, you can add water or starch.
- Cool the mixture to a temperature comfortable for the body and pour in a little water.
- You shouldn’t let our “jelly” cool completely, because... he will be very difficult to work with.
With this paste you can create durable cotton wool Christmas decorations for the New Year holidays.