Rules for taking measurements
A knitted hat for a child is sewn according to 2 main measurements. This is the circumference of the head and the depth (or height) of the product. For a hat with ties that covers the ears, you also need to know the measurements for the side depth of the hat.
The main measurements and measurement technology are given in the following table:
| Measurement name | How to measure |
| Head volume | Place the measuring tape above the ears at the level of the eyebrows, at the back - along the most convex part of the back of the head. |
| Cap depth | Measure the distance up to the forehead from the crown to the point between the eyebrows, back to the base of the skull and along the sides to the edge of the earlobe. |
| Rear Width | Measure the distance from your earlobe to the posterior center line at the base of the skull. |
To create a hat pattern, take any pattern from a sewing magazine as a basis or print out a ready-made pattern. You can also trace the outline of another baby hat and add seam allowances.
Stages of work
- Take measurements from your head as indicated above. When felting, the size must be increased by 30%, since wool always shrinks. The easiest way is to take a ready-made knitted hat and use it as a pattern.
- Separate thin fibers from a whole piece of wool and lay them out on the pattern in different directions. This is necessary so that the material adheres better. When laying out the wool, don't be afraid to go beyond the edges of the template. Everything unnecessary will turn up later. It must be laid very tightly so that there are no gaps in any way. Try to keep the amount of wool the same throughout the entire area.
- Examine the future product in the light. If there are holes, they need to be closed. The thickness of the future felt should be the same everywhere.
- Spread bubble wrap. Place the workpiece in a washing bag and place it on film. Cover with soapy water using a spray bottle.
- Pat the workpiece until a stable foam forms. Go over it with a rolling pin.
Related article: How to grind a concrete garage floor
- Remove the film. Turn the workpiece over and place it on the pattern. Tuck the excess under the pattern. Hold it down.
- Beat the foam and lather the product well. Knead it with your hands until it stops breaking up into fibers and becomes a solid canvas.
- Place the future hat on the blank and smooth the edges. Leave to dry.
- Fill a bowl with cold water. Rinse the product. Now drain the cold water and add hot water. Alternate liquids of different temperatures several times. Squeeze out the excess. Don't twist it. Return it to the blank or bottle. Shape the bath cap and leave it to dry away from central heating radiators and open sunlight.
- Once the product is dry, trim off any excess to form a helmet. Decorate it with pieces of multi-colored wool and felt decorations.
Simple version of the product
It is recommended to iron the fabric before cutting. If the knitwear has a pattern, it is necessary to position the pattern so that the objects are placed centrally or symmetrically around the center line.
A knitted hat for a child, the pattern of which can be created in just 10 minutes, can be single-layered or with a lining.
First you need to decide on the size of the hat: measure the volume of your head and choose the desired height of the product.
Next, to create a pattern you need:
- Divide the head circumference measurement by 4 and make a deduction for the stretch of the product (for dense fabrics, subtract 0.5 cm, for thinner and more elastic ones - 1 cm).
- On a sheet of paper, construct a rectangle with the following parameters: the width is equal to a quarter of the circumference of the head, taking into account the necessary deductions, the length is the height of the hat with an increase of 5 cm for the lapel (optional).
- On the left side, move 2.5 cm from the corner to the left, and down ¼ of the height of the cap. Connect the dots to get a dart.
- Round the upper left corner of the rectangle.
- The resulting part is ¼ of the cap.
Knitted hat for a child, a simple pattern.
Preparing fabric for cutting
The length of the fabric cut for the hat depends on how it will be cut:
Sequencing
The main characteristic of knitted fabric is its elasticity. It can stretch in one direction or in two. When cutting products, you should pay attention to the main direction of stretching and place the pattern strictly perpendicular to the direction of the stretching line.
For correct cutting you need:
- Fold the piece of fabric across the stretch line with the right side facing inward.
- Attach the hat pattern, trace it with chalk or pencil and cut out the resulting parts, leaving a 1 cm seam allowance.
- When cutting out two-layer products, the fabric needs to be folded across and separately cut out 2 parts with a fold at the bottom.
- To sew a hat with a lining, cut out 4 identical parts or 2 parts with a side fold.
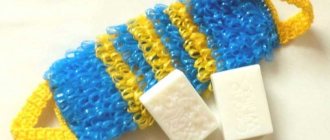
How to choose a kilt
Today, many offers of various bath kilts can be found on the Internet. Manufacturers offer kilts of varying quality and design.
The most common type is a terry product made from 100% cotton. However, for those who prefer other fabrics, there are kilts made from bamboo, linen and other natural materials.
There is also a very wide selection of designs available. Children's drawings, feminine and masculine tones, decorative elements are present in almost every option.
The cheapest ones cost 300-500 rubles. And the most expensive ones are from 3 thousand rubles and above.
When choosing your kilt, it is important to understand that the primary purpose of this bath accessory is hygiene. The comfort with which a person will steam depends on what material is used when sewing a kilt. If the material is synthetic and does not absorb moisture well, then most likely a person runs the risk of developing a rash or skin irritation.
Waffle kilt for a bath
A bath kilt should be terry or waffle, preferably 100% cotton. Such a kilt will perfectly absorb droplets of water and keep a presentable appearance for a long time, which is important when going to the sauna with friends and colleagues.
Women are advised to pay less attention to the appearance of a kilt or pareo and choose based on quality.
In general, here are the main characteristics of a quality kilt:
- natural fabric;
- durable tailoring;
- moisture absorption;
- convenience and comfort.
Choose this hygiene item carefully. After all, the most important thing in a hygiene item is maximum harmlessness to the body.
Sewing
A knitted hat for a child has a simple pattern that even an inexperienced craftswoman can handle. Sewing a hat takes no more than 30 minutes.
To complete the work you need:
- Place the cut pieces right sides facing each other and pin the edges together with sewing pins.
- Sew the edges on a machine and overcast them with an overlocker or a special machine stitch.
- To ensure even seams, iron the product with an iron.
- Sew the darts in one line. Carefully align the previously stitched seams to create a beautiful intersection of lines on the front side.
- Finish the edges of the dart with an overlocker.
- Sew the bottom of the hat with an overlock stitch and fold it inward by 2-2.5 cm. Pin the hem and sew the edge on a machine, departing 1.5 cm from the fold.
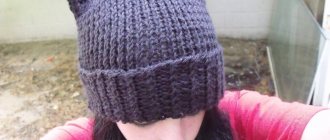
Crochet a binnie hat
To knit this stocking cap I used Italian yarn: 50% Merino 50% Acrylic 3/650 217m/100g Dinamo. Consumption is a little more than 100 g.
The binny hat is knitted with single crochets (SC) in the back half loop. Knitting proceeds in a transverse direction, that is,. The height of the hat is the number of loops, the width is the number of rows.
The yarn contains merino wool, which makes the fabric of the hat flexible and the hat drapes well on the top of the head.
The diagram is shown for yarn with a thickness of 200-220 m per 100g. In order to knit this hat from another yarn, you need to knit a sample of approximately 20 rows and 20 loops with a sc pattern. Measure the width and height of the sample and calculate how many loops need to be cast on (this is the height of the hat) and how many rows need to be knitted (this is the width of the hat). Knitting pattern for a hat and stocking.
The height of the hat without the lapel is 28 cm. The width of the hat when not stretched is 54 cm. The hat stretches well (however, the knitting is tight) and fits a head circumference of 56-60 cm.
The number of wedges is 4: the first and third wedges are 2 rows smaller than the second and fourth wedges. In the diagram, I highlighted rows 33, 34 and rows 67, 68 in green for clarity. But this is not necessary; the number of rows in the wedges can be the same. I have 68 rows knitted for the required head circumference, 68 is not even divisible by 4, so I distributed the “extra” rows in this way. The wedge is formed by "partial knitting". There is no such term in crochet, so I put it in quotes. Verbal description rows 1-4 We cast on a chain of 38 + 1 ch (this is a ch rise, replaces the first sc at the beginning of the row). 1 row. In the second loop from the hook we knit 27 sc, 1 psc 2nd row. We turn the knitting, in the second loop from the hook WITHOUT LIFTING LOOPS we knit 28 sc. 3rd row. 1 ch rise, 29 sbn, 1 psbn. 4 row. We turn the knitting, in the second loop from the hook WITHOUT RISING LOOPS we knit 30 sc.
After the PSBN is knitted at the end of each row in the next row, at this place we see not a loop, but a kind of “hem”. We knit the next one into it according to the RLS pattern. This way we get a wedge.
We return to knitting the hat. The first wedge.
Third and fourth wedge. The canvas is completely connected.
This is what the top of the head looks like up close.
We do not break the knitting thread. Use this thread to join the hat with a chain stitch.
We cut the thread so that the end remains long enough. We fasten the last loop. Use a knitting needle to tighten the hole at the top of the head.
View of the seam from the front side.
View of the seam from the wrong side.
We fasten the thread and hide the tail. We carry out wet-heat treatment in accordance with the recommendations on the yarn label. The binnie hat, or as it is also called the stocking hat, is ready! In addition to the hat, I also knitted a snood.
When copying this master class anywhere, please provide a link to the author and the resource.
Budenovka pattern
Budenovka is primarily associated with the clothing of the men of the Red Army. This hat can be given as a gift or souvenir with a focus on history for the elderly. Young people use these elements in military style. The pattern can also be used when sewing carnival costumes. There is a hero with whom many children are introduced - Malchish-Kibalchish. As a result, many people are looking for where they can buy such a hat, but they don’t always find it, so there is only one option left - to sew a budenovka with your own hands.
How to sew a turban on your head from a towel without a pattern
If you want to learn how to quickly and easily sew a turban on your head from a towel, welcome to my master class! It will be a great thing for going to the sauna and bathhouse; you can wrap your head after applying the mask, and just conveniently dry your hair after washing. It is easy to sew, consists of one seam and I don’t need a pattern.
Ready-made head turbans, which are sold in stores, are made from synthetics - microfiber, which does not absorb water, and the hair does not dry afterward. You can make a turban with your own hands from natural cotton fabric, which will be comfortable for your hair and head.
Beanie
To make a hat with a flip at the top of the head, you only need to sew 3 seams. Job completion time: 10 minutes. To cut a hat, you need to place the fabric in front of you and set aside along the stretch line a size equal to the circumference of your head and subtract 4 cm for tension. Measure 55 cm in height and cut out the part.
The nuances of making a beanie hat:
- First you need to fold the rectangle in half, perpendicular to the stretch line, align the side cuts and pin them together with pins.
- Next, lay a straight machine stitch along the edge, leaving a hole (5 cm long) in the seam for subsequent turning of the product.
- The next step allows you to create a curl at the top of the head. To do this, you need to place the stitched part in front of you vertically, take the upper right corner and align it with the lower left corner of the rectangle. Then take the top left corner and align it with the bottom right corner.
- The bottom cut produces 4 layers of fabric. The middle 2 layers need to be moved slightly inward and the 2 outer layers need to be pinned together.
- Next you need to start sewing the chipped sections together using a machine. Having reached the opposite edge, you need to do the following: gradually begin to straighten the folded edges and continue sewing in a circle. As a result, the machine stitch will be laid along the entire lower circumference.
- After stitching, the product must be turned inside out. The hole must be sewn up on the front side with a hidden seam or machine stitched.
Step-by-step felting of a bathhouse cap: master class from professionals
For bath lovers, an original cap will be an excellent attribute in a hot sauna. Wet felting is great for wardrobe items. Consider a master class on making a bath cap.
To work you need:
- Material for pattern;
- Wool;
- Polyethylene;
- Nylon fabric;
- Warm soapy liquid;
- Sanding machine, if available;
- Gloves for work.
We make a pattern on paper. The hat will be in the shape of a bell. We focus on size 56. Based on this, the width is 44 cm and the height is 28 plus 6 cm to create a semicircle. Let's make another pattern on polyethylene.
We put the polyethylene under the paper and begin to lay out the wool. Let's choose the main shade and start working from the top of the head. Thin strands will make approximately 6 rows.
The next step is to wet press the pattern. Place a nylon cloth on top of the felt ball and moisten it with a soap solution. It will be convenient to use a spray bottle.
We begin to wipe the future hat, moving from the central part to the sides. When the wool lies evenly, you can begin to make circular movements, lifting the nylon fabric. These manipulations must be performed until the felt stops stretching.
We apply a film pattern to the product. It is necessary to press down the template well. Carefully tuck any protruding fibers behind the film.
Next you need to place the second ball. Now starting from the bottom and moving to the top. Next you need to carry out the same manipulations as with the first layer. Cover with a nylon cloth, moisten and smooth out a little. Then the hat blank must be turned over. Carefully tuck any protruding fibers behind the film.
Now you need to make a cross layer of wool. On the sides the villi can boldly protrude, while at the top and parallel to it a straight line should form.
The bath cap can be of any design, the main thing is to follow the instructions, then the result will not be long in coming
Then we again cover the cross layer with a cloth, spray it with soapy water, and rub it. Turn over and remove any protruding fibers.
On the other side the process is similar. Then repeat the cross layer on both sides. Total of 4 layers in total on each side.
The wool needs to be pressed. To do this, you can use a special machine or work manually. There is no need to process the edges.
Monitor the moisture content of the product. In case of high humidity, remove excess water with a towel.
Next you need to roll the hat onto a stick and roll it on a bamboo mat. The procedure will take 5 minutes, after which the product is straightened and the felting side is changed. You need to allocate 20 minutes for this. During surgery, smooth out any creases. After this, the cap must be turned out and the procedure repeated. The product resembles a cap.
It’s time to add a soap solution to well-felted wool. It is better to work with gloves. You need to crush the product thoroughly.
When the product begins to shrink, you need to put the hat in hot water and wrinkle it a little. Next, lower the product into cold water. Repeat this contrast again. This is an important measure so that the hat gets used to changes in temperature in the bathhouse. When finished, rinse the product in warm water and dry with a towel.
The still wet hat must be put on the workpiece and given the desired shape.
If desired, you can create a woolen decor. You can also make the lining on silk.
Lined
A lined hat is made from a knitted outer material and lining fabric. If you plan to wear a hat with a lapel, then the color of the lining should be chosen so that it is in harmony with the main color of the hat. To sew, you need to create a pattern or use a ready-made printed pattern. A lined hat can have a classic cut, a beanie shape, or a model with triangular ears.
To sew a hat with a lining, you need to do the following:
- Cut out 2 pieces from the main and lining fabric.
- Turn the hat base blank inside out and sew the back seam and darts.
- On the lining piece, sew a back seam and a front dart. Leave the middle undercuts unsewn.
- Place the lining piece into the base blank. The front sides of both parts should be facing each other.
- Sew the bottom edges with an overlock stitch.
- Turn the hat right side out through the hole in the lining. Sew the hole closed with a blind stitch.
What fabric can be used to sew a turban?
- Before jumping into the process of sewing a turban, it is important to choose the right material. Most often, Muslim women used silk or brocade, but you can use absolutely any fabric that you like. The only condition is that it must be soft. It can be delicate silk, cashmere or velvet.
- If you are making a turban for the cold season, then give preference to wool blend fabric. But you should not take fabrics that are too rough or thick, otherwise all her femininity and tenderness will be spoiled.
- You should also not choose linen fabric, because... it is too rigid and will form unsightly and rough curves. Felt is also not suitable; at a minimum, the headdress will look ridiculous and cheap.
- And the knitted material is too thin and will stretch out very quickly. Although it is quite often used as an accessible analogue.
- Wool, corduroy or cotton are great because... These materials are quite dense and will hold up well.
- For winter cold, you can even use short-haired fur.
Article on the topic: How many pickets are in a meter of fence
With such a headdress you will always be feminine
Double sided
A knitted hat for a child (the pattern and cutting diagram are presented later in the article) can be sewn from one piece of material and look exactly the same inside and out. Before sewing, you need to create a pattern.
To do this you need:
- Take a sheet folded in half and set aside from the fold an amount equal to ¼ of the length of the head circumference, and at the top measure the length of the cap and build a rectangle from the resulting points.
- From the top, retreat 2.5 cm from the fold line, and down a distance equal to ¼ of the length of the cap. Connect the resulting points and cut the corner along the line.
- On the other side, smoothly round the corner of the rectangle.
The resulting part is a pattern for half of the hat. When cut from the bottom and left, it will have folds.
To cut and sew a hat, you need to do the following:
- Fold the fabric so that the fold lines on the fabric coincide with the fold lines on the pattern, and cut out 1 solid piece of the hat with undercuts and seam allowances.
- Sew the middle undercuts using a machine.
- Fold the piece in half with the right side inward and sew with a continuous stitch in a circle. For turning inside out, leave an unstitched space of 4-5 cm long.
- Turn the hat inside out through the hole left and sew it with a hidden seam.
In addition, you can sew a simple scarf from the same fabric with a button closure. To do this, sew a rectangle of the desired length (so that it fits freely around the neck) from the inside out around the perimeter using an overlocker. Sew a fabric loop on one narrow side. Next, turn the product inside out through the hole left and sew on a button.
Types of wool for felting
Before you buy wool, you need to know about its varieties. To make bath caps with your own hands, you can use:
- Carding. Its second name is “wool wool”. Products made from it are quite thick. Good for beginners as it is very easy to felt. Suitable for felting both wet and dry.
- Sliver. This is a combed type of yarn. There are no hard hairs in it. Unpainted, which is why it costs less than colored counterparts. An excellent choice for felting bath hats.
- Colored combed wool. High-quality and expensive-looking material. Has thin unidirectional fibers. Often used to decorate bath caps.
- Merino wool. Elite material. Used in the manufacture of thin things. Expensive designer hats are made from it.
Working with wool is a real pleasure. Natural material is pleasant to the touch, environmentally friendly and gives room for imagination. Felting a product from it is faster than knitting it from yarn or sewing a similar one from fabric.
Bath caps can be felted or sewn in a variety of shapes. For example, products in the shape of a watermelon, pumpkin, and ladybug are popular.
Article on the topic: How to make a decorative fence with your own hands
With ears
Making a model for a baby with ears does not have significant differences in sewing technology. The difference is that the pattern is not rounded, but has corners at the top in the form of ears.
The pattern of 1 half of the hat is a rectangle, the width of which is equal to the half-circumference of the head minus 1.5-2 cm for the tightness of the fit. The length of the rectangle is determined by the height of the header. To do this, you need to measure the distance from the line between the eyebrows to the back of the head and make an increase for the ears and lapel.
How to determine the degree of water hardness
As a very important factor when it comes to washing any type of textile, the water hardness level cannot be ignored. It’s quite easy to check this in several ways using available tools that are found in every home.
With tea
You need to brew loose-leaf black tea and, after a couple of minutes, look at the saturation of its color
It is important to do this not with a packaged product, because it brews quickly
If the liquid is light and bright, then everything is fine with the water. When it is cloudy and very dark, the hardness is increased.
Using soap
A little laundry soap needs to be rubbed and diluted in water. If everything dissolves quickly enough, then the liquid is safe and suitable for washing without additional processing. Floating particles indicate that the quality of the water supply is poor.
A competent approach to choosing detergents and following individual washing rules will help you cope with the problem or avoid it altogether. Returning a material to its original state is more difficult than maintaining it. And we already know how to make terry towels soft after washing.
https://vplate.ru/dom/kak-mahrovye-polotenca-sdelat-myagkimi/ https://pentad.ru/7-sposobov-vernut-myagkost-mahrovym-polotentsam/ https://podomu.info/care/ textile/kak-sdelat-polotence-magkim-posle-stirki.html
What does a real Budenovka look like?
The budenovka pattern is very simple. Initially, the hat was sewn in the form of a helmet made of cloth with a cotton lining. The cap consisted of 6 spherical triangles; a metal plate of about 2 cm was sewn into the top. An oval-shaped visor and a backplate with long edges were sewn to the cap so that they could be fastened under the chin. A mandatory element of any budenovka was a cloth star. Its color depended on the type of troops. In the winter version of the hat, the size of the star was 10.5 cm, in the lighter version - 8.8 cm. The star was the location for attaching the badge - the cockade.
As you can see in the photo, the winter budenovka was made of felt and had a quilted insulated inner layer. With minor changes, the budenovka served in the Red Army wars until the introduction of new uniforms with shoulder straps. The last photo of a fighter in Budenovka dates back to 1943.
Why is there a hat in the bathhouse? Features of a bath cap
Many people wear a hat to the bathhouse just for fun, because a person usually looks funny in it. But in reality, a hat is necessary. The steam room has extreme conditions (high temperature and humidity), and the closer to the ceiling, the more aggressive the environment. Staying in a steam room for a long time can lead to overheating, and a person may experience headaches, nausea, or even heatstroke. To avoid overheating and protect your head from high temperatures, bath caps are exactly what you need.
In addition, exposure to high temperatures has a detrimental effect on the condition of the hair. They become overdried, brittle and begin to split. A bath cap will help protect them.