Some recommendations for using a disk oven
During operation, some difficulties may arise that can be completely avoided if you follow some simple rules:
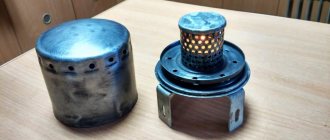
The main thing is to reliably weld all the joints of the future stove. During operation, smoke may enter the steam room through unsealed cracks.
This is not very pleasant, so pay special attention to welding work. Of course, with prolonged use due to high temperatures, cracks may occur, but they can be easily eliminated with clay and well-dried sand.
Sand can help find new cracks. Before you start using the stove, it needs to be treated with paint. The paint must be resistant to high temperatures. You need to pay special attention to the upper part of the structure. The evaporation of the liquid occurs precisely in it. Sometimes metal can corrode and, as a result, lose its properties. A stainless steel sheet must be installed on the chimney pipe. High temperature water has a negative effect on structures. A pre-prepared clamp may be suitable for fastening. You can buy it in a store or make it yourself. Observe fire safety. If the floor in the bathhouse is wooden, then there must be a fire-resistant structure. In front of the room where the firebox is located, you need to install a piece of iron 20 by 30 centimeters. This will be a fireproof shield. Insulate the entire area below. Fill the distance between the insulation and the stove with sand and stones. It is recommended to fill the gaps between the stove and the insulation with dry sand and fill the top with stones. These natural materials will absorb the high temperature that the stove gives us. In addition, they perfectly retain the resulting heat and, thanks to this, can allow the stove to maintain the temperature longer even after the fire has died out. And thirdly, this is an excellent decor for your bathhouse.
In conclusion, I would like to say that building a sauna stove yourself from old disks is not so difficult. You just need to follow the recommendations and carry out each stage of work conscientiously.
What you need to know about disks
The furnace is being worked out. made using car wheels. Don't do things like that!
To make a furnace from disks with your own hands, you need to know not only the advantages, but also the disadvantages of the source material and some of the design features of furnaces that are significant in this case. The disadvantage of special steel is that it is not standardized for welding properties. There are several technologies for the production of wheel rims, but if welding is used for this, it is very limited, followed by thermal tempering (annealing) and flaw detection of the seam. And, of course, no vehicle designer expects anything to be welded to the wheels during operation.
This leads to a very important conclusion from a safety point of view: an exhaust furnace made from disks (see figure), as well as long-burning furnaces and pyrolysis furnaces, should not be made from them under any circumstances! Unless you really want that at one not at all wonderful moment boiling, most likely burning, oil will flow through a crack in the seam or chemically aggressive, highly toxic gases will begin to be released. But these stoves cannot be extinguished; they must burn out completely. Disks can only be used to make a solid fuel combustion furnace.
Nevertheless, it is quite possible to make a completely safe solid fuel stove from car wheels using welding for non-residential premises (a country house also belongs to them) if you follow the instructions. rules:
High quality welding seam
- The weld must be of visually high quality, without visible defects - cracks, splashes, holes, bubbles, see fig. on right;
- You can only weld two mating parts at a time; under no circumstances should you weld the entire structure at once!
- After making each seam, the welded parts must be given a rest to allow residual internal stresses to resolve, approx. from 3 minutes per kilogram of mass of connected parts. In practice, cook further no earlier than when you can touch the metal with your bare hand 3-4 cm from the end of the seam;
- The finished furnace, after being left for a day to absorb the same stresses, is subjected to a test run, from 3 hours for a stationary one and from an hour for a portable outdoor one, at full power, i.e. with the air throttle (if equipped) or combustion/blower door fully open, and maximum fuel load.
During the test run, the furnace is annealed simultaneously. Detected minor welding defects, no more than 2 per seam, are eliminated after a day, after which the furnace run with annealing is repeated.
Step-by-step guide to making a wheeled stove
Assembling a stove structure from wheel rims is an activity that does not require special training, but does require skills in working with a welding machine. Before you get started, you need to decide on the type of device. It could be a stove, barbecue or potbelly stove. The furnace manufacturing process consists of several stages. The very first thing is to prepare materials and equipment.
List of materials and tools
The main components of the furnace are car wheels. The most suitable are steel rims from passenger cars or small trucks. Large specimens left over from large-tonnage trucks require efforts to seal the joints, and ovens made from disks of this size are cumbersome. For work you also need to prepare the following materials:
- wheel rims – 4 pcs.;
- Sheet steel;
- fittings;
- door hinges;
- square pipes;
- thermal paint.
To cut and connect parts you will need a grinder, a hacksaw (for fine cutting), a welding machine, a drill, a file, pliers, a tape measure, a hammer, and sandpaper. Brushes will be needed for painting.
First stage: preparing disks
All irregularities and dents on the rims are corrected - the shape should be symmetrical. The surface is cleaned of rust. If there is old paint, then the disk sources are calcined and sanded. But the most important thing is that car wheels must have smooth, even edges. This will ensure that the circles are in close contact and that there are no gaps through which smoke can penetrate. To level each disc, it is ground in a circle.
One disk out of four is left in its original state; it will be needed for the hob. The remaining three copies require additional processing. They cut out the core using a grinder. The result should be a hollow, wide pipe. When these three components are combined, the furnace body is formed.
Second stage: making grate bars
The grate is a lattice plate that separates the firebox and the ash compartment. Firewood or coal is placed on the grate, and the air coming from below provides draft and promotes their combustion. The easiest way to make grate bars is from reinforcing bars. They are cut into pieces and welded inside one of the disks. It is not necessary to make a lattice; it is enough to weld the rods parallel to each other.
Instead of reinforcement, you can use a sheet of steel. Slots are cut in it or holes are made. The steel must be thick enough to withstand the high temperature. A thin sheet will quickly burn out and will not cope with its function.
Third stage: welding parts
For welding work, 5 mm electrodes are chosen. The blanks are welded circumferentially to each other. The auto disk with the whole core should be the top one. First, the edges are pinched by welding. Then, making sure that the cylinder is smooth, weld along the entire edge. The result is a barrel-like structure. If necessary, the number of ring segments can be reduced or increased.
A circle is cut out of a steel sheet. If you plan to use the stove indoors, then this sheet should be larger in diameter so that the coals fall on it and not on the floor. If the stove will operate exclusively outdoors, the bottom can be the same size as the body. Four legs are cut out of a small diameter pipe and welded to the base of the stove.
Fourth stage: installation of a firebox and blower
The next step is the combustion and ventilation windows. The height of the firebox is determined at your discretion, but most often it is made in the second disk from the bottom. The blower is located under the firebox (in the lowest rim). The hole for it is smaller than for the firebox. The marked rectangles are cut out with a grinder. Frames for the holes are made from steel plates and welded. Doors are cut out of metal sheet and hung on hinges welded to the wall of the body. Handles are attached to the doors.
There is a simpler option for installing a firebox and a vent - without using frames. Rectangles cut from the cylinder barrel are used as doors. The hinges are welded directly to the body of the disk stove.
Fifth stage: painting
The finished structure is painted to give an aesthetic appearance. To do this, first all welds are processed with a grinding machine. The remaining areas with rust are also cleaned. After this, the body is coated with heat-resistant paint. Another option is to use a can of high-temperature paint. After the paint has dried, the oven made from car rims is ready for use.
Disc furnace assembly video
The entire process of making a stove from car wheels is shown step by step in the video:
List of materials and equipment for installation
Large-diameter steel reinforcement
To make a furnace from disks, you will first need the car wheels themselves. It is best to use wheels from cars and light trucks. Furnaces made from the disks of large heavy-duty trucks will turn out to be unnecessarily bulky and heavy, and it is difficult to ensure the tightness of their connections. For independent installation and assembly you will need the following materials:
- Large diameter steel reinforcement;
- Metal corner;
- Material for making gratings;
- Sheet of metal for mounting the door;
- Small pieces of metal for stops;
- Pipe with a wall thickness of at least 5 mm and a diameter of 100 mm;
- Steel pipe with a wall thickness of 2.5 mm and a diameter of 80 - 100 mm.
Steel reinforcement is used to make the legs of a garden stove; the legs are also mounted from angle steel. The metal corner is used as a base for laying skewers; it is often removable. To lay skewers, you can place the corners on the upper socket of the disk perpendicular to the skewers. The steel grate is used for barbecuing, grilling, and serves as the basis for installing a boiler or cauldron. The grating is made of steel reinforcement.
Disk ovens are often made with a door. To do this, you will need a sheet of metal, door hinges, or an improvised loop of nuts and bolts of different diameters. The presence of a door increases the safety of the stove and improves the combustion process.
The stops along the perimeter serve as the basis for installing the cauldron and firmly fix the removable grate. A thick-walled pipe with a diameter of more than 100 mm is useful for making a sauna stove from disks. A pipe with a diameter of 80 mm and a wall thickness will be required for installing a chimney for a garden stove.
To make the unit yourself, you will need the following tools:
- Welding machine;
- Welder mask, electrodes;
- If available - cylinders with a gas cutter;
- Angle grinder (grinder) with cutting and cleaning discs;
- Sledgehammer;
- Hammer;
- Measuring and marking tools - chalk, pencil, marker and tape measure.
It is more convenient to use a gas cutter for cutting metal - the discs have convex, rounded surfaces; processing them with a grinder will be difficult. A window cut by a gas burner is easier to remove carbon deposits with a grinder and a grinding wheel. A sledgehammer is useful for straightening badly bent car rims.
Potbelly stove for the garage - why it’s interesting
A small potbelly stove, which was very popular at the beginning of the twentieth century, still remains relevant today. At one time, she replaced the fireplaces, but as soon as centralized heating and gas stoves appeared, she began to slowly lose ground and disappeared from her homes. However, such stoves can still be found in dachas and garages.
It is interesting that most of the potbelly stoves that were used during the war years were made by hand. They were used by soldiers in dugouts and dugouts, by residents when the central heating was turned off, and by builders in residential cabins. After the war, potbelly stoves were less common. But in the second half of the twentieth century in the USSR, people began to actively allocate summer cottages, and potbelly stoves began to often appear in country houses.
The potbelly stove is made entirely of metal, which has excellent thermal conductivity, which means it can warm up a small room very, very quickly. Heating of the air in the room begins immediately as soon as the stove is lit. True, it also cools down quickly, and to maintain heat it has to be constantly heated. The pipe of such a stove was also made of metal.
Potbelly stove for garage
The main disadvantage of such a stove is its high fire hazard.
It must be handled carefully and carefully, not left unattended during combustion, and there should be no flammable objects or liquids nearby. But on the other hand, it is extremely easy to use, multifunctional, it is very easy to do it yourself, transport it somewhere or install it in a new place
Why is a potbelly stove often used in garages? The answer is above: this stove warms up the room very quickly and at the same time cools down quickly. An ideal option that will allow you to quickly warm up the same garage, but for a short time, only while a person is working in it. But it’s unlikely that anyone will stay in the garage for a long time. And leaving a flooded stove unattended next to your iron horse is dangerous. This means that before leaving you need to wait for the stove to go out. In short, taking all these factors into account, a potbelly stove is an excellent inexpensive option for heating a garage. The same brick oven will take much longer to warm up!
Homemade potbelly stove from a barrel
And you can heat a potbelly stove with anything - it is absolutely not demanding on the quality of the fuel. Not only firewood or pellets are suitable, but also wood waste, rotten dry boards, and so on.
You can make such a stove yourself and in different ways. We suggest you create a potbelly stove from car rims - every motorist definitely has old ones in the garage, and making a potbelly stove from them is a great way to give rims a second life and make a reliable and durable device for heating a room.
Step-by-step instructions for creating a furnace from disks
Step-by-step instructions for creating a furnace from disks will help you make the design without any problems
It is only important to decide on the purpose of using the ready-made device. In particular, if you are making a stove for heating or cooking, then the design is quite simple
The base of such a stove can be refractory bricks or a section of an old radiator on which a metal sheet is mounted (its thickness should be more than 5-8 mm).
The design itself must be done following the following steps:
- Prepare four KAMAZ disks. They must be steel; aluminum will not work.
- Using a grinder, cut out the center portion of the three disks.
- Weld two disks together. In the lower disk, install a round plate of suitable size and cut from a steel sheet. If desired, this plate can be immediately welded to the metal base.
- Using a grinder, cut a small square hole on the side of the resulting workpiece. This piece should not be thrown away; it will be used to make a door. The door can be mounted to the body using welded bolts and nuts. Additionally, you can attach a latch and a handle. The result is a finished housing that will perform two functions at once - a blower (to increase the draft, you will need to slightly open the door of the lower chamber) and an ash pan.
- Next, weld the two remaining disks together so that at the bottom there is an element with an uncut core. Firewood will be stacked on it. On the side you need to cut a hole in the same way as described above and install the door.
- A plate should be mounted at the top of the firebox, and a round hole should be cut in it. A pipe will be installed in it.
- All that remains is to connect all the parts of the body together. Carefully lower the pipe into the upper hole and weld it so that the valve is at the top.
It is important to remember that the weakest point of the oven is the seams. That is why they need to be brewed with maximum responsibility.
If this is not done, smoke will leak through the cracks and enter the room. And if you do everything in accordance with the recommendations, the smoke will go up the chimney. Additionally, you can cover the cracks and seams with clay and sprinkle with dry sand, since the seams tend to become thinner during use.
Step-by-step algorithm
The first thing you need for construction is a pair of classic stamped car wheels made of durable metal. The sizes of the disks should be selected to suit your cauldron; option 13 may be suitable, or maybe 15, although a very large design is not needed.
Two stamped white discs
On one of the disks we mark a cutting line, exactly above the round holes, and cut off this circle using a welding machine.
Mark the cutting line
The cut circle will work perfectly as a lid on which you can put pots or a kettle, so don’t rush to throw it away.
The part is cut out
On the second disk, you need to weld the main central hole, which will require a small piece of thick metal.
Preparing the welding machine
We carry out welding work
Then the two disks are placed on top of each other and, using the same welding machine, they are connected into a single structure.
Circular welding process
Welding from all sides
This creates an impressive seam that firmly connects the two discs. To make it more presentable, you can modify it with a grinder, cutting off strongly protruding elements and grinding the edges.
Weld seam
In order for the structure to stand stably at the required level, you will need legs. The legs can be tightly welded to the grill if you are preparing a summer cottage, or you can make the structure detachable. In the second case, the device will be mobile; it can be easily carried in the trunk of a car and, if necessary, assembled. Small pieces of a profile larger in cross-section than the legs themselves can act as fastenings for the legs. These three parts should be welded to the grill on three sides (in this case, a tripod is made).
Leg parts
There is no need for precise calculations here; it is enough to roughly estimate equal distances and weld the necessary parts to the bottom of the grill made of disks at the same angle.
Leg clamps are welded
We also cut out the legs from metal, in particular we use a rectangular profile.
The legs themselves, cut from the profile
It is worth trying on the legs by inserting them into the prepared grooves. If they enter with difficulty, you should process the edges of the parts with a grinder, and then hammer them into the grooves with a hammer.
Legs installed
Next, mark the door that will open directly into the firebox and cut it along the line.
Marking the location of the door
At the next stage, you will have to use your imagination and engineering skills to create a decent hinge for the door. For example, you can make it from one bolt. It is necessary to cut off the cap from it, then select two nuts that are screwed onto it. One nut should be welded to the door, and the second to the wall of the grill. By screwing the bolt onto the threads of both nuts, you get a convenient loop. You can weld any piece of metal of suitable size as a handle.
The door is cut out
You can make two loops using the same bolts, here all the work is done at the discretion of the master.
Loop manufacturing option
To make it easier to transport the grill, you should weld lugs to it on both sides, or at least on one side. Such improvised handles will allow you to comfortably carry the barbecue without fear of getting dirty with soot, soot or dirt.
We weld the handles
For a more uniform smoke output, you can make four even cuts along the diameter of the disk. At this point, work with the hearth to form its shape is completed.
Making cuts from the top
To remove paint from car rims, you should burn the resulting grill on all sides. For final processing, you can use a brush or sandpaper.
Removing paint using improvised means
Then, using heat-resistant paint, you need to paint the structure in a suitable color. Black looks very harmonious.
Paint it black
As you can see, making a grill for a cauldron is quite simple; there are no special tricks here. A simple and convenient design will allow you to install a cauldron and cook pilaf, and if desired, you can make a shish kebab on it using skewers of suitable length.
Ready product
In this simple and uncomplicated way, we create excellent conditions for outdoor recreation, which is accompanied by cooking delicious and healthy food.
Additional recommendations
To make the stand for a cauldron made from car rims more convenient and practical to use, you need to take care of the special features:
Additional stability can be added to the assembly using legs. They are made from profiled steel, which is cut to size. The blanks are welded to the sides of the furnace or the bottom and flanges. A tripod is the best option in terms of stability and economy. A good solution would be to make a separate stand for the stove from car rims for the cauldron. Its advantage is that it is not rigidly connected to the main structure and can serve as a support for anything. If there is a stand, the profiled bottom of the lower section will work as a grate. This will significantly increase draft and increase the temperature of the arch. You can simplify the project, reduce labor intensity, and save on materials if you make the oven from two segments. In this case, the roof of the structure will become lower, which will negatively affect heat transfer. This is due to the fact that during combustion pyrolysis gases are released, their contribution to the total heat release is decisive. If the arch is not high enough, they do not have time to burn completely. Contact with the cold walls of the casing causes soot deposition. Over time, the inner surface of the vault becomes coked. The heat output of the furnace is noticeably reduced. Soot fire cannot be ruled out. The versatility of the design allows you to convert the cauldron oven into a grill and barbecue with minimal changes. Without unnecessary cuts, you can get by with ready-made holes on the surface of the product - they will create several temperature zones. If you install a grate on top, it will combine the functions of a flame divider and a rasper - this will allow you to simultaneously cook roast beef of varying degrees of doneness
It is important to understand that a large company will need a more solid stove; Gazelle disks are suitable for its manufacture. They do not need to be welded together, which is a definite plus.
Heat-resistant metal adhesive can successfully handle the functions of a weld seam. Good potbelly stoves are obtained with horizontal wheel rims. It is better to cut off their convex parts with a grinder. The sections welded together form a capacious thick-walled cavity with a complex surface. Such a potbelly stove will heat up the room faster and take longer to cool down. To make such a stove, it is better to use wheel rims from trucks; they will provide a sufficient firebox volume and increase heat transfer. The efficiency of such devices is higher.
The area under the supports must exceed the parameters of the cauldron: the higher this ratio is, the more stable the entire structure will be.
Comfortable stoves with installed legs
You can install a grate and use it as a barbecue. Potbelly stoves heat better with horizontal disks.
Why are car wheels suitable?
When planning to heat a garage unit, its owner often has to solve the problem of saving money. Factory products are too expensive, sheet steel is also not affordable. In such cases, the optimal solution is old wheels from trucks of the ZIL, KAMAZ and GAZ brands.
The advantages of this material:
- wide selection, including rims of the same size;
- the opportunity to purchase blanks for free or cheap at the price of scrap metal;
- use in the production of high-quality metal, characterized by strength and resistance to strong heat;
- The initially round shape ensures the tightness of the assembly and heat distribution.
An important factor in favor of this solution is the thickness of the disk walls. They are strong, resistant to burning and conduct heat well.
Sauna stove made of wheels and bricks
They started using car scraps to make stoves not so long ago, but this type of homemade product is quickly spreading. The material is practically waste, the metal is good, there are different sizes, you can build a unit of any power. For this furnace, disks from ZIL-160 were used. They have ideal dimensions - height 250 mm, diameter 500 mm, and metal thickness - 7 mm.
The stove requires 4 discs and solid ceramic bricks (about 60 pieces). It’s better than stove-made, but you can also use regular one, the main thing is good quality. To remove smoke, you will need two steel pipes with a diameter of 160 mm, a length of 50-60 cm, and a wall thickness of 5-6 mm. The bottom of three disks is welded and the holes are welded (with metal plates at least 5 mm thick).
This furnace requires a separate foundation () - the mass turns out to be solid. In the figure, the foundation is deliberately made below floor level so that part of the ash pit is in the underground. This promotes good ventilation and dries the boards after procedures.
The lower part folds into half a brick. Its dimensions are 625*265 mm. The ash door, grate, and firewood storage door are installed.
Sauna stove made of wheels and bricks
We take a disk without a bottom. We weld a circle with a diameter of 380 mm from metal 5 mm thick to it on rods. If possible, it is better to make it concave. This is a divider that forces smoke to move along a complex trajectory, improving heat removal.
We weld a divider on one of the disks without a bottom
We install the disk with the divider on the brick body of the furnace. We take the disk, place it bottom down on the installed one, and weld them in a circle. We cut a hole in the center of the bottom and weld the pipe. This is a heater. To it, using legs (4-6 pieces) made from reinforcement with a diameter of 12-60 mm and a length of 200 mm, we attach another disk with a bottom. If you want a closed heater, make a removable lid. You need to give it some steam - they opened it, poured water, then closed it again.
It also requires making a hole in the center and welding an adapter casing into it, into which the chimney is inserted (the node is circled in red in the figure). This casing is slightly larger than the outer diameter of the pipe. The remaining gap during assembly can be filled with asbestos cord and filled with clay mortar, on which the brick bottom of the stove was placed.
The middle part of a sauna stove made from car rims
Next we cook another divider. This is a bowl, the diameter of which is 30-60 mm less than the diameter of the disk, the height of the sides is 50-60 mm. We make the bowl from metal with a thickness of at least 4 mm. We install the divider inside the third disk on legs made of the same reinforcement, 50 mm high (quantity - 3-5 pieces).
The fourth disk is used as a tank for heating water (volume 40 l). If you heat it in another way, you can put stones here or do without it altogether.
This disk must also have a sealed bottom with a chimney welded in the center. At the bottom we weld a fitting for draining water. We make a lid at the top. it can be made of metal with a thickness of 2 mm. It is convenient if the lid consists of two halves.
Tank for heating water and passage through the ceiling
This tank does not need to be welded. An asbestos cord soaked in clay can be laid along the edge of the lower wheel rim. Place a little clay mortar on top, place the resulting tank and press down.
The last thing is the ceiling cutting. You can place a sandwich pipe, a gate valve and a standard or homemade passage unit above it, or you can make a cutting out of brick.
And this is what a ready-made sauna stove made from rims and bricks looks like
To support the cutting, a metal platform is attached to the pipe; it is additionally fixed with legs. The cutting itself is laid in one and a half bricks, has 5-6 rows, the cross-section of the smoke channel is square. A stove valve is installed between the first and second rows (the bricks are trimmed)
The upper part of the chimney can be made of a sandwich, you can install an asbestos pipe, or you can use a metal pipe, but it will need to be wrapped in heat-resistant heat-insulating materials (to prevent condensation from falling out). Just pay attention, the total mass of the chimney should not exceed 50 kg - this is the maximum load that the structure can withstand
Potbelly stove made from two barrels
Even more different homemade potbelly stoves. There are a lot of designs. From the most basic to quite complex designs.
The most common heating devices for garages and cottages are potbelly stoves
A very interesting version of this potbelly stove is made from two barrels of different diameters nested one inside the other. How to make it: you need two barrels of different diameters, bricks instead of legs (you can weld metal ones if you wish), doors and hinges, metal for making a grate and a lid. You will need pebbles, clay and sand to make the backfill.
Potbelly stove made from two barrels
- Let's start by making the backfill: mix pebbles, sand and clay and heat them on fire.
- We cut identical holes in both barrels for the blower and fuel filling. But this needs to be done with an offset. We start with the smaller barrel. We cut out the ash door 2-3 cm above the bottom, and above it 10-15 cm above the door for loading fuel. We also do it in a larger barrel, but the bottom hole is already at a distance of 10-15 cm from the bottom, respectively, the second door is also higher (the distance between the doors is exactly the same as on the smaller barrel).
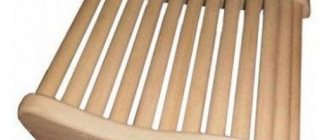
- In a smaller barrel above the hole for the blower door, weld a circle-grid in which holes are cut.
- Pour the prepared backfill into the bottom of the larger barrel. We select the level so that the holes for the doors coincide. Moreover, the barrels are in contact with their front sides, and a decent distance remains behind. Fill this entire distance with the same backfill, compacting it well.
- Having aligned the holes, weld them around the perimeter, weld the hinges and doors, and install the locks.
- Next you need to install the stove cover, cutting a hole in it for the chimney pipe, and weld it well.
- The last step is to install the chimney.
That's it, the potbelly stove from the barrel is ready. The uniqueness of this design is that it produces softer heat: most of the hard radiation is absorbed by the backfill. This structure can probably even be filled with stones by modifying the lid to make it possible to service the stones (replace destroyed ones).
Whatever design you choose, there are some rules that should be followed in order to comply with fire safety:
- A stove of any design must be placed on a base made of fireproof materials, for example, heat-resistant tiles, bricks or asbestos board sheets.
- The dimensions of the stove must be such that the space in front of the stove to the wall is at least 1.2 m.
- You cannot place a metal stove closer than 1 m from the wall. If the wall of the bathhouse is covered with metal or plastered with a layer of at least 2.5 cm, this distance can be reduced to 80 cm.
- Sufficient insulation of the chimney is also very important. The safest way to make it is from a sandwich pipe.
Follow these simple rules, and your homemade metal sauna stove will delight you with excellent performance and intense heat for a long time. You can read more about how to install a stove in the article “How to install a metal stove for a bath.”
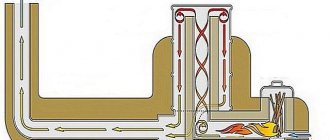
Operating principle of a disk stove
A self-made sauna stove made from car rims has the following principle of operation: fuel is immersed in the firebox, and during the combustion process thermal energy is generated, which flows through the first disc into the second.
The second disk contains a heater, where the stones are heated and thermal energy is released into the room. A pipe is also installed here to remove fuel combustion products through a smoke outlet in the roof.
In the third disk, gases are dissected and even more thermal energy is released. In this case, the disk is a reliable heat economizer.
Cooling of the gases and their removal through the chimney is carried out in the last wheel, which is equipped with a protective cover and a water tap.
Even novice craftsmen can make their own sauna stove from used car rims. To do this, it is enough to follow all the recommendations and perform a high-quality assembly of the structure.
Preparing tools
If you decide to make a hearth for a cauldron or a regular stove using car wheels, then you need to take care of the availability of tools, among them the following should be highlighted:
- welding machine;
- electric drill;
- chisel;
- sledgehammer;
- disks;
- paint brush;
- ruler;
- grinder;
- hacksaw for metal;
- hammer;
- file;
- pliers;
- roulette
It is noteworthy that almost any of the disk-based models made will be portable, which is very convenient, because this design can be used in a bathhouse or on the street. It is best to use stamped steel disks, the diameter of which varies from 40 to 50 cm. Their height can be 25 cm. The hearth for a cauldron, like a sauna stove, cannot be made of aluminum disks, or those made on the basis aluminum alloys.
Stove design features
Any type of sauna stove, made with your own hands from available materials, is characterized by its simple design and ease of installation. Thanks to its compact size, the wheeled sauna stove heats up quickly and therefore has high heat transfer.
The cooling process of a metal potbelly stove made from wheels takes no more than 120 minutes. In addition, exhaust gases do not accumulate in such a design, which makes it possible to carry out bathing procedures simultaneously with warming up the stove.
A homemade disk oven has a number of advantages:
- availability and low cost of building materials;
- ease of manufacture;
- high strength and durability;
- ergonomic design that does not take up much space;
- accelerated heating and high thermal output;
- resistance to mechanical damage and deformation;
- inertness when exposed to high moisture and high temperatures;
- possibility of using different types of fuel - wood, coal, pellets.
Among the disadvantages of the device are the following:
rapid heating of metal discs can lead to injury and burns if the stove is handled carelessly; rapid cooling of the structure will require a doubling of the volume of fuel used.
For these reasons, a stove made from car wheels should not be considered as the main heating equipment for a country house or cottage, but it is quite suitable for temporary heating of bathhouses and technical rooms.
How to make a stove from discs for a sauna with your own hands
Making a stove from disks
Metal disks on sauna stoves serve as a superstructure on a stone stove. They perform the following tasks:
- Serve as a surface for heat transfer into the bathhouse;
- They are the basis for the construction of a heater;
- Serve as a chimney trunk;
- On their basis, a water heating circuit is often constructed - a tank is installed.
Installing the furnace itself from metal discs is impractical. Smoke leaks may occur due to leaks in welding seams; the metal has low inertia and cools quickly.
The superstructure installation process consists of the following steps:
- The first disk is installed on the finished stone stove. The disk is installed with the free side down. The joints with the surface of the furnace are sealed.
- The second disk is installed on the front side of the first disk, and they are welded together.
- A hole is cut in the center of the front sides folded together, corresponding to the diameter of the selected chimney pipe. A pipe is installed on the cut hole and welded hermetically.
- A stone selection is placed in the internal space of the second disk around the pipe - it will serve as a heater. The stones are very inert and retain heat for a long time. They receive heat from heated metal disks, heat up and, when poured with water, produce steam.
- 4 posts of equal length are welded around the perimeter of the second disk.
- A third automobile disk is installed on the racks, face down, and a chimney is passed through it.
- The third disk is welded to the chimney pipe.
- Homemade tanks with a hole in the central part for the passage of a chimney are often installed on top of the disk. The water is heated in the tanks.
- The passage of the hot part of the chimney pipe through building structures is sealed with fireproof materials.
- A damper or gate is installed at the top of the chimney to regulate the draft force.
Sometimes stoves for baths using car rims are built according to a simplified design. A stove is installed on the surface of the firebox, and an open tank is placed on it to heat water. Next, behind the stove, channels are laid on the smoke channel instead of the upper wall. The channel joints are sealed with clay. A heater is laid on top of the channels.
After the heater, a vertical complex is constructed from disks welded together. The complex serves as a chimney channel and works as a heating device, releasing heat into the room. This design is much more reliable and airtight; it does not require the construction of an intricately shaped water tank with a passage space.
Fire safety rules when installing homemade stoves
The oven, made from old car rims, creates heat using infrared radiation. To transform the infrared flux into heat, you will need to make a furnace casing from metal sheets. They are fixed at a distance of 7 to 10 cm from the heater. The same size gap between the floor and the stove.
There are general rules for the safe operation of disk sauna stoves:
- Place a concrete or iron slab on the floor. In this case, this structure must extend beyond the edges of the furnace by more than 60 cm in four directions. This will help eliminate the possibility of a fire if coal or other fuel falls out.
- The chimney and stove made of metal should not touch easily and quickly flammable materials. In this case, it is recommended to use special insulation gaskets.
- Before lighting the stove, be sure to check the draft in the channels. If it is absent, warm up the chimney a little or clean the chimneys and ash pan.
- Liquid firelighters should not be used because they can easily cause fire to be thrown into the room from the firebox.
Features of the location of the rims
The wood burning in the firebox will give off its heat through the walls of the first rim, in which the bottom is cut out. It is welded to the second disk, where the bottom is in place, making it possible to fill it with stones. There is a pipe running inside through which combustion products will escape. The pipe should go inside the third rim, where instead of the bottom there is a gas divider. It is made of sheet metal. The last stage of gas cooling takes place inside the last rim, which looks like a tank with a tap and a lid. As a result, the stove works no worse than factory models, and in terms of durability it turns out to be even better than any of them.
How to make a stove from disks for a sauna with your own hands
First of all, the discs need to be prepared: cleaned of debris, rust or paint residues using sandpaper. After this, you can begin manufacturing the structure, following the stages of work in the specified order.
Water container
To equip the upper chamber of the future stove, two rims are needed. The water will be heated in this tank, so it must be sealed. To do this, cut out the central plates for fasteners from 2 disks with a grinder, leaving only the rims. They are stacked on top of each other and welded together.
Disc core cutting
The upper part of the tank is closed with a metal lid or a movable flap. For safety reasons, you can combine these two options and tightly weld the larger segment of the lid, making only the small hole through which water will be poured into the tank sliding or hinged. A metal plate cut from a sheet is welded to the bottom of the chamber.
The structure of the upper part of the stove
After welding, holes are cut in the upper part and at the bottom of the container along the diameter of the chimney pipe. It will pass through the entire tank, should be tightly overlapped by the walls and come out through the bottom. A thin tube is installed in the side of the tank near the bottom at an angle to the floor and is closed with a tap to drain hot water.
Note! The tank must be checked for leaks. Fill it with water and carefully inspect the cracks for leaks, paying special attention to the joints between the walls of the container and the slots for pipes
If defects are found, they must be eliminated by welding, but only after removing the water and drying the tank.
Arrangement of the heater and the upper part of the firebox
From the two remaining rims you need to make a heater and a firebox cover. The core is cut out of one, the second remains intact. The blanks are placed one on top of the other and stitched together by welding so that the hub of the whole disk is in the middle (it will serve as a grid). The container remains open at the top - stones are poured here. The lower part of the cylinder will serve as the upper part of the firebox.
Natural round-shaped stones, which are used in saunas and baths - diabase, basalt, peridotite, are best suited for arranging a heater. But they are quite expensive. Therefore, you can look for heater material near the nearest body of water - these stones have been well hardened by humidity and sun. The best option is dark-colored rocks with a non-layered structure.
The best stones for a heater
Note! The stones in the stove, although slowly, are destroyed under the influence of high temperatures. And this makes it difficult for smoke to pass through
Therefore, periodically the contents of the heater should be sorted out and replaced.
Foundation and brickwork
It is recommended to install a sauna stove made of rims on a strong and fire-resistant foundation. It can be built from reinforced concrete screed, and the top surface can be lined with fire-resistant bricks.
When the base is dry, you can begin to work on the bottom of the oven. For a stove with masonry 62*62 cm, you will need 60 pieces of red heat-resistant bricks. They are held together with clay diluted with water and laid in a square. Don't forget to provide a cavity for the blower and a hole for the door. Attach the grate to the top of the masonry.
Stove assembly
All parts of the structure are assembled sequentially. The metal part is connected to the brick part, the firebox and ash pan are closed with doors cut from a metal sheet.
Scheme of a stove-stove for a sauna made from wheel rims
On a note! For comfortable use, it is advisable to equip the door with a handle made of one large bolt. And to prevent firewood or coals from accidentally falling out, use a latch made of a narrow metal plate and a small loop.
Next, a second section of pipe is welded to the central hole of the hub, located between the firebox and the heater, and sewn to the upper part of the chimney running through the water tank. Stones are placed in the heater: large and medium ones at the bottom, small ones at the top.
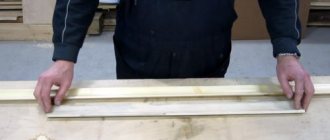
To strengthen the structure, metal channels are welded to the rim of the heater and the water tank, which are installed at a slight angle to the top of the body. The pipe is led into a chimney lined with fire-resistant bricks and equipped with a damper.
Such a stove will heat the steam room and water in the tank in just an hour.
How to assemble a potbelly stove body
So, you will need 4 disks, but three of them will need to be worked in a special way.
In the disk that will be below, you need to cut a hole and make a removable tray for removing the ashes
In the side of the disk you need to cut out a half ring with a grinder, as shown in the photo. This half ring will become the basis for the pallet
Measure the inside of the disk, make a template and cut a piece of thick sheet metal along it to create a circle that can then be welded to the half ring
To easily remove the tray, you need to attach a handle to it. Even an ordinary door or any other suitable metal bracket will do. It can be secured by welding or bolts, whichever is more convenient for you.
The second disk is installed on the lower one with the rim down, there is no need to redo anything, and ash will then spill into the tray through the ventilation holes
But in the third element, the rim needs to be cut so that the disk turns into a metal ring. Its task is simply to make the firebox higher so that fuel can be refueled
Three discs are installed in this sequence: first the one with the tray, then the usual one without changes with the holes down, and finally the ring
The final, fourth disk must be placed with the holes facing up, then all the small ventilation passages will need to be welded and only the axial one will be left, to which the exhaust pipe will be attached. The entire structure must be fastened by welding, making continuous seams. This is where you can practice with a welding machine.
The furnace body is ready, you just need to make a few additions.
Design Features
We have looked at one of the features of constructing a furnace of this type, let’s move on to others. In the vast majority of cases, a disk furnace is configured as a combined furnace. The key reason for this decision is that the steam obtained from the stove, made up entirely of disks, is quite hard and uncomfortable
For a sauna, with its low humidity, this is not so important, but in a Russian steam bath this circumstance is certainly worth paying attention to
To obtain high-quality soft steam, you must have a stove with a brick firebox. The discs are used as a container for laying closed stone backfill and as a mounted hot water tank for heating water. The use of an open heater is very limited due to the impossibility of burning the fuel in the stove to its fullest extent, so soot fragments will settle on the stones, which will cause them to enter the steam room atmosphere the first time you try to add steam with a ladle of water.
If it is not possible to build a stone firebox, then it is worth making a full-size stove from cargo disks, which are much larger than passenger cars and have a main seat diameter of about 20 - 22 inches. To reduce the overall height and laying of the disk segments, the design should be made with an embedded-type grate, made of a steel circle with a thickness of 6-10 mm along the diameter of the internal fit and reinforcing rods with a thickness of 12-16 mm.
A hole with a diameter of 150-170 mm is cut in the center of the circle onto which reinforcement sections are welded at intervals. The air passage of such a grate is enough to accelerate to a power of 25-27 kW. When installing the grate, it is necessary to provide a thermal gap within 8-10 mm; a metal ash pan with a diameter of about 200 mm is placed under the grate hole.
Again, taking into account the fact of the formation of hard steam in conditions of high humidity in a Russian steam bath, it is better to use a stove of this type for arranging a Finnish dry steam sauna. In general, step-by-step instructions for making a stove of this type can be viewed in the attached video
In general, step-by-step instructions for making a stove of this type can be viewed in the attached video.
Any type of sauna stove, made with your own hands from available materials, is characterized by its simple design and ease of installation. Thanks to its compact size, the wheeled sauna stove heats up quickly and therefore has high heat transfer.
A homemade disk oven has a number of advantages:
- availability and low cost of building materials;
- ease of manufacture;
- high strength and durability;
- ergonomic design that does not take up much space;
- accelerated heating and high thermal output;
- resistance to mechanical damage and deformation;
- inertness when exposed to high moisture and high temperatures;
- possibility of using different types of fuel - wood, coal, pellets.
We suggest you read: How to install a stove in a wooden house?
Among the disadvantages of the device are the following:
rapid heating of metal discs can lead to injury and burns if the stove is handled carelessly; rapid cooling of the structure will require a doubling of the volume of fuel used.
For these reasons, a stove made from car wheels should not be considered as the main heating equipment for a country house or cottage, but it is quite suitable for temporary heating of bathhouses and technical rooms.