New Year is coming, Santa Claus, Christmas tree, gifts... But even if you don’t have money for expensive decorations, you can decorate the house with your own hands, for example, with various products made from paper snowflakes.
You can’t even imagine how many New Year’s and creative things you can do with the help of ordinary thin paper, scissors and imagination! In some cases, you will need more glue, nail polish and a little more patience.
For example, you can decorate a wall with snowflakes - it will turn out to be a very festive panel.
To do this, you will also need paints or colored pencils to decorate the white paper snowflakes.
Colored “butterflies” and “flies” will look impressive on a light, plain wall.
Especially if you put a Christmas tree against this wall. Or you can decorate a wall in the hallway or corridor in this way so that guests plunge into a New Year's fairy tale right from the doorstep.
You can also hang snowflakes on a chandelier, it will immediately take on a fabulous openwork look.
To make them hang under your ceiling longer, it is better to treat the finished snowflakes with glue or nail polish, you can even use multi-colored varnishes - the chandelier will turn out to be shimmering with all the colors of the rainbow. Both large and small paper snowflakes are suitable for decorating a chandelier. It all depends on your imagination.
You can make various crafts from snowflakes
by gluing a paper openwork onto cardboard, wood or even metal. Or you can make a whole composition on a New Year's theme. Natural materials, such as tree branches, bunches of rowan or viburnum, autumn leaves, moss, etc. are welcome in such crafts.
You can make a festive curtain from paper snowflakes
and decorate your bedroom or living room with it. To do this, it is better to fasten the snowflakes together with paper clips or sew them with thread.
Snowflakes can be treated with glue or varnish, or you can leave them just paper - this way they will look more delicate, although such a curtain will not last long.
A curtain made of snowflakes can be thrown over a regular curtain, or you can hang it separately on a window, which will make it look openwork from the street.
And, of course, you can make window decorations from snowflakes.
Make snowmen, a Christmas tree, various animals, or even a whole picture out of them.
And now we present the most common patterns for cutting out snowflakes:
With the New Year holidays approaching, every housewife tries to create a festive mood in her home. New Year's curtains are one of the ways to beautifully decorate windows in order to transform the interior of your home, and to make the window look especially festive from the street.
DIY snowflake curtain. Master class with photos
This material will be useful to kindergarten teachers, teachers and parents who design premises according to the seasons and carry out the artistic and aesthetic development of children.
Creating a developmental environment in a preschool institution is one of the most important conditions for the comprehensive development of a child’s personality.
In artistic activities, children not only express their inner world, but also convey their impressions of the environment. “Window to Nature” uses a real example to show children and adults how to notice changes in nature at different times of the year and reflect the impressions of contemplation in activities, how to establish connections in the natural world. A curtain of snowflakes appears, which means winter has come. An aesthetically designed educational environment with your own hands can give a powerful impetus to unlocking a child’s creative potential, forming an aesthetic taste with the reasonable help of an adult at minimal cost. The purpose of the master class : making changes to the interior design of the kindergarten in the winter. Objectives: teach how to create a curtain from snowflakes, include it in the “window to nature” composition, promote the artistic and aesthetic development of adults and children.
Nature is an inexhaustible source of inspiration and creativity. To educate the eye aesthetically means to learn to see the beauty of the surrounding world (the natural world, the built environment, the world of art). Preschool children cannot cope with this task on their own. An adult can help a child explore the ever-changing world of nature in all its diversity of colors and shapes. Not everyone can display all this in their creativity on their own. One of the main tasks of educating and developing preschoolers in the artistic and aesthetic direction is to provide every child with the opportunity to experience the joy of creativity. And to do this, it is necessary to show children not only a creative product, but also the process of its creation.
Ready-made New Year's curtains for windows with 3D effect
The best option for decorating windows for the New Year holidays is ready-made curtains with a themed 3D pattern. If among the assortment of ready-made offers it is difficult to find a suitable option for curtains with a New Year's pattern, then in this case you can order the production of such curtains to order. For this, a special UV printing is used, which applies the photo or picture you like to the curtain fabric. This is an excellent option that allows you to choose the color and texture of the main fabric on which the design will be applied.
There are only a few types of fabrics on which you can apply a photo design. The type of fabric is selected depending on the windows of which room they plan to decorate with New Year's curtains. So, photo tulle (New Year's curtains made of light chiffon) will look beautiful in the living room. The kitchen is a special place, so the window should also be decorated with New Year's curtains made of well-draped fabric, for example, satin. Thick Roman curtains with a themed 3D pattern also look beautiful on the kitchen window.
New Year's curtains for the kitchen - decorating ready-made curtains
The kitchen is one of the rooms whose interior is initially thought out to the smallest detail. And the kitchen window was initially decorated with a curtain, the color and design of which most harmoniously complements the interior design. When preparing for the New Year holidays, it is absolutely not necessary to change ordinary curtains to New Year's curtains with a themed pattern or decorative elements.
- The simplest of all options is to create a New Year's mood using tinsel. In this case, there are a lot of options for creating New Year's curtains with your own hands - from decorating the cornice, to more complex designs,
- Christmas decorations. This decoration can be lowered with tinsel from the cornice, or it can be attached directly to the curtains. Only in the second case should you choose small toys.
- Garland. With flickering mysterious lights on the curtains, the kitchen will literally be transformed. The garland can be attached to the curtain fabric, either in straight lines or in the form of an intricate pattern, for example, in the shape of a Christmas tree or Santa’s sleigh.
- To create a New Year's interior with your own hands in a room such as a kitchen, you can cut out snowflakes of different sizes from white paper and attach them directly to the curtains, or put beautiful garlands on top of the main curtains.
How to make New Year's curtains with your own hands
The easiest and most interesting way to make New Year's curtains with your own hands is to create real snowy splendor from ordinary paper snowflakes.
To make such New Year's curtains, you need to cut out 100-150 snowflakes from white office paper (their number directly depends on the length of the future curtains, and on the individual window sizes). To make snowflakes perfectly even, you can iron them, or put them under a weight for a while. To make fragments of future curtains shiny, you can apply special glitter to them (it is very convenient to use not loose glitter, but in the form of a spray).
Pre-prepared snowflakes will need to be connected into vertical stripes of 10 (or more) fragments each. Depending on the number of snowflakes in the strip, the length of the New Year's curtain is also adjusted.
You can connect them in several ways - string them on a thread using a hand needle, sew them together using a sewing machine, or glue them to adhesive tape. DIY New Year's curtains made from snowflakes can be of various lengths. They can only reach the middle of the window, or go down below the window sill. You can also make combined New Year's curtains - string golden or silver beads between the snowflakes, decorate the spaces between the fragments with tinsel, etc.
New Year is approaching, so why not look for some cute ideas to make this holiday even more special? New Year's home decor is designed to create a festive atmosphere and a festive mood, I propose to consider ideas for New Year's window decorations. Window decor will add New Year's charm to the “eyes” of the house, will delight you with every glance and give positive emotions to other people.
New Year's drawings on the windows
is the easiest way to create something personal and unique, and the process doesn't take much time or money. You just need to turn on your imagination, write and draw whatever you want. These could be the warmest New Year's wishes, favorite New Year's poems or songs, snowflakes, snowmen, and so on. The only drawback is the need to remove this beauty from the window when the season is over.
Paper applications and stickers
Another simple way to decorate your windows for the New Year. You need to cut out various figures and decorations from paper - these can be deer, snowflakes, Christmas trees, Christmas balls, stars and other things. Of course, you can buy ready-made stickers and attach them to your windows if you don't want to waste time or don't like doing crafts.
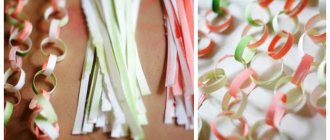
Wreaths and garlands
are some of the most popular Christmas decorations in the home, they are affordable and can be found at your local store. You can easily make evergreen garlands, add lights and hang them above your windows.
Wreaths made from artificial or natural spruce branches, eucalyptus, arborvitae, moss - add elegant bows for a chic look.
New Year decoration. Choose any decorations that are dear to your heart and eyes and hang them on the window. You can secure a branch above the window and hang your decorations from it. These can be your favorite, antique or handicrafts made by yourself or your children, figurines, toys made of fabric, paper, natural materials, pine cones and everything that comes to mind. Christmas cookies with icing, citrus fruits, beautiful apples and will bring an adorable Christmas aroma and a festive atmosphere.
There are a lot of options for how to decorate a window for the New Year with your own hands! Above the window you can hang light garlands, letters with words and wishes that you like, garlands of pine cones or dried fruits, gift boxes, etc. Decorate the window sills with Christmas trees or fir branches in pots, add candles, vases with pine cones, stumps from tree trunks, figurines of forest animals and birds or a snowman. Get inspired by various Christmas window decoration ideas and start decorating your home for the holidays this coming weekend!
Despite the rapid approach of the New Year and an endless series of worries, we definitely need to have time to decorate the New Year's windows in our home. There is very little time, but this is exactly the long-awaited moment when it is very appropriate to create a fabulous atmosphere in your family.
Beautiful windows in the house are already half the story. Try to decorate them interestingly and tastefully. The decorations in the windows look very harmonious. Remember the New Year's windows of luxury stores. We not only admire them, but very often freeze in our tracks, looking at their magnificent, amazing decorations and remembering our favorite characters. So why not do something similar at home?
I clearly remember the tradition of decorating windows for the New Year holidays from early childhood. My grandmother especially loved to do this. Between the window frames they always laid out a lot of cotton wool or white fabric, making small snowdrifts out of them, sprinkled them with glitter, and decorated the top with beautiful balls, snow maidens, little animals... Icicles, snowflakes, crackers, streamers were hung in the upper part of the window... The New Year's mood began already from the street , and the children spent hours looking at the simple decor, which was then considered the height of perfection, and often asked to take their favorite toy out of the window, although the same one was hanging on the tree.
The possibilities for creating New Year's window decor have expanded endlessly. To create a festive mood for all family members, you need a wide variety of accessories, satin ribbons, shiny tinsel, colored paper, toys, pine cones, twigs, colorful napkins and everything your soul desires. You can use them ready-made or make your own.
How? You can find out more in the article "". They can wonderfully decorate your windows. Undoubtedly, there are other possibilities, and everyone has their own. And don’t forget about the blooming one - it will become a wonderful decoration for winter window sills.
New Year's snowflake ideas
The very first winter craft idea that comes to almost everyone’s mind is snowflakes for the New Year. These traditional symbols of winter and holiday decorate homes and offices, government agencies and private companies every year. Craftsmen choose a variety of materials from which to make New Year's snowflakes:
- paper;
- cardboard;
- yarn;
- textile;
- cotton buds;
- pasta and much more.
You can make simple or more complex volumetric paper snowflakes, or master the following techniques:
- kanzashi;
- quilling;
- origami.
Simple New Year's snowflakes
For activities with small children, or if you need to make a large amount of decor, it is better to choose simple New Year's snowflakes for the windows. During the work process, the craft can always be complicated. A simple option for making snowflakes, familiar to many from childhood:
- To work you will need sheets of paper (both white and colored), a pencil and scissors. Adults can use a utility knife.
- The sheet of paper should be square. If it is rectangular, then you need to cut off the excess part on one side.
- Then the resulting square is folded in half and in half again.
- At the next stage, a triangle is made from the blank so that all the paper cuts are on one side.
- It is folded diagonally again, cutting off the excess corner.
- The contours of the future snowflake are applied to the resulting blank. You can do this yourself or look at the options from the masters.
- The last stage is cutting along the contours and evaluating the resulting craft.
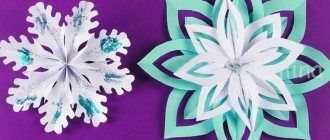
Volumetric New Year's snowflakes
With older children, you can try making large, voluminous New Year's snowflakes from paper. To do this you will need:
- 6 square sheets of paper of the desired color;
- glue;
- scissors;
- pencil;
- threads or “rain”.
Progress:
- Fold a sheet of paper diagonally to form an even triangle.
- Then you need to carefully cut the workpiece from the edge to the fold line into equal strips about 1 cm wide, leaving approximately 0.8 cm from the fold line.
- The workpiece unfolds. To create a volume effect, the strips are glued alternately from different sides. To do this, the tip of one strip is smeared with glue, it is wound onto the paper and pressed against the other opposite strip. Then the adjacent strips are glued together, but on the other side.
- The above operations are carried out for all 6 sheets.
- After all the parts are ready, they just need to be carefully glued together with the base inward.
- The finishing touch will be to attach a beautiful ribbon or thread to one of the parts for hanging. New Year's volumetric snowflakes are ready.
New Year's snowflake made from cotton swabs
Very simple and beautiful New Year's snowflakes are made from cotton swabs. To make them you will need:
- cotton buds;
- cotton pad;
- glue gun with a rod;
- decorative rhinestones and beads.
Progress:
- The craft can be done even with children who know how to work with a glue gun and understand that it has hot parts.
- First, you need to cut out a smaller circle from a cotton pad, which will serve as the base.
- Then glue cotton swabs to its center like sun rays.
- For strength, all the resulting “rays” are connected to each other at the bases with another 7 cotton swabs. Depending on the age of the master, the level of complexity of snowflakes can be changed by cutting cotton swabs in half and creating more complex patterns.
- Finally, you can decorate the snowflake with beautiful rhinestones, beads, beads and everything else you can find in the house.
Crochet New Year's snowflakes
Handicraft lovers should try making knitted New Year's snowflakes. They look very stylish and cozy. Many craftsmen even decorate traditional Christmas trees only with knitted toys. To create such a craft you need:
- Choose a thin buckle, such as iris. New Year's knitted snowflakes with lurex keep their shape well and look interesting due to the inclusion of metallized threads.
- Crochet or knitting needles.
- Selected knitting pattern. You can pick up ideas from other craftswomen or create them yourself on a piece of paper.
- Knit a snowflake according to the chosen pattern.
- Fix it on the surface and starch it. The most convenient way to do this is with a special aerosol with starch. A solution of potato starch, sugar or PVA glue with water will also work.
- After the solution has dried on the snowflake, it needs to be ironed. The craft can be used to decorate a house or apartment.
New Year's snowflakes Kanzashi
You can try to create unusual snowflake Christmas tree decorations using the traditional Japanese kanzashi technique. It involves the use of satin and silk ribbons, from which petals of various shapes are cut out and folded, and they are later glued or stitched into beautiful snowflakes. Initially, the technique was used to create hair clips.
New Year's snowflakes using the kanzashi technique are made as follows:
- Select ribbons of the desired color, length and width. Let it be a white and silver ribbon 5 cm wide.
- From the ribbons you need to cut 5x5 cm squares: 18 white and 12 silver.
- A square of white tape is folded in half and soldered over a candle fire or lighter.
- The resulting triangle is folded two more times. Then its tip is cut off, the place of which is soldered with fire.
- Then the adjacent corner is cut off, the edges are soldered and sealed with fire. Using this technique, 12 white and 6 silver petals are made.
- From the remaining triangles, double sharp petals are made using the same algorithm using intertwined white and silver ribbon.
- All finished elements are connected to each other with hot glue and fixed to a circle of white felt with a diameter of 5 cm.
- If desired, the elements are decorated with beads or rhinestones.
New Year's snowflakes quilling
Beautiful New Year's decoration using the quilling technique involves making snowflakes from twisted long strips of paper. The very name of the technique is translated as paper rolling. To work you will need:
- special quilling paper or just thick colored paper.
- glue;
- round template in file;
- rulers;
- scissors;
- cylindrical objects of different diameters.
Progress:
- You need to calculate the number of stripes.
- Twist the selected elements according to the template using cylindrical objects, being sure to fix the edges with glue.
- Assembling a snowflake begins from the center of the template to the periphery, one by one fixing all the finished elements with glue.
New Year's snowflakes origami
New Year's snowflakes made of colored paper, made using the origami technique, look very impressive in the interior. Its essence is that square sheets of paper are folded in a special way without the use of scissors and adhesives. Large New Year's snowflakes can be made using the origami technique according to the following scheme by James Sakura:
- A square sheet of paper measuring at least 21x21 cm is folded into the basic shape of a double square, which should be positioned with the free edge down.
- Then the “Bird” shape is assembled from it.
- The whole process is repeated for the reverse side.
- Then, on both sides, the top point is folded down.
- The workpiece is opened and reverse folds are made.
- Then the entire workpiece is folded according to the above diagram from an acute angle along the line.
- All folds are carefully smoothed out.
- The edges of the resulting snowflake are bent.
New Year's snowflake made of felt
Beautiful small New Year snowflakes for the holiday tree can be made from felt. For this you will need:
- pieces of felt fabric;
- scissors;
- templates;
- needle and thread for embroidery;
- cotton wool or other filler.
Beautiful New Year's decor of felt snowflakes is made as follows:
- For each, two shapes are cut out of felt according to the template.
- Embroidery is done on the front side or on both sides at once.
- Both halves are sewn together leaving a small hole for the filling.
- The workpiece is stuffed with cotton wool and completely sewn up. Rhinestones and beads are glued with hot glue to the finished snowflake.
New Year's snowflake made from pasta
Pasta is a readily available and safe material for crafts. You can safely make such New Year’s snowflake decorations together with your kids, guiding the process:
- Pasta of the selected shapes are arranged in the shape of a future snowflake.
- Then they need to be connected to each other. For the smallest ones, you can use salt dough or plasticine. Older children can be trusted with Moment glue or a glue gun.
- The dried product is painted with gouache or acrylic paints, dyes from spray cans.
- To hang the decoration, a beautiful ribbon is attached to the back of it.
New Year's window decor ideas
Made from colorful paper and foil
One of the most favorite and original ways to decorate a window is snowflakes - small and large, flat and voluminous, and multi-colored, made from napkins and decorative paper. Patterned beauties, stars and abstract exciting figures can be cut out of white paper, as well as thin colored cardstock and foil. They can come in a variety of sizes - from miniature to very large, sprinkled with artificial snow or decorated with glitter. With a minimum of skill, such decorations are easy to make with your own hands, or even better - together with children. How much pleasure and joy both from work and from decorations!
Made from artificial snow and paint
Another of the most affordable ways to decorate a window is to spray artificial snow on the windows. With its help you can create the most beautiful patterns and endlessly intricate New Year's stained glass windows.
From personal experience I was convinced that it is very easy to wash off artificial snow from glass. There are no streaks or stains left on them. You don't have to worry about this. And it’s very pleasant to look at the fairy-tale snow characters on the windows, as if drawn by Santa Claus himself!
For those who love to draw, this is the most suitable option. Winter windows can be decorated with bunnies, squirrels, bears, foxes, as well as snowflakes, Christmas trees, snow drifts and, of course, gifts with bows. The winter wind, Santa Claus in his chariot, a snowman and your favorite fairy-tale characters look amazing. They can be painted on with gouache and colored paints, which are also easily washed off. Children will be especially happy to see a New Year's fairy tale on the window.
By the way, you can decorate large mirrors in your home in the same way!
From toys and pine needles
One of the most luxurious window decorations are Christmas wreaths made of pine needles and decorated shiny balls. They can be of different sizes - from large to small. It is preferable to hang them separately on shiny braid or satin ribbons, or they can be combined into compositions at different heights, combined in clusters. Bells, icicles, stars, bows, flowers, candies, sweets and any toys that are customary to decorate a Christmas tree are also appropriate here.
From glowing light bulbs and garlands
If you want something more dynamic, use glowing garlands, running lights, which will light up your windows with bright fire, excitement and give a huge supply of New Year's energy. Additional window lighting makes the whole house surprisingly festive, so invest in garlands and let the New Year's festival into your home. This is a truly exciting holiday for everyone - both children and adults.
Christmas decorations on the windows, exquisite and elegant decorations are sure to attract Santa Claus to your home, a lot of joy and a large portion of happiness. Add glitz and glamor to your New Year's window decor, turn on the lights on your Christmas fantasies, be the director of your own fairy tale and the queen of the winter holidays.
The time for magic is coming! Meet your happiness this winter!
You can sew New Year's curtains with your own hands using festive fabric with a themed pattern. At the same time, there is no need to make a complex cut, because the main thing in such curtains is color, pattern, theme. You can decorate ready-made curtains with homemade decor or garlands, or purchase ready-made New Year's curtains. But there are a lot of options for what curtains can be.
New Year's curtains for windows: how to decorate ordinary curtains
It is not always possible to purchase or sew new “clothes” for the window, in this case it helps. To make New Year's curtains out of ordinary curtains, there are several clever tricks.
How to decorate regular curtains:
- Christmas decorations
. Who said that their place is only on the Christmas tree? Try hanging simple Christmas tree balls on thin satin ribbons, and fix them in any way on the cornice or curtains. One such row - and the curtains automatically become festive. - Glowing garlands
. This method will not surprise anyone, but there is one caveat. Many people think that the more lights, the more colors, the more spectacular the window looks. In fact, another point is important - the design of the light bulb attachment and how exactly the garland is hung. On thin curtains, light and transparent, you can hang just three vertical rows of garlands with infrequent star spacing - and this will be more convincing and touching than a sea of lights. - Homemade garlands
. It’s hard to imagine children’s parties without homemade garlands, and why? You can make them with your own hands, using, for example, decorated deer cut out of red cardboard. With a certain step, pull them on a thick red thread and hang them on the window. Red deer will immediately create a New Year's mood. But the garland can also be made of cotton wool, felt gloves, snowmen and Christmas trees, etc. - Curtains made of snowflakes
. You can, of course, make string curtains with snowflakes strung on them. But there is another proposal - a lambrequin made of snowflakes. It can be knitted, but you just need to start early, in the fall. You can cut out snowflakes from paper and stitch them, creating a separate narrow rectangle that will be secured like a lambrequin.
Let the decorations go on the curtains in the kitchen and bedroom, because not only the living room needs a holiday. Use homemade pendants in the form of Christmas fairies, ballerina snowflakes, winter owls, etc.
DIY snowflake stencil for the window
Decorate your windows with colorful Christmas decorations using paper snowflakes as stencils . The stencils are very easy to cut and even easier to use. You will need:
- snowflakes from paper (how to cut a snowflake from paper, see the following blocks)
- scissors
- acrylic paint
- dishwashing liquid
- large plastic lid for use as a palette
- brush
- kitchen sponge (new)
- insulation tape
- paper towels and window squeegee
- old newspapers
- Optional: wrapping or stencil paper
Gather the materials, most importantly, scissors and paper to make paper snowflakes. Cut the paper into squares of different sizes that correspond to the windows you will be decorating. Cut the sponge into four to six pieces. Tip: It's easier to cut with a sponge if it's wet. Cut out paper snowflakes in different sizes and designs. See instructions below. Place newspapers under the window to protect the floor. Clean the window with spray and let dry.
Pour a small amount of acrylic paint onto the plastic lid. Add a couple of drops of detergent and mix with a brush. Wet the sponge pieces with water and squeeze out. The sponge should be slightly damp. Place a paper snowflake on the window. Secure the stencil using small pieces of duct tape to the back of the snowflake. Use a sponge to apply the paint mixture onto the stencil, just a little. Apply the paint using an up and down motion. Be sure to cover the entire cutout area. If you want, you can paint the outer edges of the snowflake! Remove the tape and pull out the stencil. Let the paint dry. The same stencil can be used several times. To make your stencil last longer, use special stencil paper. When you are done with all the stencils, wash the sponge, brush and lid with warm water.
Photo source: www.auntannie.com/FridayFun/Stencil/
New Year's curtains 3D: the most technologically advanced
In fact, such a curtain turns the window into a real work of art. But since 3D curtains are very bright, rich, and eye-catching, you shouldn’t make other equally bright accents in the room. Even the Christmas tree can be decorated more modestly, using a specific color scheme.
Another name for such curtains is photo curtains.
- The image you like can be transferred to virtually any fabric, no matter what its density and texture;
- The image is transferred to the fabric using UV printing; this method helps to transfer the image onto textiles with maximum accuracy;
- Externally, photocurtains resemble a bright screen or louvered curtains.
Do not be afraid that very thick fabric will make the drawing faded and unclear; the image in all cases is of high quality.
New Year themed curtains: if you make it yourself
How to make beautiful holiday curtains yourself? Of course, you can buy bright fabric with Santa Claus and snowflakes in the store and cut simple curtains. It will take an evening to do everything about it, no more.
But if you use only what you have, how can you sew holiday curtains from completely non-New Year material?
The ideas are practically on the surface - decide for yourself with the drawing, or rather, the applique. The simplest option is to take a red fabric, on which, in the form of an appliqué, make a row of hanging New Year's balls from another fabric.
We hang an electric garland on the windows
Small lights on the windows are beautiful in themselves, and in combination with Christmas tree decorations and fir branches they instantly make the New Year’s interior cozy and elegant.
The light of electric garlands is multiplied, reflected on glass and Christmas tree balls
New Year's window decor outside
- Cascading garlands, as in the photo below, are especially suitable for decorating windows.
New Year's decoration of curtains
This option immediately comes to mind - a garland. Of course, the modern choice of garlands allows you to turn a room into a nightclub, concert studio, etc.
You can often see queries such as “garland, New Year’s curtain, lighting modes.” Such a curtain garland can actually hang on a bare window, that is, the curtains can be removed. It consists of many light bulbs that turn on in a certain color and in a certain order, creating a certain effect. Today you can buy a garland that turns on and lights up like a curtain with a tieback, which looks very cool.
Since modern garlands have an average of 8 glow modes, you can alternate them without getting tired of any one.
Dressing up the curtains
Do you want to avoid spending money on New Year’s window decorations and not having to clean the glass after the holidays? Then simply decorate the curtains with the Christmas tree decorations you have in stock. For example, they can be sewn to the bottom edge of roller blinds as shown in this photo.
An idea on how to decorate roller blinds for the New Year
Christmas balls or garlands can be hung on a cornice or secured to curtain hooks/rings.
Decorations can be tied, pinned or sewn to tiebacks.
Curtain decor ideas for the New Year
Instead of Christmas tree decorations, you can use pine cones tied with ribbons or whole bunches of cones to decorate curtains.
In the New Year, curtains can be completely replaced with a cascade of garlands of Christmas balls and ribbons.
DIY New Year's paper curtains
This snowy splendor, which is so often missing outside, can be made at home, and with your own hands. All you need is to be patient, because there will be at least 8 elements in one row.
So, paper curtains made of snowflakes:
- Cut out 50-100 snowflakes of approximately the same size;
- Place them under a load so that they are perfectly level;
- Snowflakes can be made shiny by using a silver spray;
- Next, you need to sew snowflakes on a machine in one vertical row - for example, 10 snowflakes in a row;
- And there should be so many such rows that they are enough to cover the entire width of the window;
- If you want to make symmetrical curtains, then the first row will reach the window sill, and the subsequent ones will go in descending order.
However, you can cut out not only snowflakes. Stars, balls, light bulbs, hearts - everything can become an integral part of the curtains, the main thing is that the color of these parts is New Year's.
New Year's decorations for curtains
You can start with the simplest thing - take the same paper snowflakes. There are many ways to attach them to curtains. Hint - use more than just white. Red and white have already become a traditional New Year's color scheme, so a white curtain and red snowflakes are actually a festive ornament.
Other curtain decor options:
- If you are a supporter of minimalism, simply hang a couple of Christmas balls tied with a New Year's bow on the cornice where the curtains begin;
- A garland of Christmas balls can also be secured as a window frame by simply threading the balls through a beautiful decorative braid;
- Ruddy apples on satin ribbons with a New Year's pattern - such vertical decorations would be appropriate in the kitchen, and the ribbon in the middle can be decorated with a snowflake.
Using the same satin ribbon, you can hang a New Year's wreath on the curtain - it is very easy to make from green tinsel under pine needles, New Year's beads and sweets.
Even the most modest apartment can be made extraordinarily New Year's, festive, cozy, and no landscape outside the window will deprive you of this winter, magical feeling. Decorate the curtains, make decorations with your own hands, and carefully store them in beautiful boxes so that you can open them with delight and anticipation of the holiday next year.
New Year is coming, Santa Claus, Christmas tree, gifts. But even if you don’t have money for expensive decorations, you can decorate your house with your own hands, for example, with various products made from paper snowflakes.
You can’t even imagine how many New Year’s and creative things you can do with the help of ordinary thin paper, scissors and imagination! In some cases, you will need more glue, nail polish and a little more patience.
For example, you can decorate a wall with snowflakes - it will turn out to be a very festive panel.
To do this, you will also need paints or colored pencils to decorate the white paper snowflakes.
Colored “butterflies” and “flies” will look impressive on a light, plain wall.
Especially if you put a Christmas tree against this wall. Or you can decorate a wall in the hallway or corridor in this way so that guests plunge into a New Year's fairy tale right from the doorstep.
You can also hang snowflakes on a chandelier, it will immediately take on a fabulous openwork look.
To make them hang under your ceiling longer, it is better to treat the finished snowflakes with glue or nail polish, you can even use multi-colored varnishes - the chandelier will turn out to be shimmering with all the colors of the rainbow. Both large and small paper snowflakes are suitable for decorating a chandelier. It all depends on your imagination.
You can make various crafts from snowflakes
by gluing a paper openwork onto cardboard, wood or even metal. Or you can make a whole composition on a New Year's theme. Natural materials, such as tree branches, bunches of rowan or viburnum, autumn leaves, moss, etc. are welcome in such crafts.
You can make a festive curtain from paper snowflakes
and decorate your bedroom or living room with it. To do this, it is better to fasten the snowflakes together with paper clips or sew them with thread.
Snowflakes can be treated with glue or varnish, or you can leave them just paper - this way they will look more delicate, although such a curtain will not last long.
A curtain made of snowflakes can be thrown over a regular curtain, or you can hang it separately on a window, which will make it look openwork from the street.
And, of course, you can make window decorations from snowflakes.
Make snowmen, a Christmas tree, various animals, or even a whole picture out of them.
And now we present the most common patterns for cutting out snowflakes:
Glad to see you on the blog pages)
I really love decorating the house for the New Year, and you probably do too, otherwise you wouldn’t be interested in this article))
There are many options for decoration and places for this in the house, today I suggest you learn more about window decoration for the New Year.
It seems to me that when you decorate a window with New Year’s paraphernalia, and then look through it at the street, then all these snowflakes, tinsel, glowing garlands not only add festiveness, but also bring an additional touch of magic and fabulousness.
You look and understand - is there going to be a miracle?
There are not so few design methods, I have broken them down into points for convenience, I haven’t used them all myself yet, I haven’t tried drawing on glass, for example, I’m not much of an artist, although thanks to stencils, which are apparently not visible now, perhaps I will dare )
In general, I suggest choosing a decoration option, or maybe several, that suits your liking and taste.
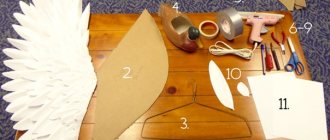
Making a decorative curtain from snowflakes
1. Using stencils of different sizes, draw circles on the back of the wallpaper and cut them out. If you took paper of several textures, then distribute the number of circles evenly (so that there are snowflakes of all sizes from each type of paper).
2. Glue 2 circles together, wrong sides together. Trim the edges with scissors.
3. Using the same stencils that were used in the first step, draw circles on thin cardboard. You'll then need to pierce the pieces with a needle, so make sure the cardboard isn't too thick for this. The number of cardboard circles is approximately a third of those already prepared from wallpaper.
4. Cut out cardboard circles and glue them onto wrapping foil. Let the glue dry, cut the foil along the contour. Turn the piece over and stick it on the foil again. After the glue has dried and cut out, you will have double-sided glitter.
5. Lay out all the circles on a large, flat surface (on a table or directly on the floor). Experiment with the arrangement and combination of different sizes and types of workpieces. Make sure that paper snowflakes and foil snowflakes alternate evenly. Once you find an option you like, move on to the final stage.
6. Now we need to string the snowflakes onto threads for hanging. Cut pieces of yarn to the required length (with some extra for tying on top). Using a needle, start planting circles from the bottom. After each circle, make 1-3 large stitches in diameter. Leave a gap between the parts so that they can rotate freely. When the chains from all the circles are on their threads, cut another piece to hang the entire structure. Tie all the blanks to it and tighten it in the door or window opening (you can use small furniture nails or stronger buttons to fix the tension).
If you have nowhere to hang such a structure, then you can come up with something more compact, for example, a mobile.
Window decoration for the New Year
Paper snowflakes, cutting templates
The oldest and most famous method is decorating with snowflakes. It seems simple, not a new method, but it’s so beautiful.
This is correctly called decoration with vytanankas; this includes not only snowflakes, but also various other figures cut out of paper.
Let's look at other New Year's figures in the next paragraph, but now just about snowflakes. Because cutting them out is more difficult, and this process is more creative than designing ready-made templates.
I’m terrified how many papers I ruined in my childhood while making something that vaguely resembled snowflakes, they looked more like they were cut out with a hatchet than cut out with scissors?
But then there were simply no paper snowflake templates that exist now, looking at them, all you have to do is fold the paper correctly and cut it out in the right places.
Paper snowflakes, templates for cutting.
Now you can download snowflake templates that do not need to be folded and cut out, but printed and cut along the marked lines. In my opinion, the labor costs are the same, but there is less pleasure and expectation of “what will happen”) but here, as they say, it comes down to taste and color.
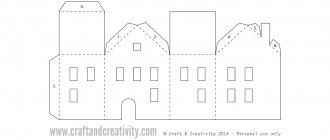
How to cut a snowflake stencil
After completing this project, you will be able to make a snowflake from any square piece of paper. Download the template from the website and print it on a sheet of A4 paper. Cut out a square outline. Try to make cuts at a 90 degree angle. In general, all snowflakes are made from a square sheet of paper. Large snowflakes in this project are 20 cm, medium ones are 15 cm, and small ones are 9 cm. If you plan to make a snowflake from paper of your own design, any square size will do. Fold the square once diagonally, and then fold it one and a half times as much along the other diagonal. After this you will have an isosceles triangle. That is, one angle is 90° (right) and two sides are equal in length.
Fold the triangle into thirds with the right angle pointing upward. Make two folds one on top of the other.
Trim the corners to create a triangle. If you open the folded sheet now, you will have a figure with twelve corners.
Cut out the snowflake along the pattern line. Remove pencil marks. Now carefully unfold the paper and look at your beautiful snowflake.
Now the snowflake can be used as a stencil or simply mounted on the window as a finished product.
Photo source: www.auntannie.com/Geometric/Snowflakes/