4/5 — (8 votes)
Have a good and bright day everyone! Very soon, in a month, the first flowers will appear, I suggest not to wait for this and make your own flowers from paper. After all, you can give such lovely gifts of nature without a reason, but if you need a reason, then don’t forget to congratulate your mothers and grandmothers on March 8 or Happy Mother’s Day, because it is on these days that such crafts are always given.
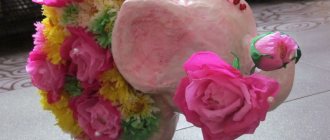
Let them be paper, but they can be presented so cool and superbly that they will look even better than alive, and even more so they can stand on a table or shelf for a single year. And this certainly makes me happy. Take a look at this picture, do you like it? If yes, then in the last article I showed step by step how you can do this.
In my opinion, today’s theme will always be popular, because this is the most beautiful and delicate souvenir that you can give for any occasion. So, I suggest you hang out with me for a while))).
Instructions for making flowers from paper:
To make such flowers, we will need:
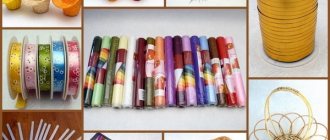
Tools and materials:
- Double-sided colored paper (possibly with patterns) or pages from newspapers, magazines, books
- Scissors
- Glue
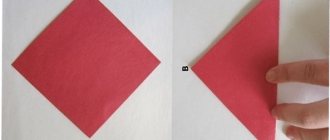
1. First, take scissors and cut out a square from colored paper (the larger the square, the larger the flower will be).
We twist the square so that we get a rhombus. 2. Fold the diamond in half diagonally. We have a triangle.
3. Once again, fold the two corners of the triangle into the middle to form new corners, as in the photo below. We have a rhombus again.
4. Now let's start creating the core. Thanks to the core, our paper flower will look more natural. To do this, carefully straighten the two side corners. The bend line should be exactly in the middle on them.
5. We bend the side corners of the triangles (F and G) inward so that they do not extend beyond the boundaries of the sheet.
6. Next we need to fold the two side triangles in half. The corners remain inside. After this, apply glue to the sides, as shown in the picture, and glue the petal.
7. We have one petal with a core.
8. To make one flower, we need five such petals. We already have one, we need to make four more of these petals. To do this, repeat the previous steps four times.
9. We got 5 petals. Now, to make a flower out of them, spread glue on the sides of the five petals and glue the petals together.
To make paper flowers more vibrant and original, you can use colored paper with patterns.
If you want to give a vintage look to your paper flowers, you can make flowers from newsprint or from book pages.
By showing your imagination, these paper flowers can be used to decorate almost any holiday or gift!
Tools and materials for creating artificial greenery
You will need the following simple and accessible materials:
- masking tape (wide),
- wire,
- toothpicks,
- tape,
- acrylic paints (green) or
- green gouache and acrylic varnish.
I take thin wire “Gamma” 0.3 mm, the one that I usually use for beading. The color is not important - the wire will be completely hidden.
If there are acrylic paints in the shades of green you need, close to the natural colors of the foliage, use them. I didn’t have one like this, it was mostly blue, so I settled on gouache. To make the leaves look more interesting and more practical, I cover them with acrylic varnish. I use the simplest one - “Interior acrylic varnish, colorless semi-gloss”. He is always “in business” with me.
Tools: wire cutters (can also be cut with scissors), scissors, brushes.
Paper flowers - Rose
Let's make such a wonderful paper rose together. For this we need:
Tools and materials:
- Scissors
- Ruler
- Threads
- Scotch tape (preferably colored or double-sided)
- A piece of wire
- Stretch Crepe Paper
- Ball or candy
Step-by-step instruction:
1. First we need to prepare the preparations. To do this, you need to choose the color for our rose and cut crepe paper of the desired shade measuring 7 x 5.5 cm - these will be our petals. The more preparations we prepare, the more magnificent the rose will look.
2. Now we need to stretch our blanks across. This is necessary in order to give them a bend and shape.
3. Next, we make a blank using green paper (look at the picture). This trick will make our rose look more realistic.
4. At this stage you need to connect the stem of the rose with its petals. Carefully wrap the petal blanks around the ball or candy and attach them to the stem with a thread.
5. Now you need to make the wire more similar to the stem. To do this, take green paper and wrap it around the wire. After this, we attach the green leaf blanks to colored or double-sided tape.
That's all! The paper rose is ready. If you want to make a whole bouquet of such roses, then repeat all the steps as many times as necessary.
To make the bouquet look more fun, you can use paper of different colors.
Types of flower panels
With the help of wall compositions made of dried flowers, you can decorate not only the interior of the house, but also an office space, a store's sales area, or a gazebo on a personal plot. An art object using the oshibana technique can be three-dimensional or flat. The shapes and colors of plants are as close as possible to the natural varieties growing in nature. Some plant material can be replaced with artificial raw materials.
Volumetric
Dried buds and bouquets of plants that retain their shape are suitable for creating such paintings. Flowers and leaves can be secured on cardboard or burlap. Such works look original and unusual on a flat wall. Volumetric compositions are unique because they are always done by hand.
A flower panel can be safely placed in any room of an apartment or country house without fear that the craft will be harmful to health or release harmful substances. All components are natural and environmentally friendly. A creative three-dimensional panel is a great gift. The painting will create a certain image in any room.
From pressed dried flowers
Flat appliqués are the easiest way to create a panel of dried flowers. In addition to inflorescences, seeds, leaves, and curved shoots are suitable for paintings. You can lay out absolutely any composition on thick paper. Sometimes plants are laid out on a prepared base, painted with watercolors and covered with fabric.
Plant painting can be very difficult to do. Some master classes describe creating panels using cut-out images from leaves. This requires special patterns, a sharp stationery knife and absolute precision. Such a fragile pattern is laid out on the surface with tweezers and covered with a special film.
DIY paper orchid
Such wonderful orchids can be used for decoration or you can make a branch and put it in a vase.
Tools and materials:
- Scissors
- Color printer
- Glue
- Paper
- Clothespin (if we want to decorate gift wrapping)
Paper orchid templates
Download and print these templates on a color printer
Step-by-step instruction:
Santa Claus pants
What if all the pots in your house are filled with flowers, but you still want to create? Simply paint them red, add cotton wool or faux fur to the stand, and tie the two pots together with a belt attached to a gold buckle. If painting the pots is not possible, you can simply wrap them in colored film or cardboard of the desired color.
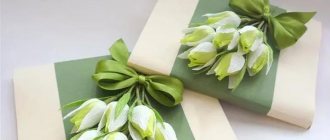
Sweet bouquet of paper flowers
Such a bouquet of flowers with a sweet surprise inside will be a unique gift for a loved one!
Let's start making it.
To make such a bouquet of flowers from paper, you need to prepare the following tools and materials:
- Corrugated paper
- Wide tape
- Narrow ribbon (0.5 cm)
- Wire
- Green type tape
- Scissors
- Wire cutters
- Wooden skewers
- Wrapping paper or mesh for a bouquet
- Sprigs of greenery
- Bow for decoration
Well, and, of course, chocolates
Step-by-step instruction:
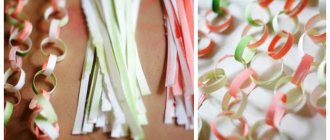
1. First you need to take wire cutters and cut the wire for the stems into 10 cm pieces. In our case, you need 7 pieces of wire.
2. Take scissors and cut a thin ribbon (0.5 cm wide) into pieces about 25 - 28 cm long.
3. From corrugated paper we make seven blanks in the form of rectangles, measuring 18x12 cm.
4. Then cut out small rectangles in the bottom corner of a sheet of paper, measuring 9cm x 5cm. These will be our future flower buds.
5. Place the smaller piece on top of the larger one and place the candy on the smaller piece.
6. We twist our blank together with the candy into a tube, forming a bud.
7. We take the wire and place one end of it in the middle of the bud. We wrap the bottom of the bud blank around the top of the wire, forming the stem of the flower.
8. Now you need to wrap the tape around the top of the wire to secure the stem and bud well.
9. We take the previously cut ribbon and tie it around the bud with the candy.
10. Now we need to fluff the flower and give it a wavy look. To do this, gradually turn away the edges of the paper at the top of the bud, pulling it a little so that the paper stretches and bends like a petal.
11. We carry out all the above steps with all the buds.
12. We take a wooden skewer and, using tape, attach three flowers and decorative greenery to it. Then we add other flowers and continue wrapping the stem with tape.
As a result, we should get a bouquet like this:
You can stop here, or you can continue and beautifully package the composition.
13. We take the packaging, which should be longer than the stems of the bouquet, place the bouquet diagonally and wrap the flowers in the packaging.
14. We tie the bouquet with a ribbon and decorate it with a bow.
The bouquet of flowers is ready!
Leg-split
Decorating a pot with twine is also not particularly difficult. It is necessary to apply glue and wrap the pot tightly with twine. The initial and final pieces of this rope are secured with an additional layer of glue.
The direction of winding is usually chosen horizontally, but no one forbids winding the pot diagonally or in any order. The main thing is that the twine fits tightly to the adjacent turn.
A lovely “country” pot can be decorated with artificial flowers or an elegant bow with a bead inside.
Instead of twine, you can use yarn, braid, or lace.
Paper flowers with rounded edges
Quiet paper usually comes in large sheets, in a stack of 8-10 layers. This is exactly how many layers we need for the flower.
1. Take a stack of eight sheets and cut out a rectangle of any size. The diameter of the flower will be equal to the width of the leaf.
2. The next step is to fold our rectangular sheets into an accordion. The height of the fold was about 2 centimeters, but you can also experiment with this parameter.
We fold the sheets into an accordion until the very end, turning the sheet over after each movement.
This is how it should turn out.
3. Cut a piece of rope, ribbon, fishing line or thread
4. We tie our accordion in the middle. It should look like this.
5. Use scissors to round the edge to form a rounded petal.
It is difficult to cut through all layers at the same time, so try to cut in several steps.
6. On the other side we do the same.
This is how it happened:
7. If you buy ready-made pom-pom flowers from tishu, then you will be given exactly such a blank, which now you need to open, forming the flower as follows: starting from the top, lift all layers of paper to the middle.
At the same time, rotate the flower, grabbing the paper in turn from one side to the other.
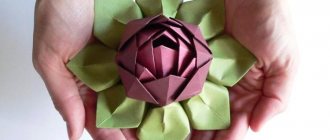
After a while, you will have a stunning paper flower in your hands!
You can also watch all the steps in this video:
It was a flower with round petals. Go ahead!
Mosaic
Any small fragments will be suitable as a mosaic. They can be small pieces of ceramic tiles, multi-colored pieces of glass, plastic Lego parts, pebbles, buttons, shells, coins.
Note!
Drawing master class: step-by-step do-it-yourself drawing schemes. Master classes on creating drawings using different techniques (120 photos)- Master class on sculpting - TOP 150 photos with step-by-step instructions on sculpting products with your own hands. Master classes for beginners
Sewing master class - TOP 150 photos with detailed DIY sewing master classes. The basics of sewing from experienced craftsmen
For this type of decoration, the pot is first covered with soil and then with glue. And before it has time to dry, he lays down the selected decor. Usually you start decorating from the bottom, but some ideas will require you to change direction and start from the top.
This way you can decorate the entire pot, make unusual stripes or interesting inserts.
Paper flower with pointed petals
1. We repeat all the same steps until the petal formation stage.
2. At the stage of petal formation, we do not round the edge, but make it sharp.
3. We make sharp edges on both sides.
4. Now open the flower and see what happens.
This is what a miracle turns out to be like in the end!
Paper flowers. Chrysanthemum
The next version of paper flowers that we will learn to make resembles a chrysanthemum.
1. We take the workpiece, but now we do not round or sharpen the edge, but cut it into thin strips.
2. We do the same on the other side.
3. Opening the flower.
As a result, we got such a flower.
Very cool!
Custom pots
Very often for large plants you have to use a regular bucket. You can decorate it using any of the above methods.
Do the same with mayonnaise buckets.
Magically attractive flower pots will decorate any room; you just need to come up with a non-standard use for the most standard things. And for those who don’t want to strain their imagination, they will help you choose the design of the photo “pot decor”.
Flowers made of paper (paper towels)
Let's now look at how to make these paper flowers using paper towels. 1. Tear several rectangles from the paper towels.
In our version, the paper towels came with perforations. It needs to be cut off.
2. Now divide each sheet into several layers, depending on how many layers it consists of. They are usually two-layer or three-layer.
Thus, we obtain a fairly thin and durable paper suitable for making flowers.
3. Take 8 thin pieces of paper and stack them on top of each other.
4. We fold the sheets into an accordion, bend them in the middle and tie them.
5. We make sharp edges on both sides.
6. Opening the flower.
As a result, we get such a beautiful flower from paper towels in a couple of minutes!
Stitched covers
Pieces of fabric are also suitable for decorating flower pots. To do this, you simply need to wrap the selected scraps around the pot and secure them with a ribbon or a lush bow.
Such sewn covers look great from leftover curtains, beautifully completing the decoration of windows.
Paper flowers (we use napkins)
Now let's look at creating flowers from paper napkins.
In our version, we took a multi-colored napkin. Let's make the lower layers of the flower yellow and the middle white.
1. As with paper towels, we also divide the napkins into layers.
2. Stack the yellow layers of napkins and cut out a rectangle of the desired size.
3. After this, we stack the white layers of the napkin and cut out a rectangle slightly smaller than the yellow rectangle.
4. After this, we place the yellow layers with the colored side up, and place the white center just below the main petals.
5. We fold the layers into an accordion.
6. Open the accordion and carefully separate the yellow layers from the white ones.
7. Fold the layers back into an accordion. As a result, we get two packs of white and yellow accordions.
8. Take a white accordion and cut its edges into thin strips.
9. Take a yellow accordion and make rounded edges.
10. Open both accordions and combine them in this way: put the white one on the yellow accordion and assemble it back into the accordion.
11. Bend it in the middle and tie it.
12. Layer by layer we open the flower.
This is such a wonderful flower! Agree, napkins make no less original flowers!
Finally, one more master class:
Advantages of handwritten design
Like any other craft, decorating flower pots will help you decorate the entire room according to the hostess’ wishes, give it a unique look and comfort, and fill it with homely warmth.
This is a great opportunity to break away from social networks and the latest horror stories on TV, as well as to tear your household away from them and have a great time with them.
This is a wonderful opportunity to give unnecessary things a second life and get rid of some of the accumulated trash that you feel sorry for throwing away, because it will certainly come in handy someday.