After reading a fairy tale, you don’t want to say goodbye to your favorite characters. Therefore, children often ask their parents to tell their favorite story again at night until they memorize it or until they can understand everything that escaped attention before.
Crafts on the theme of fairy tales by Pushkin, Andersen, Milne, Chukovsky, Suteev, Kawabata, Lagin and other popular authors, on the theme of folk tales, are a great idea for relaxing with a baby, preschooler and schoolchildren, unless, of course, your favorite cartoon is shown on TV at that time .
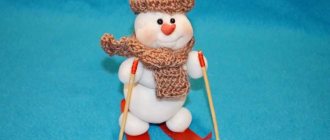
Cheerful snowman made of cotton wool
In further subheadings there will also be a master class on crafts for the New Year. You will be able to clearly master the technique of performing them and present the necessary materials.
You will need the following materials:
- strong Whatman paper;
- cotton wool;
- glue gun;
- buttons, 3 of which are orange;
- double-sided blue paper;
- scissors;
- black gouache.
Preparing materials for work
Teachers often give this homework task - to make a craft dedicated to your favorite fairy tale or cartoon. For a creative competition, you can prepare a craft on the theme of a fairy tale - for kindergarten or school. You can sew a toy, sculpt it from plasticine, or draw characters. But you should remember that the easiest way to make a beautiful, spectacular craft is to use different techniques at the same time.
The craft is voluminous, bright, made diligently, with a smile, with soul, it will be remembered, and even if it does not receive a high rating, the time can be spent fun and usefully. Creative applied activities, as is known, develop motor skills, spatial-imaginative perception, fantasy, thinking, and aesthetic feeling.
Most kids like them, just like regular games with parents or friends. They will not be tiring if you prepare everything and organize the work correctly.
The materials may be different, but you will definitely need:
- paper;
- scissors;
- pencil;
- paints or wax crayons;
- PVA glue or double-sided tape.
What else is needed depends on the chosen idea, characters and, of course, on ingenuity.
Execution technique
To make a funny snowman, you need to do the following:
- cut out 3 circles of different diameters from white paper - large, medium, small;
- Using small bases, attach the circles in ascending order to each other;
- then apply glue to the circles one by one, except for the smallest circle;
- Glue pieces of cotton wool in small pieces to two circles;
- use glue to attach the number of buttons you need to the belly of the snowman;
- make a nose from orange buttons in the same way;
- draw the snowman’s eyes and nose with black gouache;
- cut out a thin rectangular leaf from blue paper;
- wrap it around the snowman's neck, securing it with glue.
How to make a New Year's watch for a competition
Did your child bring an assignment from school or kindergarten to make a New Year's clock for the competition? I am sure that you will make the most magical and most accurate clock that will always show the New Year's hour. Let us consider with you light options made from cardboard, disks, as well as watches made from candies.
approach the matter with all seriousness, you can use a clock mechanism. In the first case, the dial can be replaced by an openwork paper napkin. Ask your dad to make a blank from a plank and age it with paint.
Look how interesting they approached the creation of watches. I think all this can be found in the house and simply glued to the base.
Watches made directly by children are the most magical in the world. They have absorbed a time of goodness, miracles and love. And this time is endless.
If you have leftover branches from an old Christmas tree, decorate the clock by also adding tinsel. And you can fit so much on the dial itself.
A watch made from a cardboard box and disks will deserve a place at the exhibition. We use the old disk as a dial, and make the frame from the same CD pieces. Just cut this material yourself, as cutting the edges can turn out quite sharp. Be careful.
The round base can be decorated with tinsel and rhinestones, and supplemented with New Year's figures.
A watch does not have to be round. Look how beautifully the craft is designed. And the divisions can be made from buttons.
The Japanese-style watch just needs to be decorated a little and brought to the exhibition. Let your child express his imagination.
And finally, we’ll make you a super delicious watch to outshine everyone at the exhibition.
For the craft we will need:
- Thick foam
- Cardboard
- Wrapping
- Colored paper
- Candies
- Coffee beans
- Pasta
- Dye
- Glue gun
- New Year's elements for decoration.
We make preparations. It is necessary to determine whether you will make a large watch or a small one. We cut two circles of cardboard and foam according to the required diameter. You can use corrugated or shiny smooth colored paper.
Glue the paper circles to the cardboard, each on one side only. Next, apply glue to the foam and fasten it to the cardboard on both sides. We measure out a strip of wrapping paper of the required width and glue it along the entire circumference on the side.
It turns out to be such a neat basis for future watches. Now it's time for the candy. To keep them well, give preference to square sweets. We also glue them around the entire circumference.
As an additional decoration, take any pasta, paint it and decorate it around the perimeter.
The divisions on the dial will be made of coffee beans. Perhaps you will have a different idea.
For the rest, do as you please. And depending on what decorations you have on hand. The hands can be made of beads, painted millet, or you can install a real mechanism. There is room for creativity here.
Lush spruce made of paper ribbons
If little readers have difficulty handling scissors. Adults can help you by cutting paper strips. The main method is the usual fastening (gluing) of these parts.
Necessary materials:
- stripes;
- glue; cardboard sheet;
- multi-colored;
- scissors.
Applications in the form of fairy-tale characters
It is simply impossible to find an easier DIY fairy-tale hero craft than applique. It is easy to make using different material options.
But first, the desired image needs to be transferred to cardboard. You can draw a fairy-tale hero or translate it using tracing paper.
Younger children can make applique using plasticine balls. Multi-colored plasticine is easy to glue and does not need to be painted. In addition, the child will not have to cut out any parts.
Draw an image on a piece of cardboard. Next, small balls are made from plasticine of the desired colors, glued to cardboard and flattened a little.
The second option for applique is using colored paper. First, a base is made from the required color of paper. It is glued onto cardboard, and then the rest of the parts are glued onto it. This creates a colorful fairy-tale character that can make a wonderful postcard.
Another option for this type of creativity is an image using pumpkin seeds. They are very easy to paint and due to their small size you can make any picture out of them.
If you don’t have pumpkin seeds, then pasta, as well as rice or millet, will do. For rice and millet, you first need to apply a layer of glue over the entire image with a brush, and then sprinkle the grain on the design.
The last stage is painting with the desired colors.
How to do the craft
Making a paper tree includes the following steps:
- roll the cardboard sheet into a cone, cutting off excess parts;
- prepare colored strips, starting from the shortest and ending with the longest ribbons. They can even be with sparkles;
- fasten the two bases of the strips to each other, forming a semi-oval;
- In ascending order, start gluing the strips to the cone, from top to bottom;
- The fasteners should be placed close to neighboring ones so that there are no gaps;
- At the end, cut out a small star-garland from a shiny yellow ribbon and glue it to the top of the resulting Christmas tree.
Making gingerbread men
A wonderful craft that kids will take part in making with special pleasure. They, of course, will not be able to cope with it themselves, since it is quite difficult to make such little men, but with the participation of adults, children will completely master the creative task. So, mothers, grandmothers, older sisters, teachers, and along with them, kindergarteners - roll up your sleeves! Moreover, both figuratively and literally. Let's start making gingerbread men - holiday products that delighted our great-grandmothers (that is, such a craft is very ancient).
- Take a sheet or even several sheets of thick cardboard. Any cardboard will do for this craft, including shoe boxes.
- We are looking for a pattern of people. These can be any characters: Father Frost and the Snow Maiden, pirates, soldiers, just a cheerful family, etc. All this is easy to find on the Internet or draw on cardboard yourself.
- Cut out little people from cardboard. Moreover, there are several identical copies at once. Better - 2-3 copies.
- Glue the cut out people into one whole. As a result, they will turn out strong and plump, and will not bend or break. We are waiting for the glue to dry.
- Next, we begin making the “glaze.” It is made from a special mixture. So, let's take:
- flour, starch, PVA glue and gypsum plaster. Everything - in equal shares;
- mix all these ingredients. We dilute them with water until they become sour cream;
- take a brush, dip it in “sour cream” and cover the cardboard men with it;
- as an option, we fill a confectionery syringe with “sour cream” and begin squeezing the mixture onto the cardboard men, trying to distribute it in an even layer;
- Having covered all the products with the mixture, wait until it dries;
- When the mixture has dried, take paints and a brush and paint the little men as you wish.
The end result should be these cute New Year's items. And if you take an awl, make neat holes in them and thread a thread or thin fishing line through them, then gingerbread men will be a wonderful decoration for the New Year tree.
Magic garland of stripes
This garland in the shape of hearts will envelop your Christmas tree like a charm, creating a unique image for it.
Material used to make the craft:
- multi-colored graceful ribbons;
- glue, preferably a stapler.
Luntik
When making crafts from cartoon characters made of plasticine, it would not be amiss to remember one of the leading fairy-tale characters of modern children - Luntik.
Let's get started:
From lilac plasticine we make a round ball for the head, 4 long ear blanks from purple, eyebrows of the same color and a circle that must be attached to the center of the forehead. Let's connect it all.
We form large white eyes with a black center. Using a special stick, we simply cut out holes for the nose and mouth cavity on the face.
- Craft angel - 105 photo ideas on how to make your own angel quickly and easily from scrap materials
- Crafts from matches - 125 photos of original ideas for professionals and simple crafts for beginners
- Crafts with children: a review of interesting and exciting ideas for creating toys and decorations (115 photos)
We sculpt a lilac body and paws for it. In the middle of the belly, glue a large purple circle, around which there are the same ones, but smaller ones. This applique resembles the footprint of some animal, located in the center of the abdomen.
We connect all the parts together, do not forget that the neck of the moon bee must be wrapped. The lunar guest has already added to the collection of the little needleworker.
New Year's souvenirs from pine cones
You will need:
- a few cones;
- small, flat plate;
- glue moment;
- green gouache paint;
- various examples of decor for decoration;
- thin white tinsel or cotton wool.
Method of implementation:
- color the cones green;
- after the paint has dried, glue the cones to the bottom of the plate;
- attach white tinsel or cotton wool with glue, thereby creating snowdrifts and grass strewn with snow;
- decorate the cones with various small garlands, rhinestones, you can sprinkle them with finely chopped paper, creating an imitation of snow;
- the craft is ready!
Crafts as a result of a child’s creative thinking
After kneading the dough, you can begin to skillfully sculpt the ball, which will serve as a blank for the bun. After the sculpted hero dries, he is painted with gouache.
Once the bun is ready, you can begin to create the fox and other animals that play the main role in the fairy tale.
Creating crafts based on the storyline of fairy tales allows you to realize magic in reality and open up limitless creative potential in every child.
Wonderful lantern made of natural material
You will need:
- any size jar;
- a candle, sized so that it can fit in a jar;
- sprigs of pine needles;
- decorative items;
- glue moment;
- cones;
- matte wool threads;
- paints;
- wire;
- tinsel.
Manufacturing process:
- place some pine branches on the bottom of the jar, so that some branches touch the sides;
- place a candle in a jar, preferably with a large diameter;
- decorate the cones, for example, in the color of Christmas trees or any garlands;
- wrap wool threads around the neck;
- tie the dried cones to the neck of the jar;
- pass the wire under the threads and secure;
- wrap the wire with tinsel, securing it with glue if necessary;
- Finally, decorate the lantern with various decorative items.
Idea No. 8. Beaded goldfish
Probably the most popular hero of Pushkin's fairy tales is the goldfish. We suggest making it from beads to imitate golden scales.
You can do it using the classic beading technique.
But if the toy is performed with children, then you can use a simpler method:
- Draw a silhouette of a fish on thick cardboard.
- Apply glue inside the silhouette.
- Lay out the beads. It's better to use different colors.
- Don't forget about the black eye.
- After drying, cut out the fish, attach a thread and hang it on the Christmas tree.
Using this technique, you can make not only children’s crafts, but also real works of art.
You can experiment further. For example, use cereals instead of beads, and lay out not a swan, but a squirrel.
Royal snowball
Snowballs will gracefully enhance the design of any room with their splendor. They will create winter coolness, the threshold of a miracle in the New Year.
To make this craft you will need a foam ball, beads, beads, and a glue gun. Glue the beads to the circumference of the ball, then attach a hanging string. Our New Year's mesmerizing souvenir is ready.
"Kolobok" as a popular folk tale
An excellent craft on the theme of folk tales can become an indicator of a child’s skill, the richness of his imagination, the ability to think logically and his ability to do needlework.
“Kolobok” is considered one of the most popular folk tales, which over the years has become truly beloved among the children's public.
Kolobok is an interesting character that is known to almost every child. As an experiment, you can try making a kolobok out of paper, clay, or wood.
It is necessary to cut out the wooden materials so that you get a product in the shape of a ball, on which you can subsequently draw the character’s eyes, mouth, and nose.
The relevance of New Year's crafts made by children
DIY children's crafts for the New Year play a very important role in the development of a child. In order to become creative people with a rich inner world and to study well, various making of beautiful crafts will help you.
The most important thing is the fact that when using hands, fine motor skills are developed, which contribute to the development of the brain. You will also be able to enrich your attention when you imagine images of the future task or its specific details.
Beautiful crafts for the New Year with your own hands will delight your parents, grandparents, and so on, because you put your soul into them, hidden for your loved ones.
Unusual ideas
From juice packaging you can build a thunderstorm for all those who don’t like to wash themselves Moidodyr:
- The top of the box is cut off and attached to the bottom, forming a kind of shell, which is trimmed with foil.
- Foam eyebrows are glued and the face is drawn.
- A cut terry towel is limbs, hair made from a washcloth or yarn.
- The final touch is to place a disposable plate on top instead of a basin.
Gorgeous snowmen, geese-swans, and snow-covered landscapes emerge from cotton pads. Non-standard idea - The Little Mermaid. The waist-length girl is cut out of cardboard, depicting long hair as flowing threads, and the tail is sculpted from plasticine. The beauty is placed on a pebble, surrounded by sea decorations. You can display a swimming mermaid with a tail made of pebbles.
Kolobok is the most beloved and easy hero, it is made from any raw material, older children will like the following method. An inflated balloon is coated with adhesive and wrapped with thread in several layers. After drying, the ball is pierced, resulting in a round sphere, which they paint at their discretion and even put on a hat.
A special art is crafts made from salt dough from fairy tales. A harmless flour mixture of equal amounts of fine salt and flour, diluted with ice water, is kneaded to a consistency suitable for modeling.
From the fertile material, you can recreate anything, from individual characters to fairy-tale cities. The samples are dried naturally or in the oven, and then painted in the required color. They can be stored for a long time without losing their original appearance.
Trying on the role of creators, children not only get acquainted with the environment, but also come into contact with the spiritual wealth and culture of their people. Such pastime develops fine motor skills and artistic taste, and joint work with parents brings closer people and promotes mutual understanding.
Wonderful New Year's paper crafts
Working with paper involves easy DIY crafts for the New Year.
Each time the days become shorter, and the snow-white starry nights become deeper. There is very little time left to make gifts. A great idea would be a simple “Chain” garland consisting of ribbons. It has been known to everyone since childhood for its simplicity and elegance.
You will need: glue or tape, ribbons of various colors and decor. Glue the two edges of the ribbon together to form a ring. Then thread the next ribbon through the finished ring and seal the edges with tape or glue. This way, all the rest of the work on the garland is done.
Idea No. 13. Swan Princess made of foamiran and feathers
Foamiran is a foam material that, in terms of ease of working with it, resembles felt. With its help it is easy to create chic toys.
- Draw or print a template for the future toy.
- We cut the template into parts - the body separately, the wings separately - this will make the toy more voluminous and more beautiful.
- Using the resulting templates, we cut out parts of the swan.
- We glue the wings to the body, and the body to the cardboard for better fixation.
- Decorate with feathers, sparkles and tinsel.
Next, we will make a wreath
For this you will need: double-sided light and dark green and other colors of paper, glue, a plastic plate, items for decoration.
How to do it:
- cut out the bottom of the plate, leaving only the ring;
- cut ribbons of colored paper of any thickness;
- thread the strip into the ring of the plastic plate;
- seal the edges of the tape with glue;
- After a wreath of green and other ribbons has been formed, decorate it with various beautiful decorations, for example, a bow, rhinestones, tinsel.
Winter craft Polar bear
The polar bear is another popular winter craft character. You can make a charming “polar bear” pendant from felt.
Felt polar bear
An original way to make a polar bear is to make it from pompoms.
White bear made from pompoms
Skilled needlewomen can sew a beautiful polar bear. How to do this, watch the video:
Cotton pads in products
Cotton pads will help you make a real sketch of winter landscapes. They will serve as an excellent element of snow-white airy snowdrifts, snowy decoration of trees and roofs of houses. They also make great cute snowmen.
Just give freedom to your imagination and then you will get wonderful crafts that seem to reflect the entire winter fairy tale. Photos of DIY New Year's crafts will help you feel the boundlessness of ideas and creative ideas.
Beautiful New Year garlands for the Christmas tree for school and kindergarten
You can buy a lot of ready-made decorations and hang the Christmas tree. Undoubtedly beautiful. But something made with your own hands can add soulfulness. And in this part of the article, we’ll look at beautiful New Year’s garlands for the Christmas tree that kids can bring to school or kindergarten. While at the event, children will definitely find their product on the decorated Christmas tree and feel their importance and involvement in preparing the matinee.
How do you like the idea of making a garland from multi-colored stripes of fleece?
Volumetric paper balls that can be folded in a certain way look original.
The pictures show a master class on how to make such a garland. Choose your own color scheme.
In such a chain, every detail is unique. You can cut out several shapes at once and then decorate each one as you wish. This is also a good topic for joint creativity in children's groups.
A fragrant scattering on a string can decorate a Christmas tree or walls.
Or this idea with repeating elements.
Multi-colored light bulbs look beautiful and festive. Use thick paper so that it holds a smooth bend well.
Fold the paper several times and draw any outline. Snowman, Christmas tree, hare or mouse. The main thing is that when unfolding the workpiece, they seem to be holding together by the paws or handles. And now you can draw unique faces and dress them up in clothes.
Perhaps needlewomen who knit a lot or grandmothers have a lot of small skeins of yarn left. Look how beautifully they can be assembled into a New Year's garland.
And if you make pompoms from yarn and weave a multi-colored rope, then this beauty comes out.
Well, this option is again from my childhood. And they could just glue meter-long decorations. It is made very simply from flats of multi-colored paper and simply fastened with a chain.
A more complicated option with pointed stars. Looks very nice.
Don't forget corrugated paper. It makes an interesting craft.
What do you think of the idea of making an edible popcorn garland? But so as not to eat it while it is hanging at the holiday, I recommend painting it with paints.
You might like the ideas for garlands made from multi-colored strips of paper. Moreover, they can be folded in different ways. For example, in the shape of hearts.
Or voluminous balls
This is how you can glue strips of stickers that already have an adhesive side. Or simply secure it with a strip of tape on the other side of the thread.
There are a lot of fantasies, as well as materials from which you can make a festive scattering of multi-colored lanterns, stars or pompoms. The main thing is the alternation of bright shades.
Photos of DIY New Year crafts
The easiest way is to draw a cartoon on paper with a pencil.
The complexity of creating animations depends on free time, creativity and, of course, the age of the child. The classic method of creating animation is slightly changing pictures in the corner of a notebook. For a creative task you will only need 2 items: a pen (pencil) and a small notebook, and, of course, a good mood.
Animation creation begins with coming up with a plot and drawing the first frame. It is recommended to start from the last page, this will make it easier to scroll through and review in the future. With each subsequent leaf, everything moves a little. If this is the movement of people or animals, then they are depicted very slowly, literally a couple of millimeters on the page. If you wish, you can colorize the characters or leave them black and white; the storyline can always be improved with additional elements.
When work on each of the many pages is completed, the paper cartoon is ready for viewing. The notepad is placed on a flat surface and the pages are quickly flipped through.
Paper cartoon with pen
Drawing on the corner of a notebook is a simple task, but quite meticulous. You will have to draw several dozen pictures to get a story for just a couple of seconds. Schoolchildren and young children cannot wait long, they need it right away, and that there is a result, otherwise there is a high chance of losing interest.
You can make a simple paper cartoon for children using just one A4 sheet. Moreover, one piece of paper can produce up to 4 scenes, each of which consists of only two frames.
Transferring a paper cartoon to a real screen
A fascinating idea for creating animation is brought to life, but a sheet of paper is one thing, and viewing your masterpiece on a real TV or laptop screen is quite another. How do they make a cartoon on paper and then transfer it to a playback device? It's much simpler than it seems at first glance. In addition to several sheets of paper and pencils, you will need a camera or phone with a camera, a laptop, although the same smartphone will do the job perfectly.
Shooting a three-dimensional paper cartoon
To complete the idea of creating a three-dimensional cartoon from paper, you should equip a filming pavilion. The ideal solution would be a large box with the roof and front wall cut off, the magic will happen inside. Decorations are placed on the bottom and the remaining 3 walls, and the light is adjusted in the form of table lamps from above. The shooting is carried out with a camera or phone camera; it is advisable to fix the equipment so that the shooting angle does not change.
The characters inside the filming pavilion move manually, according to a pre-conceived plot. The figures should be moved very slowly so that when all the frames are merged into a single video, the motion will be smooth with the least amount of jerks.
You can edit a finished paper cartoon for children using GIF animation programs or video applications. Depending on your skills and end goal, you will end up with either a jerky animation or a fairly smooth video. It all depends on the desire, patience of adults and children creating the cartoon, and creative drawing abilities.
Three-dimensional cartoons on paper
Having mastered the basics of home cinema, you can go further and try to make a cartoon with three-dimensional characters. What distinguishes it from ordinary hand-drawn pictures is that you only have to create a hero once, but countless episodes with his participation can be filmed. Children and parents familiar with origami can make any convenient figures and choose stories with their participation. Anything will do, even a banal boat.
As in any film, the work begins with the plot, and then the main characters are created. There are no restrictions on the flight of fancy; you can use paints, felt-tip pens and pencils for coloring.
The maximum burden in creating cartoon paper crafts falls on creating the scenery. Pictures can be printed on a printer, but it is much more interesting to draw them yourself. A three-dimensional paper cartoon will require filming and subsequent editing.
How to draw flat cartoon characters on paper
To cheer up your child and recreate an episode of his favorite animated series, you will have to work a little. You need to follow a few recommendations, and the result will not disappoint.
- You should choose those characters whose drawing technique will be as simple as possible, who are familiar and will not require much effort.
- The easiest way to recreate a cartoon paper craft is to sketch. Any photo or picture from a magazine will do; in extreme cases, you can turn on a cartoon and press stop at the right moment.
- Drawing real-life characters, such as people or animals, can help familiarize your child with body proportions.
- Don't forget about the details. Almost every character in a cartoon doesn’t just move on his own, he communicates with other characters, wields tools, or plays something. A complex picture with many details will captivate you more and leave a vivid impression.