Simple homemade boilers made from razor blades were very popular back in Soviet times. Recruits in the army, as well as students, often “dabbled” with such heating devices - mainly to quickly boil water for brewing tea.
With the development of modern technology, the need for boilers has disappeared. However, interest in this kind of homemade products has remained to this day.
In this article we will share the experience of different craftsmen and tell you how to make a boiler with your own hands from available materials.
Please note: when making homemade boilers for subsequent use at home, you act at your own peril and risk.
We do not recommend using such devices at home, because if you violate electrical and fire safety rules, you expose yourself and your loved ones to a potential threat!
The methods for making homemade boilers described in this article are provided for informational purposes only.
Terms of use
First of all, you need to know that metal utensils conduct current, and immersing a homemade boiler in a stainless steel or aluminum mug can result in an electric shock.
Therefore, such a heater can only be used in ceramic, glass or plastic dishes.
When using a device made from razor blades, you must adhere to the following rules:
- First, the device is immersed in water, and only then is it plugged into a power outlet.
- While heating the liquid, you should never touch the device or the container in which it is located with your hands.
- Heating water with such a boiler is possible only if it contains metal salts that have conductive properties. Thus, distilled water, completely purified from all impurities, will not be able to provide the boiler with a conductive environment, so it will not heat up.
After your first DIY test, test the water. If the electrolytic boiling method negatively affects its taste, then such a device can only be used to heat water for technical needs.
It is advisable to make such a boiler only in cases where it is impossible to heat water by other means. Such a device is unreliable, short-lived and can be dangerous, so if possible, it is better to buy a boiler in a store. It is inexpensive, but much safer than homemade.
Dear friends, subscribers and casual viewers of the MiFodiCH Life channel. On behalf of the entire team of our project, we would like to congratulate you on the New Year 2022 and Merry Christmas. We want to wish you good health, fulfillment of all your plans, great luck and happiness in the new year 2022.
Winter is the best time for experiments in the style of “Survival”
Today, together with you, we will try to warm ourselves up with hot tea and delicious food, but how can we do this if the only means we have at hand are: two razor blades, a wire with a plug and matches. Now I'll show you everything
make yourself comfortable and enjoy your journey, friends. Let's rush off.
A boiler made from razor blades. How to assemble at home.
Let's list everything we need for our homemade product:
- Brain
- Hands
- Possession of electrical safety skills️
- 2 Blades for a razor (blades from a stationery knife will also work)
- cable with plug
- matches
- a thread
Everything is ready, let's start assembling.
Be careful with blades, friends, you can cut yourself very easily. A very sharp and very dangerous thing, take your time when making this boiler, take care of yourself.
- We take out and unpack two blades
- We take a cable with a plug and expose the wires at its free end
- We connect the wires to our blades, as shown in the figure.
For greater importance and compact size, I wrap the blades with each other with thread, through wooden spacers - matches. The blades and bare parts of the wires must not touch, otherwise a short circuit is guaranteed
I moved the bare ends in different directions in order to isolate the surfaces as much as possible from short circuits, in addition, I wrapped a thread around the exposed wires on twists with blade plates that will serve as a heating element
The matches serve as an insulator that prevents the plates from touching each other. If you are not confident in yourself and your abilities, then a video will be released soon where I will show the entire assembly process from start to finish.
subscribe, as I will start editing the video immediately after writing this article.
INSULATION OF BLADES WITH MATCHES:
the task is very simple and at the same time very difficult, you need to do it wisely without being distracted by anything, but think only about how best to tie matches to a sharp blade with a thread so that they form a strong and wide enough frame for complete confidence in isolating the blades from each other friend. We place three blades on the finished frame (we bring the contact wire of the upper plate in the opposite direction from the contact wire of the lower plate, for maximum insulation) and wind it with thread, while controlling the bends of the blade plate, so that, Boeing forbid, it doesn’t jump out. Fuck these harsh sounds)
Take into account the fact that as the temperature rises, the plate can become deformed and shorten quite a bit, but we don’t want that. The better the frame, the better the insulation, and therefore your wiring, friends)
We can make tea, but how about we use this boiler to cook French fries?
Let's try, after all, we are inventing a universal weapon for survival
- Take a glass jar
- We cut potatoes into it
- lower our boiler
- pour sunflower oil
- plug in the boiler
Razor-boiler
Home craftsman A boiler made from 2 safety razor blades is probably known to those who served in the army. Those who did not serve could see such a homemade boiler in films about the zone. It is with this that chayfir is boiled in places not so remote. But this is all lyrics. Let's move on to the manufacturing process.
Making such a boiler is very simple - just take a couple of matches, two safety razor blades and a piece of wire with a plug.
How to assemble a boiler with your own hands can be seen in the photo.
It is necessary to ensure that the razors do not touch each other. A wire is wound on each side of the safety blade.
The power of a razor boiler is about 1 kilowatt, so be careful.
It can only be boiled in non-conductive containers - for example, a glass jar or glass.
During use, do not touch the water or blades - this can be life-threatening!
Using this boiler is very simple. Place it in a jar of water and plug it into a power outlet. The boiler heats water with a volume of one liter very quickly - in 10-15 seconds. After the water boils, unplug the power cord and remove the boiler from the glass container. Now you can add tea leaves to boiling water and enjoy your tea.
Do not try to use a homemade razor boiler to heat water with tea leaves; tea leaves falling between the razor blades will cause a short circuit and blow out the fuses.
All by yourself and with your own hands
The soldier comments:
I boiled tea like this in the army. xxx comments:
Tough.
1l 10 15 sec. cooler than a teapot! Kotya)))) comments:
I tried everything, it worked, the blade needs to be kept further away
Alec comments:
We cut out round timbers from a tin can, punched holes with a nail, placed two sticks between the round timbers, wrapped them with thread, and screwed the wires.
The boiler was ready, they even boiled it with tea, and the wiring was already smoking to the music of it. Samodelkin comments:
But the leash won’t smoke?
The electrician comments:
will you be able to drink water afterwards?
The master comments:
Or better yet, a piece of glass between the blades.
This way the water will become cleaner and will not contain metal impurities. Ivan comments:
I made a boiler from two silver plates as well as from blades.
And boiling and ionization of water. Master2 comments:
Better yet, put water in your mouth and put your fingers in the socket!
Roman comments:
The last comment is very good)))))) This is how terminators are born)))))
Ron comments:
And the Pindos die!
:). Alexey comments:
Really cool) I’ll try it now)
The dissatisfied one comments:
And I fucking wonder where my blades always disappear!!!!
The cat comments:
To Master 2: If you also pour Rollton into your mouth, then you can also have some refreshment.
Flint comments:
Prison technology! In the army, we boiled tea at the post in a three-liter jar
Maxim comments:
I did this too, only I took 4 matches, 2 on each side, and there was more distance between the blades.
Maxim comments:
Do razors rust in them?
Artem comments:
Razors are made from stainless steel.
So they don't rust. Nikita comments:
There was a case where we cooked pasta with a boiler like this.
A friend decided to salt them... Well, here we go. Lightly comments:
The army used such a boiler.
cheap, cheerful and unsafe, you need to be careful Oleg comments:
By the way, the version of the boiler in the picture is incorrect and dangerous, it will immediately shorten in the water and knock out the plugs. matches need to be clamped between the blades so that the blades, God forbid, do not touch each other, and securely tied with thread
Do-it-yourself boiler repair – Homo habilis. Magazine for skilled people
Rating: 5 / 5
waferboard, flickr.com CC BY
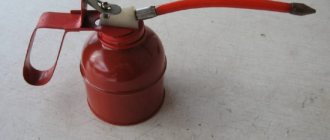
Who doesn't love hot tea or coffee, especially when you want to warm up or spend the evening with friends? The easiest way to heat water for tea is a boiler. It comes to the rescue when there is no gas stove or electric kettle nearby. But sometimes the boiler itself needs help.
As you already understand, a boiler is a good thing, and not expensive either, but their quality leaves much to be desired. And most often this concerns the cord and its connection to the heater. Therefore, sometimes an entire heater is thrown into the trash because of just a faulty cord. This is insulting and not economical.
But there is a way to return the boiler to its former life. Believe me, it is quite possible, you just need to have a few tools and straight hands.
So, for work you will need:
- small screwdriver
- knife
- circuit tester or tester
- wire cutters
The materials you will need are a terminal block; it can be purchased at any electrical goods store or picked up, for example, from an old lamp. The cost of such a block is 30-50 rubles.
The cord can be immediately bitten off at the base of the boiler.
Next, use a knife to carefully cut off the plastic casing.
If it is very difficult, you can use side cutters, biting off the plastic in small pieces. When doing this, be careful not to damage the heater leads.
At some point, the entire plastic housing should come off freely. Only the “naked” heater will remain.
Now carefully clean the heater terminals with a knife or file.
You can also use the tester in resistance measurement mode. Depending on the power of the boiler, the resistance of a working heating element can be in the range of 50-100 Ohms.
So, in our case there is a chain. It would also not hurt to check the breakdown on the housing. We connect the indicator at one end to the leads of the heater, and at the other to its outer metal casing. If there is no chain, everything is in order, we continue to work further. Otherwise, nothing will help the boiler. When checking with a tester, the resistance to the housing must be at least 100 kOhm.
Since the leads are practically not solderable, we will use a connection using a terminal block.
A fairly reliable and safe method, since the current-carrying parts are closed.
Unscrew the screws to the desired level and insert the ends of the heater into the terminal.
Now use a thin screwdriver to clamp them.
If you do this, there will be better contact between the wire and the terminal. Even better, if possible, solder the ends
It is very important that the entire exposed part of the wires enters the terminal and nothing sticks out anywhere. This is a necessary safety measure against electric shock.
We clamp the ends of the wires with the terminal screws.
Make sure that the screw does not completely cut the copper core when clamping. Otherwise, the cord will soon fall out or burn out in this place
That's all. For complete safety, you should only place and remove the boiler from the cup after first unplugging the plug from the socket.
From the editor.
When using a boiler converted in this way, exercise extreme caution! Do not touch the boiler when it is plugged in, do not touch the container in which the boiler is located, and do not put your fingers or conductive objects into the water. You can significantly increase the safety of using the boiler and restore its appearance if you fill the terminal block with epoxy resin, selecting or making a suitable shape
We use a heating element from a kettle
The safest option is to use a heating element from an electric kettle; such a part is often sold cheaply on the market. If you have an electric kettle lying around that is leaking (or the button does not work), or it simply has an unpresentable appearance, and at the same time you do not want to repair it, we recommend removing the heating element from the design and using it to make a simple boiler.
In addition to the heating element, you will need a two-core wire with a plug, which you can also take from a kettle or any other household appliance located at home. It is advisable to take a wire with a cross-section of at least 0.75 mm2 to avoid heating it. To attach the wire to the heating element, you can use a soldering iron or, even better, as shown in the photo below. In the second case, the manufacturing process will take literally 5 minutes, because all you need to do is expose the wires and tighten the clamping screws on the blocks.
Before using a homemade device, we recommend checking it - ringing it with a multimeter. This should not be done under voltage. Turn the multimeter into resistance measurement mode. First, ring the heating element itself, then connect the wires to it and measure the resistance again.
If everything is in order, you can try using a homemade boiler from the heating element of the kettle. The appearance of the device should be something like this:
Remember that it is highly not recommended to immerse terminals and exposed parts of the wire in water, as this can lead to their rapid destruction. When using the device, do not, under any circumstances, touch the heating element and water; they may contain dangerous mains voltage. All manipulations with the device can only be performed when it is completely disconnected from the network.
Assembling a homemade boiler from blades
Attach the stripped threads to both blades. Using welding is useless, so let's do a strong twist. It is desirable that the exposed part of the wire be as short as possible. Remember electrolysis.
Next, you need to secure the canvases at a short distance from each other. From 2-3 mm to 1-2 cm. The boiling speed depends on this and, as an inverse relationship, on energy consumption. The farther the blades are from each other, the cheaper the device. As a result, the longer the water takes to boil.
There are two ways to assemble a boiler with your own hands. Install a dielectric pad made of matches and tie wires around the frame.
This is the most common design - a powerful boiler that quickly heats water. Power requires a good plug and reliable wiring. This connection is reliable and the device is designed for repeated use.
The second option is easier to assemble and does not require threads. However, this is more of a one-time scheme: “repair” is unreliable. But you can assemble such a boiler in up to 5 minutes.
Advantages: no risk of short circuit, less energy consumption. In this case, the water takes longer to heat up.
Blade options may sometimes fail to work because the amperage and power are too low. You will have to wait up to an hour for it to boil.
Such “heaters” are called students or prisons: according to the main places of use. Having certain skills, you can cook dumplings using such a cauldron (naturally, a metal frying pan in a glass jar will cause a short circuit). And boiling water for tea is child's play.
Homemade radio transmitters
In the same 50s, citizens' interest in radio began to grow rapidly. But the post-war USSR had not yet recovered from the not so distant tragic events, keeping all stations under strict control. And it is quite natural that the people did not really like this, as a result of which they had to establish the process of manufacturing homemade radio stations.
Along the way, a new terminology appeared - “radio hooliganism”, and with it the decree “On liability for the illegal manufacture and use of radio transmitting devices.” Violation of the latter was subject to severe punishment - measures of social sanctions or administrative liability in the form of a fine with confiscation of equipment.
Of course, scorched equipment a la “wire-on-wire” could not be safe. Just like the disk under the TV, and the “swindler” who steals electricity. But that was all. It happened, but it has passed, and today no one would even think of heating water with blades or making radio transmitters for wave interception.
Alternative options
Another donor for contacts is heels for army boots and combat boots.
They are assembled in the same way as from blades: threads, matches. The performance and power are similar. Since the metal is of relatively high quality, water boiled with their help can be drunk.
Fastening elements can serve as a “garage” alternative. Two bolts are screwed into a piece of plastic, the issue of connecting wires is solved reliably and elegantly: simply tighten the nuts. “Electrodes” are located at a distance of 5 cm.
The efficiency of this design is very high: a liter jar boils in less than a minute.
The only problem is hygiene. Finding stainless steel bolts is quite difficult, and galvanized models quickly lose their coating, again due to electrolysis. Therefore, this option is more suitable for technical heating of water than for food purposes.
Boiler made from Spoons. ANYONE can do this! WITH YOUR OWN HANDS. From a can, wire and spoons
To make a boiler, you need to find a heating element. The simplest solution would be to use an old heating element from an electric kettle or other appliance.
The manufacturing process consists of several stages:
removing a heating element from an unnecessary electrical appliance
It is important to ensure that the heating element is working; this can be done using a household tester; In addition to the tena, we will need an electrical cord with a plug, as well as terminal blocks. Electrical wires from the cord are connected to the contacts of the heating element; the final stage will be making reliable insulation and checking the finished device using a multimeter.
If the test confirms that the heater is working, you can begin operating it.
Water heater made from scrap materials
There is another way to quickly make a boiler, but it is quite dangerous
This device should not be left unattended and special care must be taken when using it.
We will need the following materials:
- two metal objects. These can be nails, spoons, bolts or knives, but most often blades are used to make a boiler;
- matches or other wooden objects;
- sewing threads;
- cord with plug.
First of all, you need to connect the metal plates (blades) to the stripped contacts of the power cord. For greater reliability, you can use a soldering iron.
The boiler is assembled in this way: wrapped matches are placed on one blade, then they are covered with the second blade. Then this structure is also wrapped with threads for reliability.
You can learn how to make boilers thanks to this video:
In life, sometimes unforeseen circumstances arise. One of these is the lack of hot water, for example, during repair work, when there is no gas, without which you cannot boil water.
It turns out that making such a heating device is not at all difficult, the main thing is to find the necessary materials in your apartment.
A homemade boiler or a primitive 12-volt heating device can be made from available materials
For this we need:
- An insulated piece of two-core wire.
- Blade, which is used for a razor in the amount of 2 pieces. You can also use a paint knife blade. If you don’t have any in your apartment, even two metal spoons will do.
- A saucepan or jar for water.
- Two matches or wood chips.
- Threads.
1 option
. You need to attach a wire to the ends of the blades. The blades should not be allowed to touch each other. To do this, we install spacers made of matches or wood chips between them on both sides. Then you should wind the blades with thread. The wires should also not touch. You just need to place a homemade 12-volt boiler in a container of water, plug it into the outlet and wait until it boils.
Option 2
When using a metal container to boil water, one wire can be connected to the pan, and a blade, spoon, or other available metal object can be attached to the other end. It is important to ensure that the latter does not touch the walls of the metal container
This turns out to be a 12 volt boiler.
A self-made boiler with a power of 12 volts copes with boiling a small amount of water quite quickly.
It is important to follow safety precautions
when using this heating device:
- Before you are going to use a homemade boiler, you must carefully check all the connections of the structure for strength.
- Under no circumstances should you put your hands in the water while heating the liquid (you may get an electric shock).
- Do not leave the heating device turned on unattended.
- Don't risk boiling salt water. Otherwise, you will cause an explosion, causing most of the water to splash out of the container.
- Do not use this design for more than a month. And also think about the quality of the water you are going to drink. Due to the ingress of metals into it, the water becomes of poor quality.
How to use a boiler?
Now you know how to make a boiler with your own hands. The design diagram is shown in the figure in the article. But you still need to know how to use it. The main requirement for the container in which boiling will be carried out is that it should not conduct electricity.
Plastic or ceramic containers are suitable (the second is preferable)
You also need to be careful when turning it on and off. First, lower the device into the water, then just turn it on.
And when heating, do not touch the water, wire or container.
Boiler from a tin can
We've sorted out the razor blades and tablespoons. What about tin cans?
Yes, some home craftsmen even manage to assemble a homemade boiler from such “consumer goods”.
The idea of this homemade product belongs to the author of the YouTube channel Sergey Wolfram.
Necessary materials:
- tin can (from stewed meat, condensed milk or various canned products such as green peas or corn);
- wooden sticks;
- sewing or nylon threads;
- electrical cord with plug.
From a tin can you need to cut two rectangular plates with “ears” into which holes are drilled.
Next, you will need to prepare six wooden sticks from any tree (birch, oak, pine, etc.).
We place the first plate from a tin can on two wooden sticks. We put two more sticks and a second plate on top. Then we place the last two sticks on top of the second plate.
The ends of the wooden sticks should protrude beyond the metal plates. We connect them with a thread.
We strip the two ends of the electrical wire and attach them to the “ears” on the metal plates.
We place the completed electric boiler in a three-liter jar of water. We plug the plug into the outlet, and then all that remains is to wait until the water boils.
The step-by-step process of making an electric boiler for heating water can be seen below in the author’s video.
Boiler from a tin can
For those interested: the author managed to bring 3 liters of water to a boil in 40 minutes. One liter can be boiled in 10-13 minutes.
How it works
Electric current flows between points of different potentials. Of course, the medium must be conductive. Water is far from a dielectric; the resistance is quite low (unless, of course, it is a distillate). If you immerse two electrodes with a sufficient potential difference in a glass of water, the current strength will be very high. So much so that the heating temperature will cause the water to boil. For comparison, a similar current flows through the filament of an incandescent lamp. The metal becomes white hot.
Why doesn't a glass of water explode? The resulting steam bubbles are a kind of dielectrics that protect the system from short circuits. Let's not go into calculations of voltage and current, let's turn to practice.
Materials used for making the boiler
To make a boiler you will need:
- soldering iron;
- soldering tin;
- pliers;
- heating element of an electric kettle;
- soldering acid;
- plug;
- cable PVS 2*0.75.
Soldering wires
The ends of the cable wires are first stripped of insulation, etched with alcohol-rosin flux or soldering acid, and a layer of tin is applied to the ends of the wires. The heating element contacts are also etched and soldered to the ends of the cable wires. The cable length is at your discretion.
For a reliable contact connection with the plug, the ends of the cable wires are also etched, followed by the application of tin.
Contact insulation
As an insulating material for connecting a wire to a heating element, a cambric is first put on a separate wire, then after soldering the wires, the cambrics are put on the contacts of the heating element.
Photo and description
To provide information in a more visual form, the topic will be supplemented with personal photographs.
Photo No. 1 shows a homemade boiler, which we have been using for more than ten years. To make such a boiler you will need about fifteen minutes.
In this image \photo No. 2\ it is clearly visible that terminal blocks are connected to the contacts of the heating element from a used electric kettle.
The two wires of the network cable are respectively also connected to the terminal blocks. Everything is quite simple, you take an unnecessary power cable with a plug and any heating element - a heating element for heating water.
Resistance-heater measurement
Diagnostics of the heating element for our example with a boiler is carried out in the following way:
The multimeter device is set to the range for measuring resistance; two probes of the device can be connected to the pins of the plug as shown in photograph No. 3. The display of the device in the photograph shows the total resistance - the resistance of the network cable and the heating element.
The resistance value for this measurement is 27 ohms.
When measuring the resistance of a separate heating element - heating element \photo No. 4\, the resistance is 38.1 Ohms.
For both methods of measuring resistance, we can conclude that the reading from the device is satisfactory and corresponds to the resistance of this heating element.
How to check the network cable
Checking a single network cable, both for a boiler and for any type of household appliance, is carried out using the following methods:
For example, we need to check the network cable\electrical cord\ with plug. To do this, you can short-circuit two wires of the network cable \photo No. 5\ and connect two probes of the device to the pins of the plug \photo No. 6\.
Photo No. 6
In this device reading \photo No. 6\, with the integrity of two wires of the network cable, the device display shows a very low resistance, the resistance in its value is equal to the short circuit mode.
This will mean that there is no break in the network cable and that the cable is suitable for use.
Photo No. 7
The following method for diagnosing a network cable is shown in the image of photograph No. 7. That is, we also short-circuit one end of the network cable \photo No. 5\ and touch one of the pins of the plug with a probe.
In the same way, each individual wire of the network cable is checked:
- for connection \phase, neutral\;
- ground \ground wire\.
And as a reminder to all that has been said, such diagnostics are carried out in a passive way \without connecting to an external AC voltage source\. When diagnosing any electrical circuit - a boiler, an electric kettle, and so on, if the resistance value is zero - the electrical connections should be reconsidered.
That's all for now. Follow the section
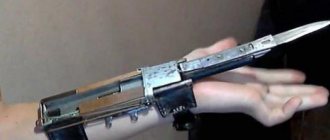
Classic homemade blades
We immediately draw your attention to the fact that an electric boiler made from blades is very dangerous. They must be used with extreme caution. It is strictly forbidden to heat water in a metal container or salty liquids or solutions with such a device. Otherwise, electric shock or electric shock may occur. the wires are exposed in the water. One more point - it is recommended to use this homemade product only for heating water for bathing; for brewing tea, it is better to make a boiler according to the previous instructions, since when the device is operating, a small amount of metal salts from which the blade is made gets into the water.
So, let’s look at the process of assembling the device step by step with photo examples. First of all, prepare a two-core cable with a plug. If you don’t have a ready-made one at hand, use a two-wire one by screwing a collapsible electrical plug on one side. It is advisable to take a wire with a cross-section of at least 0.75 mm2. to avoid heating it up.
After this, we strip the cores and screw them to the blades, trying to do this as tightly and securely as possible, as shown in the photo below:
We tie the entire structure with threads, make sure the connection is correct, after which we can check. Perform the first start with extreme caution.
As a rule, water in a three-liter glass jar heats up in a few minutes.
You can clearly see the manufacturing technology in the video below:
By the way, using a similar scheme, you can make a boiler with your own hands from bolts, stationery knife blades, spoons, nails, or even metal plates. The operating principle and wiring diagram will be similar. The main thing is to ensure that there is no contact between the two blades (or whatever you have), otherwise a short circuit will occur.
That's all I wanted to tell you about how to make a boiler with your own hands at home. Still, we strongly recommend using only factory-made products, or even better, an electric kettle, which will be much safer. We have provided these step-by-step instructions for informational purposes, and these methods can be used in practice only in extreme situations when there is no alternative.
There are situations when an electric kettle breaks down, and a person is at the dacha or there is simply no opportunity to buy a device that will heat water. Every person can face such a situation, but it won’t be difficult to find a way out, because you can make a heating device with your own hands. In this article we will tell you how to make a boiler at home from scrap materials.
How to make a boiler with your own hands - the best proven methods
Most often, in artisanal conditions, boilers are made from:
- Razor blade. Blades Satellite.
- Nails.
- Heating element for a kettle.
Heating element from an old kettle
Heating element from an old kettle
You can also make functional devices for heating water at home from nichrome wire, which is installed on a ceramic insulator.
The main task that must be accomplished when designing heating elements yourself is to minimize the possibility of short circuits and electric shock. When using low-voltage homemade products, there is little to fear from electric shock, but devices operating on a 220 V network can cause accidents and fire.
How to make a homemade water boiler
Why blades, and not, say, spoons, nails, and other metal objects? Optimal balance of consumer characteristics.
- Firstly, this method has been around for decades, and in “those days” almost the entire male population shaved with a safety blade. The material was always at hand. So - traditions...
- Secondly, the surface area of the resulting electrodes was wonderfully suited to balance the characteristics. The load on the electrical wiring was not too high, and at the same time the water boiled quite quickly.
- Finally, the material. The blades are made of fairly high quality steel. They last a long time and practically do not pollute water.
Let's take a closer look at the last point. There is such a thing as electrolysis. When an electric current occurs between the electrodes in a liquid medium, particles of the material move along with the electrons. A significant part remains in the water, not reaching the opposite electrode. Naturally, this does not make the water any tastier, and if you have a homemade boiler made from nails, it is not suitable for drinking at all. So blades (especially high quality ones) are an ideal donor for the heater.
How it works
Electric current flows between points of different potentials. Of course, the medium must be conductive. Water is far from a dielectric; the resistance is quite low (unless, of course, it is a distillate). If you immerse two electrodes with a sufficient potential difference in a glass of water, the current strength will be very high. So much so that the heating temperature will cause the water to boil. For comparison, a similar current flows through the filament of an incandescent lamp. The metal becomes white hot.
Why doesn't a glass of water explode? The resulting steam bubbles are a kind of dielectrics that protect the system from short circuits. Let's not go into calculations of voltage and current, let's turn to practice.
From nails
For such a boiler you will need 6 nails 8cm long, a wooden strip about 2cm thick that can be installed on the edge of a container made of non-conductive material, a ready-made power cord or a pair of wires with a plug. To work, you need pliers and a drill with a drill bit of the same diameter as the nails.
The principle of creating a boiler is as follows:
- drill holes in the board at a distance of 5 mm from each other;
- insert the nails into the holes, leaving a free distance of 2 - 3 cm above the board so that it is convenient to wind the wire;
Rice. 10: Insert nails into holes - strip the edges of the cable by 5 - 10 cm with a knife or wire cutters, you should be left with bare metal without varnish or other insulation;
- screw the exposed wires to the nails right under the heads - 3 nails for each wire, note that the reliability of the electrical connections depends on the tightness of the fit, so they need to be tightened as tightly as possible;
- Drive the nails in as far as possible using pliers, but make sure that the mechanical impact does not weaken the electrical contact point.
The boiler is ready, pour water into a glass jar or plastic bowl, place a bar on top so that the sharp edges of the nails are immersed in the water. Plug in the boiler and wait until it boils. Never try to check the heating temperature of the water with your finger or hand, as you will receive an electric shock if the boiler is turned on.
From spoons
For such a boiler you will need two metal spoons, a two or three-wire cable, a power plug, a glass jar and two clothespins. The process of making a boiler consists of the following stages:
- remove the insulation from the cable and wires to obtain 2–3 cm of bare wires on each side;
Rice. 11: Strip the insulation from the wires - attach a plug to one end of the cable, and attach spoons to the terminal of the other end;
- place the spoons in a glass jar on opposite sides and secure with clothespins, the spoons should not touch; Rice. 12: Attach the spoons with clothespins
- secure the cable on the outside of the can with tape.
Rice. 13: Secure the cable with tape
The boiler is ready - just pour water into the jar and plug in the plug. Please note that it is unsafe to move the jar with the device turned on, so first unplug the boiler.
Rice. 14: finished kettle made from spoons
The most powerful homemade boiler
Nichrome spiral
In order to boil a large volume of water, you can make a powerful portable device from available materials. To manufacture the device you will need the following parts:
- Nichrome spiral with a wire diameter of at least 1 mm.
- Industrial fuse series PN 2.
- Two-core cable made of wire with a cross-section of at least 4 mm2.
- Screwdriver and wood screws 20 mm.
- The plug is of a collapsible type.
Fuse PN-2
The manufacture of a powerful device for heating water is carried out in the following sequence.
- The PN-2 fuse is disassembled to remove the ceramic body of the product.
- 8 self-tapping screws, which were formed during disassembly of the device, are screwed into holes in the body of the ceramic insulator.
- The end of a nichrome spiral clings to one of the 8 screws.
- Then, inside the body of the electrical insulator, the spiral is pushed through to the opposite end of the round insulator and again fixed around the screw.
- The spiral turns in the opposite direction, but is already fixed to another screw screwed into the insulator.
- In the same way, the spiral and self-tapping screws are connected at 5 more points, after which stripped copper wires are connected to the first and last screws and the screws are completely screwed into the ceramic insulator. Considering the significant power of such a homemade boiler, the cross-section of the connected copper wire must be at least 4 mm2. A plug is installed on the other end of the wire.
Checking a powerful homemade water heater
The boiler can only be operated in a suspended state. The heating element must be completely immersed in the water and must not touch the walls or bottom of the tank. When using a homemade powerful boiler, it is strictly forbidden to touch the container and body of the device while heating the water.
Video on the topic
Previously, in every house of the Soviet Northerner, there was such a homemade boiler.
With its help, one could quickly heat a bucket of water for watering livestock, poultry, or melt imported frozen drinking water for people, which was usually stored in 200 liters. iron barrel.
The design of the boiler turned out to be very simple, reliable and easily repeatable, all the parts (at that time) were easily accessible, every store always had a large selection of nichrome spirals for tiles, air heaters, and there were plenty of blown fuses PN2 (for the body) in every production. I propose to repeat this design and make a “Turbo” boiler with the maximum possible power for this body size. Step 1. For manufacturing we will need.
Materials and tools:
Nichrome spiral or wire (preferably d=0.7-1 mm).
Production fuse PN2 or its ceramic housing. Wood screws, 20 mm long - 8 pcs. Wire with plug (cross-section not less than 4 mm2). Device for winding a spiral (see sample). Knife, screwdriver. Step 2. Calculate the power parameters of the spiral. For all calculations we need these formulas:
1. Determination of the current strength I = P / U 2. Spiral resistance R = U / I 3. Length of the required wire R = ρ l / S 4. Wire cross-section S = π d²/4 or S = 0.8 d² First you need to decide what kind of nichrome spiral or wire you can get, if any, then your possibilities are simply limitless.
The thicker the diameter (section) of the wire, the more powerful the heater and boiler will be. We measure the diameter of the nichrome and look at the table below.
In the line with the resulting diameter, the last column indicates the value of the maximum current for a given spiral.
* When using the heater in liquid, this value can be further increased by 1.2 - 1.5 times.
I found wire d=1 mm.
(S = 0.8 mm2), look in the table, it turns out that for 1000C Current = 19.2A. Let’s use a coefficient* for liquid (water) of 1.4; you shouldn’t take the maximum. (1)
It turns out: I=19.2A*1.4=26.88A.
maximum current for the future boiler = 26.9A.
Let's see what it will be in kW: P=I*U =26.88A*220V=5913.6W=
5.9kW.
This is what a powerful boiler should look like, about 6 kW.
(2)
We calculate the required resistance for the wire: R = U / I = 220V/26.88A =
8.18 Ohm
.
(3)
Now let’s calculate the required length of wire for winding into a spiral: l = RS / ρ = 8.18 Ohm * 0.8 / 1.11 = 5.89 m. ρ - we take it from the table below.
All the necessary data has been obtained, you can bite off 6 meters of nichrome wire and curl the spiral on a special device (step 1). Step 3. Making a boiler.
We take a PN2 fuse of 100A or more.
They are used in such and similar shields.
By unscrewing eight screws and completely disassembling the fuse, we will get this ceramic body for our boiler.
Let's take the other eight, longer screws and screw them into place; there should be about 5 mm left unscrewed.
We push the end of the spiral inside and twist the end around one self-tapping screw.
We do the same thing, with a snake, a little tighter, around all the screws, finishing the spiral at the last one. If everything doesn’t fit, there’s an extra leftover, bite it off; if it’s short, then evenly stretch the entire spiral.
We connect a wire with a plug to the starting points of the spiral; be sure to use a wire with a large cross-section, 4 mm2 is the minimum, which will heat up noticeably.
The boiler is ready.
Step 4. Testing.
A little TB before the test.
ATTENTION!
This device can only be connected to sockets, wiring and circuit breakers that are designed for a current of 30A or more! (for a less powerful heating element, the restrictions are reduced) When turned on, touching the heated container and water is strictly prohibited! Do not leave unattended and keep out of reach of children!
We hang the boiler in a container with heated water so that it does not touch the walls and does not lie on the bottom.
We connect 220 volts to the network and check the resulting power readings with the device, it turned out to be 26-27A, which corresponds to the calculated one.
Such a boiler is capable of boiling a bucket of water in 8-9 minutes, and 200 liters. barrel in about 3 -3.5 hours.
Category: Cottage, garden, vegetable garden, Electricity. Tags: . Add
Previously, in every house of a Soviet northerner, there was such a homemade boiler. With its help, one could quickly heat a bucket of water for watering livestock, poultry, or melt imported frozen drinking water for people, which was usually stored in 200 liters. iron barrel.
Appearance.
Video of the boiler in operation.
The design of the boiler turned out to be very simple, reliable, repairable and easily repeatable, all the parts (at that time) were easily available, every store always had a large selection of nichrome spirals for tiles, air heaters, and there were plenty of blown fuses (for the body) in every production. I propose to repeat this design and make a “turbo” boiler with the maximum possible power for this body size.
Point 1. For manufacturing we will need.
Materials and tools:
Nichrome spiral or wire (preferably d=1 mm). Production fuse PN2 or its ceramic housing. Wood screws 20 mm long - 8 pcs. Wire with plug (cross-section not less than 4 mm2). Device for winding a spiral (). Knife, screwdriver.
Point 2. Calculation of the power of the filament coil.
For all calculations we need these formulas:
1. Determination of current strength I = P / U 2. Spiral resistance R = U / I 3. Length of required wire R = ρ l / S 4. Wire cross-section S = π d²/4 or S = 0.8 d²
Photo. A roll of nichrome wire.
First you need to decide what kind of nichrome spiral or wire you can get, if any, then your possibilities are simply limitless: wink: . The thicker the diameter (section) of the wire, the more powerful the heater and boiler will be.
We measure the diameter of the nichrome with a caliper and look at the table below.
In the line with the resulting diameter, in the last column, the value of the maximum current for this wire is indicated. When using the heater in a liquid, this value can be further increased by 1.2 - 1.5 times.
I found wire d=1 mm. (S=0.8mm2), according to the table it turns out that for 1000C Current I=19.2A.
We will use a coefficient for liquid (water) of 1.4, we will not take the maximum.
(1) It turns out: I=19.2A*1.4=26.88A. maximum current for the future boiler I=26.9A. Let's see what it will be in kW: P=I*U =26.9A*220V=5918.6W=5.9kW. This is what a powerful boiler should look like, about 6 kW.
(2) We calculate the required resistance for the wire: R = U / I = 220V/26.88A = 8.18 Ohm.
(3) Now let’s calculate the required length of wire to wind it into a spiral: l = RS / ρ = 8.18 Ohm * 0.8 / 1.11 = 5.89 m. ρ - we take it from the lower table.
All the necessary data has been obtained, you can bite off 6 meters of nichrome wire and curl it into a spiral using a special device ().
Point 3. Making a boiler.
We take this fuse PN2 (usually 100A or more).
Their main place of application is these shields with a handle. Having unscrewed the eight screws, pour out the sand from inside (by the way, very good quartz sand, maybe someone is looking for something like this: winked:), completely disassemble the PN2 fuse, we will get this ceramic body for our boiler. Let's take the other eight, longer self-tapping screws and screw them into place, it should remain about 5 mm under-tightened. We push the spiral inside the insulator and bend the end around one of the screws. We do the same thing, with a snake, a little tighter, around all the screws, finishing the spiral at the last one. If there is excess left, bite it off; if it is short, then evenly stretch the entire spiral. We connect a wire with a plug to the starting points of the spiral; be sure to use a wire with a large cross-section, 4 mm2 is the minimum, which will still heat up noticeably.
The adult generation and students probably know the idea of assembling a homemade boiler from two blades and a pair of matches. This kind of homemade product was very often used on construction sites, or in the army, dormitories in the absence of a normal boiler or stove. However, in addition to this method, there are several more options for making an electric boiler from improvised means. If you are interested in this topic, we suggest that you familiarize yourself with the simplest instructions explaining how to make a boiler with your own hands at home. To make the information more understandable for you, we have additionally prepared visual photo examples and manufacturing diagrams.
12 Volt boiler
A popular device for many car owners, which allows you to heat water far from civilization using power from a car battery. The most difficult thing is the selection of a heating element, which is calculated by the formula: P = U 2 / R
where P is the power of the boiler;
U – supply voltage rating;
R – circuit resistance.
For example, with a circuit resistance of 1 Ohm, the power of a boiler powered by a 12V source will be 144W. Accordingly, the heating time of the glass will be about 10 – 15 minutes.
The heating element can be ceramic resistors or a nichrome thread wound on a textolite. Connect them to the two terminals of the battery and the boiler is ready. The main condition is that the heating container must be made of dielectric material.
Rice. 15: 12V heating element
Alternative options
Another donor for contacts is heels for army boots and combat boots.
They are assembled in the same way as from blades: threads, matches. The performance and power are similar. Since the metal is of relatively high quality, water boiled with their help can be drunk.
Fastening elements can serve as a “garage” alternative. Two bolts are screwed into a piece of plastic, the issue of connecting wires is solved reliably and elegantly: simply tighten the nuts. “Electrodes” are located at a distance of 5 cm.
The efficiency of this design is very high: a liter jar boils in less than a minute.
The only problem is hygiene. Finding stainless steel bolts is quite difficult, and galvanized models quickly lose their coating, again due to electrolysis. Therefore, this option is more suitable for technical heating of water than for food purposes.
Principle of operation
In fact, the principle of operation is quite simple. The main condition for the operation of this electrode boiler (and that is exactly what it is called) is a heated body, in this case it is water. The liquid that is between the two electrodes must be electrically conductive. This is why a homemade boiler cannot boil distilled water, since there are no conditions suitable for electrical conductivity. This is due to the fact that a conductor is required for the flow of an electrical impulse. That is why distilled water is very often used as experiments between plates.
To prevent an electrical short circuit, several wooden spacers must be inserted between the two blades, which must then be secured with threads. Yes, this is a rather painstaking process, but the result is worth it.
A boiler for those who are afraid to put wires in water
People who are not very well versed in physics, and in particular in electrical processes, are often surprised how they can dip bare wires into water.
And even after seeing how others do it, they are still afraid to repeat it. In principle, this is correct. Such homemade products are actually dangerous.
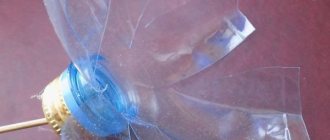
Nevertheless, especially for such suspicious and distrustful people, some home craftsmen came up with the design of a homemade electric boiler, made in such a way as not to immerse the ends of the wires in water.
Necessary materials:
- 2 stainless steel metal plates;
- electrical cord with plug;
- a small piece of plastic (the author uses the front panel of the PC system unit);
- fasteners - 2 bolts, 2 nuts and 4 washers.
First of all, you will need to strip the ends on the two cores of the electrical cord, and twist them into rings.
Next, using the prepared bolts, nuts and washers, we fasten the ends of the wire to the metal plates in which we need to pre-drill holes or cut out U-shaped grooves. The plates themselves are attached to a plastic part.
The edges of the plates (on one side of the workpieces) will need to be bent at an angle of 90 degrees.
Thus, the electrodes will be on one side of the plastic, and the wires on the other. Only the metal plates themselves are placed in a container with water, while the ends of the wires will be completely dry.
Place the plastic plate with the electrodes on a mug of water (or other container) and plug the plug into the outlet. For reliability, you can secure the wire with a clamp or clothespin so that it does not dangle.
You can watch the video for details on how to make a boiler with your own hands. The author of the YouTube channel GlucMaster shared his experience.
Do-it-yourself boiler repair: rules
In most cases, the boiler can be easily repaired yourself. This requires some tools and strict adherence to instructions.
Tool for work:
It is worth noting that work done correctly and efficiently will allow the device to last a long time.
Malfunctions of boilers include failure of the heater, damage to the cable and malfunction of the plug.
If the heater fails, it must be completely replaced. But if the malfunction is insufficient contact of the wire with the terminals of the heating element, then the following must be done. Using pliers, you bite off the plastic that hides the contacts of the device.
Next, the burnt wire is disconnected and reconnected. As insulation, you can use a gun with liquid plastic.
If the cable itself malfunctions, it is separated at the break point and connected using terminal blocks. It is better not to use twists for these devices.
If the contact in the plug is broken, it is necessary to disassemble the device and make a quality connection.
Razor blade boiler
This option has already become a classic for people who lived during the period of domestic shortages. Over the years, a lot of variations of such heating devices and decent experience in their implementation have appeared, so let’s look at this model in more detail. Blades are not the only option for boiler electrodes, but they are used most often and this is due to several important reasons:
- High quality steel - during electrolysis, an electric current flows in the water column, formed by metal electrons released from the electrodes. Due to the resistance of the liquid, not all particles move from one electrode to another, but precipitate in the form of metal, significantly changing the taste of the water. Razor blades are made of fairly high quality, so the percentage of sediment from such a boiler will be minimal.
- Optimal ratio of geometric and physical parameters - despite the fact that no one invented blades as an electrode for a boiler, they provide a relatively high rate of heating of the liquid.
- Mass distribution - can be found in almost every home, garage or workshop, which is why they are always at hand.
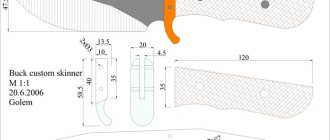
Materials for a blade boiler
Before manufacturing, you need to acquire the following elements:
The blades themselves - for the quality operation of the boiler, the brand and condition of the cutting surfaces do not matter; you can even use dull blades
It is important that they are of the same design; it is better if you take them from the same package. A dielectric for isolating one blade in a boiler from another - you can use any items you have (plastic lids, plugs). If nothing comes to mind, it is best to use regular matches to isolate the heating elements from each other. Material for fixing electrodes in a boiler - threads are most often used
You definitely shouldn’t fasten it with glue, and even more so, you shouldn’t resort to wire and other metal products - they will immediately short-circuit the blades. Power cord with plug - any option with stranded copper wires that can be conveniently screwed around the blade will do.
This is a minimal set; if you wish, you can complicate the design by using crocodiles to connect wires to the blades or installing a plastic block as a base.
Manufacturing procedure
To make a boiler from blades, it is advisable to have the following tools on hand: pliers, a knife or side cutters, and electrical tape. The manufacturing process is as follows:
- strip the wires on the power cord with the electrical plug, you will need about 2 - 3cm of bare wire;
Rice. 1. Strip the wires - screw each end of the wire to the blade, note, do not try to solder them - it is useless, you need to screw the wire tightly, if you can’t do it by hand, take pliers;
Rice. 2: Screw the wires to the blade - fix the blades at a distance from each other using a dielectric, in this case matches are used;
Rice. 3: Put matches between the blades - wrap the resulting boiler with threads so that it does not fall apart during use; if it holds up as it is, you can do without threads.
Rice. 4: Secure the blades with thread
The homemade water heater is ready, it should be noted that the distance between the blades determines both the parameter of the power consumed from the network and the heating rate. Therefore, you will get the fastest heating at a distance of 2 - 3 mm (per match thickness); at a distance of 2 - 3 cm, the heating time will increase proportionally.
Rice. 5: Perpendicular placement of blades on matches
But the amount of electricity consumed to boil water, say, in a half-liter jar, will be the same for both cases.
Do not forget that all homemade boilers that pass electric current through the heated liquid cannot be immersed in metal containers; they will be under potential and can give an electric shock. Only dishes made of dielectric material are suitable - glass, polymer and others.
Rice. 6: Blade boiler in action
From the heating element of the kettle
You can also assemble a boiler from an unnecessary electric kettle, provided that the heating element is in working order. In this case, you don’t need to come up with anything extra - you will need the heating element itself and a cord with a plug. First, check the integrity of both parts of the electrical device using a multimeter.
Rice. 7: Check with a multimeter
Ring the cord and heating element, if they are in good working order, then they can be safely used to make a boiler.
To connect the terminals of the heating element, it is more convenient to use terminal clamps, but if you don’t have these on hand, you can use a regular soldering iron.
To make a boiler, follow these steps:
The boiler is ready, it can be used both for heating technical water and for boiling drinking water. In terms of its operating parameters, it is no different from a classic kettle or boiler, so it can also be used in metal containers. Due to the fact that the heating device uses a factory heating element, you get a fairly powerful boiler.
Manufacturing technology
We will need the following materials:
- Power cable with plug (preferably with a cross-section of at least 0.75).
- Two safety blades. The sharpness of the edge does not matter, usually just dull ones were used. It will be better if both electrodes are the same (for uniform wear). In the case of blades - one company, preferably from the same package.
- Dielectric for installation between blades. Matches were usually used. You cannot simply lower the electrodes in a freely suspended state. They may touch (moving while boiling) and a short circuit will occur.
- Thread for fixing structural elements. As practice has shown, this is the safest method of fastening. You can't use glue; the rest of the fasteners simply don't fit.
Instructions for creation
Many became acquainted with this type of equipment when they served in the Soviet army or in any other conditions where it was necessary to boil water, but there was no suitable device for this purpose.
To create a boiler you need the following items:
- 2 blades.
- Matches.
- Two-core wire.
In order to make such a boiling unit, it is necessary to attach wires to two heating elements (in this case, blades). They should not touch each other, so spacers made of matches must be installed between them. Next, all that remains is to lower the finished device into water and bring it until it begins to boil.