DIY octopus from a glove
Surely every home has a box or drawer for old, no longer needed things. With a little imagination, you can make a toy out of them. For example, sew a funny craft, a small octopus from a glove with your own hands.
To work you will need:
— Glove; — Cotton wool or padding polyester for stuffing; — A pair of buttons for the eyes; — Threads; - Needle; - Scissors; - A stick or pencil.
First, fill the glove with cotton wool or padding polyester using a stick. Try to push the cotton all the way to the tip of your finger, otherwise your octopus from the glove will end up with problems standing on its legs. Also try to distribute the stuffing evenly to avoid lumps and leave no voids.
Then we stitch the glove along the edge with the seam forward and the needle, retreating about 1-1.5 cm. If the upper part has a thick, dense elastic band, then we make the seam below it.
We tuck the upper part of the glove, hiding the elastic inside.
Tighten the thread so that there is no hole left. To prevent the neck from coming apart, we make 2-3 stitches on top of the tie.
And in order for our octopus to stand on its legs, we tighten the space between the thumb and little finger using a hidden seam.
This is what we ended up with.
After making the figurine, we proceed to the most important stage - designing the toy. Here you can use your imagination. For example, make a boy or a girl octopus. We're having a girl. Sew on button eyes.
You can use wool threads to make hair and embroider a mouth. And finally - small bright bows made of satin ribbon.
This is such a funny toy we got!
This toy, sewn by mother's hands, will surely please your baby. Just don’t forget to sew the buttons on tighter if your child is of kindergarten age. And for very young children, it is better to embroider the eyes with colored threads.
Children's craft from yarn “Octopus”
An octopus made of threads is a children's, very funny craft for children aged 4-5 years.
And you can play with such a craft. And by weaving “legs” for an octopus from threads, it’s very convenient and fun to learn how to braid hair. The color of the thread for our octopus can be any.
To work you need:
- any yarn (preferably two contrasting colors),
- eyes,
- scissors,
- buttons for decoration (optional).
Step 1: Cut 84 threads of wool (approximately 50 cm long).
For clarity, I divided them into 4 piles of 21 threads. The result will be 8 legs.
Step 2: Put all the threads together.
We determine the middle and tie them with a thread of the same color.
Step 3: Form the octopus head.
We make a small ball of threads of the main color and insert it into the middle, between the threads, as shown in the photo.
We straighten the threads carefully.
We tie it under the head with a thread of the main color.
Step 4: Making the legs of the octopus.
We take 21 threads, divide it into 3 equal parts, that is, 7 threads each, and weave a braid. We tie at the bottom with a thread of a contrasting color.
Trim the threads using scissors.
You can decorate with additional decorative buttons.
Braid the rest of the braids in the same way.
Step 5: Make the octopus's face.
The eyes can be glued on ready-made, or they can be sewn on cut out from felt or embroidered with suitable threads. You can make a mouth. Imagine!
These are the octopuses I made from yarn.
I was glad to help.
I create detailed master classes with step-by-step photos and video instructions.
Source
Octopus brain controls eight arms
Octopus tentacles are not meaningless appendages. Under the control of the central nervous system, the octopus takes the bait out of the maze with its favorite “hand,” zoologists have shown.
Octopuses are one of the most highly organized groups of invertebrates. Therefore, scientists are studying their behavior with great interest. A group of zoologists led by Dr. Tamar Gutnick from the Hebrew University of Jerusalem found that the common octopus is able to control the movement of its eight “arms” using the central nervous system.
Of the eight “hands” one is the favorite
It has always been believed that octopuses move their soft tentacles completely randomly. Recently, biologists from the Weymouth Marine Center (UK) showed that the octopus’s brain only signals the limbs to begin movement. And then each limb acts independently. Moreover, even the octopus’ “arms” cut off from the body continue to make programmed movements for some time. But Gutnik’s experiment proved that the movements of octopus tentacles are coordinated by the central nervous system, and on the basis of visual information.
Gutnik conducted the following experiment: she constructed a transparent labyrinth with three sections, in the central section there was food - bait. The octopuses were allowed into the maze one by one and their actions were observed. During the experiment, six out of seven animals learned to lower the same “hand” into the central section of the maze and retrieve the bait from there. Moreover, the experimental octopuses could repeat these actions several times with the same selected limb.
“Our experiment showed that the octopus sees the bait, and then the central nervous system sends a signal to the limbs. This means that, based on visual information, the octopus makes conscious and well-coordinated movements of its limbs,” Gutnik sums up his work.
Highly organized cephalopods
Octopuses belong to the class of cephalopods. They have eight tentacles covered with many suckers. Each tentacle contains taste buds that determine whether food is edible. Octopuses do not have a hard skeleton. And the head, compared to the body, is large in size. The cartilaginous skull protects the octopus's brain, which even has a rudimentary cortex. Octopuses have excellent vision - they look at the world with the help of square pupils. Recently, Taiwanese scientists managed to prove that octopuses also hear perfectly.
You can read more about the experiment by Dr. Gutnick and her colleagues in an article published in the journal Current Biology.
Very simple
Even the smallest craftsman can easily make this toy. Give your baby a handkerchief or a square piece of fabric, slightly cut on the sides (as in the photo), and a small ball made of anything: fabric, foam rubber, crumpled newspaper, a ball, and so on. Let the child throw a rag over the ball and tie a ribbon around the octopus’ “neck”. Draw the eyes or glue them together.
Required:
- two old socks, maybe different ones;
- any filler;
- wooden knitting needle;
- scissors;
- threads, needle;
- felt-tip pen.
Master class on making an octopus from socks
Take two socks and draw lines for future cuts on them. From the toe to the middle of the foot, one of the socks will represent the head of the toy. From the heel to the elastic, we divide each sock into 4 parts lengthwise. These will be the tentacles.
We cut out the details of the toy.
We sew the legs, leaving them unstitched on one side, and turn them inside out.
Using a wooden knitting needle, fill all the parts with padding polyester. Carefully sew up all the holes.
We sew the tentacles to the head and tighten the “neck”. Let's draw a face. The toy is ready.
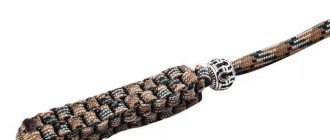
This version of the sea mollusk involves both 4 legs and 8. It all depends on how many gloves you don’t mind using in your work. Moreover, the gloves do not have to be the same.
Hide one thumb inside and carefully sew up the mark from it. Wrap the elastic band inside. Fill the remaining 4 fingers and the glove with filler and sew the top closed. To be more convincing, you can pull the glove a little at the base of the fingers. Sew button eyes and mark a mouth. The four-legged octopus is ready.
The toy made from two gloves is a little more complicated. We also remove one thumb inside and mask its presence. We make an incision at the base of the fingers in a fingerless glove and insert another one inside it, leaving 4 fingers “outside”. We fill all 8 fingers with padding polyester, stitch them at the base, while simultaneously closing the slot. We fill the double glove with filler, first tucking the elastic. We sew up and shape the face.
Popular articles An easy way to grout tiles
Doctor Otto Gunther Octavius, a supervillain, star of comics, cartoons and television series, has recently become our children's favorite toy. The doctor has his own biography, his personal and public life. It's difficult to do, but possible. We offer several options.
- A Lego villain doctor, like the one in the photo.
- Doctor Octopus from an ordinary doll with four tentacles glued to the back from scrap materials: polymer clay, boiler tubes, wire wrapped in threads, etc.
An octopus made from strips of paper will add to the collection of crafts made using this popular technique. The work is very simple, perfect for children, but will require diligence and accuracy.
Materials you will need:
- Double-sided orange colored cardboard;
- A little white paper for the eyes or ready-made moving eyes;
- Ruler, pencil, scissors, glue stick, compass, black felt-tip pen.
Master class on making a children's toy “Octopus and Goldfish”
Tatyana Koksheneva
Master class on making a children's toy “Octopus and Goldfish”
The most ordinary threads can become a bright and interesting material for creating children's crafts . With their help, using various techniques and techniques, you can create beautiful paintings, toys , postcards. The history of thread dolls goes back to ancient times. For many peoples of the world, dolls were not so much children's toys , but rather obligatory objects for the performance of certain rituals. Small toys made of bright threads can be an excellent gift for the upcoming holiday for your loved ones. Their production makes it possible to have a good time with friends and comrades and do interesting and useful things.
It's no secret that the development of children's fingers - fine motor skills of children's hands - contributes to the development of the baby's speech and intelligence. One way to develop fine motor skills is through creativity. Drawing, modeling, appliques and creating all kinds of crafts will help your child develop his imagination, perseverance, accuracy, and of course fine motor skills. An octopus and a goldfish made from threads and glue is a simple and interesting craft that you can easily make with your child, and even introduce your child personally to the main character of the fairy tale “ Goldfish ”
.
We made these with older children for kids on the eve of the holidays: octopuses for boys , and goldfish for girls .
Dare, fantasize and the joy of creativity will definitely come to you!
MATERIALS AND TOOLS REQUIRED:
- skeins of thread of different colors;
- black and white cardboard;
- scissors;
- PVA glue.
1. Threads (in our case blue)
wrap onto a suitable backing of the required size.
2. On one side, tightly tie the winding with a thread of a contrasting color.
3. Carefully remove the winding from the warp, fold it in half and, stepping back a little from the edge, tie the skein tightly. We got the head of an octopus . Carefully cut the skein of thread on the opposite side. octopus legs here .
4. Divide all the threads into 8-9 parts - the number of octopus . Weave a braid from the threads of each leg and tie tightly at the end with a contrasting thread.
5. Carefully trim the threads on each braid leg. Tie bows at the ends of the legs.
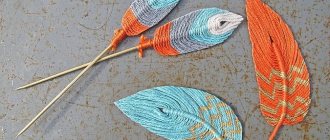
6. Make a solid winding using red and yellow threads to make a goldfish .
7. Carefully cut the skein of yellow thread on one side. Tie a skein of red thread on one side and cut it on the other. Place a bunch of red threads on the laid out bunch of yellow threads.
8. Tie both bundles tightly with red thread where the red bundle is tied. Fold the threads so that the red ones are inside the bundle, and, stepping back from the edge, tie the entire skein, separating the fish's .
9. Divide the yellow threads into three parts and the red ones into four.
10. Weave a braid from the upper central part of the red threads. This will be the upper middle fin. Place the threads of the fish's together and tie them, grabbing the tip of the upper fin-pigtail.
11. Having determined the length of the side fins - the side parts of the red threads, tie them up and cut off the excess.
12. Cut out small circles from white and black cardboard to make eyes for the octopus and fish .
13. Glue the eyes to the octopus : white circles first, and black ones on top.
14. Cut out a small triangle from black cardboard and fold it in half.
15. Glue the finished beak to the octopus .
16. Glue the eyes of the goldfish on the sides , distribute the threads of its tail evenly so that the red threads are visible. If necessary, trim the ends of the tail threads.
toys might look like .
Good luck. Try it, you won’t regret it, the kids loved it!
Very simple
Even the smallest craftsman can easily make this toy. Give your baby a handkerchief or a square piece of fabric, slightly cut on the sides (as in the photo), and a small ball made of anything: fabric, foam rubber, crumpled newspaper, a ball, and so on. Let the child throw a rag over the ball and tie a ribbon around the octopus’ “neck”. Draw the eyes or glue them together.
Required:
- two old socks, maybe different ones;
- any filler;
- wooden knitting needle;
- scissors;
- threads, needle;
- felt-tip pen.
Master class on making an octopus from socks
Take two socks and draw lines for future cuts on them. From the toe to the middle of the foot, one of the socks will represent the head of the toy. From the heel to the elastic, we divide each sock into 4 parts lengthwise. These will be the tentacles.
We cut out the details of the toy.
We sew the legs, leaving them unstitched on one side, and turn them inside out.
Using a wooden knitting needle, fill all the parts with padding polyester. Carefully sew up all the holes.
We sew the tentacles to the head and tighten the “neck”. Let's draw a face. The toy is ready.
This version of the sea mollusk involves both 4 legs and 8. It all depends on how many gloves you don’t mind using in your work. Moreover, the gloves do not have to be the same.
Hide one thumb inside and carefully sew up the mark from it. Wrap the elastic band inside. Fill the remaining 4 fingers and the glove with filler and sew the top closed. To be more convincing, you can pull the glove a little at the base of the fingers. Sew button eyes and mark a mouth. The four-legged octopus is ready.
The toy made from two gloves is a little more complicated. We also remove one thumb inside and mask its presence. We make an incision at the base of the fingers in a fingerless glove and insert another one inside it, leaving 4 fingers “outside”. We fill all 8 fingers with padding polyester, stitch them at the base, while simultaneously closing the slot. We fill the double glove with filler, first tucking the elastic. We sew up and shape the face.
Doctor Otto Gunther Octavius, a supervillain, star of comics, cartoons and television series, has recently become our children's favorite toy. The doctor has his own biography, his personal and public life. It's difficult to do, but possible. We offer several options.
- A Lego villain doctor, like the one in the photo.
- Doctor Octopus from an ordinary doll with four tentacles glued to the back from scrap materials: polymer clay, boiler tubes, wire wrapped in threads, etc.
Sock octopus
Required:
- two old socks, maybe different ones;
- any filler;
- wooden knitting needle;
- scissors;
- threads, needle;
- felt-tip pen.
Master class on making an octopus from socks
Take two socks and draw lines for future cuts on them. From the toe to the middle of the foot, one of the socks will represent the head of the toy. From the heel to the elastic, we divide each sock into 4 parts lengthwise. These will be the tentacles.
We cut out the details of the toy.
We sew the legs, leaving them unstitched on one side, and turn them inside out.
Using a wooden knitting needle, fill all the parts with padding polyester. Carefully sew up all the holes.
We sew the tentacles to the head and tighten the “neck”. Let's draw a face. The toy is ready.
Cutting and sewing
Using the pattern of the cap wedge, you should cut out 6 parts of the octopus’s body from knitwear. Seam allowances should be as follows:
- along the side sections – 5-7 mm;
- along the bottom cut - 1 cm.
All 6 parts must be duplicated on the wrong side with an adhesive lining on a knitted base.
Then any 2 parts of the body must be sewn together along the side sections with a seam 5-7 mm wide (depending on the processing allowance). The parts should face each other, and the seam itself should be laid along the wrong side of the parts.
For ease of stitching, the parts can be pinned or basted with hand stitches.
After this, the seam allowances must be laid out in opposite directions and set aside at a distance of 1 mm from the seam.
The third part should be sewn and delayed in the same way.
The two halves of the body must be sewn together, as shown in the photo.
Then you need to cut out 12 tentacle parts (2 for each) from knitwear. Their length and width can be arbitrary. The approximate length can vary from 50 to 60 cm, the width at the widest point is 6 cm, at the narrowest point - 3-4 cm, you also need to add a processing allowance - 7 mm..
6 parts of the tentacles should be duplicated with an adhesive pad.
All parts of the tentacles need to be pinned together in pairs, one part duplicated, the other not, face to face, and stitched around the perimeter at a distance of 7 mm from the cuts.
After stitching, the allowance at the end of the tentacle should be trimmed to a width of 3 mm, so the part will be easier to turn out and will look beautiful when finished.
The prepared tentacles must be turned right side out.
Each tentacle should be loosely filled with holofiber. Due to the fact that one part of the tentacle is duplicated and the other is not, the stuffing will pull the latter more strongly. As a result, the tentacle will have a slightly curved shape, which will allow the octopus to look more realistic.
From white and black felt you need to cut out the details of the octopus's eyes. They can have any shape. They need to be sewn onto the body.
In the middle of each of the 6 wedges (along the lower cut) you should sweep the tentacles of an octopus.
After this, you need to cut out the lower part of the octopus’s body from knitwear - a circle. Its diameter can be calculated based on the circumference formed by the width of the lower parts of the wedges (circumference formula).
The allowance for sewing the circle to the body should be 1 cm.
This part should be manually basted around the entire perimeter onto a layer of thin padding polyester, which will give it rigidity.
Then approximately the length of the workpiece should be sewn to the body of the octopus. Through the unsewn hole, the toy must be turned right side out.
Even a child of five to eight years old can make this toy with his own hands, if, of course, you show him how to do it and give him the material. Moreover, a soft toy octopus is recognizable in any form, if it has a head with eyes and as many legs as desired.
Popular articles Non-Newtonian fluid
We will need:
- a square piece of plain fabric, preferably one so that its raw edges do not fray: fleece, thin felt, drape, and so on;
- a small ball, a ball, a ball of unnecessary thread or a piece of foam rubber to fill the head;
- scissors;
- beautiful thin braid;
- "eyes";
- small scarf made of colored fabric.
Sequence of work
Determine the middle of the square flap and place a ball or a skein of waste thread in this place (the “brain” or what will become the insides of the head). Pinch the ends together with chalk or a felt-tip pen.
Unfold the fabric, straighten it and cut the fringe on all four sides, 6 strips on each side, without crossing the “neck” line. Try to make them the same width. You should end up with a small square with brushes.
Put the “brains” back into the octopus and tighten the “neck” with a strong thread. You can tie a scarf or bow tie.
Use scissors to straighten the fringe.
Make tight braids, tying them with a bow at the end.
Glue or sew on the “eyes”, draw a smile with a felt-tip pen and tie a scarf.
From threads
The same charming octopus with pigtails can be made from thick threads. It is better to use synthetic yarn or cotton with synthetics. It holds its shape and volume perfectly. The technique for making the toy is shown in the video.
A few additional tips
Instead of a lump of newspaper, you can use a plasticine ball or Kinder Surprise packaging.
- To prevent the threads from coming apart on the octopus’s head, you can lightly grease the filler with PVA glue.
- To accurately calculate the number of legs, you can do a simple multiplication of 15 cm (length of the octopus) x 3 (number of threads in a strand) x 3 (number of strands in a braid) x 8 (number of braids) = 1080 cm. This means we take a bundle of 9 threads 120 cm and fold it in half three times.
Origami from modules
Korean artist Nga Tran proposes making a spectacular octopus using modular origami technique. Despite its impressive appearance, the model will not present any difficulties during assembly. You will need 1012 solid-color modules, 1/36 in size, PVA glue, and plastic toy eyes to complete the look.
Categories
- Toy library (186) Indoor games (46)
- Outdoor games (39)
- Competitions (28)
- Folk (49)
- Educational games (28)
- Applique (43)
- origami 4-7 years (35)
- Master classes. Folk dolls. (69)
- Holiday scenarios (21)
Octopus made from strips of paper step by step
Cut out a circle of any size from orange cardstock. What the octopus will be like depends on its size. Don't make it very small, as it will be difficult to glue the strips of paper later. Also, the sizes should depend on the age of the child; the smaller the children, the larger the circle.
In addition to the circle, cut 8 strips for the tentacles, about 1.2 cm wide. Place the strips together and round everything at once on one edge.
Glue the tentacles along the edges of the circle to form something like rays.
Now cut 8 more long strips, 1 cm wide and twice the length of the circle.
Place them together and bend a couple of centimeters on both sides. This will be the area to glue to the circle.
Glue the first strip, fitting the folded sides to the edges of the circle. It should look like an arch.
Glue the next strip across the first.
Glue all the strips in this way, filling the spaces between the previous ones.
Octopus made from strips of paper is almost ready. Make paper eyes by cutting out small white circles and drawing black pupils on them with a felt-tip pen. Glue the resulting eyes onto the octopus's body and twist all the tentacles upward. This is how another character for the collection turned out.
What to do with a two and a half year old baby on a rainy summer day? Let's meet the octopus. Our baby doesn’t know such an animal yet.
First, let's look at his “portrait”, where he lives and gets along, watch a cartoon about naughty octopuses and get down to business.
Colored paper, glue (PVA or glue stick), felt-tip pens, glue and 15-20 minutes of free time - this is enough to make a beautiful and voluminous octopus. This craft can be used as an independent toy. Alternatively, colorful octopuses can be useful for a small theatrical performance.
You don’t need to think that a 2.5 year old child made the craft on his own. For him, this is an option to get acquainted with something new through different types of activities: a picture, a cartoon, a craft. He took an active, very active part: he drew “Velcro” on the tentacles, tried to cut paper, and smeared glue on the octopus. Almost correctly (vasinog) learned the name of the beast.
An older child (4-5) can make a craft with a little help, and six or seven year olds can do it on their own. But watching a cartoon and learning poetry is useful for everyone.
Popular model from Lee Armstrong
A British origamist has developed a diagram of a realistic octopus, which can be made in several versions. The figurine is inflatable and gains volume under the influence of air. It is better to use thin but durable paper for it, since it will be folded in several layers. The minimum size of the initial square is 21x21 cm. Otherwise, difficulties will arise with small details, especially for beginners.
Step-by-step instruction:
- We make two folds in half in both directions “valley”. And then diagonally “mountain”.
- Bend the corners towards the center to make a “Pancake”.
- Now we fold the workpiece into a “Double Square”.
- We unfold the product with the free edge towards us. Fold the right and left corners to the central axis. Let's reveal. Repeat the same step on the back.
- We make mountain folds along the marked lines.
- We move the top points apart. We repeat the action on the reverse side.
- We “push” the side valves inward.
- We make folds along the indicated dotted lines.
- This is what should happen. Repeat step 8 on the back.
- We outline the fold lines.
- Fold the right and left edges to the center line. Let's reveal.
- Now bend the edges to the lines from step 11.
- Make reverse folds following the arrows.
- Repeat steps 10 – 12 on all valves.
- We complete step 13. Move one layer to the left. And we do the same on the back.
- We bend the figure along the dotted line.
- Return the first layer to the right. We do the same on the other side.
- Fold the top corners diagonally.
- Bend both halves of the first layer back.
- Raise the lowest point.
- We make a “bunny ear” fold, outlining the first tentacle.
- We turn the valve inward.
- Repeat steps 22 – 23 on the reverse side.
- This is what should happen.
- We make eyes by opening and flattening the side flaps.
- The head is ready.
- We make the remaining tentacles following the example of the first two.
- We bend the top of the figure forward and back.
- Press along the arrow to create a diamond fold.
- We blow from below, giving the figure volume.
- We curl the tentacles onto a pencil or bamboo skewer.
A slightly different option:
The model can be used for paper jewelry that is fashionable today:
From a glove
This version of the sea mollusk involves both 4 legs and 8. It all depends on how many gloves you don’t mind using in your work. Moreover, the gloves do not have to be the same.
Hide one thumb inside and carefully sew up the mark from it. Wrap the elastic band inside. Fill the remaining 4 fingers and the glove with filler and sew the top closed. To be more convincing, you can pull the glove a little at the base of the fingers. Sew button eyes and mark a mouth. The four-legged octopus is ready.
The toy made from two gloves is a little more complicated. We also remove one thumb inside and mask its presence. We make an incision at the base of the fingers in a fingerless glove and insert another one inside it, leaving 4 fingers “outside”. We fill all 8 fingers with padding polyester, stitch them at the base, while simultaneously closing the slot. We fill the double glove with filler, first tucking the elastic. We sew up and shape the face.
Materials
All the materials needed to make an octopus costume can most likely be found at home. As a last resort, they can be easily and inexpensively purchased at a store like “Funny Prices” or Fix Price near you.
So, we will need:
- 4 pairs of tights;
- belt, belt, ribbon or at least rope;
- T-shirt with long sleeves;
- cap;
- pieces of felt or other fabric in black and white;
- pins (preferably safe English ones);
- lots and lots of padding polyester or cotton wool.
Popular articles Newspaper basket
An octopus costume will certainly look more harmonious if all its parts - tights, T-shirt and hat - are chosen in the same tone, but an eclectic combination of different colors and textures can give an interesting result. It all depends on your imagination and the materials available.
Poems about octopuses
With older children 2.5 it is useful to learn poetry. Unfortunately, I couldn’t find any poems that our hero could understand. Well, maybe the first one will do. The first two lines.
***
I'm a huge octopus! I have eight legs! I can dance... And step on feet... But try to step on so many feet yourself! (T. Sofinskaya)
***
The octopus was surprised: “Why do I need eight legs?!” Answer quickly, children, Why do I need these shoots? The children answered in chorus: “There are sharks in these waters.” To escape you need eight legs at once! (V. Trusov)
***
An octopus has eight legs... Is it a little or a lot? – Eight legs are an awful lot! - This is how the lamprey would answer, Because lampreys have absolutely no legs... Eight legs are insignificant! - So the centipede would answer, Because centipedes, As you know, have many legs... And ask the octopus: - Eight - few or many? And he will answer immediately: “Eight is just right!” (In Voskoboynikov)
DIY thread octopus: materials
- yarn (the thicker, the more voluminous the toy will be)
- simple thin threads
- soft filler (cotton wool, padding polyester, holofiber)
- scissors
- decorative details
Choose the decor at your discretion. For example, we decorated the tops of our octopuses with satin bows. And you can easily put miniature hats on their heads in the style of Charlie Chaplin :-) Turn to the rich children's imagination for creativity!
How to make an octopus from threads?
STEP 1. Form a ball from the filler - this is the future head. The size of the workpiece depends only on what size toy you want to get.
Cut 24 threads of the same length from a skein of yarn (it also depends on the desired size of the octopus). There can be 48 or 72 pieces, if your yarn is thin and you have to braid the braids in two or three threads.
STEP 2. Drag the entire bun in the middle with a thin thread (this is the top of the octopus). “Hide” a ball of filler under the yarn; From below, secure the head of the toy with thread.
STEP 3. How to get only 8 out of 24 “tentacles”? A problem on the verge of mathematics and handicrafts! But it can be solved quickly: braid three threads into braids (6 or 9, respectively, if there are 48 or 72 threads in the bundle), and tie knots at the ends.
STEP 4. All that remains is to decorate the resulting octopus. Our guys have eyes and mouths made of ordinary paper. Perhaps yours will have them embroidered with beads? Imagine!
But what a family of octopuses Tatyana Falina sent us to the editorial office! You can also send photos of your crafts made using our master classes to the editor. We will be happy to publish them on the site!
Is the simplicity of the craft impressive? Be sure to try making an octopus made from knitting threads with your child!
Even a child of five to eight years old can make this toy with his own hands, if, of course, you show him how to do it and give him the material. Moreover, a soft toy octopus is recognizable in any form, if it has a head with eyes and as many legs as desired.
We will need:
- a square piece of plain fabric, preferably one so that its raw edges do not fray: fleece, thin felt, drape, and so on;
- a small ball, a ball, a ball of unnecessary thread or a piece of foam rubber to fill the head;
- scissors;
- beautiful thin braid;
- "eyes";
- small scarf made of colored fabric.
Sequence of work
Determine the middle of the square flap and place a ball or a skein of waste thread in this place (the “brain” or what will become the insides of the head). Pinch the ends together with chalk or a felt-tip pen.
Unfold the fabric, straighten it and cut the fringe on all four sides, 6 strips on each side, without crossing the “neck” line. Try to make them the same width. You should end up with a small square with brushes.
Put the “brains” back into the octopus and tighten the “neck” with a strong thread. You can tie a scarf or bow tie.
Use scissors to straighten the fringe.
Make tight braids, tying them with a bow at the end.
Glue or sew on the “eyes”, draw a smile with a felt-tip pen and tie a scarf.
Octopus made from knitting threads
This kind, cheerful inhabitant of the ocean depths can become a souvenir, decoration, and toy. You can make a whole family of octopuses - the product is made very simply from available materials without any special equipment. Even children can easily make it.
To work you need:
- yarn (knitting threads, for example, wool mixture), - strong nylon thread (20-30 cm), - thin multi-colored silk ribbons or ribbons for gift wrapping: 8 -10 pieces, 15-20 cm long, 0.5- wide 0.7 cm), - white paper and colored pencils for drawing (eyes, mouth), - a sheet of thick A4 cardboard for making the initial workpiece, - glue, scissors.
Manufacturing:
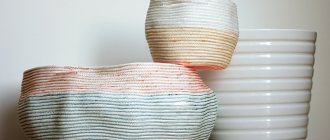
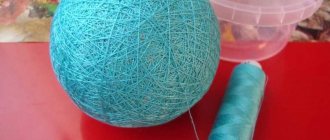
1. Wind threads evenly onto a sheet of cardboard. To make the octopus well-fed, you need 100-130 turns of thread (depending on the thickness of the thread). When winding, lay the thread without tension, otherwise the cardboard will bend and you will not get the desired length of the turn.
2. Carefully remove the skein from the cardboard sheet and use nylon thread to securely tie the threads 6 - 7.5 cm from the edge. This will be the head of an octopus. It should turn out almost round, so keep in mind that this lump will be its “wrong side” or middle, evenly covered with threads again during the next steps. If you make it shorter, the octopus will look disproportionate even for a toy. If it turns out longer, the elongated head will not have stability, and the threads will sag, forming unsightly loops.
3. Cut the edge that is longer. It turns out something similar to a whitewash brush. These threads are the future tentacles of the octopus, so their length should be about 2/3 of the entire product.
4. Taking the uncut edge-clump in your hand, you need to turn it over and evenly distribute the threads in a circle so that they beautifully cover the base - just like combing a wig. It is convenient to perform this step by placing the workpiece on the table. 5. Now, having determined what kind of head we have, without turning it over, we tie it in the “neck” area with a thread of the same color as the entire craft. Do not tighten too tightly, otherwise the octopus will fall on its side. The diameter in this place can be 3.5-4 cm..
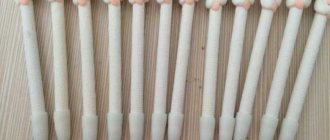
6. The most interesting thing: we divide the threads into 8 even strands and weave tentacle braids, tying small bows at the ends. If it is a male octopus and you find the bows inappropriate, you can simply cut the ribbons shorter and tie them in a modest knot. After the tentacles are completed, the final touch: you need to carefully trim the threads at the ends of the braids with scissors.
7. All that remains is to draw the eyes and smile, cut and glue. Why do we use pencils and not markers? It is known that upon contact with liquid glue, felt-tip pens immediately leak. High-quality pencils produce bright, long-lasting colors. Draw several options and choose the most suitable one. You can tie a bow to the girl octopus. You can make a hat for the boy octopus.
Octopus
We will need:
- a square piece of plain fabric, preferably one so that its raw edges do not fray: fleece, thin felt, drape, and so on;
- a small ball, a ball, a ball of unnecessary thread or a piece of foam rubber to fill the head;
- scissors;
- beautiful thin braid;
- "eyes";
- small scarf made of colored fabric.
Sequence of work
Determine the middle of the square flap and place a ball or a skein of waste thread in this place (the “brain” or what will become the insides of the head). Pinch the ends together with chalk or a felt-tip pen.
Unfold the fabric, straighten it and cut the fringe on all four sides, 6 strips on each side, without crossing the “neck” line. Try to make them the same width. You should end up with a small square with brushes.
Put the “brains” back into the octopus and tighten the “neck” with a strong thread. You can tie a scarf or bow tie.
Use scissors to straighten the fringe.
Make tight braids, tying them with a bow at the end.
Glue or sew on the “eyes”, draw a smile with a felt-tip pen and tie a scarf.
Craft "Octopus"
You don’t need to think that a 2.5 year old child made the craft on his own. But he took an active, very active part: he drew “Velcro” on the tentacles, tried to cut paper, and smeared glue on the octopus. Almost correctly (vasinog) learned the name of the beast. An older child can make a craft with a little help, and six or seven year olds can do it on their own.
Materials
What materials will be needed:
- colored paper (any shade will do);
- felt-tip pens (you can use colored pencils or paints, but felt-tip pens are better for the baby);
- PVA glue;
- scissors with rounded tips (safety!).
Step-by-step plan for creating a paper octopus:
1. First you need to take suitable colored paper. The size of the sheet does not matter, but its shape should be rectangular. In this case, the A5 format was used - half of the usual A4 sheet.
2. Then you need to draw the octopus tentacles. Using a regular pencil or pen, draw vertical stripes about a centimeter wide at the bottom of the sheet. On each strip you need to draw circles with a felt-tip pen to better imitate the tentacles of an octopus.
3. On a free piece of paper you need to draw the face of a sea creature - eyes, eyebrows, nose and mouth.
4. The drawn octopus tentacles are cut along straight lines. And only one strip is cut off completely - here the paper will be rolled up and glued together. It is useful to keep in mind that a 2.5-year-old child does not have enough control over the strength of his movements and will quickly crush the toy. You can increase the “life” of the craft by gluing an octopus prepared for gluing onto a toilet paper roll.
5. All that remains is to take the scissors and twist each tentacle upward. If you press lightly on the paper, it will not tear - you will only get neat curls. Another option: simply twirl the tentacles with your hands.
It is important that even a small child can make such an octopus. If you wish, you can create a family of octopuses. It is enough to take large rectangles of colored paper for adult octopuses and smaller ones for their colorful babies.