The advantages of the Russian stove can be listed for a long time: it warms, feeds, and provides a warm bed for sleeping. But in a small house there is not always enough space to accommodate a bulky structure. Master stove makers came up with a smaller copy - a mini Russian stove built with their own hands is not inferior in function to a full-fledged design.
For those wishing to try their hand at the stove business, we suggest considering one of the options for constructing a mini-stove with procedures and a description of the technologies. If you enlist the help of an experienced craftsman, you can independently build a beautiful, efficient, useful heating unit that will last for decades.
Master class on making three-dimensional decorations for fairy tales “Russian stove”
Vera Aksenkova
Master class on making three-dimensional decorations for fairy tales “Russian oven”
Dear colleagues, I would like to offer you a master class on making a three-dimensional decoration “ Russian stove ”. We use it at matinees, open classes, in theatrical fairy tales , as well as to introduce children to ancient life
I just want to remember the words of the poet Yulia Kalyakina
Russian Stove , Russian Stove !
There is no warmer place in a good house!
Hands of tireless and generous creation -
Thanks to the great ancestors!
We started work by selecting boxes of different sizes.
We glued them together, covered them with white paper, and made slits. When the stove was dry, we covered the base with white water-based paint. Made pencil sketches of the main patterns.
The stove itself was painted with gouache paints . Firewood made from paper can be placed in the bottom hole.
Master class on three-dimensional applique for Easter “Here I come!”
Hello, dear friends and guests of my page! I offer a children's master class “Here I come!” For work we will need: .
Master class on three-dimensional applique “Basket with tulips” Hello, dear guests of my page! For me, a tulip flower is the beginning of spring and women's holiday. I really love seeing them. Master class on three-dimensional applique “Cheerful Clown” Hello, dear friends and guests of my page! I would like to offer a children's master class “Cheerful Clown”. Ha ha ha! Here I am! Clap. Master class on making decorations for graduation. The Royal Castle. Master class on making decorations for prom. The Royal Castle. According to the script, we planned characters from the fairy tale about the Bremenskys. Master class on making a three-dimensional number “Unit” Not long ago I showed how to make a tutu skirt with your own hands, now I want to tell you how to make a three-dimensional number. I did one. Master class on making a three-dimensional postcard for mothers on March 8 IMG]/upload/blogs/detsad-420847-1457051251.jpg[/IMG]The idea of creating such a postcard is not new. I offered the children several options to choose from. Master class on three-dimensional applique “Apple Tree Branch” Let’s take red cardboard of A4 size. Glue an apple tree branch from thin brown cardboard onto it. Let's prepare mugs of different sizes for... Master class of three-dimensional postcard “Peep a peek at summer” So much greenery all around! What is this? This SUMMER is finally rushing into our house. Summer is the best time. The cold weather has ended and the most beautiful things have appeared. Source
We build stone wood-burning barbecues and barbecues for the garden
To build a foundation, it is recommended to first dig a small pit, each side of which should be approximately 20 cm wider than the side of the future barbecue. Sand and crushed stone should be poured into it, watered and compacted thoroughly. After this, it is necessary to install formwork from boards, and lay a reinforcing belt inside for greater strength and fill it with concrete. For reinforcement, you can use steel mesh or wire. It is recommended to add crushed stone or pieces of old brick to the concrete mixture. After pouring, it should take 5-7 days for it to set well. Roofing felt or some other waterproofing material should be laid on top.
Then you can proceed to the construction of the base. Laying should be done on a pre-marked surface using a building level. To achieve greater strength in the corners, it is recommended to reinforce with wire. The dimensions of the base depend on the planned width of the firebox and the presence of additional compartments for firewood. The brick should be soaked so that it does not absorb moisture from the mortar. The stone can be laid dry. The width and height of the plinth may vary, but 5-6 rows of bricks are quite sufficient.
To further equip the furnace from scrap materials, it is necessary to lay the interior of the structure. For this, it is recommended to use refractory bricks. If it is not available, then you can use ordinary red brick or natural stone, first thoroughly soaked in water.
When laying with any available materials, you should use clay that has been soaked for several days. It must be mixed with sand in a ratio of 1: 3. You can use another composition by mixing cement, sand and slaked lime (1: 1: 3) and adding water to bring the solution to a thick mass.
It is necessary to leave a gap at the bottom for the blower so that the air necessary to maintain the fire can freely flow into the firebox. Place a grill rack in the roasting pan. It should be installed on built-in iron corners or brick projections so that it is removable. You can also make racks for the spit from reinforcing steel.
After this, you can begin exterior finishing. The outside of a stone stove with a barbecue can be beautifully lined with natural stone, with which forged decorative elements will be beautifully combined.
It is recommended to lay the floor around the structure with paving slabs, and the cutting surfaces are best made of porcelain stoneware or marble slabs. Additionally, if desired, you can design an exhaust pipe.
The construction of a stone oven should be completed by installing a roof, which will allow the fireplace to be used in any weather.
Below are several photos of stone ovens, where finished objects are presented:
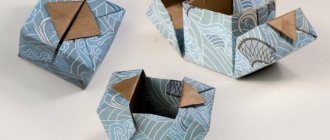
Master class “Russian stove made from cardboard boxes”
Tatyana Pikalova
Master class “Russian stove made from cardboard boxes”
to form in children ideas about the Russian hut and the traditions of the Russian people
— introduce children to the interior decoration of a Russian hut ;
- to cultivate interest and respect for the traditions and customs of the Russian people , the origins of Russian culture ;
In the old days, in the center of the hut there was a Russian stove , in which they not only cooked, but also slept on it. Popular wisdom says: “The hut is not red in its corners, but red in its pies.”
. All this equipment near the stove was called the woman's corner. Here was everything she needed to cook dinner and feed her pets.
This is the Russian stove I made for the “ Russian Izba ”
from cardboard boxes .
Cutting out the furnace (firebox)
and damper.
Cover with white wallpaper.
We design: we draw a stove, bricks on a pipe, fire, firewood, stairs, doors (large and small)
.
"For lovely ladies"!
Boxes made of cardboard boxes using decoupage technique Good day everyone! I bring to your attention the production of boxes that will be very useful for storing our ladies' accessories. Household appliances made from cardboard boxes for role-playing games for preschoolers Thanks to gender education of preschool children, the successful formation of the child as an individual depends. Gender education of children. Decorative fireplace made of cardboard boxes. Master class Hello, dear colleagues, Happy New Year 2022! Happiness, health and all worldly blessings to you in the New Year! And I want to share. Photo report on the excursion to the library “The stove feeds, the stove warms, the stove is a dear mother” Dear colleagues! I have already dedicated several posts to the Day of the Russian Stove. It turns out that the entertainment “Visiting Alyonushka” was not the final one. Christmas tree toy “Russian stove”. Master class Emelya, Baba Yaga, Ilya Muromets, Masha and Vitya... What unites these fairy-tale characters? Of course, the stove! Emelya used it as original. Master class on making a model “Russian stove” My idea to build a model of the stove was necessary to answer the question: what was used to cook food in the old days? It is important to maintain the original appearance. Master class “Russian stove”. Making a Russian stove from scrap material Let's plunge into the still so recent world of the Russian stove. This is what the whole world of our grandfathers and grandmothers revolved around - it will feed and dry. Source
Staircase DIY furniture for the mini museum Russian Izba.
We take two sticks of equal length, corresponding to the desired length of the stairs. We outline the cuts for the steps.
We make cuts for the steps. To do this, we make two parallel cuts at a distance of 0.5-0.7 cm to about half the stick, and then use a knife to break out part of the wood between the cuts.
Let's cut the required number of sticks-steps.
We insert the step sticks into the cuts. For strength, we fix the joints with threads.
The extension ladder for the Russian Izba mini museum is ready.
The necessary set of furniture for the Russian Izba mini museum, which you can make with your own hands from scrap materials, is ready.
But the most important thing in a Russian hut is missing - a stove. This post is dedicated to how to make a stove with your own hands
Now we will make a character who rode on the stove. Emelya origami is done like this: Prepare from yellow paper, painted on one side, 2 squares measuring 10 x 10 cm (head, legs), from paper of any color, 1 rectangle measuring 5.5 x 3.5 cm (hat), 1 square measuring 9 x 9 cm (sheep coat), 2 squares measuring 6 x 6 cm (hands), 1 square of dark color measuring 13 x 13 cm (pants). Fold the head, hat, sheepskin coat and arms using the folding patterns for the origami Ivan Tsarevich figurine. Legs Bend a square with a side of 10 cm diagonally. Place the triangle at a right angle upwards.
Master class “Making a Russian folk stove from boxes” for a theater corner
Yulia Chuvardina
Master class “Making a Russian folk stove from boxes” for a theater corner
(making an attribute for a corner of the theater»)
homemade materials and aids . Children also very often and with great pleasure get involved in the work and help me. I would like to bring to your attention a simple way of making an attribute for the corner of a theater-stove using simple cardboard boxes . This is an indispensable attribute when conducting entertainment and performing theatrical performances .
To make the stove, I needed boxes from collapsible chairs (Ikea)
First, the boxes need to be pressed tightly together and glued together using adhesive tape or PVA glue, and then cover the blank with sheets of white paper (you can also use wallpaper in light shades, or simply paint it with paint
Then, using paints, markers and pencils, outline the main elements of the stove and its decor, draw and color the stove
Wait until our stove dries out
I. You can use it!
Our stove is used not only by us, but also by our music workers for their events, and other teachers of our kindergarten as an attribute for decorating groups in preparation for classes.
Making a Russian folk rag doll “Bird of Joy” (replenishment of the collection). The Russian folk doll “Bird of Joy” took part in the “Invocation of Spring” ritual. It is believed that this doll turns. Master class for parents “Making the Russian folk doll “Ubozhenka” (photo report) Goal: Instilling interest and love for the Russian rag doll as a type of folk art. Objectives: 1. Introduce. Master class for older preschoolers. Making a “Tank” from waste material (boxes). February 23 is the birthday of the army, Defender of the Fatherland Day. We are grateful to those who served and are serving in the army, who defended our Motherland over the years. Master class “Making a house for a patriotic corner” To make a house you will need: 1. PVC panels 2. Glue gun (4 packs of tubes for the gun) 3. Self-adhesive paper (wood-like. Master class on making a calendar of a Russian folk doll-twist "Round dance of dolls" As I already told in my previous publications, in my group there is a mini-museum of the "Russian folk spinning doll". Exhibits. Master class on making a scarf theater based on the Russian folk tale "Turnip" Autumn, autumn. In guests are welcome! Autumn, autumn, Stay for eight weeks: With abundant grain, With tall sheaves, With leaf fall and rain, With migratory rain. Master class on making the Russian folk doll "Domovushka" According to the Slavic calendar, the holiday of Pochinki is celebrated on February 16. Following the saying " Prepare a sleigh in the summer and a cart in the winter," men immediately after. Master class "Theater screen for a musical and theatrical corner" Good afternoon, beloved MAAM! So I decided to share my work on replenishing the group's developmental environment. The theater screen is an excellent aid. Photo report on the educational and play program “With the stove, at the stove and around the stove” Goal: to introduce children to folk traditions and culture, to continue acquaintance of children with objects of Russian life, with the Russian stove. Integration.
A fairy tale for theatrical activities “Box of Matches” based on the Russian folk tale “Three Bears” (middle group) Characters: Presenter (adult, girl Sasha, papa bear, mama bear, little bear cub, moose, jackdaws, foxes, eagles, pigeons, .
Source
Backlight and mechanics
Using all kinds of battery-powered lights and hidden wiring, some areas of the kitchen can be realistically illuminated. This is especially true for burners and ovens, where imitation fire is needed. An excellent effect is achieved by LED strips located along the edges of the “heating” devices, or light bulbs mounted under a transparent surface. In addition to warm yellow, red and blue tints of diodes would also be appropriate.
konforki_iz_diskov_i_svetodiodnoy_lenty.jpg
To ensure that the mechanisms of the hood, microwave, and washing machine can rotate, mini-fans from a PC or battery-powered motors will be useful. It is advisable to securely hide the batteries from children’s eyes, and additionally secure all wiring with electrical tape. Many engineering solutions for children's kitchens are presented in this video.
Master class: crafts from boxes “Russian stove”
Diana Medvedeva
Master class: crafts from boxes “Russian stove”
Master class “ Russian stove ”. The children and I decided to make pies from salt dough, and pies are baked in an oven, and to make the activity even more interesting, I made a stove .
To begin with, I found a picture on the Internet of a suitable stove , then took a TV box and cut out a hole.
box is not where the pipe should be . box (the future stove ) in two layers.
unnecessary light wallpaper using PVA glue.
And inside, where I cut out a hole, I also covered it with wallpaper and drew a flame. I drew from a children's book.
I drew bricks on a separate piece of cardboard and glued them onto PVA over the flame.
Then I started drawing individual elements.
Of course, all my work is checked by my main controller.
The activity turned out to be a success; the children played with the stove .
.And the sun and clouds are from the ceiling tiles.
"Miracle stove" Kindergarten decoration What is summer? This is a lot of light, This is a field, this is a forest, These are thousands of wonders. There are many miracles, and one of these miracles appeared on the territory. Christmas tree toy “Russian stove”. Master class Emelya, Baba Yaga, Ilya Muromets, Masha and Vitya... What unites these fairy-tale characters? Of course, the stove! Emelya used it as original.
Summary of a lesson on familiarization with the life and culture of the Kuban Cossacks “The Russian stove is the nurse for the whole house” Summary of a lesson in the preparatory group of MDOU DSKV 31, Yeisk, Yeisk district. Educator: Kovalenko T.Z. Russian stove for the whole house.
Master class “Design of the mini-museum “Russian Izba” Hello, friends and colleagues! You have already become acquainted with my events at the Russian Izba mini-museum, and now I want to introduce you to. Master class on making a model “Russian Izba” To familiarize children with Russian life, how and where Russian people lived many years ago, I decided to make a model. I took it to make it. Master class “Russian folk doll “Village Angel” MASTER CLASS “RUSSIAN FOLK DOLL “VILLAGE ANGEL” Elena Viktorovna Melnikova, e-mail ( [email protected] ) additional teacher. Master Class. Russian rag doll-amulet “Lovebirds” In our group there is a folk art corner in which kitchen utensils, napkins and towels embroidered with satin stitch are placed, wonderful. Hairdresser and stove for role-playing games on the site. Hairdresser and stove for role-playing games on the site. I took two large egg boxes and glued them together. Colored garbage bags.
Educational lesson in the preparatory school group “How the stove appeared” Topic: “How the stove appeared” Purpose: to introduce children to the origin of the Russian stove; about its use by humans; cultivate love for yours.
Source
DIY children's kitchen
Children's kitchen - buy or make it yourself?
Now there is a rich assortment of all kinds of different children's play kitchens, from small to large, with almost real sinks, stoves, ovens, everything like mom’s, only on a smaller scale. ⠀ There are different materials and prices. When I started sewing food from felt, and my daughter was enthusiastically playing with it, the need for a kitchen immediately arose, where else could I cook borscht for the bear and make a sandwich for my mother? ⠀ I didn’t like all the plastic kitchens with their vibrant “eye-opening” color and collapsible design. We had one of these, firstly it was low, and secondly it was constantly being taken apart. ⠀ I liked wooden kitchens like IKEA, except for the price tag. Well, I’m not ready to give so many thousands for something that it’s not a fact that a child will like it. ⠀ I decided to make the kitchen myself, cheaply and beautifully, from boxes that I always feel sorry for throwing away.
I had two large boxes lying around on the balcony, and they went into action.
I turned the box inside out because initially I wanted to paint it; if you cover it with foam, you don’t have to do that. I reinforced the walls with cardboard from another box, it turned out quite strong. The strips inside the box are a mount for the future oven.
The cardboard was glued with double-sided tape and PVA glue.
Next I glued the bottom and front wall of the oven at the same time. The bottom lay on the planks along the perimeter, and the front wall was glued to the sides with tape. Inside, the bottom of the oven was also secured with strips; they can be seen through the open oven door.
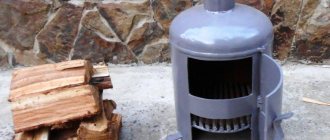
Design of long-burning furnaces
Long-burning stoves have design features. They consist of two chambers or combustion zones, in one of which pyrolysis of wood occurs, and in the other, afterburning of wood gases occurs. The location of the cameras relative to each other may be different.
In some models, fuel is loaded from above; as a result of primary smoldering, the firewood compacts and settles, and gases enter the afterburning chamber, which can be located either below or through a partition on the side of the first chamber. Such stoves are often equipped with blower fans to direct the draft into the desired channel.
Closing events
Three more rows of brickwork are made to connect to the pipe. Having removed the “knockout” bricks, the furnace channels are immediately cleared of construction debris. The perimeter of the structure is carefully covered with a plinth.
Whitewashing or lining of the stove is done after test firing.
Only after the whitewashed or tiled mini-oven is completely dry can it be used. In order for a mini stove for a summer house to please you for a long time, you should not rush to light it. Let it sit for a week or two with the doors open.
It is not recommended to use coal right away; you need to give the stove time for initial heating with the help of wood chips.
What materials will be needed for construction?
- red brick – 750 pcs.;
- fireclay clay;
- sand;
- felt or asbestos fiber for insulation;
- roofing felt on the bottom layer also for heat and waterproofing;
- fasteners;
- metal corner, sheet and steel wire;
- grate – 2 pcs.;
- doors for the combustion chamber and ash pan – 2 pcs.;
- damper – 1 pc.;
- valve – 1 pc.
... and tools:
- building level;
- spatulas;
- Master OK;
- drill with a mixer attachment for mixing the solution;
- buckets;
- sieve for sifting clay and sand.
Don’t forget about the tools: spatula, trowel, drill with mixer. Additionally, have buckets or tanks and a sieve on hand. To ensure the oven is level, use a level.