Every year, millions of people spend huge amounts of money to visit exotic places on the planet. You can recreate natural beauty in miniature by making a decorative indoor fountain with your own hands. The lively murmur of water has a beneficial effect on a person’s emotional state. Moreover, it is impossible to take your eyes off her.
The design not only gives the room a luxurious look, but also humidifies the air during the hot season. To create a decorative indoor fountain with your own hands, it is not necessary to purchase expensive installations. The main thing is to be patient, use your imagination, pick up the tools and create miracles. First, let's look inside the structure to understand how it works. Then we will get acquainted with the types of indoor fountains. And finally, let's look at step-by-step instructions for creating a natural miniature for your home.
The fountain is not only a decorative element. Since it wonderfully humidifies the air, it should not be installed near wooden furniture.
What do you need to prepare for work?
In order to make your own fountain from improvised materials, you need to prepare a number of basic components:
- A reservoir into which water will flow in the future.
- Waterproof glue.
- Decorative elements.
- Silicone pipes.
- Pump.
We must not forget about the selection of the main element - a special pump. It is impossible to say unequivocally which device is better to purchase, because everything is individual and depends on the wishes of a particular person. The required pump power varies depending on the desired height of water lift. A universal option is a high-power pump with a regulator. To do this, you can use an aquarium pump to filter the water.
Electric pump
A simple pump with a 12-volt electric motor can lift water to a height of about 2 meters. An electric pump is manufactured as follows.
purchase an electric windshield washer motor from a VAZ car;
remove the cover from the washer and unsolder a couple of contacts from the electric motor;
- Next, you should solder the wires to the motor contacts and bring them out through the cover;
- apply sealant to the connection point of the cover and fit it tightly onto the engine;
- seal well the holes through which the wires exit;
- remove the remaining sealant from the pump body and cover and place a silicone tube on its nozzle.
The pump is ready for use. All that remains is to connect the electric water pump to a 12 V power source.
Advice! For these purposes, you can use a power supply from a television antenna with a regulator. The latter will allow you to regulate engine speed and, accordingly, water pressure.
Assembly method
At the very beginning, of course, you need to prepare the tank. To avoid problems in the future, it should be quite roomy. It is advisable to try to leave extra space that can be decorated in the future. This is much better than wiping the water off the table and throwing away the unsuccessful product. The depth of the reservoir must be sufficient to completely submerge the pump in water. A good material for making a homemade fountain is to use two ceramic pots as a base.
To do this you need:
- Prepare 2 ceramic pots and 5 trays. In the center of the large and small pallets you need to drill a hole for the pipes, and then cover all the items with waterproof varnish. You can also make several cuts along the edges of the pallets, which will ensure beautiful drainage of water.
- Install a pump at the bottom of the created tank and cover it with a pot, then pull the tubes out through the hole.
- Nearby you need to install a slightly smaller pot, on which another tray will find its place.
- The next tier is 2 more pallets, which will be arranged in decreasing order. It is important that the holes in the trays are positioned correctly and allow water to flow from one to the other.
- After assembling the main structure, you can safely decorate the fountain with various stones and shells.
Features of operating a water pump
Instructions for assembly and use are included with each unit, but it is important to take into account all its points. This will ensure an error-free installation
The inner cavity has a built-in motor with a 2-voltage switch. Before starting, it is worth checking whether it is positioned correctly.
How to use the water pump:
- Remove the cover from the exhaust pipe.
- Pour oil into it. The level is checked through a special window. It should pour to the center. Afterwards, close the pipe with a lid.
- It is necessary to pump out the air. To do this, remove the cover along with a quarter of the fitting.
- The pump is started for 15 seconds, and the cap is placed on the thread.
For high-quality operation, the pump must have a sufficient oil level, which must be checked regularly. Fuel is added as needed, without exceeding the permissible level.
Pros and cons of creating
A decorative fountain is primarily an element designed to decorate the surrounding space. It has several key advantages:
- Bright and elegant appearance. The fountain will transform and refresh any design, perhaps becoming its main element.
- The fountain will do an excellent job as a source of coolness and will be able to maintain fresh air in any place where you install it.
- Falling water is a very beautiful action. The sight of a seething stream or streams of water rushing down promotes relaxation and helps to distract from bad thoughts. Additionally, the sounds of water allow you to achieve harmony and unity with nature.
- If you choose the right location, a fountain can help give your area a complete look. Such structures can help hide unattractive objects, for example, utility rooms.
But artificial fountains also have certain disadvantages:
- The need for special care and periodic monitoring. This structure must be cleaned regularly to prevent debris from clogging the pump. It is also necessary to monitor the serviceability of the equipment and promptly resolve any problems that arise.
- Given that the pump requires electrical power to operate, the fountain will incur certain costs to operate, which can be particularly high if the installation will be in operation for a long time.
Equipment required for the construction of a hydraulic structure
It is important to know! A plastic container, which you can buy in a store, can provide reliable waterproofing. This product will serve for a long time
This product will serve for a long time.
Water pumps
Only after connecting it will you be able to ensure continuous movement of water flow.
The pump is also called the “heart” of the entire system. With its help, from the bowl, through the pipes (read about equipment for soldering polypropylene here), water under high pressure flows to the nozzle.
For these purposes, underwater and surface pumps are used. Most often, submersible pumps are preferred.
They are compact and easy to install.
The main condition when installing such equipment is its location on an elevation.
This must be done to prevent bottom silt deposits from getting into the mechanism.
Surface pumps are installed on land.
The water in them should circulate only through a filter, similar to how it is done in an automatic watering system for indoor plants (read this article).
Advantages of this approach:
- reliability and long service life of the unit,
- ease of maintenance.
If you want a high flow of water, you need to buy a powerful pump.
A very important part of the entire mechanism is the filter. Since the liquid from the reservoir to the pump may not be of ideal quality, without filtering it, the pump will quickly fail.
Since the liquid from the reservoir to the pump may not be of ideal quality, without filtering it, the pump will quickly fail.
You can give a building a more attractive look with the help of lighting.
Various nozzles will help you achieve any type of water jet.
Pressure receiver tank
By installing it, you can maintain water pressure at a constant level.
This will ensure stable operation of the system as a whole.
If for some reason you do not have the opportunity to connect to electricity, the fountain can be made without a pump.
In this case, it will work due to the pressure difference of the liquid substance.
“Sluggish” streams will be pushed out and they will not be able to splash over a long distance. This option is best suited for stream type fountains.
Shapes and sizes
Although the fountain can have any size and shape, when choosing them it is recommended to use common sense and remember that it will be somewhat more difficult to care for an installation with a more intricate shape and large dimensions.
The bowl of the fountain can have a symmetrical or non-standard asymmetrical shape. For example, it can be made in the form of an oval, square, circle, triangle, as well as any other geometric shapes, including those that follow the contours of the silhouette of an animal or a person.
Also, fountains can be complex multi-level or made of several interconnected containers. In this case, each element can be equipped with its own nozzle, being an integral part of a more complex installation.
Fountains and fountain installations
Fountains are designed to give a pond on a plot of land an unusual appearance or a babbling sound. There are no rules for their choice. But it should be taken into account that the height of the jet in the fountain should not exceed the radius of the reservoir itself. Otherwise, when the wind blows, the drops will fly outside the fountain, forming puddles. The height of the jet rise is determined by the pressure created by the fountain pump. There are models where this parameter is regulated by a switch or remote control.
There are two main groups of water-emitting systems:
- fountains where water plays a dominant role;
- sculptural groups, the main importance is artistic design.
In most cases, fountains are submersible. They consist of a pump with a vertical pipe and special nozzles that give the stream unusual shapes. There are many types of attachments, some create a water figure in the form of a “lily”, others - a “volcano”, “geyser”.
Some nozzles are installed above water, others under water, and some require strictly defined parameters for installation.
A type of submersible fountains are floating. A pump is installed at the bottom of the reservoir, the nozzle is mounted on a float, and water is supplied through a flexible hose. Due to gusts of wind, the upper part of the structure moves throughout the reservoir, so the fountain constantly changes its location.
A type of such fountains are wall-mounted. When installing them, the walls of houses, fences and gazebos are used, along which water flows into the bowls located below. In this case, a waterfall pump is used.
Stylistic design
Fountains used for decorative purposes can be made in a wide variety of styles. Whether a design belongs to one direction or another depends on various factors - appearance, shape and size, material of manufacture.
There are several design options applicable to decorative fountains:
- Classic option. The installation can be made in the form of an asymmetrical bowl made of ceramic, plaster or stone with a stream of water falling in the shape of a bell or jet.
- Fountain in English style. In such designs, the bowl has a non-standard shape and is necessarily supplemented with stucco.
- The design is in the form of a sculpture with gilding or decorated with bronze elements, made according to all the rules of such colorful styles as Baroque or Rococo.
- Installation in eco-style. This fountain is made in the form of a natural waterfall, giving it the most natural look. An installation that is a container buried in the ground complete with a nozzle disguised with stones, associated with a rock from which streams of water fall down, can best cope with this role.
- Country style fountain. A structure made from an ordinary wooden barrel or cart will be an excellent decoration for a personal garden.
- As part of the Provence style, you can use romantic sculptures made in the form of angels or sophisticated girls. Moreover, the sculpture can be specially made slightly flaky or cracked, which will give it a special flavor.
How to arrange
Statues and figurines always remain classics of the genre. Modeling enthusiasts with artistic talent will enjoy working on masking the pump. The material for the manufacture of monumental figures is polymer concrete - artificial stone. It retains the strength of its forms even in bitter frosts.
Modeling and statues are traditional decorative elements
In a large area, even a car can be disposed of. Let currents of living water pass through it and give strength to the green shoots around, and let the neighbors stop to take a selfie against such an unusual background.
Even an old car can come in handy
A still life like this will be more appetizing. Antique samovars, teapots and cups will be used, and the pump tube will be hidden in the leg of the tea table. The abundance pouring out onto the earth will be a symbol of the endless hospitality of the owner of the dacha.
Fountain-still life - an original composition in the recreation area
Imitating a natural source will always be appropriate among lovers of natural farming. To decorate the fountain, only the stone that is under your feet is taken. Naturalness is ensured by this technique one hundred percent.
Natural stone is one of the popular materials used in landscape design
An excellent illustration of the fact that it is not necessary to engage in excavation work to arrange a fountain. A geometrically adjusted stone slab becomes an obstacle to the source supposedly gushing from the depths and, unable to withstand its power, lets it upward.
An ordinary stone slab can be installed among plants on large pebbles
The fountain in the Art Nouveau style is modern and minimalistic with its right angles. The emphasis of the structure is given by successful lighting in the place where the water flow falls. Bulbs for underwater “chandeliers” are purchased exclusively from LEDs and are completely protected from moisture getting inside.
Successful backlighting will make the entire composition more lively
You can even imitate the miracle of levitation. To create the illusion of a water tap floating above the ground, simply veil the pump hose in a transparent plastic tube. The water flows into the tap, turns around and falls down.
By skillfully decorating tubes and wires, you can create an unusual composition
In this version, it is as if an invisible gardener is watering the flowers in the flowerbed. If the tube is thin enough, it will not be visible from a distance. For such a fountain, any used dishes are taken. Here a bowl was added to the teapot.
An old kettle and a rusty bowl were put to good use
From these bottles will flow continuous fun. With such an original fountain, there is no shame in inviting friends to a barbecue. And let alcohol remain at the celebration of life only in this form - in the form of cooling water.
An original fountain, next to which you can sit with friends
There is nothing easier than placing an old musical instrument in a bathtub filled with water. A child's rubber duck quietly sways on the waves of pouring “music.” Such an installation would be the envy of the best museums in the world. If desired, the structure is removed and the bath is used for its intended purpose. The multifunctionality of the tank is another feature of the presented masterpiece.
The structure is easy to assemble and disassemble
Installation location
In order for a decorative fountain to successfully cope with its role, it is necessary to correctly approach the location of its placement.
- It is advisable to choose a prominent place for the fountain so that it is clearly visible from all sides, otherwise such an installation will lose all decorative meaning.
- It is recommended to choose an elevated location for the fountain, otherwise water will accumulate and stagnate in the bowl.
- Try to install the fountain in an area where it will be protected from direct sunlight, which can cause flowering and the associated green tint and unpleasant odor.
- Don't place the fountain too close to trees if you don't want their leaves to fall into the bowl and clog the pump.
How to choose a place
You need to carefully choose a site for a homemade fountain. In particular, the choice of location depends not only on the structure itself, but also on the nuances of the landscape area and aesthetic details.
To place, for example, decorative cascades in a dacha, it would be best to do this on a natural or artificially created break in the relief, which will coincide with the direction of the water flow.
A pressure fountain is suitable for a flat open space on the site. And a waterfall can add dynamics to the landscape, emphasizing the beauty of the area. A fountain for an apartment can be placed in any corner of the room, the main thing is that it does not interfere with movement.
DIY decorative fountain
It is not necessary to pay money to a craftsman to make an original decorative fountain. Any owner can handle this task independently.
Materials and tools
And first of all, you need to prepare the tools, materials and devices necessary for the work:
- container that you will use as a bowl. This could be an old barrel or a bathtub. The main thing is that the product is strong enough without damage to withstand the volume of water;
- a pipe or a sufficiently strong and dense hose for supplying water;
- pumping unit;
- materials for waterproofing;
- filter;
- nozzle;
- shovel.
Manufacturing process
Once you have everything you need prepared, you can proceed to making a decorative fountain:
- The process begins with digging a pit, which must correspond to the size of the selected container.
- The bottom of the pit must be filled with sand in a layer of 10-15 cm, and then thoroughly compacted.
- Place the bowl in the prepared recess so that its edges protrude 2-3 cm above ground level. Place waterproofing material on top of the container to prevent leakage.
- Now you need to install pumping equipment, a filter for water purification and a nozzle to obtain a jet of the required pressure and shape.
- Remove the wire from the water and connect the installation to the electrical network.
- Turn on the equipment and check the fountain in operation. All errors identified at this stage must be corrected immediately.
The fountain you make will last longer if you regularly check the condition of the devices and promptly eliminate any malfunctions that arise, as well as clean the bowl of any debris that gets into it.
A decorative fountain can become one of the main elements of your site and change its design for the better. You just need to approach its production correctly. With a little imagination and using unnecessary materials, you can certainly create a creation with your own hands that will look no worse than products made by professional craftsmen.
While landscaping their backyards, some owners at some point realize that there is not enough fountain on their property. You shouldn’t give up on this idea if you have everything planned out long ago and there is no extra space left. After all, it doesn’t have to be a large structure. Even in small areas you can find a place to arrange a compact decorative fountain, which will give you coolness and become a wonderful relaxation area.
If you decide to create it yourself, then you need to thoroughly prepare for this work. And first of all, you must understand what type of installation this installation should have, what material it should be made of, and how water should flow in it. These and many other factors will determine whether you will be satisfied with the end result.
If this is your first time making your own fountain at your dacha, then you should not build a complex configuration installation. This will not only require more time, money and effort from you to create it, but will also create certain difficulties for you in the future during care. It is best to build a small fountain of a standard shape, which can be made from the most common materials and which will not be more difficult to care for than any other object on your site.
Purpose of the pump and method of use
A pump is a device that allows you to cycle water through an established circuit. The equipment is often used in decorative hydraulic structures and in summer cottages and country estates.
The principle of operation of the mechanism is that the device creates positive pressure, pushing out water with a certain force. The power level corresponds to the height of the ejected jet.
- A pump in an artificially created reservoir generates hydraulic pressure that ensures water flow in a given direction.
- Pumping equipment creates the effect of a stream or waterfall - a filtration pump equipped with one or more pipes for connecting hoses.
- To operate in open reservoirs, filtration pumps are equipped with a suction pipe to which a strainer or skimmer is connected.
- In the line of equipment you can find an option of any power. Their main design feature is the pressure pipe located on the side.
- To form one upward-directed jet or a whole group, the pressure pipe of the pump unit is installed at the top.
- The pump for forming a fountain in a small artificial reservoir is complemented by several nozzles for supplying water in different formats.
- Pumping units for arranging fountains are selected so that the height of the “water column” is equal to or greater than the minimum distance from the edge of the shore.
- It should be taken into account that the height of the fountain will be less than the maximum pressure value specified in the technical specifications.
Popular articles Using amphoras in landscape design
Country-type pumps are distinguished by priority mobility for seasonal use. The unit is convenient in that its operation does not require any additional extensions or communications. It copes well with pumping water without the need to connect a water supply.
Before installing a water supply system, it is recommended to calculate everything correctly.
The table shows the main characteristics of popular devices and the power ratio. Prices range from 3 to 58 thousand rubles (+)
When choosing equipment, first of all, it is necessary to compare the power of the device with the size of the bowl of the artificial reservoir. In most cases, the height of the fountain jet collected through such a system should not exceed a third of the width of the reservoir itself.
Naturally, the flow power depends mainly on the size of the tank. In order to achieve a height of 1.2 m, it is necessary to pump approximately 800 liters through the pump system. at one o'clock. This is a fairly small amount compared to other devices that push water about 2 m high and pump about 3000 liters. at one o'clock.
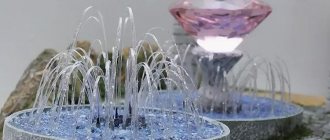
Let's create a decorative indoor fountain with our own hands for the joy of the whole family
Every year, millions of people spend huge amounts of money to visit exotic places on the planet. You can recreate natural beauty in miniature by making a decorative indoor fountain with your own hands. The lively murmur of water has a beneficial effect on a person’s emotional state. Moreover, it is impossible to take your eyes off her.
The design not only gives the room a luxurious look, but also humidifies the air during the hot season. To create a decorative indoor fountain with your own hands, it is not necessary to purchase expensive installations. The main thing is to be patient, use your imagination, pick up the tools and create miracles. First, let's look inside the structure to understand how it works. Then we will get acquainted with the types of indoor fountains. And finally, let's look at step-by-step instructions for creating a natural miniature for your home.
The fountain is not only a decorative element. Since it wonderfully humidifies the air, it should not be installed near wooden furniture.
Pump equipment
To operate a fountain on a site, water pressure is required, created by a natural drop or using pumps. Modern equipment is small in size and quite economical, so they usually use general-purpose pumps or specialized types designed for installation in garden fountains to circulate liquid.
It is possible to use submersible and surface pumps, each of which optimally suits certain conditions.
A modern view of the problem has led to the emergence of complete equipment for the manufacture of a floating fountain, in which a compact pump is combined with solar panels that provide it with electricity for operation.
This option is ideal in the question of how to make a mini-fountain with your own hands on a summer cottage or personal plot, eliminating a lot of the hassle and costs associated with installing a stationary system.
It is somewhat more difficult to use a submersible system to build a cascade fountain made of stone with your own hands due to the fact that it does not always need a bowl, and the intake of recycled water can be organized in a miniature disguised container.
An outdoor pump eliminates the requirements for the depth of the reservoir and does not require electricity to be supplied to it. It can power both garden fountains with high water pressure and cascade ones, in which the dominant criterion is a significant flow rate of liquid at minimal pressure. For an example of how a solar-powered fountain works, watch this video:
However, such equipment has its own disadvantages:
- the external pump must be installed out of sight, providing some way to disguise it;
- a significant distance from the points of water intake and water supply negatively affects the efficiency of a self-made fountain and may require calculation of the pressure created;
- for the same reason, the length of the supply and discharge lines increases, which increases the cost and labor costs;
- the noise produced by the unit is not damped by a layer of water, leading to the need to soundproof the unit.
Why does water flow
“All rivers flow into the sea, but it does not overflow.” This is what it says in the most ancient book of humanity. We see confirmation of these words every day when snow or rain falls from the sky to the ground. The Great Designer launched the water cycle in nature. Imitating him, experienced craftsmen created with their own hands a decorative indoor fountain that pleases the heart all year round. How does this system work?
Schemes and drawings
To create the design there will be the necessary drawings.
Small fountain
You will need a container to collect water and a pump. Various decorative details, such as stone slabs, are put on the tube coming from the pump. A hole is drilled in the center of each stone and strung onto a pipe in decreasing order, forming a pyramid.
To prevent water from leaving the container, a drainage system is provided. A pipe is inserted into the container, the free end of which is taken to a suitable place.
Fountain installation diagram:
- Dig a hole into which a large flower pot without holes is placed.
- Bricks are placed on the side walls. They will give stability and strength.
- A pump with a pipe is fixed between the bricks.
- Fill the container with water.
- Holes are drilled in the center of the prepared tiles and placed on the pipe.
- The free surface is covered with pebbles.
Indoor and tabletop
Small fountains have a low power pump. To make it you will need bamboo, which you buy at a flower shop:
- Bamboo up to 72 cm long is cut into three unequal parts. An oblique cut is made on one side of each part.
- Place a pump in the container, put on the largest piece of bamboo, and attach the other two pieces to it.
- The container is decorated with sprigs of growing bamboo.
- The surface is filled with pebbles, water is poured in and the pump is turned on.
Pebble
The work involves performing simple sequential actions:
- a container is placed in the depression made;
- a pump with a pipe is fixed in the center of the container;
- the bowl is covered with a metal grid;
- then install a mesh with small cells made of strong wire;
- Pebbles are laid on top of the mesh.
Near the wall
The water jet coming from the wall back into the bowl looks beautiful. In the center of the bowl there is a pump that pushes water through a pipe of various lengths to a given point.
Fountain-cascade
With this design option, water flows from one reservoir to another. The fountain is easy to make from any available materials. Buckets, watering cans, carts are suitable. The operating principle of this design is simple:
- the selected containers are attached to each other so that water flows freely from one container to another;
- below, under the containers, install the main, large bowl;
- a pump is mounted in the main tank;
- attach a hose to the pump that will pump water into the uppermost container.
Tiffany
The design is a combination of a fishtail (several pipes for the outlet of a stream of water) and a bell (one powerful pipe is installed in the center for the outlet of water). Thick jets fall in one or more directions.
Tulip
A powerful pump with a pipe nozzle is installed in the center of the bowl. At the upper end of the nozzle there are spherical disks. The water stream is applied at a slight angle, forming a flower shape at the top.
Ring
Install a strong pipe, bent in the form of a ring. Holes are made in the pipe at equal distances from each other. Guide nozzles are inserted into each hole.
Singing
A musical fountain will decorate any landscape. The design consists of a bowl, a music control system, a water filtration system and a jet height control.
From a bath or other available materials
You can choose any container for storing water; it is not necessary to line the foundation pit with film. The main thing is that the container is without damage, cracks or chips. An old bathtub, barrel, flower pot or basin is suitable.
The fountain from the bathroom is made according to the following scheme:
- a bathtub is installed in a dug hole, sealing the drain holes hermetically;
- Smooth, oval stones are placed at the bottom;
- fix the pump;
- fill the container with water.
How to create a decorative indoor fountain with your own hands: step-by-step instructions
Before you get started, you need to think about the size and location where the structure will be installed. For example, it is inappropriate to place a huge fountain in a small room. And, conversely, in a spacious room, a miniature structure may go unnoticed. The decorative fountain is installed on the floor, wall or table. Much depends on the overall design of the room and the number of household members.
Depending on the movement of water, fountains are:
- Cascade - liquid falls along decorative steps or ledges.
- Closed - water moves in flasks or flat containers attached to the wall.
- Fountaining - the stream is directed upward, after which it falls into a miniature pool.
There are backlit options in the form of wall paintings that create a unique atmosphere in the room.
When choosing a location for the structure, you should take small children and pets into account. The main thing is that the structure does not disturb anyone.
But how to make a fountain at home with your own hands to fill it with exquisite exoticism.
Of course, you first need to understand how the structure works, and then collect the necessary items:
- suitable container;
- aquarium pump;
- flexible hose;
- waterproof glue;
- decorative elements (expanded clay, shells of various sizes, colored soil, wood, ceramic products);
- backlight (optional).
A vessel of any shape is suitable as a main bowl. The main thing is that water does not leak out of it. The upper part of the pump for a small fountain is equipped with a sprinkler. Since the dimensions of the structure are very small, there is no need to put on the tip. Otherwise, water will flood the surrounding area of the room.
It is quite possible to construct a miniature pump yourself, since the unit has a relatively low power.
Let's start the creative process
Those “who despise the day of humble beginnings” never achieve success. Therefore, having collected the necessary tools and materials for the construction, the wise guys get down to business.
Let's consider a traditional master class on creating an indoor fountain with your own hands at home:
- A piece of about 10 cm is cut from a suitable hose (can be an aquarium hose). Its diameter should coincide with the tip of the pump.
- A pump is attached to the bottom of the tank using suction cups and connected to the tube.
- The resulting space is filled with expanded clay or stones, placing a tube between them.
- To give the fountain a presentable appearance, all elements of the device are carefully masked using all kinds of shells, pebbles or glass.
- Depending on the preferences and interior of the room, the design of the structure is carried out using various objects.
Fountain
The fountain pump can be connected directly to the nozzle. In this case, it is installed where the fountain is located. This is a good solution for small ponds. If the reservoir is large, then to simplify the maintenance of the pump, you can use a hose to connect the fountain nozzle, installed on a special stand in the pond, with a pump located near the shore (submersible) or on the shore (surface)
Please note: the pump must have a connection to which a hose can be connected. Small floating fountain pumps are also available
The fountain's jet pattern depends on the nozzle (most pumps can accommodate a variety of replacement nozzles). When choosing a place to install it, you should remember that:
- the nozzle should protrude slightly above the surface of the water;
- the maximum height of the fountain jet should be less than the distance from the fountain to the edges of the reservoir;
- yellow water lilies and white water lilies do not tolerate too much water movement, as well as irrigation of leaves and flowers.
Stylish exoticism in the interior of the bedroom
A small tabletop fountain can be made from a flower pot with a diameter of approximately 25 cm.
To work you will need:
- durable container;
- pump;
- translucent balls or pebbles;
- aquarium plants;
- paints for painting on ceramics or glass.
A flower pot is used for the base of the fountain. To give the structure a stylish look, the container is painted with special waterproof paints. To circulate the liquid, install a pump, make a hole and bring the tube up.
The bottom of the fountain is decorated with decorative balls, shells or pebbles. After filling the system with water, aquarium plants are placed inside. They give the design an exotic look and uniqueness. A simple design creation scheme opens up wide opportunities for beginning craftsmen.
Choosing a place for a fountain
The correct location of the fountain not only ensures maximum decorativeness of the structure, but also makes it easier to care for during operation. If the fountain is located in a completely open area, which is actively heated by the sun, the water will evaporate and bloom faster.
You cannot build a pond with a fountain next to trees and deciduous shrubs. Firstly, this will lead to damage to the pond bowl by the roots, and secondly, leaves, small twigs and other debris will get into the water. In such conditions, filters quickly become clogged and fail, and the water becomes cloudy and acquires a putrid odor.
Choosing a location for a fountain is of great importance
The fountain should be located on the leeward side and no closer than half a meter from buildings and garden furniture. Due to splashes and water spray, the surfaces will always be wet, which will lead to the development of fungus and the gradual destruction of materials. But you shouldn’t place the fountain too far from the house either. Electricity is required to connect the pump, and a cable that is too long causes additional inconvenience and expense. A backlit fountain looks very impressive, and for this it is also necessary that the energy source be at the optimal distance from the reservoir.
The illuminated fountain looks very impressive
And last but not least, the fountain must have a decorative background and be clearly visible from different corners of the site. It makes no sense to install such a structure if there is no opportunity to admire it and show it to guests. A decorative fountain should be located in a visible place
A decorative fountain should be located in a visible place
A stream gurgles in a fountain and without a pump
Perhaps only a few have seen natural geysers in all their glory. As you know, there are no pumps there and no electricity. But such a release of water causes unprecedented admiration. Of course, it is impossible to create such a phenomenon at home without electricity. However, there is a way out!
To build a miniature fountain without a pump, use:
- several containers;
- thin tubes;
- connecting adapters;
- sealant (if containers are made of plastic);
- decorative elements.
First of all, drill a small hole at the bottom of each bowl. Thin tubes are pulled through them, and then sealed with cold welding. The procedure will protect the system from fluid loss.
The container used for the base of the fountain must contain the entire volume of liquid used. Several holes are also made in it for the adapter and tubes connecting the higher vessels. Since the system operates without a pump, the lower bowl must be removable to return the liquid to its original position. The final touch is the decorative decoration. For this, artificial plants (vines), transparent balls, seashells, glass and pebbles are used.
Photo selection of indoor fountains
Practice shows that maintaining mini fountains is quite simple. To do this, you need to regulate the level of liquid in the system, since it tends to evaporate. It is important that the pump is always under water. Otherwise, there will come a time when the pleasant murmur stops and the device fails. Let the water flow like a spring for happiness in every home.
Sources:
https://www.asusfone.ru/svoimi-rukami/samodelnyj-komnatnyj-fontanchik-iz-podruchnyh-materialov https://sotka.guru/dachnye-sooruzheniya/izgotovlenie-dekorativnogo-fontana-dlya-doma-svoimi-rukami .html https://glav-dacha.ru/dekorativnyy-komnatnyy-fontan-svoimi-rukami/
Step-by-step example of micropump assembly
Making a water blower will not benefit the fountain owner. However, the self-assembly procedure will allow guests to demonstrate their knowledge of the structure of circulation pumps and skills in working with polymer materials. If a pump is needed to create a tall fountain or cascading waterfall on a site, it is made from a motor from a cordless screwdriver.
Housing design
The main part of the pump is its body. In factory models it is made in a curved, snail-shaped shape. This design allows for maximum efficiency of the unit. At home, the body is made from a plastic cover. Manufacturing sequence:
- A hole is made in the center of the part (on the flat part). Its diameter should be equal to the size of the motor axis. The hole is drilled with a screwdriver or pierced with an awl.
- A hole is cut out on the side of the cylindrical part, equal in diameter to the body of a ballpoint pen or felt-tip pen.
- The motor axis is inserted into the central hole, and the junction of the motor and the housing is sealed with superglue.
Please note! You can connect the parts with hot glue using a heating gun.
Making a paddle wheel
The impeller is assembled on a finished base - a gear. The latter is attached to the axis of the motor. Assembly order:
- Cut out 2 blades for the wheel from flat plastic. They are made from a plate with dimensions of 10 x 20 mm.
- The edges of the blades are bent at an angle of 30° in opposite directions.
- The blades are glued to a gear mounted on the engine axis. The blades are fixed at an angle of 90° relative to each other.
Assembling the injection area
The pressure zone is formed in the internal cavity of the lid. After assembling the impellers, the discharge area is sealed:
- Cut out a cover for the housing from thin plastic. It is made in diameter slightly larger than the size of the latter. A hole is drilled in the center of the lid for a ballpoint pen.
- Glue the end plate to the pump housing. During assembly, control the smooth rotation of the impeller. If the latter does not rotate or touches the lid, the edges of the blades are trimmed with a sharp knife or erased with fine-grained sandpaper.
- Suction and supply pipes are formed from plastic handles. The first is made in the form of a flat tube, which is inserted into the central hole of the injection area. One edge of the supply pipe is cut at an angle of 45 °. It is connected to the outlet of the pump housing.
Gluing all elements
Before assembling all parts, their surfaces are thoroughly cleaned of burrs that formed during the manufacturing process. In addition, it is necessary to remove the inscriptions and degrease each element. Otherwise, the structure will not be strong and may fall apart over time. During assembly, the parts are pre-fixed with electrical tape or tape. When the pump takes the desired shape, a thin layer of glue is applied to the joints. After the latter has dried, remove the auxiliary fasteners. Then the main layer of glue is applied.
DIY garden fountains: step-by-step instructions with photos, design
Popular articles Features of the loft style in landscape design
Connecting the power supply
To set the motor in motion, a DC supply voltage is supplied to it. You can use regular batteries or rechargeable batteries. However, such a power source discharges quickly and the elements have to be changed frequently. To connect the pump to a 220 V network, use an adapter. It can be purchased separately or made from an old phone charger. In the latter case, before manufacturing the power supply, check the compliance of the output voltage of the adapter and the motor.
A home-made pump is suitable exclusively for artificial small fountains located in separate bowls. However, a cheerful and playful stream will become a real manifestation of the owner’s talent in terms of assembling a pump with his own hands.
Fountain device
Creating a country fountain is not a difficult task that requires a lot of time and money. In most cases, owners decide to install fountains in their dacha. Of course, the cost situation will change if a large structure is built.
All structures are divided according to the method of construction into: closed and open. For construction, the type of structure is selected depending on the method of water supply. Closed ones use the same water, and open ones use new water. The first fountains are the simplest; they are not only easier to install, but also cheaper to maintain. Despite the closed system, you will have to periodically add water, since some part will pour out and evaporate.
A closed fountain is easier to install and cheaper to maintainSource sense-life.com
When arranging an open fountain, you will need to take into account the need to create a water supply system, maintain the required level and drain it. In some cases, the structure is also used for watering a garden or vegetable garden.
Fountain pumps
A pump is a necessary thing that allows you to “push” water in the desired direction. The easiest to use models are those equipped with built-in filters. This design allows the owner to free himself from the need to perform unnecessary actions. All you need to do is add water periodically.
A rich market allows the owner to purchase a pump of the required power, depending on the desired jet height. The type and nature of the jet can be modified thanks to interchangeable nozzles. The pump is powered from a 220 V network, and for warm regions, models that are charged using solar panels are suitable.
Pump power depends on the desired jet heightSource kanalizaciya1.ru
All such pumps are specially manufactured to work with liquids, so they are sealed. But owners often install additional equipment: an automatic device or an RCD, which are attached to the pump connection line
Such precautions will never be superfluous
Fountains without pumps
There are two ways to make a fountain without a pump, the first is an open type design. In this case, the main thing is to find a way to produce water under pressure. Pipes from a central water supply or from a well and borehole are well suited for this. Changing the shape of the jet is possible using tips. But in this case, you will have to consider a way to drain the water, for example, back to the well or use it for irrigation.
The second way is to install a container of water at a certain height, so that the liquid will flow through the pipe into the fountain below. To achieve a medium-sized jet, you need to raise the water tank at least three meters. But to supply water to the tank itself, you will also need a pump, but not a submersible one. This will save you money, since the cost of submersible pumps is high.
Fountain model without pump
What is a self-assembled fountain without a pump? The main elements are three plastic tanks of different volumes with a height of 40 cm and a diameter of 60 cm. In this case, the walls of the tank must be coated with acrylic varnish, and cobblestones should be placed on the bottom so that the tank is approximately half filled with them.
The walls of the container can be made green, then the illusion of a natural pond will be created. To decorate the plastic surface of the tank, you can use small containers with aquatic plants that are mounted on the walls.
Water circulation will be ensured according to the principle of communicating vessels, when liquid from a tank located above flows into a lower one. For small-sized fountains constructed by hand, three tanks are usually used, two of which will be on the same level, and the large one at the bottom.
Of course, a fountain without a pump does not mean that it is not possible to build one of a fairly large size. Many masterpieces of landscape art were created using precisely this technology, when pumps simply could not be used. However, there are a number of issues that still need to be addressed.
Therefore, if you need to build a large fountain in which the jets will hit high and under high pressure, you will still have to use an electric pump.
What types of fountains are there?
These structures are distinguished by their characteristic design features, dividing the types of fountains into:
The most popular is the open type, in which raised water is directed in jets or streams into a decorative bathtub. Water flowing through a garden fountain creates a wonderful visual effect, a calming murmur and a feeling of comfort. You can build a fountain with your own hands in a dacha of this type by simply organizing water circulation using the inlet and outlet pipes of the pump.
The “pedestrian” version looks more modern and original; the fountain design assumes the absence of a water surface and the collection of water through decorative panels or gratings installed at the site level.
By installing such a fountain in the yard, you can maintain the integrity of the layout, giving it an element of surprise and dynamics.
Sometimes garden fountains are divided into two more categories
The first include designs in which water flows out evenly, creating a stable pattern of jets or streams. You can make such a fountain at your dacha with your own hands without a pump in the form of a cascade or a simple stream washing a stone bed.
More often, such fountains are designed with pressure so that the water forms a three-dimensional pattern, giving not only the pleasure of contemplating it, but also freshness due to intense evaporation. A dynamic fountain in a summer cottage will require additional equipment that regulates the pressure according to a specific algorithm.
Making such a fountain for the garden with your own hands will require skill in setting up the electrical circuit of even the simplest automation, but the result will justify the effort invested.
Fountains without pumping systems
How to make a fountain without a pump and what is its advantage? First of all, it is worth knowing that not all types of devices with circulating water require a powerful pumping station. An oversized fountain with a dome or tiny mini waterfalls will be able to function without additional pressure created inside the pipeline. To install such a structure, you will need a clearly drawn up diagram. Negligence in such a matter is unacceptable. If important installation steps are not followed, the stream in a fountain without a pump will be weak, and the waterfall will not work at all. For the home, small installations are an ideal economical option for little money. In addition, a DIY fountain in a dacha plays more of a decorative role rather than being used for practical purposes. After determining the type of future system, you should take care of the location of the base of the fountain. Well-ventilated corners and shady sides are the best option for country houses. Natural inclinations and gravity will help you if the future fountain does not include a pump. Place the bowl at an angle, take a bold, unusual step - installing the structure asymmetrically, thereby ensuring the desired difference in the levels of the parts.
Decorating the finished device will be the last, but no less important stage in the construction of a decorative novelty in your garden or backyard.
Selecting fountain models without a pump
Is it possible to create a DIY fountain without a pump? If you want to make a smart, multifunctional decorative element at home, you can handle any task. A fountain for a home or cottage must meet certain technical characteristics and requirements.
- To create pressure for the flow of water, which is always done by a pump in a standard fountain design, three containers of different volumes (height, width) are used. Setting up such a system is quite simple, using tanks that are available in any country house or garage. So, you will be able to save costs on materials.
- Place the containers so that their levels do not coincide - the difference in height will allow the water flow to continue moving.
- The bottom of the tanks is covered with large stones, and the walls are treated with acrylic paint (natural green, to recreate the natural bottom of the reservoir).
- You can decorate the inside of the container as soon as the tanks are installed in the place designated by the diagram.
- Wall-mounted decorative plants can easily be attached along the flow of water (inside the tank).
- An artificial waterfall (liquid from the first tank passes to a lower level, into the second container) will decorate a lawn or rose garden.
- The best option for a small fountain without pumps is three reservoirs.
- Electricity is your faithful assistant if it is not possible to establish pressure in the fountain pipeline using a pump.
The principle of creating a fountain without a pump with your own hands. The diagram shows three containers (A, B and C), located one below the other and connected to each other by a system of tubes
For large, oversized structures, electrical elements are used in combination with parts of different heights. Such a fountain will be able to work conscientiously for many years without attracting unnecessary attention. Unpretentious devices do not require frequent cleaning or replacement of parts, which is their undoubted advantage.
Conclusions and useful video on the topic
The video provides information on how you can create a pump based on a micromotor with large dimensions:
Another option for making a low-power fountain pump:
There is nothing complicated about making a homemade fountain pump. The materials used for assembly are found in every home, and the technology itself is simple and understandable.
If you have experience making a fountain pump, please share the information with our readers. Leave comments and add photos of your homemade items in the form below.
How to make a decorative fountain yourself without a pump
Country houses have long ceased to be just an occasional, temporary refuge. Today these are beautiful, equipped homes with many decorative decorations. Convenient, practical, and inexpensive, decorative fountains offer all residents of a country house the necessary coolness in the summer and a beautiful, relaxed landscape at any other time of the year.
For the home, small installations are an ideal economical option for little money.
Fountain as part of the decor
You can arrange a fountain in the garden, in the backyard or even at home, on every piece of land convenient for you. There are no limits to your bold imagination when it comes to DIY decorative fountains. Finishing materials made from natural stones or artificial crushed stone, light or heavy - the cost of the future system depends only on your preferences. A full-fledged fountain consists of a pump, pipeline, nozzles, bowl and other small parts. These are the main elements that ensure the correct operation of a complex system. What to do if there is simply no way to complete the structure with all the details? There is no need to immediately give up and refuse a tempting idea. Craftsmen, people who know a lot about their craft, offer various options in which you do not need a pump or electricity. A handmade fountain will decorate a garden or pond in a short time , invariably delighting all residents of a country house for many years.
Fountain pump - manufacturing technology
A homemade pump for an indoor or portable fountain is made on the basis of a fan with lighting for the system unit. Operates from a 12 V DC network and is connected to a household network via a power supply. The portable fountain can be powered from a car battery.
Pump complete set
To make a fountain pump with your own hands you will need:
- computer fan;
- power supply 12 V, 350 mA;
- plastic container with lid;
- plastic bowl;
- aquarium hose;
- studs M3 and M4, nuts and washers for them;
- M3 screw;
- used gel pen;
- plexiglass S=1.5 mm;
- aluminum sheet S=0.2 mm;
- Janet syringe 150 ml.
Pump configuration - auxiliary elements
Step 1. The main element of the pump is the water pump. In order to cut out its parts as accurately as possible and center them during assembly, it is necessary to make templates. They are made of sheet aluminum, quantity - 2 templates of each type. The size of the templates is 50x50 mm, the holes in the bottom plate are Ø10 mm, in the top plate – Ø4.5 mm. The holes for Ø3 mm pins in the corners are made symmetrically, the distance from the edges of the plate to the center of the holes is 12 mm.
Templates for pump plates
Step 2. Plexiglas 1.5 mm thick is drilled with a Ø3 mm drill heated over a flame. Clamp a sheet of glass between two identical templates and secure it with a bolt and nut. Align the templates and drill a hole in the opposite corner. Secure with a second bolt through the resulting hole. Drill the remaining holes with a heated drill of the required diameter. The bottom plate is made in the same way.
Holes in plate
Step 3. The edges of the plates are cut according to the template using a heated stationery knife. If necessary, clean with fine sandpaper.
Making plates for the pump
Step 4. Using a template, make a hole in the lid of a plastic container - a water tank.
Holes in the cover
Step 5. A piece of rod for a gel pen 40-50 cm long is inserted into the central hole of the upper plate. It plays the role of a bearing and an oil seal at the same time.
Bearing in the top plate
Step 6. The pump body is made from a 150 ml Janet syringe. It must be cut to obtain a ring with a diameter of 40 mm and a height of 13 mm. For smooth cutting, use a device: a stationery knife blade is attached to a flat piece of board using two bolts and nuts at a height of 13 mm from the plane of the board. Heat the blade with a soldering iron and apply it to the syringe along the entire circumference. At risk, cut the syringe using a utility knife.
Syringe cutting device
Step 7. The gel pen core is cut at an angle using a knife. A hole is drilled in the body of the syringe according to the size of the cut.
Manufacturing of body parts
Step 8. Using a hot glue gun, connect the prepared parts.
Connection of body parts
Step 9. Blanks for making an impeller are cut out of sheet aluminum - 2 disks Ø38.5 mm and strips 6 mm wide. Holes Ø4.5 mm and Ø10 mm are made in the center of the circles.
Impeller blanks
Step 10. The strips for making blades are slightly bent and applied to the disks according to the diagram. The diagram shows four blades, but for greater efficiency it is recommended to make five or six.
Blade mounting diagram
Determine the length of the blades locally and cut them to size.
Manufacturing of blades
Step 11. The blades are installed on the lower disk and glued according to the diagram.
Gluing the blades
Super glue gel is used for gluing.
Glue for gluing blades
Step 12. Apply glue to the upper edges of the blades and place a plastic casing on top.
Applying glue to the blades
Place the upper disk on top, place the unit under the load and wait about half an hour. After the glue has dried, process the edges with a file to eliminate irregularities and burrs.
Impeller bonding
Step 13. Cut the M3 studs to size - they should be slightly longer than the height of the water container. Screw the nuts onto them and put on the washers.
Preparing the studs
Step 14. It is more convenient to assemble the knot upside down. Place a top plexiglass plate with a bearing made from a gel pen refill onto the studs. Secure with nuts and washers at a distance of about 60 mm from the edge of the studs.
Top plate attachment
Step 15. Install the impeller on top with the large hole facing up. An M3 screw is inserted into the small hole in the impeller and secured with a nut on the bearing side.
Impeller installation
Step 16. Apply silicone sealant to the lower end of the plastic housing, place it (the housing) on the impeller and press it tightly to the plate. After the sealant has set, check the rotation of the impeller - it should not touch the walls of the housing.
Fastening the pump body
Step 17. Apply sealant to the end of the plastic housing and install the bottom plate by threading the pins through the holes. Secure with nuts and washers.
Bottom Plate Attachment
Step 18. Connect the fan to the computer and check its functionality.
Checking the fan's functionality
Step 19. Cut off the fan blades with a sharp knife and clean the cut area.
Fan blades are cut off
Step 20. Cut out a square measuring 12x12 mm from plexiglass, drill a Ø3 mm hole in the center and insert an M3 screw. Fuse the screw with a soldering iron so that the head is flush with the plane of the plexiglass.
Shaft manufacturing
Step 21. Place the shaft on the fan and center it by rotating the fan by hand. Secure with a nut.
Shaft installation
Step 22. Secure the shaft with a hot glue gun. The glue is applied evenly to avoid wobbling during operation.
Shaft mounting
Step 23. After the glue has dried, check the operation of the fan and measure the rotation speed.
Checking the motor operation
Step 24. Place a piece of gel pen rod on the bolt and secure it with super glue.
Seal fastening
Step 25. The pump is attached to the container lid with studs. The impeller bolt with a nut screwed onto it is also threaded into the hole in the cover, the lock nut is tightened and a piece of a rod from a gel pen is attached to its free end with super glue.
Installing the cover
The rod from the handle, placed on the impeller bolt, is cut along the circumference. This is necessary so that water under pressure flows out of the rod into the container and not onto the lid.
Rod cutting
Step 26. To attach the fan, cut off 4 M4 studs.
Cutting M4 studs
Attach the fan to the standard holes to the studs, and the studs to the cover using nuts and washers. Connect the motor shaft and the pump shaft with a flexible aquarium hose. Place an aquarium hose 0.7-0.8 m long onto the rod extending from the pump body.
Pump assembly
Step 27. Conduct initial tests without water. Connect the fan to the computer's power supply and turn on the pump. Check for the absence of beating, strong noise, grinding, and monitor the rotation speed.
Initial pump tests
Step 28. Test with water. The pump is turned over into its operating position and placed on a container filled with water. The hose coming from the pump is raised as high as possible and secured. Turn on the pump and determine the height of the water column by the water level in the hose - it shows the capabilities of the pump. When using the elements specified in the specification, the height of the water column will be approximately 0.5 m.
Filling a container with water
Step 29. The second check is the performance of the pump; this parameter is important when using complex nozzles or constructing a waterfall. Productivity is measured as follows: turn on the pump and drain water from it into a separate container for a minute. Measure the volume of drained water in liters and multiply the result by 60. The resulting value will show the pump performance in liters per hour.
Checking the volume of water dispensed
Note! To use the pump in fountains with a waterfall, it is necessary to increase the volume of the container or ensure a continuous supply of water into it!
Step 30. The fountain bowl is made from any available container of a suitable size. Drill holes in it for the studs and fountain nozzle, as well as for draining the water back into the container. The nozzle and drain are equipped with seals made from scraps of a gel pen refill.
Making a bowl
Step 31. The studs are generously lubricated with transparent silicone sealant before fastening.
Applying sealant to studs
Place the bowl on them and secure them with nuts, also with sealant. A nozzle is made from the tip of a gel pen with the writing unit removed.
Bowl fastening
Step 32. Connect the hose from the pump to the nozzle, cutting off its excess. A drain hose is attached to the drain and lowered into the container. To avoid gurgling when draining, the lower end of the hose is equipped with a tee and the tubes are spread in different directions as close as possible to the walls of the container.
Drain tee
Step 33 Fill the container with water by pouring it through the bowl. Check the tightness of the bowl and drain system.
Filling the container
Use a syringe to pump out air bubbles from the pump.
Pumping out air bubbles
Step 34. Connect the motor to a 12 V and 350 mA power supply. Connect the red wire of the fan to the positive of the power supply, the black wire to the negative. The white signal wire is insulated.
Connecting the power supply
Step 35. Turn on the pump and check its performance. Pay attention to the absence of leaks, beating and extraneous sounds.
Checking the pump operation
Turn off the light and check the operation of the backlight.
Checking the operation of the pump illumination
The detailed manufacturing technology of such a pump is shown in the video.
Types of fountain without pump
Do it yourself
Making a fountain with your own hands is quite simple, the main thing is to show your imagination. A multi-tiered waterfall in the form of several terraces that will go down to the main body of water can be a very attractive and original solution. For this design you will need:
- Large main water tank;
- Purifier or filter;
- Supply pipe;
- Prepared terraces;
- Lower reservoir.
In this case, water will flow from the tube of the upper reservoir onto the steps of the terrace, along which it will sequentially run down. Since a pump is not installed in such a fountain, regular filling of the upper reservoir is required, the time of which depends on the volume. Basically, such a fountain is used for small alpine slides, when installing small fountains in rooms and on terraces, in small ponds.
Another option would be a small fountain made by yourself, the movement of water in which is provoked by the blades of a water mill. The movement of water jets occurs due to water hammer. However, filling the main tank still requires manual labor. This option is suitable for small home fountains that are easy to maintain.
Of course, the design of such a fountain is only suitable for small spaces, which are mainly installed at home or in accessible places for maintenance. They are not designed for long-term continuous operation and require periodic transfer of water from the lower reservoirs to the upper ones. However, many famous fountains of Peterhof have been operating for many years without a pump, only on the principle of communicating vessels.
In a summer cottage, such an effect can only be achieved if there is a nearby natural reservoir located above the level of the reservoir with a fountain. In this case, water will flow down through special tubes into the lower reservoir. The only drawback is the constant need to pump or divert water from the reservoir to the drainage system or for other needs.