Ornithopters have been of interest since ancient times, because this is how birds fly.
There are even drawings of an ornithopter made by Leonardo DeVinci.
To make a homemade ornithopter flywheel with your own hands, you will need the following consumables:
- Wood slats
- Plastic bag
- Banking rubber bands
- Threads
- Instant and rubber glue
- Paper clips or pieces of steel wire
In the picture below you can see drawings for making an ornithopter with your own hands.
For manufacturing, it is better to use linden or balsa; you can use carbon tubes or, as our Chinese comrades do, plastic rods. However, you can plan out the silt of any tree - birch, linden, etc.
The connection of the frame slats is made using a tongue-and-groove type and is wrapped with threads impregnated with glue.
The leading edges of the wings are also tied to the levers with threads, but before that a hole is made in them through which the lever spike is passed.
The bearing of the rubber motor shaft and levers can be made from wire insulation, or from parts of the rod from the handle; they are also wound with threads and the threads are impregnated with glue. A crankshaft similar to the one in the figure is bent from the wire, then a bead is put on it and it is inserted into the bearing, after which the hook is bent (see figure). The levers are bent and after they are inserted, their ends are bent.
The stabilizer tail is fastened from slats in the same way as the frame, after which wire is wound to it with threads and bent as in the photo.
A cut is made in the ornithopter frame into which the wire is inserted, after which it is wrapped with thread and glued.
Next, connecting rods are made, we make them from bamboo, it’s just convenient to break off thin sticks from it, we put tubes of wire insulation on their ends, we burn holes in the tubes, heat the wire over a candle and quickly pierce the tube with it. We make the tubes longer from the end where the stick is inserted; you will need this for adjustment.
We stretch two rubber bands between the hooks and twist the rubber motor, but not too much, and let go, the wings should begin to move, if their stroke is not the same, then bend the front crank.
Next, we lubricate the central rib and the edge slats with rubber glue, put our aircraft on the film and straighten it so that the film sags, but not much, we try to do it equally on both sides, otherwise it will fly in circles.
When using rubber cement, it is advisable to back everything up with small strips of tape.
We also make sure that the wings are identical.
Next we glue the stabilizer, preferably more tightly.
Be sure to let the glue dry and then launch!
If you don't quite understand the construction, watch the video below.
DIY ornithopter
Ornithopters have been of interest since ancient times, because this is how birds fly.
There are even drawings of an ornithopter made by Leonardo DeVinci.
To make a homemade ornithopter flywheel with your own hands, you will need the following consumables:
In the picture below you can see drawings for making an ornithopter with your own hands.
For manufacturing, it is better to use linden or balsa; you can use carbon tubes or, as our Chinese comrades do, plastic rods. However, you can plan out the silt of any tree - birch, linden, etc.
The connection of the frame slats is made using a tongue-and-groove type and is wrapped with threads impregnated with glue.
The leading edges of the wings are also tied to the levers with threads, but before that a hole is made in them through which the lever spike is passed.
The bearing of the rubber motor shaft and levers can be made from wire insulation, or from parts of the rod from the handle; they are also wound with threads and the threads are impregnated with glue. A crankshaft similar to the one in the figure is bent from the wire, then a bead is put on it and it is inserted into the bearing, after which the hook is bent (see figure). The levers are bent and after they are inserted, their ends are bent.
The stabilizer tail is fastened from slats in the same way as the frame, after which wire is wound to it with threads and bent as in the photo.
A cut is made in the ornithopter frame into which the wire is inserted, after which it is wrapped with thread and glued.
Next, connecting rods are made, we make them from bamboo, it’s just convenient to break off thin sticks from it, we put tubes of wire insulation on their ends, we burn holes in the tubes, heat the wire over a candle and quickly pierce the tube with it. We make the tubes longer from the end where the stick is inserted; you will need this for adjustment.
We stretch two rubber bands between the hooks and twist the rubber motor, but not too much, and let go, the wings should begin to move, if their stroke is not the same, then bend the front crank.
Next, we lubricate the central rib and the edge slats with rubber glue, put our aircraft on the film and straighten it so that the film sags, but not much, we try to do it equally on both sides, otherwise it will fly in circles.
When using rubber cement, it is advisable to back everything up with small strips of tape.
We also make sure that the wings are identical.
Next we glue the stabilizer, preferably more tightly.
Be sure to let the glue dry and then launch!
If you don't quite understand the construction, watch the video below.
From airplane to helicopter
However, the dream of flapping flight also has a practical side. The aerodynamic quality - the ratio of lift to drag, which determines flight efficiency - is exceptionally high in aircraft. But airplanes require expensive and complex airfields and large runways. Helicopters are more convenient in this sense; they take off and land vertically, without requiring any infrastructure. They are much more maneuverable and are even able to hover motionless. But the aerodynamic quality of helicopters is low, and an hour of their flight time is not cheap at all.
There are many attempts to cross one with the other - rotary-wing gyroplanes and tiltrotors have their fans. For solving some narrow tasks, these aircraft may even be indispensable. But still, such hybrids turn out to be not very successful: there is a well-known joke that they combine not so much the advantages as the key disadvantages of both airplanes and helicopters. But flywheels may be a suitable solution. Theoretically, they will be able to take off from a standstill, will be maneuverable up to the ability to hover in the air, and will be able to demonstrate almost aircraft-like aerodynamic quality.
But the first awkward balloonists thought, of course, not about airplanes, which did not exist yet, but about birds. It seemed that it was enough to learn to push off the air with wings - and the person would fly. With such views, of course, none of them were able to get off the ground. Winged mechanical devices made for clumsy gliding at best, as was done by the legendary Benedictine monk Aylmer, who jumped from the tower of Malmesbury Abbey in England about a thousand years ago, sustaining severe injuries.
How to set up an ornithopter
• If your bird is diving, bend its tail up; if it is pitching (raises its nose and falls), then lower it, on the contrary. Also, by changing the length of the connecting rods, we achieve greater stability and traction during flight.
• If everything is assembled correctly, this model gains altitude in a straight line, after which it slowly flaps its wings and then lands, slightly tucking its wings. The indoor model looks more like a dragonfly when it climbs, the flapping frequency reaches 20Hz. When assembling a larger model, the flight time, height and entertainment value of the flight increase, the frequency of swings decreases, but you need a more powerful and longer elastic band
However, flying on a rubber motor is not very exciting. Much more interesting is a radio-controlled ornithopter.
How to make an ornithopter with your own hands
This instructable is the story of how I made a prototype ornithopter.
For those who don't know, an ornithopter is a machine that flies by flapping its wings, just like a real bird. The idea was to build an ornithopter from scratch, control it remotely and, of course, make it fly.
From bird to insect
The reason for the numerous failures is clear: the very essence of flight in those years was represented rather vaguely. What gives birds lift is not the support of the air, but the special contour of the wing profile. By dividing the oncoming flow in two, it causes the air above the upper edge to move faster than above the lower edge. According to Bernoulli's law, pressure will be higher in an area with slower flow. The resulting difference between the pressure under the wing and above it creates lift. But once you start flapping your wings, this clear picture changes completely.
A well-known saying says that “according to the laws of aerodynamics, bumblebees cannot fly at all.” In principle, this is true: from the point of view of classical aerodynamics, insects and their wings are something surreal. Even in theory, they are unable to create the lift and thrust necessary for flight - unless we move from classical glider aerodynamics to new, unsteady ones. Here everything is different: turbulent turbulence, with which aircraft designers struggle tirelessly, becomes the key to flight for both the bumblebee and its relatives.
Large birds use flapping only occasionally - for example, when they need to slow down for landing or take off. This flapping plus the movement of the legs allows them to gain forward thrust for the wing's lift to come into play. Insects flap their wings constantly, and along a special trajectory, more likely back and forth than up and down. In combination with the flexibility of the wings and a sufficient frequency of flapping, this creates turbulent vortices at their leading edge, which are “dumped” from the edge of the wing at the top and bottom points. They create sufficient lift and thrust for the bumblebee to fly.
By changing the speed of the first and second phases of movement, the insect controls the direction of these forces, maneuvering in the air. And even the bristles, bumps and irregularities on the surface of the wing - unlike a streamlined airplane wing - work to form turbulent vortices.
Selecting the initial parameters of wingspan, weight and flapping frequency.
How often do birds usually flap their wings?
I searched the Internet for existing ornithopter designs and analyzed their sizes. Most ornithopters are made in line of a certain size. Hobbie ornithopters can be sorted by wingspan (from 660 to 3000 mm) and weight in flight. My ornithopter, with a wingspan of 1200-1400 mm, would be somewhere in the middle of this scale, not big, but not small either.
Knowing the approximate flapping frequency (5 to 7 Hz), I can design the flapping mechanism.
As a result, I selected the following parameters for the ornithopter:
Selecting a Swing Mechanism
The swinging mechanism is the most important part of the ornithopter. It converts electricity from the battery into flapping wing motion. Designing and assembling such a mechanism is quite a difficult task, since it must withstand enormous forces that change direction several times per second, and at the same time be extremely light and durable.
There are a large number of flapping mechanisms. Here are the most used ones.
Staggered Crank
The design of the crank is the most basic among swing mechanisms. The stepped shaft parts are at the required distance and angle to achieve a symmetrical swing. This is a commonly used design among hobbyists who assemble ornithopters from scrap materials.
Single Gear Crank
Although the single gear crank design looks simple, it is more complex than it appears. The center point where the connecting rod and wing hinges are connected to each other should expand and contract as the mechanism closes. Compression and expansion at very high frequencies can cause wear on the component.
Dual Gear Crank
This design has two gears that control the hinges of each wing separately. There are several transmission design options. The gear can drive both auxiliary gears. This way the secondary gears will rotate in the same direction as each other. In another design, the drive gear rotates a secondary gear, and that secondary gear rotates another secondary gear. The secondary gears will rotate counterclockwise towards each other. This design is much easier to implement and reduces wing misalignment.
Transverse Shaft
The transverse shaft design is another option for the crank mechanism. This design provides the most symmetrical swing possible. However, this is the heaviest and most complex design. The rotating gears and wings are not in the same plane, so the connecting rod must rotate. The connector rod has a ball bearing inside and this only adds weight to the component itself. The number of gears used in this design is more than in any other design. The cross shaft design is typically used for large ornithopters where the weight can be overcome by large wings.
I decided to go with a cross shaft design. The size of my ornithopter allows for the additional mass of the mechanism. In addition, such a design is easy to manufacture from sheet material, since the planes of the gears are parallel to the plane of the housing.
Theoretical implementation
Muscle-powered ornithopter
Edward Frost's ornithopter made of willow, silk and feathers, 1902.
According to various sources, the average maximum power a person can generate in the first 10 seconds is 1.85 liters. s., and with further operation for 1-2 minutes the power drops to 0.5 liters. With. The power required by the bird to fly is up to 0.02 liters. With. per kilogram of weight. Thus, a person is able to create a lifting force in the amount of (1.85 / 0.02) = 93 kg. However, the maximum power indicators can only be achieved by heavyweight athletes, whose weight exceeds the lifting force created, even without taking into account the weight of the aircraft. Theoretically, if a person weighing 75 kg were able to generate maximum power, he would be able to fly an ornithopter weighing 15 kg using only muscular traction, but such a flight would last no more than a few seconds.
As an option, the ideas of using spring, rubber, pneumatic and other batteries to accumulate energy generated by a person at moments of least load were also considered. The best results could be achieved by charging the battery before the flight begins. But in this case, such a device essentially becomes an ordinary engine with low efficiency. Similar batteries have found their use in small models of ornithopters. For example, one of the first free-flying models of unmanned ornithopters, created by Alphonse Penaud in 1872, uses a spin-on rubber as a motor.
Ornithopter glider
Due to the complexity of implementing a manned, motorless ornithopter as a self-sufficient aircraft, the idea of combining an ornithopter with a glider arose. The bottom line is that the device rises into the air with outside help (for example, towing, using a winch), and the propelling mechanism (wing flapping) is used to subsequently maintain the glider at a constant altitude during free flight. Such devices cannot be considered “real” ornithopters, since they are not capable of lifting off the ground on their own. The formula for calculating the power required to keep a glider in the air is as follows:
N = G ⋅ w 75 {\displaystyle N={\frac {G\cdot w}{75}}} , where
- G {\displaystyle G} — mass of the aircraft including the pilot, kg;
- w {\displaystyle w} — vehicle descent speed, m/sec.
| The information in this section is out of date. You can help the project by updating it and then removing this template. |
If we take the rate of descent equal to 0.45 m/sec and the power expended to be 0.6 hp. With. (even assuming 100% efficiency), then the weight of such a device together with the pilot should not exceed 100 kg. In this case, a person will not be able to maintain flight for a long time, since he also needs energy in order to control the glider itself.
Motorized ornithopter
| The information in this section is out of date. You can help the project by updating it and then removing this template. |
The construction of a manned motorized ornithopter should be an intermediate step on the way to a muscle-powered ornithopter, since this problem is solved in some ways easier - the designers are spared the intractable problem of a lack of human power. The main problem when building a motorized ornithopter comes down to the choice of motor to use.
A study of bird flight has shown that as a bird's size increases, the number of wing beats decreases. The approximate number of flapping strokes for a manned ornithopter would be approximately 50 flapping strokes per minute. Due to the need to transform rotational motion into translational motion and reduce high speeds, modern internal combustion engines are not the best suited for solving this problem. Even if you “remove” the internal combustion engine from the crankshaft, make it low-speed and transmit the translational movement of the pistons directly to the wing arms, then the problem of inertial forces that arise arises when trying to transfer the work of gas expansion during an explosion in a short period of time to move relatively large massive wings .
At the same time, for example, a steam engine, which allows you to regulate the speed and smoothness of the movement of the pistons, would be much better suited for transferring energy to flapping wings. The very task of building an ornithopter in this case comes down to designing the engine and its components (boiler with firebox, condenser, etc.) in accordance with the aerodynamics and kinematics of the aircraft.
Orthopter
The very idea of an ornithopter—a bird-winged aircraft—implies imitation of natural prototypes, birds and insects, both in the shape of wings and in their movements.
Orthopter "Grey Goose" 1927.
However, some inventors, in attempts to create a manned vehicle powered by muscular propulsion, came up with rather intricate solutions, such as louvered wings, trying to surpass the natural solution with a technical approach.
One of the most common types of non-bird-like flapping devices is the orthopter (English orthopter, from the ancient Greek ορθός - straight and πτερόν - wing; “straight-winged”) - an aircraft that uses a direct “blow” with the plane of the wing during flapping to obtain lift. down.
Ornithopter drawings
Let's start construction, we will focus on other people's experience.
Construction is very simple and does not require any scarce materials. Almost anyone can handle making a flywheel.
For this homemade product, the author needed the following materials: wooden skewers, large and small paper clips, a baking sleeve, super glue.
First of all, the author prepared pieces of the required sizes from skewers.
Then, using a knife, I divided a 22 cm long skewer lengthwise into two identical halves. The author will make wings from them.
Then he took a 13 cm stick and cut off one edge as shown in the photo below.
The 6 cm stick was also divided into two equal parts.
The second 22 cm stick will be the base, on it the author made a 12 cm mark and in this place glued one half of a 6 cm stick at an angle of 90 degrees.
I made a 5 cm mark on this small stick.
Next, he took a 13 cm stick and glued it as in the photo.
Then he turned the base over and glued the other half of the 6 cm stick.
Next, the author cut out strips from paper and wrapped them around a paper clip.
I glued the second edge of the strip.
I removed them from the paperclip and got these bushings, they will be needed for the movement of the wings.
Now the author took 2 small paper clips. Having aligned them, I bent them in this way.
Then I measured 1 cm from the straight edge of the paper clip and bent it 90 degrees.
Next, I measured 2 cm from this bend and bent it 90 degrees in the opposite direction.
Then I measured another 2 cm and cut off the excess. He performed the same operation with the second paper clip.
Next, the author took the previously prepared halves of sticks for the wings. And glued paper clips to them.
For greater strength, he wrapped the gluing areas with thread in two layers and soaked it with glue.
Ornithopter with rubber motor (10 pcs.)
- Price: $3.41
- Go to the store
Hi all! As part of the program to introduce children to science and technology (let's not forget adults too), 10 sets of ornithopters were purchased. They are also sold one piece at a time: for example, at first only one ornithopter was ordered on Ali with a price of $0.72 (search for “ornithopter”), after a couple of weeks an inexpensive set of 10 pieces was noticed and purchased.
100% brand new and high quality Colour:the Color is Sent by Random Size:32CM*41CM Note: Due to the difference between different monitors, the picture may not reflect the actual color of the item. Thank you!
Package includes: 10 Pieces
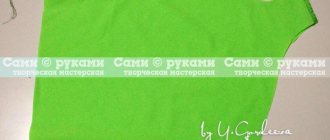
The parcel arrived surprisingly quickly - in 18 days - a black package inside of which, in a two-layer bubble wrap, was wrapped a package with assembled wings, and a package with tails, elastic bands and bamboo slats.
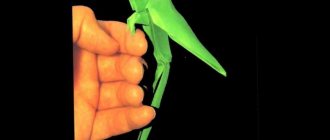
Assembling an ornithopter is not difficult. To fly, you need to connect the tail and wings into a single unit using a bamboo strip, and tighten a couple of rubber rings from the kit. It turns out to be a kind of “bird” that plans well.
By the way, the bamboo supports of a pair of wings, despite the packaging, turned out to be broken. With the help of glue and thin bamboo toothpicks, I think it will be easy to fix.
The flight does not last long - the rubber band unwinds up to 10 seconds. His task is to lift the “bird higher”; further, depending on the position of the wings, it plans. Unfortunately, it hasn’t been possible to shoot a video yet, there’s not enough space in the apartment, and it’s windy outside. Test runs in the apartment end with hitting the wall.
We plan to take a longer rack and rubber to increase the flight time.
Dimensions: Wing span - 41 cm. Bamboo slats length - 14 cm. Tail length - 16 cm. Rubber ring diameter - 4.5 cm.
I think that this toy will be interesting entertainment for children in the fresh air.
How to set up an ornithopter
• If your bird is diving, bend its tail up; if it is pitching (raises its nose and falls), then lower it, on the contrary. Also, by changing the length of the connecting rods, we achieve greater stability and traction during flight.
• If everything is assembled correctly, this model gains altitude in a straight line, after which it slowly flaps its wings and then lands, slightly tucking its wings. The indoor model looks more like a dragonfly when it climbs, the flapping frequency reaches 20Hz. When assembling a larger model, the flight time, height and entertainment value of the flight increase, the frequency of swings decreases, but you need a more powerful and longer elastic band