There are many instructions and blueprints on the internet for building, modding and hacking guitars of all kinds, I intend to demonstrate how you can achieve professional results when building your own electric guitar. I'm also going to tell you about the more difficult task of building a guitar neck from scratch, something that many builders avoid by rebuilding old ones or using "store bought" necks. And let's face it: if you play guitar, you know that the neck can make or break the instrument, so why not customize it to your liking.
I hope some of you will find some inspiration in this tutorial and try to make your own electric guitar.
WOOD
Type of wood
- I haven’t come across instruments made from any exotic breeds, so I will list the main, frequently used, and, importantly, quite affordable breeds:
- Maple and its varieties: Flamed Maple
- Laminated Maple
- Quilted Maple
- Burled Maple
- Birdseye is a very exotic and controversial variety of maple.
Maple is a very common material. You can make an entire guitar out of it.
- African Rosewood
Rosewood is a classic fretboard material. Very hard and heavy wood. Ebony is also sometimes used for fingerboards, but due to its high cost, I have rarely encountered it, and this species is not often used in workshops. The only thing I can say is that polished ebony can be confused with plastic (an absolutely smooth shiny surface).
This is a short list of wood species used. A somewhat separate topic is the production of acoustic soundboards, which use coniferous species, in particular spruce (Spruce).
Regarding the materials used in the manufacture of guitars, you can often hear something like the following: “The soundboard of a six-string is only made of alder or mahogany, the neck is made of maple... On bass guitars, mahogany is not used at all...”. In fact, there are no such categorical rules. In each specific case, the necessary material is selected based on the wishes and capabilities of the customer, as well as ensuring the best possible sound of the instrument. Nobody forbids making a guitar entirely from ebony, and, apparently, it will sound excellent. Only it will cost and weigh so much that it is unlikely to interest anyone. By the way, speaking of weight, the guitar should be heavy! Therefore, the use of light wood, in particular birch, is not recommended.
Wood preparation
For the production of guitars, as a rule, only the barrel is used, and not the whole thing, but its lower part. The felled tree must be dried. This is a very long and responsible process. The logs are filled with a compound on the saw cuts (to prevent moisture from “leakage” through the vessels) and placed in a dry, ventilated room. The drying process takes several years. For very expensive custom guitars, they use wood that has been aged under special conditions for 60 (!) years. Unfortunately, this is not a joke. Only after such a period can you be sure that the wood will definitely not go anywhere. Musical wood production is most often a family affair.
Industrial drying methods using special ovens, although they allow wood to dry in several months, are only suitable for building materials, as they destroy the structure of the wood. And this is unacceptable for musical instruments.
The bars used to make guitars must not have knots or cracks, and the wood fibers must be positioned strictly longitudinally to the cut.
To summarize: If you have decided to make yourself a guitar, then know that wood from the building materials base is not at all suitable for you. The most realistic way to find “musical” wood is directly from craftsmen who make or repair instruments (not necessarily guitars—all kinds of conservatories certainly have such craftsmen).
From my own experience I will say: you can find the right tree, but the required size is very, very difficult. Therefore, reworking finished tools (even major ones) in this case is more preferable.
Wood processing
Guitar making uses the same principles and tools as any other woodworking process. Therefore, within the framework of this article, I will not dwell in detail on cutters, drills and other files. We can only say that accuracy in this matter is simply necessary, since flaws and inaccuracies will not only have a bad effect on the appearance of the instrument, but can “kill” the sound of the guitar.
How to make an electric guitar left-handed
Many left-handers are naturally concerned with the question of how to properly make an electric guitar left-handed. To do this, you will need to remove all the strings from the instrument and turn it over. It is also optimal if you purchase a new string nut.
All that is necessary is to insert a new one in place of the glued threshold. This must be done in such a way that the hole for the sixth string is in place of the first, and the first in place of the sixth. The remaining strings must be tensioned in a mirror order. That's all.
In this article, we looked at only one idea on how to make an electric guitar yourself. There are others. Therefore, have patience and confidence in your abilities and dare - create. This hand-made electric guitar will become a source of pride for you.
Setting up a pickup for an electric guitar
There is no need to panic if the sound of the guitar is somehow different: sluggish, muddy, some frequency sounds are too pronounced. To improve the sound of an electric guitar, you need to adjust the pickup. After all, the direct purpose of the device is to produce pure and unique sound.
Tuning begins with adjusting the height of the pickups on the electric guitar. This is done using two bolts located at the top and bottom of the sensor.
On a note! Tightening the bolts increases the distance between the strings and the device, and loosening, on the contrary, reduces the gap.
If the desired result is not obtained, it is time to adjust the cores. Cores are the metal rods in the fixture. There is one thing - not all factory devices require adjustment of the cores. Determining whether the rods can be adjusted is not difficult. If the device has slots for a screwdriver or hexagon, the cores can be raised or lowered.
The main thing is to carry out the setup carefully. The cores cannot be raised or lowered more than one millimeter at a time. You also shouldn't be afraid to experiment with the settings. But you shouldn’t be too zealous - everything should be in moderation.
Types of pickups for electric guitar
Sound devices for electric guitars are divided into:
- Active. With their help, noise and interference are reduced, and the output level is increased.
- Passive. The sound from such a device is dynamic and natural. The device does not require an additional power source.
What you need to know when choosing a passive device:
- what position - bridge, neck or middle;
- what kind of magnet is installed;
- maximum output voltage;
- what level of noise reduction;
- what instruments is it intended for?
According to the method of operation, pickups are divided into:
- Electromagnetic. When the string vibrates, the magnetic field changes and the sound is removed.
- Piezoelectric. Suitable for all types of instruments. Such devices are microphones. The device converts sound when the string-body system vibrates.
- Optical. Didn't gain much popularity. They work on the principle of reflecting light from a string.
Magnetic devices are divided into:
- Single - a device with one coil. A classic device that produces the purest sound.
- A humbucker is two single coils connected to each other in opposite phases. This approach reduces noise. But high frequencies sound unnatural.
- Hamkenseller - the design consists of two coils. They are located one on top of the other. Eliminate noise and interference, while the timbre and output signal change slightly.
Piezoelectric devices are divided into built-in and removable.
MATHEMATICS
In this chapter, I will list some quantities that you need to know when making a tool. I want to immediately warn you: If you do not have experience in making guitars, or it is not great, then refrain from calculating the instrument yourself! The best solution, in this case, would be to take a ready-made tool (preferably a branded one) and carefully and accurately measure it. Don't try to create an exact copy. The beauty of making it yourself is the ability to vary certain values “to suit yourself.” If you have very little experience, then it would be best to first make a “bloodless transplant”, that is, make, say, a new soundboard for your old guitar. Having rearranged the neck and all the spare parts to your creation, you can evaluate your level, and if it is not yet high, return everything to its “homeland” and start making a new neck. In the end, you will succeed.
The most frequently asked question is the size of the scale, and as a result, the markings of the fingerboard. Let's start with this.
The following values are considered standard scale values for guitars:
- Bass – 34″ (863.6 mm)
- Electric guitar – 27″ (685.8 mm) [sometimes called a “baritone”]
- Electric Guitar – 25.5″ (647.7 mm) [sometimes called a “tenor”]
Let's look at what a “standard value” is. What prevents us from increasing our scale? There are several reasons:
- The strings may not be long enough
- It is impossible to make a high-quality long bar
- The distance between the fret walls, especially in the first position, will be so large that it simply won’t be possible to play.
It is impossible to shorten the scale length for the following reasons:
- The tuned strings will be very loosely tensioned and, simply put, will dangle
- The distance between the fret baffles in the upper positions will be so small that they will “merge”
Based on all of the above, let me summarize: the permissible deviation of the scale length from the “standard” is a maximum of ±10%.
So, we have decided on the scale. The crucial moment comes: marking the neck for the frets. I don’t know why, but many masters make a secret out of this, they say these are “family secrets”, “extremely difficult”, etc. and so on. I speak with full responsibility - do not believe them! Now I will give a number with which you can mark any fingerboard with any scale length.
This number is the twelfth root of two. It is impossible to calculate the value exactly, and it is not necessary; to a sufficient approximation it will be 1.05946. What are these numbers and how are they used? Very simple. We take the value of our scale and divide by this number. The result is the distance from the machine (!) to the first fret. We remember this number, subtract it from the scale and get the distance from the nut to the first fret. Next, we divide the result of the first division by our number again, and then subtract the resulting value from the scale. The result is the distance from the nut to the second fret. And so on. If you want, count at least to the 36th fret (by the way, I saw a bass with a three-octave neck). Yes, the calculation is carried out not from fret to fret, but from fret to fret. WHEN MARKING THE NEEDLE, YOU NEED TO FOLLOW THE SAME SYSTEM TO AVOID THE ACCUMULATION OF ERROR! That is, the 24th fret will be measured not from the 23rd, but from the zero!
Example: Mark the neck of a bass guitar with a scale length of 863.6 mm.
1a. 863.6mm/1.05964=814.993 - distance from the machine to the first fret 1b. 863.6mm-814.993=48.606 - the distance from the zero fret to the first 2a. 814.993/1.05964=769.122 - distance from the machine to the 2nd fret 2b. 863.6mm-769.122mm=94.478 - distance from the zero fret to the second
And so on. When making calculations, it is permissible to round the result to thousandths and sometimes hundredths of a millimeter. You can check the correctness of your actions very simply - the twelfth fret divides the scale exactly in half, and the 24th fret is 3/4 of the scale.
If the steps described above are not entirely clear, then I offer you a calculator program, the link to which is at the end of the article. The file format is pdf (Adobe Acrobat), the calculation accuracy is not the highest, but quite sufficient.
Marking the fingerboard should be done very carefully, with maximum accuracy, since a mistake will lead to the fact that at the very least you will have to make a new fingerboard.
Another very controversial issue is the width of the neck at the zero fret (nut width). The most common values are:
- 4-string bass, electric guitar with scale 25.5″ - 1.625″ (41.275 mm)
- 5-string bass - 1.85″ (47 mm)
This is where strict standards should not be adhered to. The width of the nut (and the neck, respectively), and, consequently, the distance between the strings, as well as the distance from the outer strings to the edges of the fingerboard, greatly affects the “playability” of the instrument. And if you are making a guitar for yourself, then no one will forbid you to make the neck so that it is as comfortable as possible for you. You can calculate the neck geometry using the fingerboard calculator program, which is given at the end of the article.
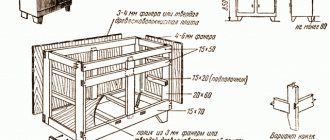
Frame
Many of those who make homemade electric guitars argue that the instrument should be as light as possible. This is especially true for beginning guitarists.
Despite the fact that it is more difficult to play a heavy guitar, the body must still be massive. Its weight usually varies between 3.5-4 kg.
As you can see in the photo of homemade electric guitars, birch, maple or multi-layer plywood are most often used to make the body.
But fiberboard is considered the optimal raw material, since this material does not have a specific texture or knots. In addition, it is easy to process.
The work plan for creating the guitar body is as follows:
- Draw a sketch of the body onto the board and cut it out with a jigsaw.
- Cut and drill all the required holes.
- Make the bottom wall from 4-6 mm plywood.
- Fasten both parts with liquid nails;
- Treat the workpiece with a rasp and sand it with sandpaper.
- Cover the body with nitro putty in several layers.
- Clean with fine sandpaper.
- Paint with nitro paint in 4-5 layers.
GUITAR DEVICE
One of the main criteria for dividing guitars is the way the neck is attached. In accordance with these criteria, they distinguish:
- Collapsible guitars (neck fastening with bolts or screws)
- Non-separable guitars (glued neck)
- Full-neck guitars (“through-neck”)
The latter option is expensive and similar tools are rare. In this case, the neck is the length of the entire instrument, and the soundboard is like two halves glued to the neck below the fingerboard. This miracle looks like this:
By the way, please note that the neck is made from “blocks” of different types of wood, which is also the prerogative of expensive instruments. The same as, in fact, coating with transparent varnish, without painting, which allows you to see the “correctness” of the wood used. I will not consider such guitars in this article.
The first option is the most preferable, since it allows the neck to be replaced during the operation of the instrument. I can assure you that this is a very valuable property, since the guitarist “plays” on the neck. And changing the neck to a better one will improve the instrument more than any other modification.
The drawing of an average guitar (for the right hand) looks like this:
Let's take the guitar apart for parts.
Deca
The deck is glued together from two parts. A larger number is not recommended (exceptions are exotic “set” soundboards, and, naturally, acoustic/semi-acoustic guitar soundboards). The gluing of the halves (it is desirable that the pieces are approximately the same) is carried out before the start of processing the future deck in order to avoid possible misalignments, that is, it looks like this:
Processing and shaping the contour of the soundboard, as well as preparing the seats, should be carried out after calculating the entire guitar, since the soundboard makes a direct contribution to the scale length of the instrument, and, consequently, to the markings of the neck. There is nothing more to say, except that by the time the deck is manufactured, it is necessary to have all the hanging elements and, accordingly, know their sizes. I would also like to warn you: it is better to copy the shape of any serial guitar, since the soundboard of the “nightmare” shape may simply not sound.
Vulture
This is the most important part of the guitar, and the one I will try to pay the most attention to. Standardly, the neck is assembled from the following parts (schematic illustration):
The elements of the fretboard markings (dots) are conventionally not shown here due to the fact that each guitarist prefers his own type of marking. Standardly, the following frets are marked on electric guitars: 3, 5, 7, 9, 12 (two dots or other difference), 15, 17, 19, 21, 24 (same as the 12th).
In conditions of self-production, it would be best to make the head and neck monolithically, from one piece of wood, since gluing the head to the neck is a very responsible and “capricious” procedure. If such a piece of wood cannot be found, then if it is possible to purchase “deck” pegs, we can recommend making a “headless” neck (stump):
This neck is easy to manufacture and operate, but some musicians do not like it purely aesthetically (me, for example). If you're very lucky, you can purchase a bridge combined with pegs, and it's even better if it comes with a branded string clamp. That is, you need to look for this:
If you couldn’t find a branded clip, that’s okay. You just need to use your imagination. Sometimes there are very interesting options for attaching strings to a “headless” neck. Please note that in the case of a “stump”, the zero fret is used “by default”, and for homemade guitars, the use of a zero fret is highly desirable because it reduces the requirements for the accuracy of manufacturing neck parts.
Now let's disassemble the neck into parts.
Frets (insert, fret insert)
They are made (cut) from so-called fret wire. Frets are sometimes sold ready-made, as a set. There are regular frets (Regular) and high/wide frets (Jumbo). In the case of ready-made frets, you will have to make a fingerboard/neck of a given width. The inserts are rolled into the cuts in the overlay. We'll look at where exactly below.
Overlay
Unlike some acoustic guitars, the fingerboard of an electric guitar is not completely flat. In cross section, perpendicular to the strings, it has a certain radius:
For a 4-string bass this is approximately 35 cm (14″), for a 5-string bass and an electric guitar with a scale length of 25.5″ - 40.5 cm (16″). The beauty of making a rubber yourself is that you can vary this value “to suit yourself,” which greatly affects the convenience of the game. In addition, it is possible to produce an aspherical profile of the overlay (an ellipse, part of a parabola or hyperbola), which is not acceptable for mass production, as it complicates/increases the cost of the manufacturing technology.
There are known cases when the pickguard was made not from a single piece, but from several (!), joined under the frets. To the “touch”, this design did not differ from the usual one; this fact was discovered only when changing the frets (they are sometimes changed when they are completely worn down).
The program for calculating the size of the overlay is given at the end of this article.
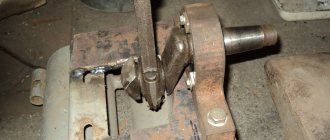
Anchor
A very important part of the fingerboard. It is also called an anchor rod or an anchor bolt. The purpose is to prevent the neck from bending under the force of string tension. I know of two types of anchors (manufactured independently; there are many more of them in industrial production). I don’t know which one is better. Both of them stop working after some time, and the neck has to be repaired.
Type one, standard:
The second type is more often used on electric guitars with a 25.5″ scale, and is generally considered an “alternative”, but, it seems to me, has the right to life due to its ease of replacement and flexibility in tuning:
In general, the anchor is a metal rod made of soft (not hardened) steel with a diameter of 5-7 mm. Regardless of the type of anchor, there are general recommendations for its installation. First of all, it should be said that the cut in the wood for the rod must be made very accurately. There should be no backlash or gaps. The adjusting nut can be moved either into the headstock or towards the soundboard. I like the second option better, it looks like this:
The opposite side of the rod is made in such a way as to ensure reliable fastening of the anchor and prevent it from turning. As a rule, it is a cross. In the guitars I use, the cut for the anchor is made on the back of the neck, and has a depth almost to the pickguard (!). After laying the bolt, the anchor is sealed with a lath. There is another option when the cut is made from the side of the lining. I have an extremely negative attitude towards this, and here's why:
- Since the rod is curved downwards, it is necessary to saw through the corresponding “crooked” groove, which is quite difficult.
- When the anchor is tensioned, it straightens up and will try to “tear off” the pad, and in the end, it will succeed.
- The bolt is located closer to the strings than to the back of the neck (relative to the longitudinal axis). Therefore, when it is tensioned, IT WILL BEND THE NECK IN THE SAME DIRECTION AS THE STRINGS! This leads to the fact that the bar begins to move in “waves”, i.e. in the area of the 6-7 frets, the anchor will work “correctly” and the neck will bend, but in the area of 2-3 and 12-15 frets, the anchor will work “wrong” and the neck will bend. When they see such a situation, masters say: “bending in the heel of the neck,” which is tantamount to a surgical operation on the neck with a change in the anchor rod.
The first and last points do not apply to the second type of anchor, which is a big plus in favor of this design.In this chapter I mentioned homemade anchors. Other types are also used in the industrial production of guitars. For example, using a U-shaped profile:
Making a fingerboard at home is quite difficult...
The neck is quite difficult to make, so it is better to order a ready-made one or find a used/broken guitar .
How to tune a guitar using a tuner
You will also need a hand router with a set of cutters, sheets of different sandpaper, and a plastic (acrylic or wooden) deck template.
You can choose the shape and dimensions of the deck yourself and make a drawing in a special program, then take it to a company that produces acrylic advertising boxes. You can take the drawings from the finished electric guitar or find them on the Internet.