Origami
The simplest material for creating DIY crafts in elementary school is colored paper. It is pliable, easy to cut and fold, its use will allow the child to learn how to work with a ruler and scissors, teach him to combine colors and glue parts evenly.
Nutshell
Remember nutshell ladybugs? They are easy to make and look very cute. But not only ladybugs can be made from shell halves. Bunnies, dolphins and even small bees are made from this natural material. The principle is the same - paint the shell in the desired color, add details. Such bunnies or bees will be an excellent addition to a large composition.
What else does half a nut shell remind you of? It looks a lot like a small boat. All that remains is to attach the sail on a toothpick and the cute boat is ready!
Bouquet of colored paper
The easiest DIY craft for school is a bouquet of flowers made from bright colored paper. Cut out 3-5 daisies with a diameter of 5 cm from white paper. The centers for them can be cut out from yellow or orange paper, or you can draw them with felt-tip pens.
Fold a whole sheet of colored paper lengthwise like an accordion. At approximately 1/3 height, secure the folded accordion with a stapler or glue to form a fan. Cover the attachment point with a strip of colored paper to match. Glue daisies to the top of the workpiece. The bouquet for March 8 or Mother's Day is ready!
Ship "Scarlet Sails"
Agree, such a ship is a great gift and a beautiful craft for a school exhibition! It is easy to make, and to make it you need to collect the following materials and tools:
- cardboard, whatman paper and colored paper;
- PVA glue and glue gun;
- scissors;
- markers of different colors and paints;
- wooden skewers and thick cotton thread.
First, make a stand in the form of a rectangular box for a ship out of cardboard and paint it blue.
From colored paper, cut out waves in any shape and multi-colored fish, which you glue to the stand on both sides. Assemble the boat from whatman paper according to the diagram in the photo and paint it yellow or brown.
Glue the anchor to the boat. It’s easy to draw it or print a picture from the Internet, cut it out and glue it to the ship’s hull.
Cut out the sails for the boat (rectangles and triangles of different sizes) from red two-color paper and carefully pierce them with skewers. Hot glue the skewers to the bottom of the ship and stretch the thread, connecting the bow and stern through the masts.
If desired, make a round lighthouse out of whatman paper and attach a Russian flag to the ship.
In general, they make a wide variety of boats for the exhibition. Below are ideas for boats for school on February 23rd.
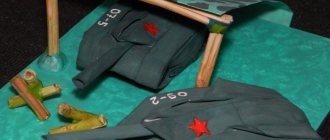
Airplane made from popsicle sticks
Airplanes, like boats, are made from a variety of materials. Even a second grader can handle this airplane, made from popsicle sticks, because it is a very simple model.
To make it, prepare:
- 6 ice cream sticks and a piece of wine cork;
- two buttons, preferably black, for the wheels;
- a square of white cardboard;
- black marker, paint and one push pin;
- scissors (sharp) and glue gun.
Next, follow these steps.
- Fold the cardboard in half and draw a propeller on it with a black marker, and cut it out and color it.
- Two sticks need to be cut according to this principle: cut 2 cm from the first, 1.5 cm from the second - from both ends.
- Using a knife, cut a round piece 0.5 cm thick from the cork;
- Glue two long ice cream sticks with hot glue to a round piece of cork - this will be the nose of the airplane. On the back side, between two sticks, glue a 2 cm piece and on the sides two 1.5 cm pieces, forming the tail part.
- Closer to the propeller, glue buttons-wheels onto the fuselage (aircraft body), and on top - the wings - the two remaining long sticks.
- Using a pushpin, attach a cardboard propeller to the center of the cork.
- Paint the airplane with red gouache and paint it with white stripes or paint stars on the wings.
Foamiran magnet
Such a craft will turn out brighter than from plasticine, more durable than from paper or cardboard, and will certainly attract attention at a school exhibition.
From cardboard you need to make templates of numbers, stars and wavy stripes for the flag in advance, which are then transferred to foamiran of the corresponding colors.
Hot glue foamiran flag strips onto felt (blue or white) and cut it out.
To make the star voluminous, heat it for a few seconds with a not very hot iron, and then glue it on top of the flag. Do the same with the numbers, and glue a strip of magnet on the back side.
If you make such a flag large and then stick it on cardboard and insert it into a frame, you will get a three-dimensional applique picture, which is also perfect for an exhibition at school.
A few more ideas for crafts for school for February 23
Not only kindergarteners can make crafts from plasticine. Plasticineography is an excellent option to “draw” a thematic picture for this holiday.
And this painting depicting a tank is made of relief noodles, painted with paints.
Here is an excellent tank made from matchboxes and colored paper on a pedestal.
A medal like this using the origami technique will also look original.
And another idea - a paper flower in a beautiful and original package. Watch the video.
In general, the holiday of February 23 is an excellent occasion for schoolchildren to show their creative imagination and show off their skills.
Craft ideas for February 23
Paper hedgehog
Using a similar technique you can create a small hedgehog. Help your child draw the profile of the animal's head, cut it out and glue it to the narrow part of a sheet of colored paper. Then fold it into an accordion so that the folds are parallel to the muzzle.
Fold the accordion in half in the middle and glue the touching ends together so that it takes the shape of a triangle. Now you can glue a paper apple or mushroom onto the “needles” of the cheerful hedgehog.
Teacher's Day Cards
Most often, of course, postcards are given. Today in stores there are greeting cards for any holiday, including Teachers' Day. But often (especially in primary school) children themselves make cards at home for their first teacher. The theme of the design of such postcards will be everything related to autumn, knowledge and the profession of a teacher.
This:
- autumn leaves;
- rain and umbrella;
- sun and clouds;
- owls and eagle owls;
- autumn flowers and bouquets of them;
- pencils, notebooks, class magazines;
- globe, chalkboard image;
- letters, numbers, formulas, examples;
- bell.
There are a lot of options for postcards, so we will consider only the most interesting of them.
Cardboard crafts
For a competition for school, you can make a craft with your own hands from colored cardboard.
New Year's decorations on the Christmas tree
Every educational institution holds matinees on New Year's Eve, where the main decoration of the holiday is a green tree.
Students are entrusted with decorating it with their own homemade toys, and each child wants to contribute by hanging a homemade craft on the Christmas tree.
Mice
You can make charming mice from cardboard cones. One of the advantages of making mice using this technique is that a first-grader will be able to learn how to work with a compass.
Take colored cardboard in 2 contrasting colors for the body and eye. Using a compass, draw a circle of the size you need, making sure to mark its center. Make a cut from the edge of the circle to its middle. Depending on how plump you want your mice to be, twist and glue a cone.
Cut out the paws, ears and tail of the rodent from cardboard of the same color.
It is best to glue the legs on the side of the cone where the gluing seam is located, the tail - from the inside of the upper part of the cone. You need to cut out the eyes and nose of the mouse from contrasting cardboard, and then carefully glue it to the workpiece.
Volumetric postcards using scrapbooking technique
Scrapbooking is the art of decorating photo albums, but its techniques are also very popular when creating cards.
Using Kirigami elements, using the Scrapbooking technique, you can also make a three-dimensional postcard with your own hands. We cut out and fold “steps” from scrap paper for the “pop-up” candles on the second half of the card. Glue the candles and glue the resulting blank onto the base of the card.
You can make a simple but original greeting card from scrap or colored paper. We cut out the candle flame and decorate it with sparkles, then glue it to 2-sided tape. We glue the second part of the candle with glue. The congratulation itself can be tied or glued to an elegant satin ribbon. Simple and original!
A postcard made from paper of a different texture will look completely different)
By placing each element of the card on top of each other, again using double-sided tape, you can create such a voluminous, bright cake!
Let's take a look at Tatyana Sadomskaya's master class on how to easily make a voluminous, delicate postcard using the Scrapbooking technique using ready-made pictures.
To create such a postcard, Tatyana used:
- scrap set ScrapBerry's “Favorite Pet”
- scissors
- thick cardboard
- glue
It is better to use scrap paper with a large number of miniatures that can be cut from a single sheet, as well as colored stamp prints and chipboards.
Before creating a postcard, you need to decide on its plot in order to choose the color of the base of the postcard and its “characters”. In this case, the basis is paper with a calm beige print, and the components of the plot are cut out of it: kittens, a puppy, flowers, a crown on a pillow.
Next we work with the base. It is necessary to make markings for cuts on the front side.
Don’t forget to decide before starting this work what will be in the foreground and what will be behind it!
In our case, we put the larger kitten in the foreground, this will enhance the feeling that it is closer than kittens with a dog.
We make the necessary cuts. The result is a design with “steps”. We glue leaves of arbitrary size onto the resulting “steps”. These leaves imitate a wooden fence.
Next, we gradually glue our elements, starting from near to far. We start from the foreground and glue the kitten. We glue it onto beer cardboard, because it gives additional volume and casts a shadow. Using the same principle, you can glue several other elements, for example, balls and flowers. When the inside is ready, glue it to the base of the card.
We also decorate the outside of the card with an elegant floral print.
For greater elegance, decorate the elements of the card with sparkles (use glitter).
For inspiration, check out this masterpiece 3D cake card:
ladybugs
Photos of handmade crafts for school in the form of voluminous postcards with ladybugs look cute and interesting.
Note!
- Plasticine figures: TOP-120 photos of plasticine figures with step-by-step instructions + simple diagrams for children
- Crafts for boys - TOP-180 photos of design ideas for crafts for boys. Simple DIY craft plans + step-by-step instructions
- Application from geometric shapes: TOP-110 photo options for applications for children. Schemes for creating types of applications with your own hands
To create a postcard you will need double-sided cardboard in red, white, black and green. Cut out the base of the card from white cardstock. It can be square, round or even leaf or heart shaped.
Cut out 2 symmetrical hearts from red cardboard and fold them in half lengthwise. Also cut out a heart from green cardboard and fold it in the same way. Cut out an oval from black cardboard, which will become the head and body of the bug.
Glue the red parts onto the black blank to create a heart shape. Draw black dots on the resulting wings, and an eye on the head. Glue the bug and the leaf heart to the base of the craft.
What kind of crafts can you make with a first grader?
Creative people make wonderful compositions from what they have on hand or even just lying under their feet. By showing your imagination, acorns with caps can easily be turned into a tea set that can be placed on a sheet of cardboard cut out in the shape of a leaf. PVA glue will help to attach the teapot with tea cups to the green base; it is better to take scissors with rounded ends so that the first-grader does not cut himself while making the workpiece under the guidance of his mother.
In the photo of crafts for school, the cheerful Smeshariki, the heroes of the animated series of the same name, immediately catch the eye; the main details were vegetables, supplemented with individual plasticine parts, and emoticons and eyes were drawn with felt-tip pens. A little student can make funny Smeshariki at home with the help of their elders at home or independently in a lesson at school.
Crafts from bushings
You can make your own crafts for school from recycled materials, such as cardboard tubes.
Crown
Use a pencil to mark the crown teeth on the bushing. You can make them sharp, or you can make them rounded so that a “precious” stone is inserted into the top of each tooth. Use scissors to cut out the workpiece. Now you can decorate it at your discretion - with beads, rhinestones, gold spray paint or acrylic.
Figure of a crow made of plasticine
The process of creating a crow figurine from plasticine will appeal to both the child and his parent. Plasticine is a material that helps develop the dexterity of a child’s fingers, and a crow can symbolize a character from a popular fable. To do this, mold a piece of cheese from yellow plasticine and hand it into the crow’s beak. So, to create a figurine you will need:
Let's start the creative process:
- Roll a small smooth ball from black or dark blue plasticine.
- Make a smaller gray ball.
- Make cutouts in a circle on the gray ball. Parts of gray plasticine need to be cut to form a star.
- Stick the black ball to the gray “star”.
- Make two dimples on the ball using a spatula.
- Make an oval out of dark plasticine and stick it to the star so that the oval forms the body of the bird.
- From dark plasticine, make two elements resembling a drop in shape. Flatten it and cut out feathers on it. Stick it to the body: you get wings.
- Make paws from gray plasticine and stick them to the bottom of the oval. Make a beak and stick it to the bird's head.
- Make several thin “sausages” from dark plasticine and stick them to the bird’s head. They will form a raven hairstyle.
- Using black and white plasticine, make eyes for the crow and place them in the prepared holes.
- Using a spatula, draw hairs on the gray part of the raven.
- Attach a small tail made of black plasticine to the crow.
Plastic crafts
Making crafts from garbage for school with your own hands is not so easy. It takes a lot of imagination to make something beautiful and useful out of unnecessary things that are usually thrown away as unnecessary.
Christmas tree made from improvised materials
The most common New Year's homemade item is the Christmas tree, which can be useful not only for display in a kindergarten or school, but also for decorating your home.
And the material can be completely unexpected things: plastic forks and spoons, pasta, feathers, satin ribbons (kanzashi technique), cotton swabs and makeup remover discs, small shells brought from the sea, newsprint tubes, etc.
Whatever the task before you, the main thing is to spend interesting and useful time with your child, develop his creative potential and give him an extra hour of parental attention and love.
Snowflakes
To make beautiful, festive snowflakes you will need smooth, transparent plastic. Lids from sour cream, cakes, and toy packaging are suitable for this purpose.
Find on the Internet and print a beautiful template of wide snowflakes. It is better to find snowflakes of different sizes and shapes so that you can choose the optimal size of the workpiece.
Place the plastic on the stencil sheet and trace the outlines with an alcohol marker. Cut out the resulting blanks along the contour and wipe off the marker with any alcohol-containing liquid.
Now you can start painting the blank. To do this, you can use white contour paint, stained glass paints, or just a corrector pen. Using them, apply a pattern to the snowflake and, if desired, sprinkle it with glitter before the paint hardens.
Current topics
It would be strange to make snowflakes and snowmen if it’s summer, and it would probably be stupid to give crafts in the form of flowers to dad on February 23rd. Schoolchildren already consciously approach the matter, understand what and when to do, but still this issue must remain under control. Therefore, the teacher sets the theme according to the season or the upcoming holiday.
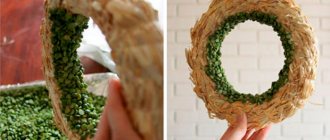
The autumn theme is very rich in ideas, and the variety of natural materials allows you to create unimaginable compositions. For work, they use almost everything that can be collected or picked up underfoot - these are leaves, cones, flowers, vegetables, twigs, seeds and much more. Also, cereals, almost all types, and seeds remain a favorite material for crafts. Let's consider one of these options.
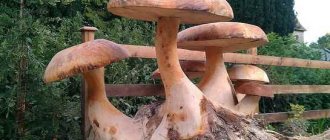
"Hedgehog made from seeds"
To make such a hedgehog you will need a small piece of plasticine and seeds. Everything original is simple.
Operating technique:
- The first step is to make a base from plasticine. Plasticine, as a rule, is taken in light shades (beige or white) so that the hedgehog’s head does not merge with the spines.
- Then from the same plasticine, only black, we make eyes and a nose.
- And finally, decorate the back of the hedgehog with spines, using seeds so that the sharp edge is on the outside.
Such hedgehogs are made not only from sunflower seeds; you can also use pine nuts, pumpkin seeds, pine needles and anything else you can imagine as thorns. And when difficulties arise with choosing a material or topic, you always have the right to turn to the Internet for help, where you will find thousands of photos and videos with hints.
Inventiveness and imagination in working with children are something that no creative process can do without. If you create all the comfortable conditions for the child, give him the right to choose, tell him how to simplify the craft and help with the theme, then your “little master” will certainly create a real masterpiece.
Butterflies
DIY bottle crafts for school are one of the most popular types of creativity.
Note!
- Crafts for the senior group of kindergarten: photos of the best ideas and new products. Instructions on how to make a craft with your own hands
- The best crafts for children: instructions on how to make them yourself step by step (60 photo ideas)
- DIY crafts for kindergarten: a review of the best creative ideas for creating beautiful crafts (90 photos)
To make a bright plastic butterfly, cut off the bottom and neck of a transparent bottle, and cut the cone to create a plastic sheet. Draw the outline of a butterfly on paper, place the plastic on it and trace it with a marker.
Cut out all the resulting blanks and fold them in half so that the butterflies have raised wings. You can decorate them with acrylic or stained glass paints, permanent markers and even nail polish.