How to make a paper star. Convex star.
These beautiful little paper stars will be an excellent decoration for your interior, postcard or gift.
You will need:
Colored paper (you can use pages from an old magazine)
Scissors (stationery knife)
* The key point in this master class is the correct cutting of paper strips.
* Stripes must be even. In this example, their width is 9mm and length 221mm.
Scheme:
1.
Cut paper strips.
2.
Take one strip and make a loop out of it (see picture).
3.
Next, you need to wrap the short tail of the paper strip and tie a knot. Do everything carefully so as not to tear the paper. Slowly tighten the knot, press it and hide the remaining tail by tucking it into the middle.
You should end up with an even pentagon.
4.
Let's move on to the most interesting and at the same time simple process - making an asterisk.
Wrap a long strip around each side of the pentagon. You need to do 12 to 15 wraps. This means that each edge needs to be wrapped at least twice.
5.
Tuck the remaining tip of the paper inside your star.
6.
Now be very careful and careful.
Hold your pentagon with two fingers of one hand. At this time, use the fingertip of your other hand to lightly press on one edge. You need to get to the middle of the edge.
This process needs to be done with all the edges and you will get a beautiful star.
How to make starfish from salt dough
- Toothpick;
- Rolling pin;
- Stationery pen;
- Knife;
- Oven with baking tray (optional).
- For salted dough - 2 cups wheat flour, 1 cup salt, ¾ cup water.
So, first, knead the salt dough. To do this, mix 2 cups of wheat flour, 1 cup of salt, ¾ cup of water in a bowl.
Next, separate a small ball from the dough, place it on the table and roll it into a round cake.
Using a toothpick, outline the contours of the rays of the star, and remove the excess with a knife.
Next, use a toothpick to create the texture of a star, draw indentations along the rays and leave small dots.
Then, using a stationery pen, we create a hole on top of the star if we plan to hang it.
The finished stars can be left to air dry for about 4-5 days. Or you can dry it in the oven at 200 degrees for a couple of hours. In this case, check the oven often so as not to overcook the stars.
Finally, we string the completely dried stars onto a thread and hang them in the desired location. As you can see, making a starfish with your own hands is quite simple. In addition, they can be painted with acrylic paints, giving them an even greater resemblance to real starfish. Happy creativity! Well, here you can see home interiors in a marine style (more than 70 photos).
Source
Star for kids
For children's options, you can take one of the instructions suggested above as a basis. There is no need to maintain strict proportions here. It is enough to know how to draw an even star.
The design can be repeated several times and used to decorate a wall in a child’s room, and if you make a double-sided star, it will become an ideal decoration suspended from the ceiling. For drawing let's take:
- a simple pencil;
- eraser;
- paper;
- set of multi-colored pencils.
You can choose the star size yourself. Now you can start explaining how to draw a star:
- Position the paper and take a pencil. Let's start sketching. Draw an arbitrary vertical stripe. Do not press on the pencil; this line should be barely noticeable. It must be wiped off before painting.
- From the line we draw two rays directed upward. We perform the same action, but at the bottom. The result was a sketch that looked like a snowflake.
- Next we will start drawing the details. As you can see, this tutorial did not require knowledge of how to draw a perfect five-pointed star using a ruler. Everything is simple and fast.
- We determine the central point between the upper rays and from it we draw a rounded strip to the top. We do the same to the other side. We repeat this action until we outline each ray.
- Since the star will be intended for a child, it needs to be made interesting. Let's draw eyes on it. Draw two arcs in the center. Draw semi-ovals. Add two arcs and draw the pupils.
- Below the eyes there will be a small mouth with a smile. The sketch of the star is ready, all that remains is to color it. Use any pretty colors.
If you don’t have time to draw a picture, but you need a star, the template will come to your aid. The site megamaster.info has selected several examples of child stars for you. But we'll talk more about templates below.
Volumetric design
The voluminous star craft is very eye-catching. Similar souvenirs can be used to decorate gathering places with friends, a festive lunch or dinner.
In addition, they should be hung in a bunch, lining the central lighting of the living room or decorating a window.
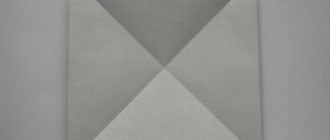
To create a three-dimensional craft, you will need: colored paper, a simple pencil, scissors, glue, strong thread.
First you need to cut out a couple of sheets of paper in the shape of a square. They need to be formed as shown in the diagram.
Then cut the workpieces along the perpendicular line and bend accordingly. Next, apply glue to each of the sides intended for gluing and connect the star.
Idea 1. Inlay frames, frames and frames
You can decorate the frame of a mirror, painting or photo frame with shells. We present examples of such crafts in the following collection.
Today we suggest you decorate a mirror frame with shells, but using the same principle you can decorate any photo frame or painting frame.
Shells of small, medium and large sizes and, if desired, additional decorations (eg starfish, pearls, figurines of skates, etc.). Glue gun and several sticks of glue or clear epoxy glue. Newspaper or any unnecessary paper to protect the mirror from glue. Masking or regular tape.
Step 1: Protect the mirror with paper and secure it with masking tape. At this stage, the frame can be painted if you are not satisfied with its original appearance.
Step 2. Sort the shells by size to make it easier to create your future composition.
Step 3: First glue the first row of small to medium shells (about the same size) around the mirror.
Step 4: Now start gluing on the largest shells. Beforehand, you can play with the layout options and choose the best one. If you are using epoxy glue, once all the parts are glued, leave the frame to dry overnight.
Step 5: Next, fill in the gaps between the large shells, medium shells, and small shells.
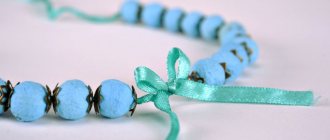
Star made of beads on the top of the Christmas tree
Beads of various sizes and shades are a good basis for making star-shaped decor. Beads of one or more colors are strung on a wire and carefully bent into a star shape.
There are many variations of how beads can be used, and some of them can inspire you to create your own product.
Shuriken. Ninja Throwing Star
Stars are made not only for beauty. Sometimes they become formidable weapons. For example, shuriken is an iron throwing star, a mandatory attribute of oriental fighters. We will make it from paper according to the diagram shown in the photo.
A paper star will not only decorate your home on the eve of the Christmas holidays, it will be suitable for educational activities with children. Making a three-dimensional paper star with your own hands is quite simple, and joint lessons will help develop the child’s imagination and hand motor skills.
An ordinary piece of paper can be a suitable space for creativity. Having given it the desired shape, the craft can be decorated by coloring it with felt-tip pens and paints. Imagination and manual dexterity will help your child create a masterpiece. This article will tell you how to make a three-dimensional star out of paper.
Cozy star made of cardboard and an old sweater
Many people think that an old sweater is not worthy of anything other than going to a landfill, but this is a mistake. When used correctly, scrap clothes combined with cardboard can make wonderful decorations for your home or Christmas tree.
The outlines of a star are cut out from cardboard and a sweater, a little less from cardboard, and a little more from clothes. One part of the sweater is hemmed to a cardboard base, then the second is sewn on top.
Making a starfish using modular origami techniques
You have already been familiarized in detail with making a three-dimensional ninja star, and we would like to offer you another clear example of making a starfish, which will also decorate your handicraft collection. With the help of our master class, you can easily cope with the task left behind. In total you need 30 yellow sheets, 5X5 cm. You can make a starfish using the provided diagram and video instructions.
There is a belief that stars bring happiness to the house. Well-being and joy. It’s not for nothing that they were nicknamed stars of happiness - these are small multi-colored stars that can be made from paper. With the help of our master class, you can create happiness, comfort and warmth in your home with the help of your own hands. The diagram and video instructions below will help you with this and you will easily cope with this task.
Christmas tree star made from scrap materials
In fact, you can make a star for your Christmas tree from absolutely any materials that are stored in your home.
From metal pipes
Metal tubes are cut to the required size, strung on wire and formed into pyramids. All pyramids are fastened together into a star.
When work is your second home
Sea pebbles can protect against troubles at work. To do this, they need to fit organically into the space of your workplace. But at the same time they should be as close to you as possible. Then all their protective functions will be strengthened many times over. It is better to place such “stone souvenirs” in the workplace so that you have constant eye contact with them
Try to periodically focus your attention on them - this will help you structure your thoughts and, at a crucial moment, make a balanced, correct decision. Think in advance about how to provide access to water for talisman stones in the workplace.
As a last resort, pebbles can be placed next to photographs or paintings that depict the sea or the sea coast.
How to make a voluminous star with your own hands
Such a star can be hung in a room (on a wall, window, chandelier) as an interior attribute or used to decorate a gift.
You will need:
Thick colored paper (colored cardboard)
Simple pencil
Scissors
Thread (ribbon)
1.
You need to start with two sheets of paper, each of which should be square.
Each sheet of paper needs to be folded in half horizontally and vertically. Next you need to bend it in half diagonally twice (see picture).
2.
Using scissors, make cuts along the perpendicular fold line. The cut should be approximately half a line or slightly less. You need to make four such cuts in total.
3.
Fold the edges as shown in the image.
4.
Now prepare the glue and lubricate one of the sides of each ray of the future volumetric star and glue it together (see picture).
5.
Make the other half, following the same instructions.
6.
Finally, glue the two halves together and decorate to taste.
Sea creatures: paper Christmas toys
Paper is an interesting material that captivates and develops the ability to think creatively, giving the skill of design.
Working with paper contributes to the development of hard work, perseverance, and perseverance in achieving goals.
There are many types of paper, differing in thickness, texture, and color.
To make toys using the paper-plastic technique, it is best to choose paper of a certain quality - thick, drawing or drawing . Colored pastel paper is especially good for such work . This paper allows for curling and cutting, has bright colors and a pleasant surface texture.
To make paper toys you will need:
- Colored thick paper of different colors.
- Colored cardboard.
- Tracing paper.
- A pencil - preferably a mechanical one with a 0.5 mm lead - for drawing thin lines.
- Scissors for cutting paper and making patterns.
- Stationery awl - for drawing fold lines, piercing holes, applying glue in small quantities in hard-to-reach areas.
- Glue is best PVA, it dries quickly, sticks firmly, is hygienic and can be easily washed off your hands.
- Glue brush.
Preparing for work:
1. Trace the contours of the parts with a pencil onto tracing paper.
2. Transfer the contours of the part from tracing paper to cardboard.
3. Cut out templates of parts from cardboard.
Tips for young masters from Terenty Travnik:
1. When making toys, before gluing the parts, you need to draw an awl along all the dotted lines so that it would be more convenient to bend the paper.
2. Decorative elements that are glued to parts can be of any shape: circles, straight stripes, ovals, wavy stripes. Decorative elements can be made of thinner paper than the toy parts.
3. You can attach a thread, braid or ribbon to the finished toys so that they can be hung on the Christmas tree.
Marine decorations in ancient times
The most ancient decoration discovered by archaeologists is in a marine style. These are beads made from the shells of the sea snail Nassarius gibbosulus. The age of the decoration is from 100,000 to 135,000 years.
This is not the only such find. Jewelry made from the shells of sea snails, barnacles and mollusks have been discovered during several excavations and are tentatively dated back to the Middle Paleolithic era. They were used not only by people living directly on the seashore, but also by distant tribes. It is known that one of these decorations was found at a distance of 190 km from the sea coast, which is quite far in the absence of transport.
How to make a paper star. Convex star.
These beautiful little paper stars will be an excellent decoration for your interior, postcard or gift.
You will need:
Colored paper (you can use pages from an old magazine)
Scissors (stationery knife)
* The key point in this master class is the correct cutting of paper strips.
* Stripes must be even. In this example, their width is 9mm and length 221mm.
Scheme:
1.
Cut paper strips.
2.
Take one strip and make a loop out of it (see picture).
3.
Next, you need to wrap the short tail of the paper strip and tie a knot. Do everything carefully so as not to tear the paper. Slowly tighten the knot, press it and hide the remaining tail by tucking it into the middle.
You should end up with an even pentagon.
4.
Let's move on to the most interesting and at the same time simple process - making an asterisk.
Wrap a long strip around each side of the pentagon. You need to do 12 to 15 wraps. This means that each edge needs to be wrapped at least twice.
5.
Tuck the remaining tip of the paper inside your star.
6.
Now be very careful and careful.
Hold your pentagon with two fingers of one hand. At this time, use the fingertip of your other hand to lightly press on one edge. You need to get to the middle of the edge.
This process needs to be done with all the edges and you will get a beautiful star.
Jellyfish Costume: DIY Jellyfish Costume
Are you planning to go to a New Year's party at the carnival or play the role of a charming jellyfish in a children's play?
In this case, there is no way to do without a jellyfish costume. We will make a jellyfish costume with our own hands, because it is so easy to make from scrap materials. To make your own jellyfish costume you will need
- umbrella;
- a small piece of fabric;
- multi-colored ribbons.
Manufacturing:
Open the umbrella and baste several ribbons to each knitting needle. Ask your child to hold the umbrella while making the costume so you know exactly how long to make the ribbons.
Ribbons can be replaced with strips cut from scraps of fabric. One condition is to cut the strip in a circle.
Another option for replacing tapes is corrugated paper, cut into thin strips. And if it’s New Year’s, then you can use shiny tinsel.
Now you need to dress the child in the color of the jellyfish costume you made and you can go to the carnival.
Star on the Christmas tree made from candy canes
Cane-shaped lollipops are what many people associate with the New Year and the holiday in general. You can use them to make a beautiful and tasty star as a decoration. To do this, the lollipops are folded into the required shape, complemented by round candies. All parts are fastened with tapes.
Let's add volume!
How to make a three-dimensional star out of paper? An eight-pointed modular star made of colored paper is folded according to the principle of a construction set. We have to make a complex luminary from separate blocks, each of which is folded like parts for a shuriken (see Fig. 4).
This product is made similarly to a shuriken (use Fig. 4 and templates for folding a four-vertex shuriken - Fig. 1), although a spectacular octagram takes a little more time. But by folding such a thing with your own hands, you will truly surprise your family and friends. Surprised by the new level of your capabilities? Then quickly tell your family how you did it all, because everyone will be pleased to see their personal contribution to decorating the rooms for the upcoming holiday. You can also show them the diagrams
Stars have always been considered something magical, mysterious and beautiful. They light the way and point the direction. Someone is lucky to be born under a lucky star. Some people rush to make a wish when they see a shooting star, others like to just look at them at night in clear weather. All people on Earth are familiar with this symbol. Maybe that’s why many people want to make their own little star of happiness, because it’s so beautiful. Now we will try to make a happy star from plain paper.
To work, we need a strip of paper and a little time. In our case, the size will be 1x23 cm. Of course, you can take a strip of any size, but the ratio of length to width should remain the same 1:23 each time. To find out what size star you can get from any strip of paper, you need to multiply its width by 1.67. For example, from a sheet of A4 paper, taking into account the ratio 1x23, it is convenient to cut strips measuring 1.2x27.6 cm. From such strips you can make a star measuring 2 cm.
And so, we begin to fold the star. Wrap the end of the paper strip around your index finger and tie a knot. You need to tighten it and press it so that you get a small figure of an equilateral pentagon.
You need to try to ensure that after tying the knot there is a very small end of the strip left. If this cannot be done, it is better to cut it off or bend it back.
Next, we begin to wrap our pentagonal star in a circle with the long end of the strip, bending it each time along the line of the edge of the figure. With each fold, the strip itself will lie on the next edge on which it needs to be folded.
After 10 similar folds, a short piece of strip should remain. It can be hidden in a nearby “pocket”. The result should be a pentagonal flat figure.
Now you need to try to make the figure three-dimensional. To do this, each edge needs to be slightly pressed inward with your fingers, while simultaneously pulling out the corners. Since the star is very small, you need to be especially careful so as not to accidentally damage it.
If you did everything correctly, then your lucky star should look like this.
Don't be upset if something went wrong and the star didn't work out the first time. Try to start again and for sure this time you will succeed! And when you learn how to do them, it will seem to you that nothing could be simpler.
Holidays, theme nights, theatrical performances - all this requires certain paraphernalia. And simply decorating your home with interesting items, especially if you made them yourself, is always nice. In our article we will tell you how to make a star out of paper. Everyone will be able to choose their favorite method from the many offered.
Starfish made of polymer clay
Good day to everyone who has visited my MK!