Many fans of crossbow shooting are stopped from purchasing by the relatively high price of high-quality products or the low consumer properties of the simplest entertainment models. However, if you have the skills and tools, you can independently make a crossbow mechanism of a simple design.
Crossbow with trigger mechanism.
Folding Compound Bow
I once made a compound bow with my own hands, but something was wrong. Based on the first bow, I decided to make a similar one, but with folding bows and a stock.
Materials
- UAZ sources
- Sheet metal
- Durable edge
- Steel rope
- Bolts and nuts
- Aluminum pipes
- Sticks from the back of a crib
- Steel corners
- Steel profile
Tools
- Grinder or hacksaw
- Wire cutters
- Set of fastening tools
- Welding machine
- Emery
- Pliers
- Vice
In this tutorial we will show you how to make a mini bow from items that can be found in every home.
You will need:
- 4 rectangular rods;
- 2 wooden toothpicks;
- pin;
- scotch;
- rope;
- small saw or knife;
- hot glue gun.
1. Boil water in a saucepan, then reduce heat and place two wooden toothpicks into the hot water. Leave for 45 minutes.
2. After 45 minutes, carefully remove the toothpicks from the water, fold them and carefully fold them into a crescent shape. If you have clips, secure the toothpicks in a folded position and let dry. If you don't have clamps on hand, you can simply glue the folded toothpicks to the cardboard with masking tape. Then tape the toothpicks together on top of each other.
3. Fold the 4 rods as shown and wrap them with masking tape.
4. Use a toothpick to cut a groove several inches deep and wide.
5. Insert toothpicks into the groove.
6. Approximately 7mm from each end of the toothpicks, attach a string by wrapping it around the toothpicks and gluing it in place using a hot glue gun.
7. Measure a piece of fishing line equal to the distance between both ends of the toothpicks and tie a loop at each end. Apply hot glue to the ends of the toothpicks and wrap them around.
8. Attach the clothespin to the chopsticks with duct tape, with the end of the clip facing the tension line, and wrap that end with duct tape so that you can barely press the opposite end of the clothespin.
9. Make arrows from toothpicks into paper feathers.
The ideal target for shooting from such a bow will be fruits and vegetables.
Do not point the bow at people or animals - you may seriously injure them.
Bow trigger
The material for making the trigger is a sheet 6-7 mm thick.
The parts are mounted directly into the stock, without making a separate housing. A socket is cut out in the butt of the bow, through holes are drilled for the axles on which the trigger parts will be fixed, and the mechanism is installed
During the operation of this trigger design, not a single (!) spontaneous operation was noticed. The descent is smooth, comfortable, and requires extreme effort.
What kind of crossbow should a beginner shooter buy for recreation?
To choose a crossbow, you need to know that there are two fundamentally different types - recurve and compound crossbow.
Compound crossbows are more compact, they are 20-25% smaller than recurve crossbows, their trigger is very soft, and the take-off speed is higher. This is achieved by the presence of special blocks in the crossbow's shoulders. But they are heavier than recurve ones; replacing the cable (string) is quite difficult, and often impossible in the field.
A recurve crossbow has arms curved towards the direction of the shot, at the end of which there are special fasteners onto which the bowstring is pulled. Their accuracy is high, they are unpretentious in maintenance and repair. You can replace the bowstring yourself without using special tools.
Device features and main details
What does this shooting apparatus consist of? The classic version has three main components, then there are solutions with increasing complexity (kicks, handles, components, Picatinny rails, and so on). Our bow-making instructions do not include the installation of optical sights or other technical bells and whistles (Figure 2).
The main part that concentrates energy for shooting is the arch. By pulling the rope, he can transfer kinetic energy to the projectile. The whole structure revolves around this “capricious lady”. The main materials for its manufacture are metal and wood, but there are also more exotic solutions, for example, glass fittings or butter knife blades. The requirements for the arch are flexibility, rigidity and ductility. So, for example, a strong steel frame will not work like a bow, while a car spring or saw will do.
To create a frame from a wooden frame, pay attention to species such as hazel, birch bark, acacia, ash, yew or bean. Before cutting the frame, you should keep the log in a dry, dusty place for about a month or two. Fresh logs do not have the qualities necessary to undergo the processing procedure.
How to make a bow shot? Choose hardwood such as yew, beech, ash or oak. Hazelnuts and conifers are suitable. The further process depends only on the flight of fancy and your skill.
Figure 2. Main structural elements
The main controller of the mechanism is the trigger. It is he who holds the bowstring until the lever is pressed. The bow cocking mechanism consists of a solid block of metal, less often it is a groove inside the butt with a cylindrical pusher rod.
The methods listed are not the final solution. Even though the bow is a single-shot design, there are workarounds. The most common way is to make a multi-shot bow by making a special magazine for storing and delivering bullets.
Crossbow assembly diagram
The crossbow that we propose to assemble consists of the following main parts, see Diagram 1 (all dimensions are given in mm).
Scheme 1
The stock can be made from solid or laminated hardwood. Its approximate dimensions are shown in the figure. The shape is chosen at the discretion of the shooter. The most important thing is that it is convenient for further use. Depending on whether you are left-handed or right-handed, a special recess is made on the corresponding side for more intimate contact of the shooter’s head with the stock. In our example, it is made for right-handers.
Scheme 2
In our crossbow diagram, the stock and guide form a single whole
Therefore, it is necessary to pay special attention to surface finishing. The accuracy of shooting will largely depend on its quality.
They must be strictly straight, free from roughness, burrs, etc. It is best to process them on a milling machine, followed by fine sanding and polishing.
Dimensions of the guide groove for an 8 mm diameter boom. shown in Figure 3.
A crosspiece with shoulders screwed to it is attached to the end of the stock. The crosspiece is cast from a light aluminum alloy or milled from an aluminum blank. It can also be made from wood.
The position of the crosspiece with elastic elements on the bed should be such that the window for the arrow to fly out is located opposite the guide groove. (Figure 4), and the bowstring was pressed against the surface of the stock when fired.
Each arm is attached to the crosspiece with two screws.
Scheme 3
Scheme 4
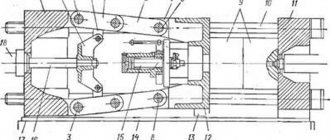
The principle of operation of the trigger mechanism is borrowed from the description of the design of a medieval crossbow. Its manufacture requires precision and scrupulousness (Figure 5).
Scheme 5
The operation and structure of the mechanism are clear from diagram 5. In the cocked position, the bowstring (1) is hooked onto the protrusion (a) of the lever (2). The trigger (3) keeps the lever from turning. When you press the hook, the lever is released, and the bowstring, rushing forward, sends an arrow. The movement of the lever is limited by the stop (4). To soften the impact, you need to put a rubber tube on the stop. The position of the stop is selected in such a way that the protrusion (a) of the lever in the extreme position is located below the guide surface of the stock, thereby not preventing the bowstring from sliding. After the shot, the lever is held in its extreme position by a spring (5).
When cocking the crossbow, the bowstring rests against the protrusion (b) and turns the lever (2) to its original position. In this case, the trigger rotates under the action of the spring (6) and fixes the lever and the bowstring.
To prevent the bowstring from accidentally jumping off the protrusion (a), the trigger mechanism is closed with a lid (7). A gap is left between the cover and the stock for the passage of the bowstring. A flat spring (8) is attached to the cover, holding the arrow on the guides when aiming.
The bearing (9), mounted on the end of the trigger, significantly reduces the trigger force. The required amount of trigger force can be selected by sawing through the surface of the lever (2), which rests on the bearing.
To reduce the weight of the lever, we recommend making it from light alloy D16T. Safety pins can be used as springs (5) and (6).
Model manufacturing technology
You can buy ready-made wooden bows in specialized stores. But made with your own hands according to specific requests, it becomes an exclusive weapon. It's also cheaper.
Parts drawing
Detailed drawing of a bow.
To facilitate the manufacture of the device and speed up the process, a drawing is needed. The simpler the weapon, the easier it is to shape it.
To do this, draw a model of the desired bow on paper and apply the required dimensions.
If you are planning a more complex option, it is worth making several drawings on which to draw the details, their size and location. This will make it easier to select materials and make workpieces.
Material selection
The best material for crafts is wood. Wood is easy to work with, it has the necessary flexibility and strength. A bow and a stock are made from it. You can also use spring metal or special composite materials.
Suitable wood:
- poplar;
- acacia;
- oak;
- maple tree;
- Beach Tree;
- ash.
The trigger mechanism must be made of more durable and wear-resistant materials. Most often it is iron. For example, make a bow out of a spring.
Preparation of material
Before starting work, you should prepare the material:
- Untreated wood is collected. The branch for the shoulders for the bow is at least 1.8 meters, the branch for the garden bed is at least 1 meter. The cross-sectional diameter of the pieces is at least 10 cm. Empty onion
- .
- To ensure uniform drying, branch sections are treated with varnish, varnish or any glue.
- The pieces are left to dry for a year in a dry and dark place.
- The pieces are cleared of bark and dried for another week.
- The branch is sawn and rested for another week.
Making shoulders
To make the arch (shoulders), the denser side of the wood is used. This is the northern side with narrow growth rings.
Sequencing:
- From the center of the part, measure 2 cm in both directions. The stock will be installed in this place, so it has maximum thickness. Project for bow shoulders.
- Excess wood is gradually removed from the center to the edges. Both sides of the part must be processed in this way.
- During processing, it is necessary to check the uniformity of the bending of the arches. This is done using a strong looped string - a bow test string. By pulling the string, you can find out which parts of the part require further processing. The arches should fold evenly on both sides.
- The shoulders can be reinforced with metal pads, which are fixed from the inside at the points of greatest stress.
How to handle knots
Knots weaken the structure, so when harvesting it is better to select branches with a minimum number of them. It is necessary to remove the knots already in the process of creating the shoulders with a sharp knife. When cutting, leave an overhang of about 1mm, and then sand with sandpaper. Do not remove knots from raw materials. This will cause cracks to appear.
Making a stock
Sequencing:
- The shape of the future bow has been chosen. If size allows, you can design a stand or a slot for the hand. The product is cut out according to the sketch.
- The rough workpiece is placed in a vice and processed with a file and sandpaper.
- A slide about 30 cm long cuts into the part, which should not have the slightest unevenness.
- Using fine-grain paper, the grooves are smoothed out to achieve a perfect smoothness.
- There is a seat embedded into which the trigger will be fixed.
- Grooves are cut on the front of the workpiece for installing shoulders.
Before you start making a bow, you need to familiarize yourself with several drawings, choose the appropriate option, and then independently prepare a diagram that you will need to rely on during assembly. Factory models are not recommended to be reproduced at home, as they have a complex design. In addition, for work you will need many tools that are not always available on the farm.
All designs are very different from each other, so it is necessary to study the most popular designs. It is important to understand that you should not completely copy the presented options. You can make changes to create a custom design for a specific person.
Classic weapons
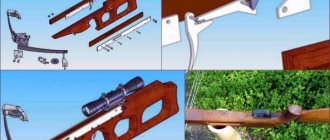
To make a real classic bow model, you need a minimum set of components. Before starting assembly, it is advisable to familiarize yourself with the existing database. The main components are the stock, the trigger module and the guides on which the arrow is mounted. Additionally, you will need to create a high quality bowstring retainer that functions as a trigger. In the image you can see a simple drawing of a bow with your own hands.
Assembling a classic version of the bow with your own hands is not difficult. To do this, you can use the following scheme:
- First of all, you need to make a high-quality and durable bed. The structure must be as durable as possible. For an amateur model, it is enough to make a simple rectangular base from any piece of thick wood. For more professional models, it is advisable to pay more attention to detail and create a comfortable seat. The wood must be free of chips and defects so that it does not break during the shot.
- The next step is to select the material for making the shoulder block. It is recommended to use spring steel or any other similar metal. It is important to ensure that the shoulder does not deform under tension. Its length should be about 50 cm or less. It is not recommended to increase the size as the power will increase significantly. To be able to adjust the degree of tension, experts recommend using it with blocks, but this will require additional components. Making a compound bow with your own hands is extremely difficult.
- Release mechanism. This is the most problematic module of the manufactured design. To make a mechanism, it is necessary to carefully study and recreate the drawing, and after installation, test it to secure the bowstring.
For a homemade bow, the manual drawing method is used. If the option is more complex in design, you can use the mechanical method. Suitable for hunting. Beginners are not recommended to assemble weapons using complex structures. Having made the first sample, you can already think about complicating the design.
Spring sample
If you plan to hunt in water, it is advisable to use a spring bow design. But it should be borne in mind that hunting on the territory of the Russian Federation using this model of hunting weapon is prohibited. The picture shows how you can make a bow according to the drawing.
The pattern looks very much like a pistol rather than a homemade bow. Instead of a shoulder lock, it is necessary to use powerful springs. They are located at the edges of the bed to reduce the size of the entire structure. This type of small arms has a number of advantages:
- ease of assembly;
- compactness;
- high reliability;
- voltage regulation.
But not without a drawback. The bow assembled according to the plans will have a short charge range, so the weapon can only be used at close ranges. Installation features:
- The springs are inserted into steel tubes to reduce the risk of clogging the mechanism. In addition, a person will not be injured when using a weapon. The springs have a high degree of tension. If you are not wearing protection, you may pinch the skin of your hand too much.
- When a bow is used for spearfishing, the number of wooden parts must be minimized. It is recommended to use metal, hard plastic or plexiglass.
- A lever block must be used to assemble the link. If the spring is very tight, assembly with the pin will be problematic.
The main advantage of the model is the ability to independently assemble a bow from scrap parts. There is no detailed description of the assembly of such weapons, since in most cases the drawing has to be adapted to your needs and capabilities.
How do people use devices today?
Simple mechanisms are very common in everyday life. Thus, it would be quite difficult to open a water tap if it did not have a small handle, which is a fairly effective lever. The same can be said about a wrench, which is used to unscrew or tighten nuts or bolts. The longer the handle, the easier the action will be. So, when working with heavy or large nuts and bolts when repairing complex mechanisms, machine tools, cars, they use wrenches with handles up to one meter in length. The most common door is also one of the types of devices under consideration.
If you try to open the door near its fastening, it will be very difficult. However, the further away the handle is from the hinges, the easier it is to open the door. A fairly clear example is pole vaulting. Its length is about five meters. With the help of this lever and the correct applied force, the athlete can fly to a height of up to six meters. The long arm is approximately three meters. Levers are found in different parts of the human and animal body. These are, in particular, jaws and limbs. Everyday examples of a lever are wire cutters, scissors for cutting metal or paper. Machines of various types also have devices in their design that allow them to gain strength. For example, pedals or handbrake on a bicycle, handles on sewing machines, keys on a piano.
Bow arrows (bolts)
To achieve shooting accuracy and good accuracy, arrows must be made correctly and of high quality, be identical in weight, shape, size, plumage (you can shoot a bow under a group of identical arrows, find the optimal target settings).
Bow arrows must be strong and elastic, because the bow
transfers a significant amount of energy to the arrow. A flimsy, poorly designed and poorly balanced arrow will break when launched or hits the target.
Recommended hand weight (in grams:
- minimum: bow tension (in grams) divided by 5000;
- maximum: bow tension (in grams) divided by 2000;
Thus, for a crossbow with a pulling force of 40 kg we get the following weight range: 10 - 25 g.
The range of an arrow depends on the area of drag, the mass of the arrow and the amount of energy transferred to it by the string. A small value of the ratio of drag area to mass will result in a longer range of the arrow (if we take the amount of energy constant).
Reducing the length of the boom also improves its flight performance because as the length of the boom increases, the turbulence of the air flow parallel to the cylindrical surface increases, absorbing more energy.
An arrow consists of fletching, a point, a shaft, and a butt plate.
If the shaft is wooden, then the butt plate may be missing. The arrow end of the bow is straight, without a loop for the bowstring. Arrows on sporting bows can be modified to be heavier and shorter.
Crossbows in Rus'
Ancient chronicles about the use of the type of weapon that our ancestors called crossbows provide very contradictory evidence. According to some written sources, the crossbow in the Middle Ages in Rus' was known and used in battles already in the middle of the 13th century. This is confirmed by historical finds dating back to fairly early periods of Russian history. For example, in the ruins of the city of Izyaslavl, which arose in the 12th century and was destroyed by the Mongol-Tatars about a century later, the remains of a warrior were discovered. On his belt there was a special hook for a crossbow bowstring. True, the weapon itself was not found. Therefore, this historical evidence has not been assessed unambiguously.
There are also facts that crossbows appeared in Rus' only in the 14th century. This type of weapon was adopted from the Bulgars during historical military campaigns in those lands of the Russian army.
However, among our ancestors the crossbow cannot be considered one of the particularly popular types of weapons. The explanation for this should be sought in the inconvenience of the design compared to a mobile bow, difficulties in charging, as well as large mass and high cost.
DIY onion
To make a bow we need a wooden stick and a piece of iron.
The stick is made approximately based on these dimensions
A spring plate 650Х100Х8 was taken. Using a grinder, slowly separate out what is needed. The arch dimensions are 35 mm in the center and 18 mm at the edges.
Tighten the arms on the sandpaper evenly from the center to the ends to a thickness of 5 mm. We stretch (hollow) steel wire onto the arch in this form. Tighten with a vice. Insert the round beam strictly in the center so that it does not interfere with the arch when bending. We stretch and at the same time check the tension and tension distance. We will continue to dance from these parameters.
As in “The Golden Calf”: we take a weight and saw. And that's what happened.
oh, to make a normal lock, we need a burn and a trigger. A hole is drilled in the top of the pin so that the spring bar bolt fits into this hole and prevents the pin from moving.
Let's start making the lock body
Let's try all this carefully and drill holes for the pins
Let's start making the trigger guard. We take a wooden stick and try it.
Let's dig a place for a castle
Insert the lock
To attach the rear sight we make a dovetail. And we cooked it. I did this with PSR, but it is also possible with POS. It all depends on how we burn (what the temperature will be).
In the arch we make two holes at the edges for attaching clamps. Many people ask whether it is possible to drill a spring. The answer is free. Correct winning drill on a diamond grinding wheel.
Straightening the rollers
We adjust the clamps to the required size. Let's start making the arch fastening clamp.
Making a bracket
This is how I close the ends of the rope. Do not hit, but press with a lathe chuck.
In production stage.
Finished look
Take a stick and make a channel for the conductor
Glue the timber
We remove unnecessary things. I took a wild cherry stick. They will make birch, walnut, etc.
We are grinding
Let's color it. But who prefers which paint?
Redundancy. But, in my opinion, it is pleasing to the eye.
It is important that the gap between the bowstring and the butt is 2 mm. The calculation is simple: half the diameter of the bolt.
Collecting everything
Bottom view
General
And he pulled the shrink film over the arch. And this gives the look and protects it from splinters in case the bow breaks.
Finished look
After 40-50 hits, the bowstring burst.
I decided to add 2 more videos.
To facilitate the design, the rollers were replaced with nylon ones. At 30cm string to hook distance and 85kg force with the addition of rollers the force on the bow is reduced and the hand speed is increased.
TTX
Well in all its glory
Castle work.
- https://diyworkplace.ru/28-handmade-crossbow.html
- https://www.promyhouse.ru/idei-dlya-doma/neobychnye-detali/kak-sdelat-arbalet-svoimi-rukami.html
- https://www.vseznaniya.ru/useful/wild/969-arbalet-draw-2
- https://nowifi.ru/oruzhie/holodnoe/169-kak-sdelat-arbalet.html
- https://VashNozh.ru/arbalety/arbalet-svoimi-rukami
- https://iohotnik.ru/snaryazhenie-dlya-ohoti/98686-d0-ba-d0-b0-d0-ba-d1-81-d0-b4-d0-b5-d0-bb-d0-b0-d1- 82-d1-8c-d0-b0-d1-80-d0-b1-d0-b0-d0-bb-d0-b5-d1-82.html
- https://VKadety.ru/strelkovoe/samodelnyj-arbalet.html
- https://zkm-v.ru/snasti/samodelnyj-arbalet-dlya-rybalki.html
- https://FB.ru/article/231650/ohotnichiy-arbalet-cherteji-harakteristiki-foto-kak-sdelat-ohotnichiy-arbalet-svoimi-rukami
- https://voinvtebe.com/oruzhie/sozdat-arbalet-svoimi-rukami-ne-tak-slozhno-kak-kazhetsya.html
[/spoiler]
Revolver Lebel arr. 1892
View
French revolver mod. 1892 is similar in design to the Colt system revolver, but the cylinder is tilted for loading and unloading not to the left, but to the right. The drum is locked by a trigger and a locking device of a slightly different device. A special feature of this revolver is its ease of disassembly. To disassemble, unscrew the connecting screw and turn the left wall; After this, the revolver will be completely open and can easily be disassembled in a manner similar to disassembling a Colt revolver. In addition, the revolver had an “Abadi door” for alternate loading of cartridges. According to A.B. Zhuk, simultaneous extraction of cartridges with the drum folded back was present, but the introduction of cartridges into the chambers of the drum was carried out one by one (as with Nagan revolvers). The revolver was in service with the French army along with old French revolvers mod. 1873-1874 The design, in general, is quite perfect for its time, but the ideas that guided the gunsmiths when deciding the issue of preloading are not entirely clear. One caliber with a rifle made it possible to use defective rifle barrels in revolver production, but the caliber did not quite provide sufficient stopping power. The problem is similar to the problem of Nagan revolvers in Russia, where the same principle of a single caliber was laid down.