DIY paper apple tree branch
Author: Chichkina Elena Vasilievna, teacher, MBDOU "Ermakovsky kindergarten No. 3", p. Ermakovskoe, Krasnoyarsk region. Description: This master class is intended for children from 7 years old, additional education teachers, parents and creative people who love to create beautiful and unique things with their own hands. Purpose: Souvenir, gift, voluminous souvenir, home decoration.
You know, if it weren’t for apples, there would be neither me nor you, either in the virtual world or in the real one. Just remember, who were the first people? Do you remember? Well, of course, Adam and Eve. But, after all, they lived in paradise, and they had everything. They only had one prohibition - not to pick an apple tree, not to eat apples.
Where are you, April breeze, charming, in love with the apple trees? They bloom and bloom, and you blow away this fragrant snowball.
In the old, blissful days, in the cold pink fog, yes, they fell sweetly, flowers of simple charms. Vladimir Nabokov
Goal: Making flowers with your own hands Objectives: - continue to get acquainted with the seasons: spring; — teach how to make souvenirs from paper and waste material; - develop interest in artistic creativity; - develop fine motor skills, eye, imagination, aesthetic taste, compositional skills; - consolidate skills in handling tools - scissors, paper; — to form a work culture: teach accuracy, the ability to use materials carefully and economically, and keep the workplace in order; - cultivate independence, patience, perseverance, a sense of satisfaction from the habit of finishing things;
Source of the article: https://kladraz.ru/blogs/elena-vasilevna-chichkina/kompozicija-iz-vetok-jablonevyi-cvet-master-klas-s-poshagovymi-foto.html
Apple wood
Apple tree wood is a heartwood species. It has a dark red core and light yellow sapwood with a pinkish tint. The growth rings are wavy and form a very beautiful pattern.
Most often, an apple tree has a smooth trunk, the diameter of which can reach half a meter. Because of this, the apple tree produces the most lumber compared to other fruit trees. And, accordingly, the cost of apple wood is much lower than, for example, peach, apricot, plum, etc.
Apple tree cuts
Apple wood is distinguished by its uniform texture, when there is practically no difference in the structure of early and late annual rings. Apple wood is dense and hard. The medullary rays on a cut of apple tree wood are not visible to the human eye.
The material requires long-term drying. If it goes fast, it cracks and warps. But, if the wood is dried correctly, it will never crack in the finished product and will last for many years.
Apple wood is quite easy to process. Well polished and sanded.
It has the ability to acquire a deep dark color when treated with drying oil or linseed oil (this can be done especially well by boiling).
Treated apple wood. Knife handle
Waste from sawing apple trees is an excellent material for smoking.
Master class “Apple tree branch”
Irina Fedoreeva
Master class “Apple tree branch”
Master class on making a branch of a blossoming apple tree.
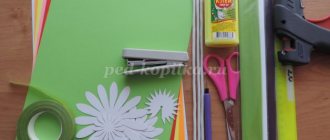
1. For work you will need: paper napkins in 4 colors: white, pink, 2 shades of green, scissors, a stapler, a simple pencil, glue and of course a twig.
2.Fold napkins in layers: white, pink, white. Then we divide the square into 4 parts and fasten each part with a stapler.
Take scissors and cut along the drawn lines into 4 parts.
3. We got 4 squares, on each we draw a flower and cut it out.
4. Having cut out all the flowers, we begin to give them volume. We straighten each petal.
5. Having made the required number of flowers, we begin to glue them onto the branch.
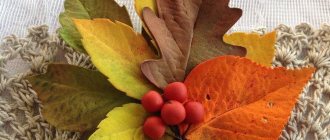
6. Make small leaves from green napkins.
7. The twig is ready. We made several branches, so we decided to welcome spring.
Christmas tree from napkins Master class: Christmas tree from napkins goal: making a Christmas tree from paper napkins. The little Christmas tree is cold in winter, We took the Christmas tree from the forest. Gift for mommy! Master class “Gift for Mom” I offer a master class for those who like to make flowers for gifts for March 8 with their children. Manufacturing.
Source of the article: https://www.maam.ru/detskijsad/fedoreva-irina-nikolaevna-mbdou-detskii-sad-5-prezentacija-vetka-jabloni.html
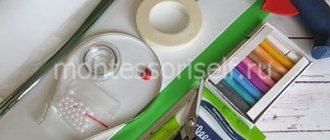
Required materials and tools
To make crafts with your own hands, you will need paper of different colors and textures, as well as additional materials and tools:
- cardboard;
- pencil;
- ruler;
- scissors;
- glue (PVA or stationery);
- glue gun with silicone rod;
- wire;
- threads;
- decor for making stamens (dyed semolina).
When working with children, it is recommended to properly organize the work and explain to them the safety rules for working with glue and scissors:
- Scissors can be passed to each other holding them by the closed blades with the rings facing forward.
- Scissors for children's creativity should have rounded blunt ends.
- The glue should be squeezed out of the tube or carefully applied with a brush.
- Do not swallow glue or touch your eyes with glue-stained fingers.
- If glue gets into your eyes or mouth, tell an adult immediately.
- Rinse eyes with running water, rinse mouth with water.
Where can you use apple blossom?
Paper flowers always remain popular. Along with the ease of their implementation, the inflorescences always look natural and allow you to decorate any space.
A branch of a blossoming apple tree made of corrugated paper or created in origami style can become a bright decoration in the following cases:
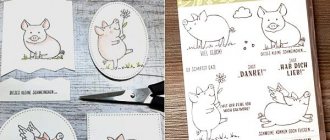
- making and decorating cards;
- interior design of a home or office;
- decoration of theme parties, banquet halls, festive tables;
- decoration of clothes and hair in the form of boutonnieres and individual flowers.
Beautiful paper crafts
There are a wide variety of techniques for making artificial flowers:
- This could be a voluminous apple tree branch made of corrugated paper that can be placed in a vase.
- A voluminous applique made of colored materials with lush inflorescences, which can serve as a decoration for a postcard or wall panel.
- Large flowers made of thick paper in origami style for decorating gift packaging.
- Delicate apple flowers made from thin napkins as interior decoration elements (mirrors, walls, windows).
- A large branch of an apple tree made of corrugated paper as a design element for spacious rooms for celebrations.
Apple tree flowers made of paper master class
This master class describes step by step the sequence of assembling a flower, shows a diagram of how to make apple tree leaves, and provides tips on working with craft materials.
Crafts of individual paper flowers with a diagram
For creativity you will need:
- corrugated paper in green, white or light pink;
- wire;
- glue (PVA or silicone);
- scissors.
Apple tree flowers made of paper, manufacturing sequence:
1. Prepare materials of the required sizes according to the photo.
When cutting out elements, pay attention to the stretch line of the paper. The petals should stretch in width, and the strip for wrapping the stem should stretch in length.
2. Cut the strips for the petals in half.
Fruits using the paper-plastic technique
Video: Learning to make a pumpkin
Apple papier-mâché
From previous master classes, we learned how to create vegetables step by step. And now we propose to talk about how to make fruits of different colors, shapes, and sizes. Bulk apple:
Description of work: Wrap a plastic apple in cellophane. Cut white paper and newspapers into 3x3 cm squares. Dilute the glue with water in a ratio of 50x50. Coat the workpiece with the resulting mixture. Cover the layout with white paper.
Re-lubricate with a mixture of glue diluted with water. Glue the newspaper layer.
Alternating newspaper with paper, cover the workpiece with 12 layers. Set aside for a day. Carefully cut into 2 halves and remove the plastic apple. Connect the parts, cover with 6 layers of paper and set aside for a day.
Smooth out any uneven surfaces using sandpaper. Paint, varnish. Attach a decorative leaf with a twig.
If desired, such an apple is decorated with beads.
Or decorate using paper art technique.
Video: Apple on a papier-mâché plate
Ripe pear
We do it in the same way as hollow vegetables. That is, first we sculpt a pear from plasticine, then we glue it, cut it, take out the “filling” and put it together again. You will learn more about how to form a papier-mâché pear from the instructional video clip.
Ideas for beautiful flowers. Step-by-step description of work and diagrams
Paper apple tree flowers can be not only a decoration, but also the basis for children's creativity lessons. A simple craft in the form of an applique can be done independently by a child.
A corrugated paper apple tree can be created using natural ornamental material such as tree branches.
Applications for children
In order to make apple tree flowers, you will need the following materials:
- paper of light pink, brown, yellow, green colors;
- A4 cardboard sheet;
- pencil;
- scissors;
- glue.
Before starting the lesson, you need to print out the template of the applique elements, then it will be easier for the children to transfer the image onto colored paper.
- Draw the outline of a branch on a brown sheet and cut it out. Glue it in the middle of a sheet of cardboard.
- Make leaves from green paper: 3 large and 2 small.
- To make the sheet voluminous, you need to apply glue only to the center line.
- Arrange the leaves as shown in the photo.
- Cut out flower blanks. You should get 1 large flower, 1 smaller flower and a bud.
- Give the petals volume by running the tip of a pair of scissors over them. At some points, children need help when making crafts. An adult would probably be better able to create the volume of flowers using scissors.
- Glue the flowers as shown in the picture, placing the bud at the end of the branch.
- Finally, make the middle of the flower from yellow circles. First, the edges of the circle must be cut often with scissors.
To make the stamens voluminous, you need to press the center of the circle with a pencil and lift the stamens up with your fingers.
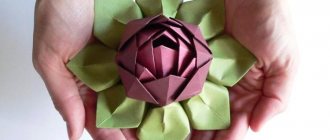
Origami flowers
Origami is the Japanese art of folding paper figures. By following a simple pattern, you can make flowers, which can then be used for various decorative purposes.
Family Bunch
Search
Our VKontakte group
Categories
- (16) (18) (4) (14) (6) (2) (1) (18) (24) (1) (22) (3) (1) (49) (49) (23) (61) (1) (6) (52) (9) (33) (1) (1) (1) (8) (2) (12)
Counter
Yandex counter
Analytics
ad unit 1
ad unit 2
ad unit 3
help for children
SUPER ADVERTISING
ad block 4
ad block 5
ad block 6
Craft APPLE (33 ideas for children).
July 28th, 2022 admin
Good afternoon. Autumn is coming, juicy apples are blushing. And therefore, in our article today we will make a variety of crafts on the APPLE theme with our own hands. Here you will find interesting and simple crafts for children (for classes in kindergarten and school). As well as art crafts on the theme of an apple using more complex adult techniques.
So let's start making our own apple crafts. Let's take a bite of our apple, so to speak.
Craft APPLE for kindergarten.
Idea #1
Mosaic filler.
There is a type of DIY craft where you need to fill a cardboard frame with a mosaic made of translucent paper. If you cut the filling frame in the shape of an apple, it will be a good idea for an autumn children's craft. For such an apple craft, you need thick cardboard, a transparent office file and colored CREPE or napkin paper.
We cut out a frame from cardboard - a contour frame of an apple. We place this frame on top of the office file. And right in the middle of the apple frame - directly on the office file, generously spread PVA glue. And on this glue we place pieces of crepe paper (or paper table napkins). Again, use a wide brush to coat them with glue and add another layer of napkins. We dry this design directly on a polyethylene file. And then we calmly peel it off. And we glue our apple craft onto the window in the kindergarten on the sunny side - so that the bright sun shines through the ripe apple side.
You can simply stick pieces of colored napkins onto a solid cardboard silhouette of an apple without a frame.
Here is a very beautiful and stylish apple applique using the mosaic technique made from cardboard fragments.
Idea No. 2
Crafts-bits
On the theme of apple.
And here’s another interesting perspective, a look at the apple theme. Craft in the form of a gnawed apple. Also suitable for an autumn theme.
You can make such a children's craft in the form of a mosaic from lumps of crepe paper. For small children, you can make the lumps yourself in advance so that they just stick them in the right places.
You can make an apple core from a plastic or paper disposable plate. Cut it off from the sides and let the child use a brush to paint over the leathery parts of the apple and draw seeds. And add a green leaf.
You can give your child a circle cut out of red cardboard. Tear it slightly on one side and then the child should quietly continue tearing the circle into two parts along the middle line. These two halves of a red circle with an uneven break line will become parts of a flat apple craft made from cardboard (see left photo below).
You can also make this craft from a toilet paper roll. Paint it white and stick on apple seeds. And add a round fan of colored paper on top and bottom.
Crafts on the theme of apple.
Idea No. 3
Using stamping technique.
If we buy a few of the smallest apples on the market and cut them in half with a knife, we will get an excellent seal for apple stamps. Pour PVA glue (2-3 tablespoons) into a flat bowl and add red gouache to it. And we get thick, juicy paint. Spread it over the bowl so that the depth is not great.
Note. For such crafts, it is better to buy glue not in the stationery department of the store - but in the construction department - there the glue is sold in liter buckets and costs 10 times cheaper than in stationery: it says construction PVA, or universal PVA - but the composition is exactly the same as that and glue for schoolchildren
Now we slap the apple into the paint. And we make stamps on a picture of an apple tree. And a quarter of an apple (or potato) will make a good stamp for leaves. A simple and quick children's craft on the theme of an apple - plop, plop and you're done.
You can dilute paint in two shades of yellow and red in a bowl - but do not mix, but let the puddles lie side by side. Then the apple prints will turn out to be different-sided - yellow-red. And you can also make this craft - apple compote. We draw seeds and cuttings by hand.
You can also make a stamp for drawing apples from a roll of used toilet paper. We crumple the bell of the roll in the shape of an apple, and fix this bend with tape (so that it does not straighten out). Such a signet will give us only an outline stamp, and the middle will have to be painted manually with a brush.
You can make stamps from large apples. And then it will be a separate craft. This apple print can be cut out and pasted onto a beautiful autumn orange background. You will get a postcard for the autumn holiday.
Idea No. 4
Craft apple
For the younger group of kindergarten.
Here is a great apple themed craft for little ones who love finger painting. Each child should be given a mold with two colors - yellow and red. And a drawing of an apple printed on a sheet of paper. And now the main thing is to explain to the children that the transition from red to yellow needs to be made smooth - that is, mixed.
Idea No. 5
Crafts apples
With blades.
But below we see a three-dimensional applique on the theme of an apple tree made of colored paper, where each apple has blades. Made in the form of a book.
This is done very simply. Three identical apple figures are cut out. Each of the figures is folded in half. And then, first, two apple figures folded in half are glued onto the background - the fold line is towards each other. And then on top of these folded halves we place the open third part of the apple - so that it sticks to the two flaps of the lower parts.
A tree like the one in the picture below is best made collectively in kindergarten. That is, it is enough for one child to make one lobed apple. And then each child will attach his own apple to the tree.
If you don’t mind colored paper, you can make a lot of blades for such a book-apple.
Idea #6
Craft apple
from waste material.
Every home has items that should go in the trash. Such material is called waste material - and with our light hand it can become an ornamental material. All sorts of old newspapers and magazines, bottles and can lids can become a filling apple. Let's see how this happens.
Here is a children's craft apple made from waste materials - glossy magazines and matte newspapers. First, draw the outline of an apple on a sheet of cardboard. We fill the surface of the cardboard around the apple-contour with scraps of newspapers - using PVA glue. And then from the magazine we tear out those pieces of pages that match the color of the apple shade - all the green, yellow and red places in the magazines. We tear these pieces into shreds of a size suitable for the craft and begin tinkering. Paste it as you please. Enjoying the process.
A plastic bottle is also a waste material, suitable for children's crafts. We cut off the bottom bottom of two bottles. We dock these bottoms together and get a round transparent capsule. We stuff more red paper napkins or crepe paper into it. Cut out the stem and leaves from felt or cardboard. It turns out a quick and beautiful craft on the theme of autumn apple.
Disposable paper plates are also waste material, ideal for children's apple crafts. The plate has a ready-made round shape and all you need to do is paint it red, add a stem and a cardboard leaf. You can also decorate such an apple with your own hands with a funny worm.
Children's craft
from stained glass paints.
You can draw a large apple on paper. Place this drawing inside a transparent office file. Take bright stained glass paints and first carefully outline the silhouette of an apple with paints, and then chaotically fill the entire space of the apple with jet lines from a tube of stained glass paint. Put it all out to dry. And then after a day, remove it from the file and stick it on a window or mirror.
Crafts on the theme APPLE
From paper strips.
The simplest craft from colored paper in the shape of an apple is made from a long, wide rectangle. We roll the strip into a circle and bend its edges inward, gluing the stalk and leaf between them. We get a simple silhouette of a paper apple. If you make a lot of these silhouettes, you will get a whole dish of apples.
In kindergarten, you can give each child the task of gluing an apple and then the teacher glues all the apples onto a ring made of a strip of cardboard - you get a beautiful autumn wreath on the theme of Apples.
Here’s another craft idea for an apple made from paper strips. Here we take a toilet paper roll as a basis. We cut long strips of the same size from red colored paper. And we wrap them around the bushing - forming rings that pass through the bushing. This craft is suitable for middle and senior kindergarten groups - there is a lot of painstaking work.
To make it easier, it is not necessary to close the strip into a ring. You can make the strips shorter and simply glue their ends to the inner edge of the sleeve - along the entire circumference of its upper and lower holes.
And here are more ideas for voluminous paper apples, where four strips of paper glued crosswise create a pot-bellied volume due to the fact that their edges are tucked inward.
DIY apple craft.
Using the quilling technique.
If you have a quilling kit. Narrow strips of colored paper, then you can make a beautiful openwork apple craft.
We twist strips of paper on a thin rod, fold and glue these twisted modules into a single apple puzzle.
You can make such a quilling apple part of an overall art picture. Print out the background on your computer and attach an apple to it. Draw a hedgehog and place such an apple with your own hands on the thorns of the animal.
You can decorate a handmade card with a paper apple using the quilling technique.
You can use the narrowest strips to make mini-craft apples for earrings. Almost DIY jewelry work on the theme of an apple.
An apple can be laid out from the simplest flagella. Don't overthink the forms. And just make round modules of all colors and sizes. And use them to assemble an apple puzzle.
Or the modules can be teardrop-shaped or eye-shaped. And be the same in size but different in color (as in the photo of the craft below).
You can also use the quilling technique to make a beautiful box candlestick from an openwork apple, as in the photo below.
Using the same principle, you can make a box-lamp simply from paper. Below is a simple master class on this topic.
Craft apple
In the form of a lamp box.
Below we see the layout and assembly diagram of a three-dimensional craft - A LAMP IN THE SHAPE OF AN APPLE.
From thick colored paper we cut out the silhouette of a cross - where the horizontal sides are rectangular. And the vertical crossbars of the cross have the silhouette of an apple. We bend our cross layout along the fold lines. We coat the edges of the rectangles with glue and connect them to the apple sides. We get a box open at the top. We decorate it with a cutting and a leaf of green paper.
And if you want without fire, then you can put an LED garland (New Year’s) in the apple box and it will glow and flicker there with lights that will appear red from the colored paper of the apple. It will be a good night light for a child's room.
Craft apple
In realistic technique
Quick papier-mâché.
And here is the papier-mâché technique. Where we sculpt an apple with our own hands, as if from paper plasticine. And it turns out to be real, alive.
Using this technique you can make apples, mushrooms and cakes just like real ones. Last winter my daughter and I made Santa Claus using this recipe. It turned out very beautiful.
Here is a detailed step-by-step master class with photos and explanations.
What do we have to do. Take a paper cassette from eggs. Better is the one that is rough and not too pressed.
Soak it in hot water. Knead it with your hands and tear it into pieces. You can leave it overnight.
Next, use a mixer to loosen this soaked paper into a homogeneous mass. I did it without a mixer, I just kneaded it with my hands, and it worked (children really like to dig up to their elbows in this luxurious liquid). I also, by intuition, put a little starch there - a handful, my soul asked for it. But it’s possible without it.
And all this thick slurry needs to be squeezed out onto a cloth (like cottage cheese is squeezed out in the village). Place a rag (or pillowcase) in a bowl, pour liquid into it, wrap the rag in a rope and press firmly with your hands to squeeze out the moisture. You can insert a stick into the string of ties and by twisting the stick-lever in your hands, you will tighten the string of the rag more tightly, squeezing out more moisture. You can simply press down this bundle with a heavy stone and leave it lying in the basin, the moisture will itself move away from the weight.
As a result, we should get a thick mass similar to paper clay. We begin to make our apple from it. We roll a rough ball in our hands. And so that the sides are smooth and not rough, you can roll them in a round bowl.
Next, we dry our ball until completely dry and hardened. It doesn't turn out as smooth as we would like. Therefore, you can make amends for him. Spread PVA glue, cover with scraps of white napkin and coat the top with PVA again - smooth it with your hands. Dry.
We make an apple stalk from wire that is wrapped in a napkin soaked in PVA glue.
Next, we paint our apple with a special paint-paint. We combine PVA glue, starch and gouache. We dilute it to a consistency close to liquid sour cream. Let's give several coatings of different colors. And with this coating we paint the apple. First in yellow-green color. And then when it dries, we paint red-orange stripes on it with a thin brush.
Crafts APPLES
Made from felt with your own hands.
If you have felt fabric (or fleece), then you can make these sewn apples with your own hands. You can make flat apple slices from felt in a cut like the one on the left craft below. You can decorate them as a brooch, or make a round autumn wreath out of them. You can make plump apples from two layers of sewn felt, filled with padding polyester.
The connecting seam on a sewn apple made of felt can be OVERCLOCK (as in the photo above) or a regular STITCH stitch (as in the photo below).
The pattern for such an apple can be any Google silhouette drawing.
If you sew several apples and pears, you can use them to decorate an autumn wreath with your own hands.
Craft apple,
cross-stitched.
If you already know how to hold a needle in your hands, then you can make an apple craft in the form of cross stitch. Buy a hoop (frame holder), a piece of canvas (mesh fabric) and embroidery thread (floss).
Here are two small patterns for cross stitching an apple on canvas.
DIY apple
Crocheted.
If you know how to crochet, you can make this round red apple filled with synthetic polyester with your own hands. You can knit a hole in the apple, like a finger on a glove, and then push it inside. And put a knitted worm in this hole.
That's all for the DIY apple craft idea. Now you can choose the craft option for which you have the material and skills. You also found good apple crafts for activities in kindergarten and school in the fall.
Cutting templates
This section includes ideas and diagrams that can be used in creative works. Here there is a template of an apple tree flower for cutting out of paper, a stencil of leaves and branches and other photographs of finished works, which you can also make yourself.
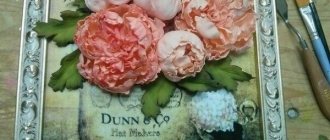
Homemade items can become original gifts if you put in the effort. An apple tree branch made of corrugated paper in a bright frame will not leave anyone indifferent and will become a stylish interior decoration.
Source of the article: https://e-ipar.ru/cvety-iz-bumagi/yablonevye-tsvety