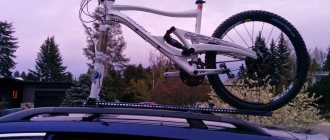
What can you take from your bike?
It would seem that there is nothing to remove from a bicycle to make a snowmobile. However, to make a snowmobile with your own hands you will need almost the entire bike. In particular, for a bike, you will need the entire frame, fork, and seat.
In order to make a snowmobile, it is best to use a mountain version or any other with a reinforced, lightweight frame and a wide range of speeds. It is advisable to use a motorcycle engine as a power unit. It has a small mass, but at the same time produces quite good torque and speed. In particular, you can take the engine from the Minsk motorcycle. or ?Izh?.
With your own hands you can make a snowmobile that can accelerate to a speed of 30–50 km/h on a flat track. Winter transport from a bicycle is designed for one person, whose weight is up to 80–100 kg. At the same time, the snowmobile can also move a small additional load.
In addition to spare parts for the bike, you will need the following parts and products:
- a ski with a length of 60 to 80 cm and the wider the better;
- two pieces of iron pipe with a diameter of up to 50 mm (it is best to use a lightweight aluminum pipe, but with a thick wall);
- a piece of channel or U-shaped bracket;
- metal plate 25×50 mm wide and 4×5 mm thick;
- square profile;
- thick rubber or ready-made tracks. Finished products for the chassis can be found on the construction equipment market. For example, the tracks needed for a snowmobile will fit from a mini-excavator;
- three pairs of metal (preferably) wheels from a small cart.
Tools you will need:
- set of wrenches;
- pliers;
- hammer;
- welding machine;
- drill.
[ads-pc-1]
Calculation and assembly of caterpillars
The caterpillar is a tape, on the outer surface of which tracks are attached. Tracks are rigid lugs installed along the entire length of the tracks. Track options:
- Made from 3mm thick transport tape.
- From a car tire.
- From V-belts.
- Ready-made factory-made tracks.
The conveyor belt must be looped. Its strength is only sufficient for light snowmobiles with engines no more powerful than 10 liters. With. Car tires are stronger than tape and are suitable for powerful engines. Solid tires do not need to be looped, so the likelihood of a rupture is minimal. It is more difficult to choose a tire of the required length than a tape.
Finished tracks are removed from other similar equipment (snowmobiles “Buran”, “Sherkhan”). They are equipped with lugs from the factory. The products are not suitable for use with low-power motors from walk-behind tractors. Homemade snowmobiles made from Buranovsky tracks must have gears from the same “donor”.
The size of the caterpillar is selected according to the required driving characteristics: the larger the width, the lower the handling, but the higher the maneuverability. The minimum area of the contact patch from the snowmobile (skis and tracks) must be such that the pressure from the equipped vehicle does not exceed 0.4 kg/cm2 of surface. Light snowmobiles use a 300 mm wide conveyor belt, cut lengthwise into 2 strips of 150 mm each.
Preparing the Tape
The tracks are attached to homemade tracks with M6 bolts with a wide head. The bolts are fixed with a nut, a washer and a groover are used. Before fastening, leading holes with a diameter of 6 mm are drilled in the tape and tracks. When drilling, use a jig and wood drills with special sharpening.
The conveyor belt is also looped with M6 bolts. To do this, the edges of the tapes are overlapped with an overlap of 3-5 cm, the connection contains 1-2 rows of bolts. For a 150 mm wide track, the following distances are maintained:
- From the edge of the tape 15-20 mm.
- Between bolts on tracks 100-120 mm.
- Between the bolts when banding 25-30 mm.
In total, one track requires 2 bolts, and one belt connection requires 5-10 bolts, depending on the number of rows. When using car tires, only the tread is left, and the sidewalls are removed with a shoe knife.
Homemade lugs
The tracks are made of polyethylene pipe with a diameter of 40 mm with a wall thickness of 5 mm, sawn in half in the longitudinal direction. The entire section of the lug is adjacent to the tape. In light snowmobiles, one track connects the tracked pair. With a track width of 150 mm, the track length is 450-500 mm.
The lugs are cut using a wood circular saw. They use a special machine with two guides (metal and wood), rigidly fixed on a fixed tabletop. The walls of the pipes are sawed one by one.
The distance between the tracks depends on the parameters of the gears on the drive shaft. Typically 5−7 cm. The specified distance is maintained with an error of no more than 3 mm. Otherwise, the operation of the drive is disrupted: the lugs “run” onto the teeth of the drive wheels, the caterpillar begins to slip and fly off the rollers.
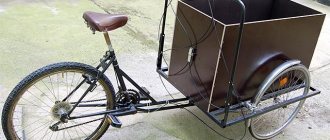
Assembling the front part of the snowmobile
First, remove the front wheel from the bike. Now we attach a piece of channel or a U-shaped bracket to the prepared ski in the center. This can be done using regular bolts. Four M8 or M10 bolts will be enough. After this, cut two identical pieces of pipe. We fix the pipes on the bicycle fork (one pipe for each “horn?”). You can firmly secure the tubes to the fork using U-shaped clamps or clamps. A minimum of two fasteners should be used per fork element.
The pipes are attached symmetrically to each other. To give additional rigidity to the extensions constructed on the fork, we drill through holes in the middle of the length of the tubes and tighten them together with a long bolt or pin. After this, we cut the fixed tubes to length so that they are 20–30 cm longer than the bottom of the bicycle.
Let's return to the ski with the bracket. It is necessary to make holes symmetrically to each other on both sides of the channel/bracket. At the edges of the tubes (near the ground) on the fork we drill holes of the same diameter as in the channel. The holes must be at least 11×13 mm. Now we connect the extended fork to the ski through the holes. To do this, we use a long bolt M10-M12. Thus, the ski is installed on the snowmobile. At the same time, it remains movable in the vertical plane, which allows descent/ascent at different angles. You can control the vehicle by turning the steering wheel, just like on a bicycle.
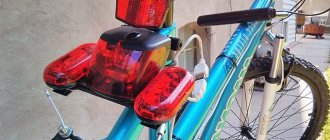
Winter bike (ski, k-trak)
Finally, real winter has come, it’s snowing, cold outside and it’s time to try out a winter bike, which means a bike equipped with skis and a rear wheel on a caterpillar track (it’s also called a ski bike or popularly a ski bike). Before starting to write a review, we tested similar bicycles three times and collected a sufficient amount of photo and video material in order to demonstrate the curiosity in all its glory. The test drive was carried out jointly with the Sokolniki like2bike on the territory of the Sokolniki Park and Culture Park, where, according to the official k-trak dealer in Russia, the only rental of such bicycles in Moscow is located (although we have heard rumors that similar bicycles were seen in Severnoe Tushino Park ). You can rent bikes in Snegohod-ville , which is located at the intersection of the Big Circle with the 6th Luchevoy clearing, for 450 rubles. per hour (price as of January 2014)
Before writing a review and sharing my own impressions of riding, I’ll draw attention to a number of points: 1 - rental bikes were tested, i.e. The state of their setup, as you understand, leaves much to be desired. the Black One bicycle is taken as a basis - a typical representative of Auchan bikes 3 - the device itself and the k-trak body kit are designed for mountains and large slopes, i.e. It is assumed that you fly down on a bicycle, using a minimum of effort, and go up on a lift. They say that in Europe, ski-pedal riders are not uncommon on the ski slopes. Taking into account the above, the use of the body kit on other (normal) bikes and in the mountains may demonstrate different characteristics than those described in this review.
The technical side of the issue. Almost any bike can be equipped with k-trak. Mandatory conditions for this are 26-size wheels and disc brakes. That's all. The front wheel is replaced with a ski, the rear wheel with a massive wheel with a track. The speed is set to low to make it easier to pedal (at rental stores it is highly discouraged to switch speeds). It is also not recommended to ski on icy surfaces, as this will warp and damage the ski.
Riding Features A winter bike has a strong weight imbalance - a heavy rear wheel and a light ski in front. The ski glides easily over the surface, the caterpillar completely absorbs all the roll-up, but actually improves the bike’s cross-country ability in the snow. Taking these two factors into account, at the moment when you “take off” from a standstill, it is worth transferring your body weight to the steering wheel, thereby, as it were, pressing and pressing the ski to the ground, preventing it from sliding and dangling 360 degrees. For me personally and for many who have tried driving, it’s convenient to start standing on your feet. And then you will have to constantly (!) pedal, as I wrote above, the pedal has zero roll-up. And every hill, even the slightest one, will require significant twisting from you to climb. Another important point is that you can’t turn sharply on a winter bike (forget about drifting right away). The track on the rear wheel is soft, tensioned by rollers and therefore fixed in one plane. Turning the wheel causes the track to simply fly off. Putting it back on is not an easy task (although during the test drive we mastered it very well =)) The rollers have tensioner wires, which also jump out of their places and if you don’t catch them, the caterpillar will fly off.
But (!) despite all this, riding such a bike certainly allows you to experience new sensations and impressions. They are rented not only by boys, but also by girls. A rental hour will be enough for you to ride, warm up and get tired =)
In order to find out whether there are advantages of such a hybrid bicycle, small competitions were held among a rider on a ski bike, a bicycle on studded tires and a skier. The result is third place.
Going further, as part of the “VeloWinter” holiday, they held a skiing competition. And the intensity of passions was serious, everyone fought for victory =)
VERDICT The thing is certainly positive and in some ways even interesting, but there is no real benefit from it in the conditions of plains and cities.
We also offer you a video review
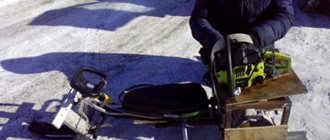
Working with the drive part of vehicles
First, remove the rear wheel from the bike. Instead, a tracked chassis will be installed. If you couldn’t buy ready-made tracks, then we make them from rubber with our own hands. You should cut a strip about 40×50 cm wide. We stuff metal, plastic or wooden strips onto one side of the prepared piece of rubber. These small elements for the snowmobile will serve as snow hooks, so it is best to make them higher. We connect the edges of the rubber to each other to form a closed piece with snow hooks on the surface.
We assemble the wheels in pairs on the axle. Taking into account the diameter of the wheels and the length of the assembled track, it is necessary to make a frame that will serve as a common platform for all three pairs of rollers. We mount two pairs of wheels tightly to the frame, and the third outer pair is movable in a horizontal plane. Its mobility will ensure good rubber tension, and as a result, prevent the tracks from slipping. We attach the sprocket from the rear wheel of the motorcycle to the axle of the first pair of wheels.
The assembled frame with track must be installed at the rear of the bicycle. This can be done by welding the drive frame to the bike frame with plates. However, if the frame is large, made of titanium or aluminum, then the drive should be secured with bolts, since at home it is unlikely to be able to weld to non-ferrous metal. The distance from the caterpillar to the frame must be at least 5×10 cm.
Let's start installing the power unit on the snowmobile. The best place for the motor is the horns behind the seat. There the engine will not interfere with your legs and there will be no fear of getting burned on it. However, you can place it in the center of the frame, but only with the top trim. It is worth noting that it is best to place the engine with the shift paw in the middle of the frame, and it is advisable to place the motor with the gear shift on the steering handle at the rear.
The engine is placed on the snowmobile so that its sprocket is above the track drive sprocket. When installing the power unit, additional welding of the plates and channel will be required to fix it on the bicycle frame. You should know how to weld them on site. After this, you need to make a chain of the required length and connect the sprockets. We mount the tank as close to the engine as possible.
Thus, the snowmobile is almost assembled. We install all the power unit controls and the brake bar. For comfort, select a more comfortable seat.
So, it’s not difficult, you can assemble a snowmobile without major investments, which uses a bicycle as a base. You can modify the snowmobile with your own hands at your discretion, but the above diagram will be quite sufficient for driving through snow-covered fields.
Every boy and adult who loves nature and rides on any type of transport, at least once, has dreamed of his own snowmobile, on which any snowdrifts can be overcome and any distance can be overcome in order to drive through the snow for fishing or just for fun, to see to new places where you have never been before.
However, snowmobiles are not a cheap pleasure, and all dreams are shattered by the sad reality of the majority of not very rich people.
What should an ordinary average person do in this situation, when he really needs to be able to go fishing in the snow, etc.?
Puzzled by such a problem, one talented craftsman thought about it and came up with a new means of transportation through the snowdrifts.
Classification of children's snowmobiles
The electric children's snowmobile runs on rechargeable batteries. Such power supplies do not require any maintenance other than periodic recharging. Self-discharge is completely eliminated due to the special design of the batteries.
Some children's vehicles use gasoline engines as their power source. Different types of motors are installed on such vehicles. Children's snowmobiles with two-stroke gasoline engines are lightweight, easy to maintain, warm up quickly, and can run on cheap fuel. Four-stroke engines make less noise during operation. They have lower fuel consumption and a much longer working life.
Some motors have an air cooling system. It must be used correctly to prevent overheating. The hydraulic cooling system uses ordinary snow.
Injection engines have a number of advantages: stable operation, environmental friendliness and efficiency. They are not reliable and are not recommended for use in field conditions. It is advisable to refuel the engines in children's snowmobiles with unleaded gasoline to reduce harmful emissions and increase engine life.
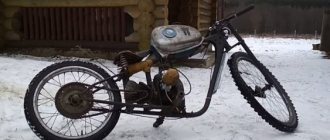
Snowmobile idea from a bike
The idea arose to make a snowmobile based on a bicycle frame; the thing, of course, is not very powerful, but for walking in the snow to feel all the joy of freely crossing space, it would be very suitable.
By the way, he had an old and already unusable bicycle in his barn, which became the donor for the implementation of this practical idea.
Consider the design of a snowmobile based on a bicycle frame
Everything is very concise and does not stray too far from the simple concept of the bike itself. The rear wheel acts as a pneumatic wheel or unicycle, and a skateboard ski is tucked into the front fork. The rear fork had to be adjusted to fit the large air tire. Such a simple structure of a snowmobile based on a bicycle with a ski.
Let's now consider what elements and materials are needed for this development: a bicycle, a camera from a Niva car, tarpaulin, a sheet of aluminum, a ski from a skateboard, a piece of pipe.
Tools: welding machine, sandpaper, grinder, hammer, wrenches, lathe, glue. For the pre-wheel, the master made a fork, as shown in the photo below.
At the second stage, a metal wheel was made, and an extension was made from an aluminum sheet. Next, the above-mentioned Niva camera was installed on the wheel. The wheel was equipped with a canvas cover.
On the front fork I put a ski from a skateboard that was unnecessary for my direct purposes.
That's the whole laconic structure of a bicycle-snowmobile, which is not so difficult to repeat and can be made, if desired, in an ordinary workshop. The photo below shows a test of the resulting bicycle snowmobile in the field.
Bike on skis for winter trips
Watch in this video how a man prepares his bike for traveling on winter roads. He doesn't limit himself to equipping his bike with winter studded tires, but attaches small skis to the front fork. Thanks to this modification of the bike with your own hands, you can race along snowy streets without much fear of falling on a slippery road and overcoming snow obstacles.
Neither idea is new. Self-stitching tires with screws and creating cheap winter tires for a bicycle in this simple way is a common practice, although not everyone knows about this technique. Some fans of riding an iron horse continue to ride on simple tires, risking capsizing on a slippery section of the road, although with the necessary dexterity and extreme care and caution, you can ride without studs, but not in icy conditions.
It’s rare to see a bicycle with skis in winter, but enthusiasts are slowly promoting this idea.
Products for inventors Link to the store.
Bicycle test for the winter - instead of the front wheel there is a sled - they stabilize the ride and allow you to better overcome deep snow. The rear studded tire—screws in the middle of the tire—suits the bike for riding on ice and braking effectively. The selling price is about 50 zlotys. The idea works best on a compact road or snow up to 20 cm. Small practical for the city, but big fun for the weekend. The next test will be on a skating rink, everything promises to be able to reach high speeds.
Winter bicycle with skis and tracks
DIY electronics in a Chinese store.
Discussion Alelsandra Sudacenkova
Well done! It would be great if there were more such entrepreneurs, especially those who not only seek benefits for themselves, but also think about others, especially children. I wish you success and good luck in the new year, as well as new technological ideas. I am interested in the K-Track winter bike kit... I was offered 2-3 VK (I can even give links) - at a cost of 9900 and 10000 rubles (New). Can I buy it from you at a lower price? I am ready to pay by cash on delivery or via Esscrow - with delivery to Almaty (Kazakhstan) - I pay for delivery myself. First, I need one trial copy - in the future I will probably purchase in bulk.
The ideal bike for winter - what is it?
Based on the information presented above, you can easily draw a picture of the ideal bicycle for the winter period and determine for yourself the main points that require your participation.
- The bicycle must be heavy, in this case the wind will not blow away and change the trajectory of movement.
- A steel frame will not cause problems and will not require complex maintenance. This material tolerates low temperatures well.
- The wheels should have strong treads with spikes, which will be previously rolled in. Although the wheels themselves will still need constant care and require careful driving, since they are made of aluminum.
- A lot has been said about forks, and probably each of you has realized the uselessness of oil forks and the advantages of spring-elastomer models.
- For brakes, it is permissible to choose exclusively mechanical disc options. Because the rim system will refuse to work after several revolutions in the snow, and the hydraulics will freeze and even DOT-4 will not help here.
- Choosing pedals is also no longer a big problem. The main thing is not to choose contact options, since there is a high probability of not having time to free your leg during a fall.
- Small things like switches and brake levers can only be made of metal, since plastic will become brittle in the cold and can break even with light pressure.
- When choosing a sprocket, ratchet and chain, special attention must be paid to the thickness of the metal. In winter, you should not chase a large number of speeds, since as they increase, the thickness of the sprockets and chain decreases.
- In a winter bicycle, all components, joints and friction points must be lubricated. The lubricant must be liquid. This may be a graphite product or liquid gear oil.