To give the light flux uniformity and directionality, it is necessary to attach a characteristic optical design to the lamp. For an LED strip, its role is played by a special diffuser. However, as a rule, ice strips are not supplemented with such devices when sold - they need to be made independently or ordered separately, depending on the conditions of use and the parameters of the lighting device based on them.
Let's consider what the operating principle of such a device is and what its function is, what types exist and where they are used, as well as how to make them yourself and what materials are required for this.
Features, application and instructions for making a light diffuser for LED strip
To give the light flux uniformity and directionality, it is necessary to attach a characteristic optical design to the lamp.
For an LED strip, its role is played by a special diffuser. However, as a rule, ice strips are not supplemented with such devices when sold - they need to be made independently or ordered separately, depending on the conditions of use and the parameters of the lighting device based on them. Let's consider what the operating principle of such a device is and what its function is, what types exist and where they are used, as well as how to make them yourself and what materials are required for this.
Application
The scope of application of LED diffusers is quite wide:
- Specialized lighting in living spaces for bookshelves, kitchen work areas, aquariums, and interior elements.
- Additional lighting of special areas in stores, shopping and exhibition centers.
- Highlighting important areas in street design, billboards, decorating squares and gardens.
- Creating a general background glow in public institutions.
With the help of colored diode strips and software control of their parameters, rooms, shop windows, interior and exterior elements, buildings and structures are decorated in honor of various events, events and holidays.
Function and principle of operation of the diffuser
The peculiarity of the LED strip is that the luminous flux from it extends to an angle of no more than 120 degrees. This significantly impairs their practical usefulness. To correct the situation, it is necessary to place a material that refracts and scatters light in close proximity to the lamps.
This is exactly the function that the LED diffuser performs. Its internal structure is based on a disordered arrangement of particles of matter. As a result, light, when passing through such a material, deviates significantly from its original trajectory - and in different directions. As a result, the light flux simultaneously weakens somewhat and expands evenly.
Note! You can see and understand the operating principle of a diffuser for an LED lamp using the following example. You need to put a small piece of matte cellophane on top of the led tape. The luminous flux from such a scattering film will immediately become slightly muted and evenly distributed over the entire illuminated area.
The diffuser or diffuser used for LED strips consists of two main elements - a housing and a light-transmitting plate. In modern models, the first part of the device is presented in the form of a plastic, aluminum or stainless steel profile of the following shapes:
Its geometry is determined primarily by the place where the diffuser is used, the types of brackets for it, features and operating conditions. An LED strip is glued to the base of the profile, and then the top is covered with transparent or matte material. The former are used when strong illumination of any selected areas is required - for example, display windows in a store, the latter - when it is necessary to create general unobtrusive lighting, for example, in a restaurant.
There is also a flexible profile for LEDs. Essentially it is a silicone tube with the ability to place an LED strip inside it. Due to their high plasticity, they can be given any shape, which is important when designing complex figured decor, advertising signs, and trees.
What and how to make a reflector from?
To make a reflector, it is important to determine not only its dimensions. The number of planes from which the rays will be reflected plays a certain role. The main difficulty is precisely to form them.
The basis can be any moderately pliable, but quite durable material. There are quite functional reflectors made of plastic, laminated plywood or non-woven fabric. How the fixture will be formed depends on the type of housing. Sometimes polygonal crystals (found in some types of old lamps, or for small reflectors, beads used in jewelry making) may be needed to give the refractor the desired properties.
It is important not only to give the material the desired shape, but also to make it reflect the light supplied by the LEDs.
An excellent option for external coating is chrome paint, which is sold in cans. You don’t have to apply a reflective coating, but entrust this procedure to specialists from a specialized workshop.
When designing any optical systems, it is important to maintain a balance between the final cost of assembly and the correct placement of elements. In this case, the following pattern should be taken into account: the higher the efficiency of the element, the greater its sensitivity to the installation site.
The components of the system can be secured not only with glue and adhesive tape, but also with the use of pins and hooks with fuses that pass through the board.
Materials for making the diffuser
A modern range of ready-made optical materials allows anyone to make their own diffuser for an LED strip. Among the most suitable options are:
Let's consider their main characteristics and application features.
Acrylic and plexiglass
Types of plastic such as acrylic and plexiglass are characterized by the same light-scattering abilities as traditional glass (they transmit about 90% of radiation). At the same time, they are characterized by maximum anti-vandal characteristics and do not crack from constant changes in climatic conditions, sudden changes in temperature from plus to minus sixty and mechanical influences.
Interesting! Among the disadvantages are flammability in direct contact with fire and low resistance under high impact loads.
Polystyrene
One of the thermoplastic polymers is characterized by high light transmittance, greater than that of standard glass (about 98%). Polystyrene is versatile and easy to process, resistant to thermal changes and localized strong impacts.
Its main advantages are low cost and significant color variety - from completely transparent to rich, bright shades. However, in general, a plate of such material is quite fragile and can ignite when exposed to open fire.
Polycarbonate
The characteristic properties of polycarbonate are strength, light weight and good light transmittance. In practice, a diffuser for LED strips made of such material is not afraid of contact with open fire, strong winds, heavy rain, hail and attacks from vandals. Moreover, in structure it differs into two subtypes:
Pros and cons of each type
The features, advantages and disadvantages of Edge LED or Direct LED technologies are directly related to the design of the TV and the characteristics of the formation of the light field for the TV's LCD matrix.
The advantages of the Direct LED backlight type include several main factors:
- a uniform light field for the entire area of the liquid crystal matrix, which is determined by the distributed nature of the arrangement of the LEDs;
- uniformity of luminescence implies a complete absence of glare;
- the placement of LED blocks on the back surface of the TV body increases its maintainability; The direct nature of LED emission determines lower energy consumption than options with end-mounted light sources.
Among the disadvantages of TVs with Direct LED technology, it is necessary to note the increased thickness of the television receiver housing and lower brightness than models with Edge LED.
Among the advantages of TVs with Edge LED backlighting, the following factors are worth noting:
- the total luminous flux of the LED block determines the increased brightness of the liquid crystal matrix, which has a positive effect on visual perception;
- side installation of backlight LEDs forms a thinner matrix of the screen and TV body (200 mm is considered to be the standard value for reducing thickness).
Among the disadvantages of thin television receivers with side-mounted LED technology, it is worth noting the high likelihood of glare and higher energy consumption compared to Direct LED.
Main conclusions
The diffuser makes the LED strip illumination more uniform and improves the practical and aesthetic effect of the lighting. The device consists of two main parts - the housing and the light-transmitting plate. For the first, metal or plastic profiles of the L-, U- and C-shaped type are used, for the second, acrylic, plexiglass, polystyrene and polycarbonate are used. Each of them has its own characteristics.
The scope of application of the diffuser for LED strips is wide:
You can make the device yourself. To do this, you will need a plastic or metal box, an ice strip, wiring and one of the considered light-scattering bases.
If you know another interesting diffuser option for LED strips and a method for making it yourself, be sure to share it in the comments.
Source
Installation of the overlay profile
Fastening is carried out in three ways:
on double-sided tape
on screws or dowels
on glue
Use a tape measure to measure the distance at the fastening site.
Then use a hacksaw to cut off the required length of the profile.
At the base, drill several holes with a diameter of 3 mm for 3.5 mm screws.
Some types of plugs already have holes for fasteners. Therefore, before drilling the edges, check what kind of plugs you have.
The pitch between the holes is 100-200mm. Do not forget to countersink each hole under the screw head, otherwise the tape in these places will peel off.
Using screws, mount the base backing in place of the backlight.
Measure the required length of the LED strip according to the length of the substrate and cut according to the cutting marks.
Remove the protective layer of double-sided tape and glue the tape. Install the diffuser and plug.
After that, all that remains is to insert the profile into the base already fixed to the surface and connect the power wires to the block.
Conical reflector-radiator for ultra-bright LED
Improving the previous design of the reflector-radiator, I wanted to focus the light flux of the LED more towards the center. The conical shape of the reflector suggested itself, since it almost completely corresponds to the shape of a parabolic mirror. After some calculations and experiments we have the following design
To make such beauty you will need: - an aluminum (can be copper or tin) scratch-free plate up to 1 mm thick and 40x35 mm in size - a single-layer foil-coated textolite plate 20x15 mm in size - a super-bright LED, a soldering iron, two contact wires, one or two paper clips - a little thermal paste - pliers (round nose pliers), hacksaw (scissors) for metal, needle files, compass, small drill - straight hands for obtaining correct curved surfaces
The theory is still the same. In order to obtain a parallel beam of light, it is necessary to install the LED crystal exactly at the focus of the parabolic mirror. Here is a picture from a previous article
It turned out to be even simpler than the previous one, the only difficulty is to give it the correct shape, since the accuracy of focusing the light beam depends on this.
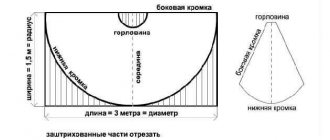
Here is an example of marking a workpiece on an aluminum sheet:
There is nothing complicated about the markup. There is no need to calculate degrees, arc lengths, etc. First, all straight lines are drawn, and then two arcs with a radius of 28 mm are drawn until they intersect with the straight lines and the marking is ready.
The material for the reflector-radiator can be aluminum, copper, or tin from a tin can. Copper and tin are even more preferable because they can be soldered. The thickness of the material must provide sufficient structural strength. For aluminum this is no less than 0.5mm. Now the workpiece is cut and bent. It is advisable to cut it with a hacksaw, but if you are very lazy, you can also use metal scissors, as shown below. Then the edges will have to be aligned with a file.
The reflector must be bent carefully so as not to scratch the reflective surface with the tool. After all these procedures we get the following:
It is clear that the LED contacts should not touch the radiator housing.
Well, that's all. The final touch is to secure the two halves of the cone together. If the radiator material was copper or tin, the halves are simply soldered together. If, as in this case, the radiator was made of aluminum, the halves are glued together by applying glue to the outside of the reflector. This seemingly small detail is very important, since the strength of the case will now increase significantly.
Now connect (observing polarity) and enjoy the result. The scope of application of this design is very diverse, from tabletop mini-lamps and backlights to homemade flashlights
Source
What types of boxes are there, their features
There are a large number of varieties of boxes designed for installation in specific locations. There are special types of profiles for end lighting of glass shelves or for decorating staircase steps. However, the vast majority of boxes are installed on plasterboard ceiling structures that form the ceiling slab or the top tier of a window opening. Let's look at the most common designs:
Niche for lighting
A niche is a section of a cornice or other surface intended for mounting an LED strip. There are different types of niches, corresponding to the characteristics of the supporting structures:
- groove for the mortise channel. It is done in plasterboard volumetric figures, in the floor or along the boundaries of parapets, steps, etc.;
- the edge of the cornice around the perimeter of the room. A matte or transparent cable channel can be installed in it, creating a soft or accentuated illumination of the ceiling slab;
- areas located under the bottom of beds, sofas or cabinet furniture. In combination with a hidden type of support, such niches allow you to create the effect of an object floating above the floor surface.
Interesting! The dimensions of the niches allow installation of any type of box, although there are designs that are precisely designed for a specific type of channel.
Hidden Niche
A niche for hidden installation of an LED box allows you to install the strip so that the viewer can only see the reflection from the strip on the surface of the wall or ceiling, and the LED strip itself is hidden behind the cornice. Such lighting allows you to create a stylish and unobtrusive appearance of the room, creating sufficiently abundant, but not excessive lighting of the room. The design of such niches involves the vertical or inclined direction of the LEDs (on the ceiling or on the wall). The box is attached to a horizontal plane, and if it is a corner structure, at the junction between the horizontal and vertical surfaces of the ceiling cornice with the diffuser directed towards the wall. The fundamental difference is the placement of the tape, invisible to the viewer, forming a soft evening or night-type illumination.
Where can a reflector come in handy?
Reflectors can significantly improve the basic properties of LEDs, so their scope of application is not limited to any specific area of lighting technology. A reflector is equally useful in the following cases:
The debate over the best automotive optics does not subside, and what is better to use - lenses or refractors - everyone decides for themselves. Both devices help to achieve approximately the same reflectance; the issue here is rather the complexity of controlling the light beam.
For side lights or other light sources with a large number of LEDs, reflectors are not only a more economical option, but sometimes the only option. Instead of a huge lens, it is much easier to use a refractor or their system.
LEDs with lenses for cars
The widespread development of LED lighting technology has led to the fact that many cars are already equipped with ice elements and a corresponding optical system off the assembly line. At the same time, during the development of headlights, the requirements of traffic regulations regarding the characteristics of on-board lighting must be taken into account.
With older cars that have incandescent, halogen or xenon bulbs as a light source, the situation is more complicated. Although many lines offer to install LEDs in standard headlights, this does not give the full effect of their use. You need a special optics system - with lenses. Therefore, many manufacturers offer car users a tuned version of their installation. Ready-made headlights can be installed on the radiator grille or bumper.
Advice! The most popular LED car headlights today are the so-called bi-lenses. With its help, you can simultaneously generate both near and far flow of lighting. Its operating principle and design are similar to bi-xenon and bi-halogen. A special shutter controlled by a solenoid changes the distribution of light inside the optics, creating the desired characteristics of the external illumination.
What are modern reflectors like?
Manufacturers are constantly expanding their model range, significantly expanding the possibilities of light tuning. Refractors are available for a wide variety of LEDs and their combinations. Now you don’t have to limit yourself to just one shade.
The devices reflect light in the forward and reverse directions, thereby making the distribution of rays more uniform.
Reflectors can be designed for installation with an acrylic rod, and they will help to neatly hide the LEDs for their most effective use in the rear lamps of automobiles.
Refractors can correct and redirect LED illumination. They are designed to operate at right angles to the diode axis. When selecting a reflector, it is important to take into account all the parameters of the light sources. Case types and designs are constantly being updated, so it’s worth regularly monitoring new products so as not to miss out on the most interesting optics options.
Reflectors significantly improve the properties of the flow produced by LEDs. They are equally needed for tuning car optics and for assembling flashlights and lamps. You can try to make simple models with your own hands, but in some cases it is simply pointless to compete with manufacturers.
Source
Purpose
If in conventional flashlights, where fluorescent light sources or incandescent lamps are used, a reflector (reflector) is used as a focusing system, then a different device is required for LED elements. The reason for this lies primarily in the structure and principle of operation of the ice source itself and its lighting characteristics. LEDs have a different directional pattern of lighting flux from standard lamps.
This is primarily due to the small size of the emitter - the semiconductor crystal, which gives them such specific technical characteristics as:
- Point properties even at very short distances.
- Small angle of light flux dispersion.
Therefore, in order to obtain the required light distribution curve in space (as with conventional light bulbs), it is necessary to resort to various kinds of technological tricks. One of them is the use of lenses for LEDs. First of all, these are car headlights, spotlights, street lamps and other powerful lamps. Indoor chandeliers, on the contrary, use diffusers to create comfortable, uniform lighting.
Note! Initially, the LED creates a normal flow of light with a gradual decrease in its strength as it moves away from its central axis. To give it a given shape, special lenses are used. They are superimposed on the ice crystal and belong to the category of secondary optics.
Operating principle of the diffuser
Light from point light sources, in particular from LEDs, has a relatively small divergence angle - up to 120 degrees. At a short distance from the source, you can see a sharp change in illumination beyond this angle. How to diffuse light from an LED? Any light-refracting material can solve the problem.
In the factory, transparent or matte plastic is used for this, on the surface of which a special texture is formed during casting. It is clear that such technologies are not available at home.
The simplest light diffuser for LEDs can be constructed in a few seconds from an ordinary food-grade cellophane bag, only it should not be transparent, but matte. Wrap the diode in one layer of cellophane and see the result. Why is this happening?
In transparent materials, the crystal lattice is ordered, and photons from light sources, passing through it, do not change their trajectory. In the case of a matte shade, each microlayer has its own structure.
This is how light passes through transparent and matte surfaces
You can make a light diffuser for LEDs with your own hands from the most common materials that can be bought at your nearest hardware store.
When choosing a material, there are several important points to consider. If the power parameters are correctly calculated, an LED lamp can operate for many years, so the reflector material should not lose its properties during this time. We must not forget that the lamp will heat up; we immediately exclude the option with a plastic bag.
Optimal materials for light diffuser:
Features of choosing LEDs
Requirements for lighting elements
Before you make an LED lamp with your own hands, you definitely need to decide which emitting diodes are optimally suited for these purposes.
Additional Information. In general, it is possible to make a lamp based on LEDs only if their efficiency exceeds 50% (compare: for a conventional incandescent lamp this figure is only 3.5-4%).
Features of the selection of these elements require taking into account the following determining factors:
The ability to obtain a do-it-yourself lamp made from LEDs (red, yellow, green or white) suitable for given conditions. A sample of a product with a white glow is shown in the photo below;
Spotlight with daylight (white) spectrum
- High luminous efficiency of a homemade lamp;
- Low power consumption when powered from a household network;
- Long service life (at least 30,000 hours) and environmental friendliness;
- Reliability of the LED design (ability to withstand an unlimited number of switches on and off).
These products must provide the ability to control the intensity of the light flux, as well as ensure low temperature in the area where the emitting elements are located.
Selection order
All the above conditions are fully satisfied by modern LED lamps for the home, the range of which is widely represented on the domestic market.
Let us add to this that the manufacture of a homemade structure will not require the expenditure of additional material resources. For these purposes, old electronic components and products containing the corresponding parts may well be suitable.
An excellent example of a rational approach to their manufacture can be a lamp from a TV with an LCD screen (not working for some reason), from which you can “borrow” working LED backlights. An example of such a display is shown in the photo below.
Display with LED backlight
Light transmittance of materials (transparent)
It would be possible to buy ready-made material with a matte tint, but this will not always give an acceptable result.
Even factory diffusers have light transmittance in the range of 60-90%. This is caused by the reflection of light. The thicker the diffuser, the higher the likelihood that light will fall “inappropriately”. Reducing the thickness of the material will not have the best effect on strength and durability. You can make a reliable light diffuser for LEDs with your own hands from transparent materials by creating a matte texture on one of the surfaces.
Advantages of using boxes
Installing an LED strip in a box has the following advantages:
- the lamp is protected from all unwanted influences;
- ensures removal of excess heat;
- the appearance of the lighting is more neat and attractive, allowing the strip to fit harmoniously into the interior;
- connection security is ensured;
- it becomes possible to increase the service life of the tape;
- The installation of such a box is simple and can be done by hand.
Important! Justice requires naming the shortcomings. Among them is the need for certain labor costs when installing the box, especially on the cornices of ceiling structures. It is not very convenient to work; it is necessary to follow the sequence of actions so that as a result there are no wires or protruding ends of the tape on the surface.
Principle of operation
The diffuser is designed in such a way as to increase the angle of light spreading. The effect is achieved by using a special design made of light-refracting material. Due to the thoughtful geometry of the diffuser and its location relative to the lighting fixture, the distribution of light flux is optimized. The light disperses over the entire area, without any concentration of the flow in individual areas.
Fastening components
Before you start assembling a powerful spotlight, stock up on parts and components. If you have a car, some of the components will be found at home. The remaining part can be purchased, or borrowed from friends.
To make a lantern with your own hands you will need:
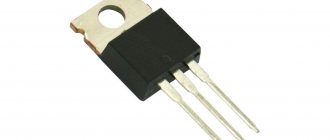
- LED matrix equipped with a driver. Such parts are installed on poles with lamps that have stopped working. All you have to do is replace the lamps that have failed. You can buy a new part at an electrical goods store.
- Frame. It can be made from metal parts and plywood. A halogen flashlight is suitable for the housing. You can find an old one that you use for fishing or hunting, or you can buy a new one.
- Wires for connecting parts and connecting the device to the electrical network.
- Foil for reflector. You can purchase this material at your nearest store. Choose tapes with high density.
- Tough glue.
- Sealant.
- Radiator for cooling.
You can see the entire tool here. The tools that are useful for making a flashlight include:
- grinder;
- welding machine;
- a drill equipped with a drill;
- soldering iron;
- solder.
Materials for making the diffuser
To create a device that scatters light, you will need certain materials. Previously, glass was the main structural element. Today, the list has expanded to include more progressive materials.
Acrylic and plexiglass
Acrylic and plexiglass are almost as transparent as regular glass. However, the protective properties of the materials are much higher. They do not crack as a result of impacts and are able to withstand significant temperature changes - from 60 degrees below zero to 60 degrees above zero. The main disadvantage is ignition in the event of direct fire contact.
Polystyrene
Transparent polystyrene is a versatile, affordable and durable material. The degree of transparency of polystyrene is even higher compared to glass. High quality matte diffusers are made from polystyrene. Its disadvantage is its fragility and tendency to ignite. Polystyrene structures are offered in different designs - from transparent to rich colors.
Polycarbonate
The material is characterized by high strength, low weight and transparency. Able to maintain performance properties in fire, withstands significant temperature changes, is resistant to ultraviolet radiation, and durable.
Polycarbonate is resistant to mechanical stress, protecting the LED strip from damage. To further increase the strength of the structure, it is recommended to use monolithic polycarbonate. This material is much stronger than standard glass and is used for anti-vandal coatings on the street.
Note! Polycarbonate is the best material for making prismatic diffusers. The qualitative difference between polycarbonate and acrylic is a larger dispersion angle. Acrylic is suitable for opal diffusers with a small beam angle, while polycarbonate is suitable for clear devices with a significant beam angle.
Another quality of polycarbonate is its light weight. This is achieved due to the cellular structure.
The choice of a specific type of material depends on the purpose of application. Not all cases require an expensive polycarbonate diffuser. At home, an acrylic or polystyrene device is usually sufficient.
Model characteristics
In addition to the material of manufacture, a ready-to-use diffuser has other features related to color, shape, and surface structure.
For chandeliers and lamps, the diffuser may differ from other models in its design and is intended for installation:
- on suspended ceilings;
- in an overhead housing;
- be universal.
There is also a light diffuser for LEDs installed in car headlights, spotlights, lanterns and other lighting devices.
The most expensive models have a matte surface. They can transmit a little more than half of the light (about 60%), which makes the lighting very soft. The light becomes warmer and more comfortable for the eyes.
A diffuser with a prismatic structure is capable of transmitting and evenly dispersing maximum light (up to 90%). This is achieved due to the transparency of the material and the corrugated surface. The light produced by the LED is refracted in hundreds of small prisms and thus dispersed throughout space.
There is a diffuser made of 3D polymer material. It is installed on an Armstrong type lamp and is produced in a variety of patterns and colors.
Fastening
Fixing the LED strip should not cause any difficulties. For this purpose, “liquid nails”, self-tapping screws or double-sided tape are used. If desired, you can create a corner mount and mount the lamp using special brackets. Also, the tape is sometimes built into one plane or another, for which a groove in the wall is prepared in advance.
For arches or similar curved surfaces, a flexible profile is used. Most often these elements are aluminum.
Installation of corner profile
Mounting such an element on self-tapping screws is not so easy, so it is much easier to use double-sided tape.
First, degrease the substrate with solvent or alcohol.
Then apply tape to both edges and cut off the excess.
Now degrease the surface itself. To do this, lightly spray it with water or “Mr. Muscle”.
Why is this being done? In most cases, the corner profile is mounted unevenly to two planes. And initially, setting it straight is very problematic.
And if you lightly spray the surface with water, the tape will not stick immediately and will give you time to adjust everything as needed.
For more reliable fastening, it is recommended to use polyurethane glue along with tape. All that remains is to stick the tape inside, insert the lens and close everything with plugs.
Making a diffuser
To create a light diffuser with your own hands, you will need one of the construction materials listed above, as well as a profile. If it is not available, a plastic profile for electrical wiring will do. You can create a matte surface that will scatter light from the diodes using any of the following two methods:
A diffuser for LEDs is an element that creates comfortable lighting. You should not neglect it, as a pleasant soft light will help maintain good vision.
Source
DIY aluminum profile
The circuits, which are made of aluminum, are very popular, because they managed to combine the two latest modern technologies. The specialists managed to put not only a strong and high-quality anodized alloy into one product, but also LED technology, which is gaining popularity every day.
Thanks to this, the result was to increase the functionality of the backlight several times and make the device for mounting LEDs much more reliable and durable. The circuit, which is usually made of excellent quality aluminum, can be used so that the LED strip can be mounted directly into the wall. In addition, the aluminum profile for such products can be safely used for installing lighting in the floor covering, ceiling, and so on.
Preparing an aluminum profile for an LED strip with your own hands video
Such profiles look great even in a variety of designs and do not harm other materials or their integrity. At the same time, aluminum alloy contours can be non-standard. This means that many modern models were decorated with different types of accessories. For example, you can often find plugs or various fasteners, even holders that look very beautiful, modern, original and at the same time discreet. Aluminum profile is an excellent option if you are planning to create a classic interior in the room.
How to use a spotlight
Most often, homemade LED spotlights are used to illuminate the yard, garage or other local areas.
You can use your imagination and make a more advanced model - make a portable device (on a tripod, which was mentioned earlier), which can be used for studio photo or video shooting.
Small spotlights with a power of up to 24 W can be used to illuminate car interiors. You can take them with you on picnics and create additional standard lighting. Before the New Year holidays, you can decorate the building with homemade spotlights.
Knowing how to make a reflector for your home, you understand that it is not difficult. This will require simple materials and tools, and the assembly process will take 2-3 days. If everything is done correctly, you can create original lighting fixtures that will decorate your home area.