The first priority when purchasing a summer cottage is the construction of a toilet. The design of this structure is not complicated, but nevertheless it is necessary to make a schematic drawing of the country toilet in order to avoid undesirable consequences during construction. There are several types of outdoor bathrooms, let’s look at them in detail. In addition, we will analyze step by step how to build a wooden toilet in the country with your own hands.
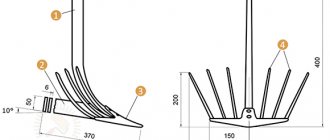
Drawing with dimensions of a country toilet
Diagram with dimensions and design of a country toilet
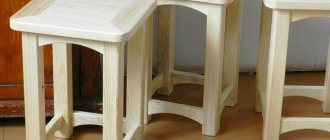
Types of toilets
The simplicity of the design allows you to equip a toilet in your dacha with your own hands, drawings and standard sizes of which can be studied in company catalogs or calculated yourself. Wood is the most popular and affordable material, easy to process and does not require special tools for construction. The structure itself consists of a frame sheathed with boards and covered with roofing material. It’s easy to build a country toilet with your own hands; you don’t need to make complex calculations; you just need to know the standard dimensions, study the construction instructions, prepare the materials and tools and start rebuilding the bathroom.
Scheme and design of a wooden toilet for a dacha Ready-made assembled wooden toilet in a dacha
Simple design of a country toilet It is worth noting that building a house is half the battle, the second half is creating a special tank for waste disposal. There are several categories of toilets that differ in how they process waste.
Backlash closet
In this type of toilet, only the lower part of the toilet is installed, with a technological slope of the floor towards the disposal tank. Thanks to it, the residues flow into the equipped cesspool on their own. The waste container itself is located behind the cabin and is emptied as it is filled.
Schematic design of a closet backlash
Drawing of a closet backlash for a summer house or home This design is good because it can be installed indoors, creating a warm bathroom, and the waste storage tank can be dug outside the house.
To do this, attach a polypropylene pipe with a diameter of 100-150 mm to the toilet.
In this situation, there is no need to install expensive full-fledged communication.
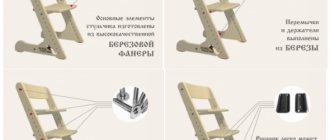
Names of toilet play elements
Important! When arranging a country backlash closet with the pit removed outside the house, there will be no foreign odors in the bathroom. It is worth taking a responsible approach to arranging a reservoir for residues; it is well insulated, covered with a sealed lid and a competent ventilation system.
The process of building a backlash closet at the dacha The disadvantage of such a toilet is that when arranging it, you will have to violate the integrity of the wall.
Powder closet
The simplest design and design of toilets for a summer cottage. To construct it, it is enough to dig a hole, which will serve as a waste storage facility, over which a wooden house is installed. To prevent the appearance of odor, waste should be poured out after going to the toilet. Sawdust and peat are used as powder.
Drawing with dimensions of the toilet powder device
Closet powder project at the dacha
To build a toilet in a country house with your own hands, it is not necessary to draw up drawings; you can make a simple schematic sketch to understand the stages of work. When purchasing a similar design in a store, a container with bio-powder is included in the bathroom kit. It’s easy to use, just put a bucket of sawdust or peat and use a powder scoop. The process of building a powder toilet in a summer cottage
The advantage of these toilets is that waste is used as fertilizer. When filling the hole, the structure is moved and the tank is filled with earth, leaving until humus is obtained. Minus, the soil will be contaminated with liquid wastewater, which is not entirely useful. If bottom waters lie close to the surface, then it is not recommended to install such a building on the site.
Master class for parents on the topic “Teremok” (middle group)
Master class for parents “Teremok”
Flat paper finger theater "Teremok", suitable for children under 5 years old. But 5 year old children will be happy to play with it. The principle of movement of the dolls is very simple - the index and middle fingers are inserted into the slits. These are the “legs” of the doll. Now she can “walk.” Of course, children of this age know the fairy tale “Teremok” by heart. But here we will be “playing theater.” And almost all the guys want to be an artist. But, although the fairy tale is familiar, such games will develop children’s speech - after all, you need to speak for each character in a certain voice, try to convey his character. The bunny speaks timidly, the fox speaks slyly, the mouse squeaks, and the bear growls menacingly. Conveying all these shades with a voice is an interesting and difficult task for younger preschoolers. In addition, children can actively participate in creating puppets and decorations for the Teremok paper finger theater.
In order to make puppets for our finger paper theater, you need to print (or draw) the heroes of the Teremok fairy tale on plain paper. The height of the dolls should be approximately 9-10 cm, and the width at the bottom of the figure should be less than 4.5 cm - so that you can freely cut holes for the fingers. Puppet templates for flat finger theater made from Teremok paper
Glue the template onto very thick paper or thin cardboard. Let it rest under a load (2-3 thick books) for 10-15 minutes. We color the animals with colored pencils of suitable colors. We cut out the figure and cut holes for the fingers. If you wish, you can paint the back of the doll. Keep in mind that it will be more difficult for your child to color an already cut out figure. The doll is ready.
You can print colored figures right away or use the appliqué technique (as in the photo below).
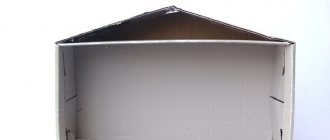
Decorations for the paper finger theater “Teremok”
To play out a fairy tale with such dolls, we need a decoration - a house-teremok. It's not difficult to make. Step 1 Take a sheet of brown (not glossy!) cardboard. Draw it as shown in the diagram.
Step 2 Cut out the windows.
Step 3 Cut strips of red paper 1 cm wide for the windows and 2-3 cm wide for the roof. Decorate the windows and roof slope with stripes. You can make a carved edge on the strips.
Step 4 Cut out circles of logs with a diameter of about 2 cm from yellow paper. Glue them onto the tower.
Step 5 Cut out grass from green paper and glue it to the bottom.
Step 6 Draw in the details with a felt-tip pen and trim off the excess cardboard above the roof.
Step 7 Fold another sheet of cardboard into an accordion shape. The first link of the accordion is 2 cm, the second and third are 5 cm. Fold the remaining piece of cardboard in half again (that is, the fourth and fifth links will be about 3-4 cm each). Glue the narrowest part of the accordion to the tower from below.
To make the tower stable, glue the side parts of the second link of the “accordion” to the tower. A kind of pocket is formed into which we will “populate” the animals.
The photo shows what our mansion will look like from behind.
Cabin with sump tank
Very often they create a similar structure at the dacha. The principle of its construction is that a waste pit is built directly under the house.
Project of a toilet with a cesspool in the country This is not a very comfortable structure, but the simplicity of the design and small financial investments in construction make this model in demand and popular.
When the pit is 2/3 full, it is pumped out. There are some disadvantages of this structure: unpleasant odors in warm weather; soil pollution.
Important! When bottom water is near the surface, the waste pit must be completely sealed to prevent contamination.
Option . Hut in the clearing
This is a more complex design, and therefore the manufacturing process can take a long time.
Hut in the clearing
For work, prepare:
- wire;
- scotch;
- cardboard box;
- pine needles;
- chestnuts (several kilograms);
- scissors;
- dry branches;
- fallen leaves of different colors;
- glue;
- handle;
- berries.
Autumn crafts for an exhibition
Having prepared everything you need, start working with your child in order to instill in him curiosity and useful skills.
This toy is easy to assemble
The sequence of actions is as follows. First make a foundation on which the structure will stand. Make a house out of a box, preparing a 40x40 cm square. Also cut out the house elements from cardboard, and then connect them with tape. Then attach to the base.
What kind of house can you make with your own hands?
Cut out the door with windows from white paper and glue it. Draw the curtains with a pen, and decorate the walls with chestnuts. The roof and ground around the house can be decorated with berries, pine needles, and leaves.
Matchstick house
On a note! Using this algorithm, a house can be made from almost any material, using glue and tape to connect the components.
A beautiful house can be made from any material
This kind of pastime will definitely please your baby; he will be happy to help you make it.
Do-it-yourself house made of branches for the garden
The new time spent together will delight the child, and he will enthusiastically help in collecting it for a long time.
Choosing a place for a toilet
Before installing a toilet, you need to study the SaNPIN standards; they cannot be neglected. It is also necessary to take into account the interests of neighbors, otherwise there will be constant unpleasant situations and disagreements if an unpleasant smell spreads throughout the area. So how to find the right place for a toilet:
- If there is a well with drinking water at the dacha, then no toilets can be installed at a distance of 25 m. Typically, such wells are filled with water from the upper layers; they can be contaminated with waste from the pit. Options for placing a toilet in a summer cottage
Ready assembled toilet in the country - The toilet should be located in a hidden place behind a large building or at the end of the site.
- It is impossible to install a bathroom closer than 1 meter to the border of a neighbor’s property, otherwise they may require the court to move the structure.
- If the terrain of the site is uneven, a house is built on a hillock, and the house is mounted in a lowland. It is not possible to find out the frequent direction of the wind and install the toilet on the leeward side, so as not to suffocate from the smell of sewage. Diagram and design of a toilet stall on the site
- No matter how deep the waste pit you have provided, it needs to be emptied periodically, so the structure needs free access.
Design options
The general appearance of the building is almost the same in any design. This is the recognizable profile of a fairy-tale tower, which in this case is its simplified mini-copy. There are several ways to diversify the design of an outdoor toilet. Including changing its shape a little. The design of the frame allows this to be done without losing the necessary load-bearing capacity and strength.
You can significantly modify the design of the toilet-teremka due to its finishing. For example, for cladding walls and gables it is permissible to use:
- ordinary lining;
- imitation of profiled timber;
- block house;
- edged board.
Since the building was originally intended for installation outdoors, it is better not to use the last of the proposed finishing options. Although this is the cheapest material among the others. The fact is that due to constant changes in temperature and humidity, noticeable gaps will appear in such cladding over time, which is not very good for a tower with such a function.
Lining and various imitation, the installation of which is carried out using a groove and tenon, eliminates the possibility of gaps appearing even after many years of operation. In addition, such finishing looks more neat, giving the already original building a presentable appearance.
The next way to diversify the external design of a toilet in the form of a mansion is to use different roofing materials for arranging the roof. For these purposes, any of the following will be best suited:
- corrugated sheeting;
- metal tiles;
- ondulin;
- flexible tiles.
It should be noted that the last option is slightly different from the others in terms of installation technology. This point is mentioned below in the section with a step-by-step description of construction.
Further, the building can be modified by using different materials for protecting and finishing the wood. Outside and inside, wooden cladding can be covered with:
- paint of the desired color;
- colorless varnish;
- stain;
- wood oil
To not only decorate the finish, but also to make it more resistant to changeable weather conditions, you can use firing. The lining is first burned with a gas burner (gasoline burners are not recommended) until it obtains a black color and a characteristic relief, after which the soot is removed, and the resulting surface is coated with a transparent varnish or some other protective agent. Wood processed in this way becomes more resistant to external influences, and also looks expensive with a fairly inexpensive implementation of firing technology.
Additionally, the country toilet can be decorated with various small decorations - horseshoes, elaborate awnings, non-standard latches, door handles and other details.
Toilet cubicle
As we wrote earlier, it is better to build a house from wood. This is the most accessible and inexpensive material, with proper processing and care, the design will be durable and attractive.
A selection of different designs and design options for toilet cubicles for the garden
Option for finishing a toilet cubicle made of wood
This is the most advantageous material for building this structure. The cabin is assembled from bars and boards.
Everything at hand
Anything can become a material for a garden house. The main rule is maximum environmental friendliness.
Natural wood, birch bark, cones, stones look harmonious when surrounded by plants... For example, the roof of a tiny house can be made from the petals of an ordinary spruce or cedar cone. And the walls are made of a piece of white birch bark. The roof of the house can be made of straw or twigs of different sizes.
A garden house does not have to be on the ground. He can “settle” on a tree. It’s interesting to make a “home” for a fairy or a picturesque feeder for real birds with your own hands.
These can now be purchased in stores. A variety of shapes, colors, filled with miniature details.
Foundation or supports
A simple house can be assembled as soon as the pit for the remains is completely ready. There is nothing extra natural in the installation process if there is a project:
- The building has a small specific gravity, and therefore it will be enough to deepen 4 supports made of metal pipes. If it is not there, then it is allowed to make pillars from brick.
Existing options for arranging a foundation for an outdoor toilet - A skeleton is built from 5x5 cm bars. First, put together two rectangles the size of the toilet, and then connect them together with 4 vertical bars, the two rear posts should be lower than the front ones, by the amount of the roof slope.
- The supports are secured by mounting a gusset made of timber to give strength to the structure.
- A toilet seat is mounted at a height of 50 cm; it is worth nailing two bars across the frame. The process of assembling the frame of the toilet Final finishing of the outdoor toilet
- A sheathing is made on top, the pitch of which will depend on the choice of roofing material. When it is planned to cover the roof with a sheet of slate, then auxiliary lathing is not required. The process of covering the toilet frame with boards
- If you have, say, soft tiles left over from building a house, then you first need to lay a sheet of OSB, then waterproof it, and only after that install the tiles. The process of tiling a toilet frame
- Place two supports, auxiliary in the place where the wooden carved door is attached.
- Place the prepared frame on the frame placed on the base and proceed to the sheathing.
Watch the video on how to quickly make a foundation for a country toilet.
How to build a Teremok toilet with your own hands
Having been inspired by the photos of the finished towers, you can get to work. The first step of a home craftsman should be to select a construction scheme and sketch its drawing. A drawing of a teremok-type country toilet proves that the roof occupies most of the entire structure.
The dimensions of the toilet-teremok are determined at the design stage. Practice shows that a tower with sides of 140x200 cm is quite sufficient for comfortable use.
Important! If there is not enough space on the site, you can reduce the size of the toilet-teremka. It is also possible to change the height of the building downward, but in this case you will have to make a semicircular or triangular door.
At the very beginning, it is worth thinking about the presence of a window, as well as such an important part of any country toilet as ventilation. The ventilation hole should be as high as possible so that the draft is stronger and the atmosphere inside the building is comfortable. In summer-type buildings, it is quite possible to combine a ventilation duct with a window; in this case, simply cut a hole in the upper part of the front wall of the toilet-teremka.
For an all-season insulated toilet-teremka, it is better to glaze the window, and the ventilation can be brought out using a pipe directly to the roof.
When all the nuances of construction have been thought out, you can begin working directly on the toilet.
Creating a foundation for a toilet-teremka
Usually, a country toilet-teremok is built, after all, from wood. Wood is available, cheaper than stone materials, and easy to work with even alone. The weight of a wooden toilet tower will be small, so it can be placed on a lightweight foundation.
Two types of foundations are suitable: strip and columnar. To create a strip foundation for a toilet, dig a trench about 25-30 cm deep, its width is approximately 20 cm. Broken bricks, cobblestones, crushed stone, construction waste are poured inside the pit, reinforcement is laid out, and then all this is filled with cement-based concrete. When the foundation hardens, you can begin building the toilet-tower itself.
The columnar foundation consists of four pillars, measuring 25x25 cm, located in the corners of the future toilet. The depth of the pits for the pillars is also small - about 30 cm. You can lay out the pillars from brick or cinder block or fill them with concrete, having previously installed metal reinforcement inside the pits.
Attention! Metal reinforcement rods must protrude from the foundation, because it is to them that the frame of the toilet-tower will be attached.
A cesspool or depression is dug inside the frozen foundation to install a chemical waste cleaner. The walls of a regular cesspool can be lined with brick, cinder block or rubber tires. The bottom should be covered with crushed stone and sand to improve drainage and increase absorption.
Construction of the frame of the toilet tower
The frame of the toilet tower is assembled on a flat surface, not far from the finished foundation. The material used is wooden beams; it is better to take coniferous wood, it better withstands atmospheric influences and temperature differences.
The frame of the toilet itself is assembled from timber, with a cross-section of 11x11 cm. The length of the beams corresponds to the width of the toilet tower and is equal to 140 cm. The beams are laid out parallel to each other on the short sides of the foundation. Previously, the foundation of the toilet tower is isolated from the wood with two layers of roofing felt.
Now the floor boards are placed on the finished frame. The front side of the floorboard of the tower is sanded, and the back side is covered with used automobile oil so that the wood does not rot.
At the corners of the toilet tower, four vertical posts made of timber of the same section are installed. The height of the racks is approximately 150 cm. They can be installed strictly vertically or made a slight deviation outside the toilet to increase the building area.
The roof rafters are attached to the beams; their length is about two meters. Now all the toilet parts are held together by horizontal beams, which are laid on the ends of the support pillars.
Attention! The wooden parts of the toilet are first fastened with nails, and after checking all angles and dimensions, they are firmly fixed with studs and nuts, as well as metal brackets.
Now the finished toilet frame can be installed in place and fixed, connecting it to the floor and frame.
Final work
Now you need to install the frame for the toilet door. Typically, the dimensions of a doorway for country toilets are standard - 180x90 cm. The frame is assembled from timber or thick boards, secured with pins, the holes for which are drilled obliquely.
The toilet walls of the tower are covered with planed boards or round timber cut in half. They nail the wood with nails with bitten off heads.
Boards are also placed on the roof of the tower, first laying the top and bottom, then filling the space between them. The roofing boards should be longer than the width of the toilet; ideally, they protrude 18-20 cm beyond the level of the walls.
The roof of the toilet tower can be covered with ondulin, flexible tiles or metal profiles. The main thing is that the roofing material is not heavy. After this, the end boards are stuffed, covering the side of the roof, and the ridge is installed.
A window is cut out in the upper part of the front wall of the tower. A shelf for a toilet seat is installed inside the toilet or a toilet is mounted.
Important! If you decide to install a toilet in the mansion, you must first nail wooden blocks to the underside of the floor - heavy plumbing will be attached to them.
All that remains is to screw the handle and hinges to the tower, hang the door, varnish or paint the constructed toilet.
Sheathing
The restroom can be covered on the inside with PVC panels; they are convenient, environmentally friendly, and easy to maintain. For maximum comfort, light is provided into the restroom for night visits, especially if people live on the site until late autumn.
The process of covering the frame of an outdoor toilet
Benefit or pure aesthetics
Children's crafts based on fairy tales can be:
- Use carefully in everyday life (for interior decoration);
- Sell at fairs;
- Give to friends;
- Keep as a memory of the happy years of childhood.
It all depends on skill. A Lion Cub and a Turtle made from beads can be an original gift. A wooden craft box, decorated with a design based on Pushkin’s fairy tales, is a worthy item for participation in a handicraft competition.
A blanket made using the patchwork technique can be passed off as a flying carpet - just choose the right colors and redo the fringe. A felt applique on the theme of a fairy tale about Muffin or Brer Rabbit, made by a 6-7 year old child, will fit comfortably in a family album.
House made of stone
To make the tower more solid, you can make it with your own hands from stone. The frame is made of ordinary plasterboard, firmly fastening the joints with staples. We cut out windows and doors.
Then we apply a cement solution to the walls and begin to cover them with small stones. Gradually the tower will become truly stone.
We also make the roof from a sheet of plasterboard. And we imitate tiles - we cover them with concrete, then use a spatula to make “tiles”. All that remains is to paint the roof and decorate our building by hanging the door, inserting window frames, and attaching a tiny bell above the door. You can place mini-pots with flowers on the windowsills, and place toy fairies made of ceramics inside.
Who lives on a stump?
If there is an unnecessary stump on your site, it is not necessary to uproot it.
Why not turn it into a mansion with your own hands? The trunk will become the basis of the house. Windows, balconies and doors can be made from sticks and boards. The roof is made of chipboard. A piece of metal tile or slate will protect it from rain. The building will look elegant if you paint its various parts in bright colors. You can place a mini-garden near the stump, fencing it with a small fence and planting small flowers there. A well made of bark, a cart made of half a walnut, a small bridge made of unprocessed twigs - the house for the forest spirit is ready.
How to make scenery for a dramatization of the fairy tale “Teremok”?
In order for the staging of the fairy tale “Teremok” to go brilliantly, you must first prepare the scenery. They are not difficult to make, since a variety of available materials will be used.
If you recently bought a shower stall, don't throw away the box from underneath it. The material will be useful for creating the next house. You can also use a box from a refrigerator or other large household appliance.
Here's what you'll need to make the decorations:
sheets of cardboard or large cardboard shipping box;
The large box is glued or stapled on one vertical side. Disassemble this area to organize the box. Now at the top, cut each section to resemble a triangular roof. Cut out the windows and cover them with colored self-adhesive tape.
But first you need to cover the outer parts of the walls with self-adhesive wood-look film. To make them look like logs, cut out such circles from colored paper or crepe paper. It will seem like they are logs.
Sew the curtains and hang them from the back of each section.
You need to glue colored paper on top so that it turns into roof elements. To do this, you first need to cut out wide strips of colored paper, and next to them glue elements made of white paper cut out on one side in a zigzag pattern. Make attic windows from the same material.
House made of cardboard and foam
This option is more labor intensive. But our instructions on how to make a house out of cardboard will help you quickly cope with the construction.
Take a regular cardboard box. The size is selected individually. A house is built from it - you need to cut the necessary parts and glue them together. After the window and door openings are drawn on the structure, they should be cut out with a stationery knife.
The hut can be decorated or covered with colored paper. But decorating with polyurethane foam will look more original. It is applied in strips, leaving 3-4 mm gaps between them for swelling. The foam will dry in 30-40 minutes.
In the meantime, you can build a stand:
- cut a piece of cardboard in the form of a rectangle with an area slightly larger than the base of the house;
- attach the stand to the building frame with glue;
- imitate snow using foam or cotton wool glued to the stand with PVA.
Excess foam from the craft is cut off with a knife, and then the structural elements are painted in the chosen color scheme.
Cardboard dollhouse
If your child asked to make a home for dolls, then you should not immediately run to the garage and start sawing boards.
Everything can be done much simpler - just use our step-by-step instructions for making a house for beginners:
Take a cardboard box of the desired size. For example, this could be packaging for parcels or household appliances. Open it from the bottom and top.
Two small side parts from above are cut off so that triangles are obtained on both sides, pointing upward. The triangles on top are aligned vertically, and the longitudinal long elements of the cover are attached to them with glue or tape, forming the lower part of the roof slope.
It will not always be possible to form a roof completely - its top (ridge) will remain open. You can solve this problem by cutting off the lids from the bottom of the box. The longitudinal elements are attached to each other in the form of a hut and fixed to the already constructed part of the roof. As a result, the roof ridge will be built. The main thing here is to take all measurements and fasten, observing the joints.
Windows and a door are drawn on the walls of the house, which are then cut with a knife. The roof can be painted to look like tiles and the walls can be painted in your preferred color.
- Legal and accounting assistance for your business
The magic of photographs.
- Unusual and successful table setting using a table setting