- Baubles made of two ribbons
- Square bauble made of four ribbons
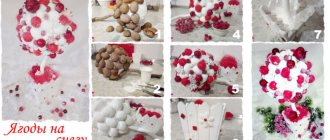
- Round bauble made of ribbons
Both adults and children will not find it difficult to weave baubles from ribbons. Materials for creating bracelets can be beads and seed beads, threads and leather, as well as satin ribbons. And if it is more difficult to work with beads or floss threads (this is quite painstaking work), then weaving baubles from satin ribbons will not cause any difficulties in the work.
Experienced needlewomen can handle one bauble in just a few minutes! Fast, high-quality and very beautiful - these are the main advantages of weaving baubles from ribbons.
Those who are just trying their hand at weaving should start making baubles from ribbons. A little patience and perseverance, and the result will not take long to arrive.
If we talk about the ancestors of the art of weaving baubles, it would be fair to remember the American Indians. Centuries later, hippies introduced this decorative item into their subculture. Today the fashion for such things is returning. Such cute things, given to a dear person, are very much appreciated. Previously, a bauble was considered an attribute of a certain culture, today it is just a friendly gift that can show off on everyone’s hand. In some cases, girlfriends deliberately wear identical baubles on their wrists, thereby indicating that they are best friends.
Young fashionistas hang baubles on their bags and use them as keychains.
So, how to make baubles from ribbons? There are at least two simple ways.
What is the secret of the attractiveness of braids and how to wear them?
Of particular interest is the weaving of satin ribbon. Such samples look especially elegant and of high quality. The production itself is simple and takes less time than the same thin threads or small beads, rhinestones, sequins, which require painstaking care, good eyesight and perseverance.
A huge selection of ideas for creating crafts can be found on the website: https://tytpodelki.ru
Adults, teenagers and teens alike will love doing this creative activity. The main thing is to become familiar with the basic principles.
Wearing a bright detail - a bracelet made of ribbons - is worth not only on the wrist, but as a keychain, belt, or used as a decorative “highlight” of the interior.
This is a fairly ancient tradition. For centuries, symbolic cords and braids served as amulets and memorial knots; they were tied by mothers to their children, and by lovers to warriors as a sign of protection.
It’s easy to add beads, stones or symbols to the braid, but this is already a complicated stage in the work. Ideally worn with suits for sports and relaxed clothing for leisure, this is not a business accessory.
Although jewelers now offer models in the form of silver and gold woven bracelets, this is not a homemade type; it is preferred by people with means.
Our master class talks in detail about different ways to design hand baubles from satin and silk. Learn these simple methods and soon you will delight your friends with amazing gifts.
Simple difficulties
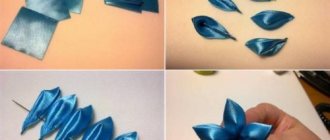
Ribbons make beautiful and naturalistic flowers. They are easy to make, but you need more materials. The plant, the stages of its appearance will be shown, is made using the kanzashi technique. It's interesting and fast. Most often they are worn in hair or decorated with dresses, skirts, etc.
Progress:
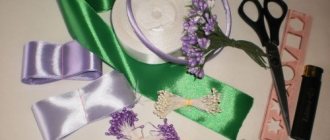
- use petals;
- glue;
- stamens (sold in specialized handicraft stores);
- pliers.
- We make 5 or 6 petals using the kanzashi technique. We put the petals on the needle, pulling the thread through them.
- Do not tighten the knot to insert the stamens!
- Lubricate the stamens with glue and insert them into the flower.
- Don't forget to tighten the thread from the petals, tying them into a knot. This flower is ready. You can collect a whole bouquet!
Some tips. In order for the product to turn out the way the needlewoman sees it, you need to remember a few rules. They will make the work easier. These are the achievements of professionals who have been working with ribbons for many years, weaving various accessories.
- Choose the color for the product very carefully. It all comes from history, when each color had a specific meaning.
- Don't pull the loops too tight because it will be difficult to unravel and the appearance will become sloppy and less defined.
- The pin is needed as a help. It holds the tapes while working.
The simplest beautiful bauble for beginners
Take two 1 meter pieces of different colors to taste. The main thing is a harmonious combination. Possible combinations:
- Yellow, red and orange;
- Yellow and green;
- Blue and green;
- Pink and purple etc.
Note!
How to make wooden shelves with your own hands - original design options
- Kinusaiga technique for beginners: what is it, a description of creating paintings from threads
- How to weave a figurine from rubber bands: how to learn to weave animals, toys and what you can make from rubber bands on a slingshot
Start the creation process:
- Fold the tip of the 1st ribbon, wrap the second one around the loop and tie it in a knot. We have a sliding loop, it is convenient to stretch and tighten it;
- Fold the 2nd into a loop and thread it through the 1st, tighten;
- Fold the loop again from the original segment, thread the second one, pull it up;
- Continue similar manipulations with the loops one by one at the required distance;
- Finally, tie a knot and our piece is ready.
Now you know what can be made from 2 ribbons.
Classic bauble made of two ribbons
You will need: satin ribbons of two colors of the same width, 1 meter long.
Master Class
- Connect 2 ribbons, step back 10 cm from the edge and tie a knot.
- Fold the edge of one ribbon and wrap it with the other ribbon.
- Tighten the knot.
- Fold the loose ribbon into a loop, then thread it through the completed first loop.
- Pull up the first loop (the second loop should become larger).
- Fold the first ribbon and thread it into the second.
- Tighten the loop.
- Repeat the weaving process until the desired length of the bauble.
- Tie a knot.
The classic bauble of two ribbons is ready! I recommend watching the video master class!
#13. Bauble of two ribbons [★☆☆☆☆]
Three-color ribbon bracelet
The technique for creating a bracelet-bauble from three flagella is similar to the previous one, but the external result will vary. The color combination is more interesting, the pattern on both sides is different, on the inside and outside.
Secure 3 pieces to a surface that suits you (pillow, table, tablet) with pins, tape or weights.
- Place one piece to the right, two to the left. Next, this pair will be braided together.
- Make a loop from the original piece of satin, wrap it with 2 others and tighten.
- From the double parts, fold a loop, thread it into the 1st one and pull it tightly again.
- Weave using the same technique, duplicating the two-color option above.
A simple bauble made of satin ribbons
You will need: 2 satin ribbons 75 cm long.
Master Class
- Fold one and the second bauble in half, leaving 10 cm ends for ties.
- Weave one ribbon over the other, as shown in the picture.
- Weave a bauble of the required length from 13 to 18 cm.
- Secure the bauble by connecting all 3 pieces into a knot.
A simple bauble made of satin ribbons is ready!
Round braided version
If you need a dense tourniquet that resists stretching, then a rounded model is suitable and will retain its original condition for a long time.
The method of “Chinese knots” is used here - a “lotus flower” is formed, it can be pulled as tightly as possible. Note!
- How to properly make a birdhouse with your own hands from scrap materials: we create an original birdhouse according to sketches
- How to make candles with your own hands: instructions for making wax, gel, scented, homemade decorative candles with a wick
- What you can make from foamiran with your own hands: we create flowers, Christmas tree decorations, snowflakes, three-dimensional paintings (photo + video)
In this case, we will need a pair of fabric ribbons 2.5 m long, or use the option for 4 short ribbons - 1.5 m each. Follow the step-by-step instructions:
If you took 2 pieces, then fasten them crosswise, if you took 4, tie them in a knot at a distance of 10 cm from the edges and pin them in the same way.
- The original part lies horizontally, bend the second part with an arch from above.
- Unfold the left fabric tip and lay it parallel to the right on the next one.
- Raise the right 1st end to the top and place it on the ends of the 2nd.
- We return to the 2nd again, bend the upper tip to the left, pass it above and below the initial one. Tighten the knot and straighten the square. Let's tighten the knot again;
- We repeat the entire pattern an appropriate number of times, reaching a certain length.
- This product is so strong that it can even be used as a keychain or a hairband.
Interesting ideas
The combination of satin ribbon and beads looks very gentle. Try making a knot bracelet.
It is enough to tie neat knots on the ribbon and insert large beads between them.
Another interesting option for baubles is made using a needle and fishing line.
Fold the edge of the ribbon 15 cm and sew the beads evenly to the base. When finished, pull off the line. Tie the finished bracelet at the edges with knots.
Related article: DIY lighting for a dollhouse
Baubles using beads
If you have achieved a certain level of professionalism, you can try incorporating beads, leather and other details into your work. The advantage of beads is their versatility; they can be used to make braids with names, designs or any symbols.
It’s good to use a machine that has tensioned fishing lines - it’s so convenient to string beads. You can also do without it; you will get a less expensive type of decoration.
Wooden bracelets
The instructions describe step by step how to make an interesting decoration from any available wood materials.
Even popsicle sticks are suitable for a cool children's bracelet. The idea is this:
- Holes are drilled at the ends of 2 ice cream sticks.
- Then the material is left in water for 2 days so that it becomes soft.
- The elastic bands are threaded through the holes, and the resulting structure is pulled onto a bottle whose diameter is approximately equal to the circumference of the wrist. In this position, the workpiece is left for a day until it dries and takes the desired shape.
Paint the accessory with oil or acrylic paints.
We offer you to master other techniques by attending the following courses:
Making a braid
We will need:
- beads of different tones and sizes;
- bracelet clasp;
- 3 fishing lines or satins, 70 cm each.
Execution method:
- Fold the pieces of fishing line in half and fasten the clasp rings.
- Secure the ends to the 2nd ring.
- Place beads on all sections to the full length (approximately 35 cm).
- As a result, you will have a three-row base - up, down and in the middle. Place the top row on top of the middle row. Then the bottom row goes to the top.
- Place the top row on the bottom again and so on, the procedure must be repeated 4-6 times until the product is ready.
Advice: if you want to get not only a bracelet, but also a necklace, then increase the length of the fishing line.
Square bauble made of four ribbons
You will need: 4 tapes 5-7 mm wide, 2 meters long.
Master Class
- Fold 4 ribbons together, space 15 cm and tie a knot.
- Straighten the ribbons on different sides - up, down, right, left. When weaving, you do not need to look for the front side, since in this bauble all sides will be viewed equally.
- Lower the first ribbon from top to bottom to make a loop.
- Move the second ribbon from right to left so that it overlaps the first.
- Bend the third ribbon from bottom to top so that it overlaps the previous one.
- Move the fourth ribbon from left to right, then pass it into the loop of the first ribbon.
- Tighten the weave slightly, then straighten the ribbons - you should get an even square.
- Repeat steps 3-7 until the desired length of the bauble.
- Secure the weave with a knot.
The square bauble of four ribbons is ready! It is worth noting that the bauble can be worn not just straight - square, but also twisted in a spiral. However, you need to handle it carefully, because if it stretches, it will lose its voluminous beauty. This can be avoided if you insert a fishing line or a strong thread at the beginning of weaving.
I recommend watching the video master class!
DIY keychains – Unusual keychains made from satin ribbons
Modeling a fashionable bauble
You are limited only by your imagination, because you can weave in anything - gems, decor for jewelry. It is only important to have convenient holes into which the fabric, braid or thread can be threaded. How to choose an interesting pattern?
Let's look at the most popular schemes in which the learned techniques will be useful to you. You can vary approaches and experiment to achieve a unique effect.
Intertwined ribbon and beaded patterns. The use of beads and different colors looks especially impressive.
New Year's baubles, weaving patterns for which are often published in magazines.
Silhouettes of animals and plants, contours of landscapes. These are real mini-paintings that immediately captivate.
Inscriptions, slogans, names. You may need some help from a pro at first, but it's a really fun and personal solution.
Hearts and other symbols of love. This is a simple but very significant element of the design, which is very popular.
You can endlessly list different patterns; this approach is reminiscent of knitting. Braid weaving is also interesting.
We recommend: you can use floss threads and leather laces. A useful tool is a ruler and a tablet; you can easily fasten threads and silk with tape on tables.
Tips for weaving baubles
Take advantage of our small but important tips that will help you in the process of weaving baubles:
- Before choosing a color scheme for your future bracelet, use your common sense and logic. A bauble is a cult thing that carries a certain meaning and someone’s cultural heritage. Before weaving, read up on what color shades represent in the hippie movement. Such political information will broaden your horizons, and will also save you from the awkward glances of people who understand this;
- do not overdo it with tightening the loops while working on the bauble. Let them be a little loose weaving, as a result, your decoration will become symmetrical and will have neat patterns or names. The edges of the tapes, no matter how many of them are used in the work, must always be of equal length. The first time, you may not succeed, but this does not mean that you should not follow the rules. Learn right away to adhere to the established scheme and rules. This is better than constantly redoing the baubles;
- if you are a beginner, then use pins in weaving; they will help prevent the ribbons from slipping out and the loops from unraveling. Experienced needlewomen can make a bracelet by weight, but for novice craftsmen, it would be a good idea to have a safety net. Tie a knot from the ribbons, and let the edges hang quietly.
By following our rules and tips, you can weave a unique bauble that no one else has. Examples of work can be seen in the photos and videos located on our website.
As you can see, there are a lot of ways to weave baubles and bracelets. The number of tapes used in work varies from two to several at once. Tapes are a material that is very easy to handle. People who have been interested in this craft for a long time can weave baubles in about 10 minutes. The big plus is that the work is done quickly, and the result is simply amazing. The end result is a beautiful and interesting bauble that was made with your own hands. A person who wants to engage in such an exciting hobby may not even have anything to do with craftsmanship at all. The main thing is that there is a desire and desire for this.
Look at examples of other works to have an idea and know what weaving patterns exist. Once you get the hang of it, you can come up with sketches of your own work. After looking at the made bauble, you can add something of your own to the composed motif.
The fashion for creating baubles has recently expanded significantly. Each generation of young people constantly introduces new weaving patterns into such jewelry. Now everyone knows how to weave baubles with names or bracelets with beads. It turns out that this is very easy to do. You just need to stick to the plan. You can teach your child to make beautiful bracelets from ribbons. And he will do this with great pleasure not only for himself, but also for his close friends or girlfriends.
In this matter, your imagination will also help you, which, together with desire and work, will help you make truly unique things from ribbons.
And although the primary meaning of such bracelets, over time, was completely lost. They are a universal decoration, even with names. Therefore, we now see the presence of baubles on the hands not only among representatives of hippies, but also on the hands of famous fashionistas. Such a thing will add individuality and beauty to the image.
Now, you know the answer to the question of how to weave baubles from ribbons.
Advice from the experts
The skill of creating such interesting accessories is simply a treasure trove for a handmade master. Instead of an expensive purchase, make a unique gift for your friends and family.
Also, do not forget the professional recommendations of experienced craftswomen to achieve success in your work:
For beginners, it is optimal to practice on materials of equal length. Do not over-tighten the knots, pay attention to symmetry.
Your faithful assistant is a pin, and also a pad on which you can secure the material. At the end of the weaving, everything is tied in a knot. This will prevent the loops from shifting and unraveling.
Without fastening, doing all the manipulations by weight is very difficult and ineffective, although a master with great skill will gradually succeed.
The role of color and color combination is important. Learn to combine shades correctly, notice interesting and unusual combinations on the canvases of painters, at fairs and clothing designers.
Don't forget that in some subcultures certain colors carry meaning. It is important to remember this so as not to get into an ambiguous situation. You can view the meanings of color codes on the Internet.When you first start using a technique, it's rare that something perfect comes out, so don't despair. It’s better to try the actions strictly according to the instructions as many times as possible; you will master the working principles very quickly.
Interpretation of colors
When planning to give someone a handmade bracelet, you should not neglect traditions. We invite you to find out what these or those colors in the baubles mean:
- White is the color of innocence, wisdom, and new beginnings.
- Red is a symbol of passion and love, helped in protection from negativity and the evil eye.
- Yellow and orange were woven into the bauble to improve mood and attract fortune to one’s side.
- Pink is the shade of a romantic personality.
- Black and gray tones are a symbol of independence and modesty.
- Shades of blue were intended to achieve inner harmony, indicate a connection with nature, symbolize friendship, kindness and wisdom.
- Brown is a symbol of stability, prosperity, support from loved ones.
- Purple was woven in to emphasize a person’s abilities in the arts, magic, and to denote an extraordinary personality.
The closest friends were given the so-called rainbow - a bracelet symbolizing soul kinship, joy, and the desire to live life to the fullest.
You can use symbolism and combine colors, giving them a certain meaning, the main thing is that the resulting product pleases its owner.
How to weave baubles - photo options for various weaving patterns
Please repost
0
Types of beads and ribbons
The increased popularity of hand-made accessories is largely due to the emergence of a huge selection of high-quality materials. Nowadays it’s easy to find beads of all colors and sizes in the store:
- from natural stones;
- acrylic;
- wooden;
- pearl and many others.
The variety of tapes is also pleasing. In the store you can choose satin, rep, lace, velvet and brocade. The ribbon can be distinguished not only by the structure of the material, but also by its color. Manufacturers produce monochrome and printed products. The polka dot pattern is especially popular, as well as themed prints – New Year’s, children’s, and holidays. By choosing one or another print, you can emphasize your style. Polka dots are invariably associated with retro motifs, while remaining at the peak of popularity among trendy patterns. And thematic drawings will show the importance of the current event for you.
At the same time, no matter how hard manufacturers try to expand the line of patterns, black and white beaded bracelets always remain relevant. This color combination will fit perfectly into almost any look.
The Ancient Origins of Macrame
The name presumably comes from Arabic dialects, and the knot weaving technique itself was known to many peoples. Knot writing was used by both the ancient Slavic tribes and the American Indians.
The emergence and history of macrame as a necessary household technology that has found practical application in various areas of life is interesting. From plant stems, veins and animal hair they wove clothes, fishing and hunting gear, and also made many things necessary for everyday life.
In the era of the development of sailing navigation, the art of working with knots is developing very widely. Sailors invented and used several thousand types of knots to fasten the ship's equipment, and in their free time, from the remains of ropes and ropes, they decorated small objects with weaving, for example, knives, flasks, and belts.
Nowadays men also often work in this type of creativity.
Weaving exercises have a good effect on the nervous system, help develop attention and concentration, and also contribute to the development of finger motor skills.