Types, models, preparation
Hand-sewn home clothes and shoes are not only original work, but also an opportunity to significantly save your budget. In addition, you don’t have to limit your imagination and use things that are outdated, out of fashion or have become small. You can also give unique slippers, accessories and other crafts to loved ones, friends, and colleagues for the holidays.
Before starting work, you need to decide on the model of house shoes. This will be the first stage. Easy to make with your own hands
- classic flip-flops;
- slippers in the form of boots with low tops;
- light moccasins;
- UGG boots;
- "bunnies".
Experienced craftswomen knit and knit slippers from sheep or goat wool. This is labor-intensive and complex work. For your first experience, it is better to choose a simple option.
The second stage is preparing everything necessary for work. The “kit” will include the main fabric, sole, adhesive pad (if the main material does not hold its shape well), threads (preferably nylon) and a needle, scissors, a sewing tape measure, a pencil and thick paper for creating a pattern, an awl, and fabric glue.
We make the pattern according to individual sizes. The number of elements depends on the selected model. For classic slippers without heels, these are two parts, for UGG boots – 3.
Materials
Craftswomen recommend giving preference to dense fabrics that hold their shape well - denim, remnants of an old sheepskin coat, genuine leather or its substitutes. But also from soft materials - fleece, felt, faux fur - no less cute and practical products are obtained.
Fleece
This is an analogue of sheepskin, dense, light, soft. It is made from polyester fibers using the knitted weave principle. It is elastic, but retains its shape well, is abrasion resistant, breathable, easy to care for, and hypoallergenic.
Homemade fleece slippers, sewn by yourself, can be washed in an automatic machine on a gentle cycle. The fabric does not wrinkle, any type of dirt is easily removed from its structure.
Felt
A material of mechanical origin obtained by felting fibers, without interlacing. The raw materials for it can be either natural or synthetic. It is elastic, resistant to mechanical damage and abrasion. Felt can even be used to make the soles of house boots.
It is not recommended to wet felt slippers, as it shrinks. Among the advantages, it is worth noting low thermal conductivity, softness, and the ability to retain its shape even with long-term and active use.
Denim
The modern textile industry produces almost 10 types of denim fabrics. Not all of them are suitable for sewing home boots. Needlewomen prefer options without elastic additives - denim or gin. They are denser and stronger than their analogues and last longer.
House shoes made from denim will be dense, but breathable, and your feet will not sweat in them. It can be washed in any mode, as long as no adhesives were used in its manufacture, but only threads.
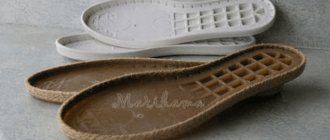
No less popular in home handicrafts are artificial and natural leather and fur. Slippers or cozy, light boots can be sewn from an old fur coat, sweater, or rather, from its sleeves. It is better to make the sole from felt insoles purchased in a store, leatherette and even linoleum scraps.
Ugg boots
This model can be sewn with your own hands from any material - fleece, felt, leftover fur. The best option is an old sheepskin coat. The boots will be elastic, warm, and will keep their shape well.
For work you will need
- cardboard for making patterns;
- pencil, chalk or soap, ruler;
- tailor's centimeter;
- dense material for the sole or seal;
- remnants of an old sheepskin coat;
- thick threads, a needle with a large eye, scissors.
We start making the pattern from the sole. It will determine the parameters of all other parts. If you don’t have such experience, you can use the knowledge of experienced craftswomen.
When cutting, you need to leave seam allowances. For dense material, their width should be 0.5-0.7 cm. It is better to draw lines with a piece of soap with a sharp edge. Its traces are clearly visible, but they are easily removed during the process of sewing boots.
The fur around the edges needs to be cut off. The seam will be soft, the elements will be easy to connect, not only with a hand seam, but also with a sewing machine.
The next stage is connecting the parts. The top parts are sewn together first. Then the top is pinned onto the sole with decorative pins and stitched. It is necessary to prick so that the “landing” is correct and uniform. The center of the heel should coincide with the middle of the heel, the “top” of the toe with the middle part of the toe on the insole.
The sole of homemade UGG boots made from the remains of an old sheepskin coat can be reinforced with an insole made of felt, polyurethane, or rubber. Synthetic insoles are glued to the base fabric using glue.
These homemade boots can be decorated with embroidery, rhinestones, and the seams can be covered with decorative braid. In the front part of the boot, you can decorate the fastener with a button and loop, or a zipper. This solution is suitable for those who have wide legs, high arches, and those who suffer from edema.
How to make a pattern for boots
After the block is ready, you need to start creating a pattern.
The easiest way to make an insole is to draw it along the contour of the foot. It is important to take into account the shape of the sock and the fact that the finished shoe should be slightly longer than the foot itself. The construction of the pattern for the upper part of the boots begins with measuring the foot in several places. For this, it is best to use a flexible tailor's meter. Having the results of measurements before your eyes, you can draw a shape. It is also necessary to measure the height of the backdrop.
The external and internal parameters must coincide with the external and internal contours of the insole; if this is not followed, it will be difficult to sew the shoes. To build a cutout you need to measure the depth from the toe to the instep. To construct a schematic image of the boot, you need to measure its width in several places, taking into account the lock, and then draw a part of the required length.
Important! Paper patterns need to be applied to the foot or last. If you need to make a looser fit, the pattern can be made a little wider. In this case, you will need to select a lining under the top layer of leather.
Felt slippers
For this model you will need to cut out only 4 parts - 2 soles and 2 tops. You can make a pattern with your own hands - trace the foot on cardboard and cut it out. The second step is to place your foot on the resulting part, place a sheet of thick paper on top of the foot, pin together the places where they touch with pins, and cut off the excess.
You can use ready-made solutions.
From felt we cut out the details of future slippers, taking into account seam allowances. It is better to sew the material by hand using a buttonhole stitch. The density does not matter, since the felt holds its shape well, the seam can withstand serious loads, of course, provided that strong threads were used.
Felt slippers can be decorated with appliqué or you can choose a material with a pattern or ornament for their top. Threads are often used as decoration, with which the parts are sewn together - thick, in a contrasting color. It is better to reinforce the sole with denser and thicker felt or a cork sheet thicker than 3 mm.
How to sew boots with your own hands: instructions
After the patterns have been cut out from the pattern, they are transferred to the leather, from which parts of the future boot are cut out using a knife:
- Sole blanks cut from thick leather are applied to the last. A leather upper blank is attached to it using nails by pulling it onto the last.
- After the top is fixed, the junction with the sole is glued with a layer of glue. After this, you can remove the nails, trim off the excess material and glue the cardboard edging.
- The second part of the sole (finished or made from cork) is attached to the top with glue, firmly connecting them together. For a stronger grip, they can be lightly beaten with a hammer.
- The remaining parts of the top are sewn together with an even and neat seam. In order for the seams to be as even as possible, you must first make the required number of punctures in the material and only after that use a needle and thread.
- A zipper is sewn into the boot, or if the boots are short, holes are made in the boot for the laces.
- To ensure that boots can be worn in rain and wet snow, they must be treated with water-repellent impregnation or cream.
In order for two boots from the same pair to be as similar to each other as possible, work on them must be carried out in parallel.
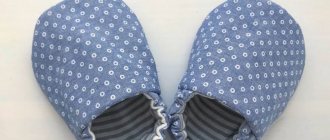
Bunny boots
This model is sewn according to the same principle as homemade ugg boots, but with the addition of decor in the form of bunny ears. You can sew them from fur, fleece and any other available materials.
Thin fabric for bunny boots needs to be strengthened - glued with special materials, quilted with denser fabric. The “bunnies” must keep their shape well, so that the soft ears stand out against the background of the boot and are “alive” and mobile.
Ear patterns are added to the main patterns. We cut out 4 parts from the fabric in the form of an elongated oval with an extension towards one edge, from which the auricle will be formed. In addition to the ears, you can decorate the boots with a tail made of the main fabric or a wool pompom.
If the boots are sewn with a lining, then the number of parts of the boot and toe is doubled. First, the upper parts are sewn together, then they are connected to the sole. The seam can be either external or hidden. It depends on the skill level of the needlewoman. The ears are sewn into the seam connecting the lining of the boot with the top.
Stages of pattern construction
The pattern is ready-made, as in the photo below.
If the leg is not standard, for example, a wide foot, a high arch, a protruding bone, then the patterns can be built independently, according to individual measurements.
To construct the sole, you can outline the foot, the insole, or a finished slipper that fits the size.
Attention: if the foot or insole was outlined, then add an additional 1 cm around the circumference. There is no need to increase the sole around the slipper - it is already large.
- Draw a center line and make a cut along it almost to the very top.
- Separate the halves at a distance equal to the lifting height. For this measurement, you need to measure the width of the foot at the base - the green line, plus 3 cm for freedom of fit.
- Mark the distance from the tip of the thumb to the instep - the blue line. This will be the length of the toe of the boot. Usually it is 12 - 14 cm.
- Draw a smooth arc - pink color. The toe is ready.
- Boot top. It is necessary to measure the circumference of the shin in the place where the boot ends, and the circumference of the ankle. Add 3 - 4 cm to these measurements for a loose fit. When using stretch fabric, such as fleece, and without insulation, a small increase of 2–3 cm can be made. If you want to sew the product looser, then add 4–5 cm.
- Mark the lifting point on the pattern.
Draw the heel with a convex arc. Its height is usually 5cm. - Draw a semicircle where the toe and boot meet.
Boots made from an old sweater
You can make cozy home boots with your own hands in literally an hour from raglan sleeves from an old sweater and felt insoles purchased at the store.
Carefully remove the sleeves from the sweater and remove any remaining threads. We “try on” the insole to the cuff line of the sleeve and pin it with pins so that the fit of the top of the future boot is uniform.
We glue the parts together or sew them with a blind stitch. We reinforce the sole with another insole made of felt, leather or thin linoleum.
To glue reinforcement parts of the sole, it is better to use contact transparent glue. It is elastic, will ensure a high-quality connection of parts, and will not collapse under load when walking. You can use special glue marked “shoe glue.”
1
Homemade boots from an old sweater are ready. You can add originality to them using beading, decorate them with laces with pom-poms on the sides of the tops, or use embroidery, ready-made appliqués, and other solutions.
There are a lot of ideas for making house shoes with your own hands. Use your own imagination, come up with your own models or use the experience of experienced craftswomen. In just a couple of hours you can create a unique thing and please yourself or your loved ones with it.