If you want to sew yourself, but don’t have the material or sufficient experience for this, try making soft toys for beginners step by step yourself. Leftover fabric or some unnecessary things are also suitable for sewing. This way you will not only get a cute toy, but also give life to old things! We have selected simple patterns for soft toys.
Cheerful teddy bear made of soft fleece
If you want to please your baby with a soft friend, a bear is well suited for this role!
You will need:
- fleece;
- needlework supplies;
- two beads for eyes;
- a piece of leather for the nose;
- cotton wool
1. Print out the finished teddy bear patterns and draw them onto a newspaper at the desired scale. Cut it out.
2. Cut out of fabric, taking into account the seam allowance: 2 blanks for the body, 4 for the legs, 2 more for the eyes, and one circle of leather for the nose.
3. Pin the eyes to the body and sew by hand (or using a sewing machine).
4. Do the same work with the paws: fasten them together, connect them, leaving the bottom unsewn. Turn it inside out.
5. Secure the front sides of the bear’s body with pins and place the paws between them.
6. Sew the toy, stepping back half a centimeter from the edge. But be sure to leave room to turn it inside out. Distribute the filler inside it, then sew up the hole.
7. Run a stitch along the circle of black leather and pull the thread together to form a ball. Stuff it with cotton wool and secure it to the face.
8. Hook the beads in place of the intended eyes. If you want to make a mouth, go through stitches with black thread.
Your DIY fabric toy is ready!
Where to start for beginners
You need to prepare all the materials and tools for the process and try to sew:
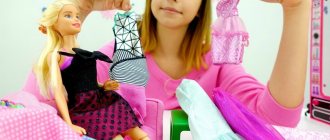
- A simple pillow or pillowcase for it;
- Sleep mask;
- Minimalist skirt;
- Turtleneck;
- Loose dress;
- Duvet cover.
You might be interested in Ready-made pattern and patterns for a heating pad for a teapot: sewing with your own hands
Attending master classes can be very useful
After completing simple work, you can begin making more complex products; of course, all the previous ones turn out well.
Products for the home are the simplest thing you can do yourself at the initial stage
Volumetric hippo
Another adorable character who won the hearts of all the kids! We often see these toys in themed clothing: a hippo policeman, a hippo fashionista.
Instructions:
- fur, suede, or soft fleecy fabric (you can take fabric in a contrasting color for the tummy);
- needles, threads, pins;
- beads, buttons.
1. Decide on the size. If you want a little cutie for the palm of your hand, the pattern should be miniature in the area of 7-10 cm along the back of the body. If you want it to be the size of a pillow, take this into account when cutting.
2. Place the parts of the legs right sides together, sew them at a distance of 0.5 -1 cm from the edge, leaving the bases of the legs unsewn. Iron the seams, turn them inside out and stuff them with filling.
3. Assemble the head. We fold the ears right sides together, stitch them, turn them inside out, and stuff them. Sew the head part along the darts to create a voluminous face. Sew the resulting blank into the front part of the head. Place both parts of the head right sides together, not forgetting the ears. Sew, leaving the base unsewn. Turn it out and stuff it evenly.
4. We sew the tummy detail into the body.
5. We connect all the parts, distributing the stuffing well.
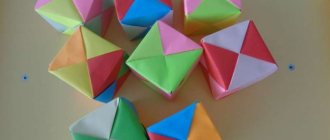
Turtle
The turtle pattern is quite simple and is suitable for all beginning needlewomen. This is how you can make a toy without a sewing machine!
The materials are the same. Choose the fabric to your taste.
The basis of the body pattern is one circle of your favorite size. 8 identical leg parts, two for each; one smaller circle for the head.
- We cut out a circle from the fabric and, stepping back from the edge, sew along the edges. Gently tightens, adding cotton wool inside.
- We sew the parts of the legs together in pairs, turn them inside out, and fill them.
- We tighten the head around the perimeter to form a ball. We sew it to the body, just like the paws.
- Beads instead of eyes.
- You can make a design on the shell of black threads.
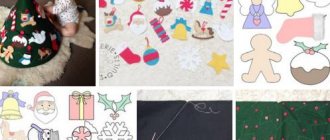
DIY felt cars - patterns
Felt car pattern
very simple, consists of only a few parts. Before starting work you should prepare:
- needles;
- filler for toys (you can use padding polyester or holofiber);
- yellow, blue, black, red and gray threads;
- scissors;
- felt in red, gray, blue, yellow, black and blue;
- pencils or crayons to trace the pattern and make notes;
- paper.
Some people recommend using synthetic fluff as a filler. Here everyone chooses for themselves. To sew a felt locomotive,
You will need a different pattern. Stencils for a truck, car, or fire truck are also different. Felt is considered the most suitable material - it is convenient to work with, it does not cause allergies and is completely harmless. Some tips from the professionals:
- There is no need to rush - sewing small elements on a machine will not speed up the process, but on the contrary, will complicate it.
- If there are crooked stitches or uneven edges, it is better to rip out the failed area and re-stitch it.
- To make the toy stable and make it heavier, you can add cereal or peas to the filling.
- It is necessary to use short stitch machine sewing mode.
- You can sew car wheels from felt with filling yourself or replace them with buttons.
- If the seam location is difficult, it is better to use a manual sewing machine. The same should be done when turning or flashing small elements. Instead of pedals, the wheel is turned by hand.
Cats in love
How many wonderful feelings a child will experience from cats! Such a souvenir will be pleasant even to a friend, husband, or parents.
The work is extremely simple, only 4 identical parts, the main thing is imagination in decorating these fluffies.
It is better to take thick material and two colors: a separate one for each cat.
- We transfer the pattern to the fabric using our method. There are two mirror parts from each color.
- We sew in pairs, turn them inside out, stuff them, fill the holes.
- Decorates the face: add eyes, mouth, bows, etc.
Why learn to sew and cut from scratch?
The market and shops are literally bursting with clothes, but people still have to spend a long time choosing the right material and size. Sometimes it takes a whole day, a lot of money and nerves. This is where sewing skills come to the rescue. Learning to cut from scratch yourself is not the easiest task, but it is quite doable.
A simple dress for girls that you can make yourself
In addition, it is very economical: you do not need to go to an atelier or workshop every time to make something to order or simply repair your favorite dress. When sewing is done with your own hands, the person himself chooses the style of the product, material, color and other parameters.
Important! The ability to sew neatly and beautifully is also a good addition to your basic income, which, with certain skills, can replace it.
Transferring pattern details to fabric
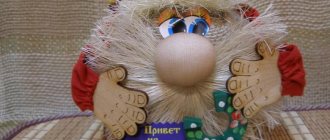
Birdie
Previously, this toy was considered amulets for children. Such things were made with their own hands from the simplest materials found at home. Make your own amulet of happiness!
Take any square piece of beautiful fabric, filler, and monochrome thread.
- Fold the piece diagonally and form a beak at the tip of one of the sharp corners, wrap it with thread 2 times, secure without breaking the thread.
- Unfold the folded piece and stuff cotton wool into the dimple near the key; this will be the head.
- Fold it diagonally again, wrap it 2 times (that’s the magic), secure it. Cut the thread, leaving 30-40 cm.
- Thread the thread into the needle and stitch along the diagonal fold, not reaching the very edge 5-7 cm. Pull and see what happens - these are the wings of the tail! Fasten in a way convenient for you, decorate your amulet to your taste.
The bird can be placed in the interior of the house or hung above the crib!
Tools needed for sewing
You only need basic materials and tools: simple fabric and a minimal tailor's kit. You will need the following list of tools:
- Tailor's scissors. Their distinctive feature is that they are very sharp so as not to spoil the fabric material, and also have one eye larger than the other. Their blades are not located at right angles, like conventional scissors. The large diameter of one of the ears is explained by the fact that sometimes it is necessary to make considerable efforts to cut dense fabric;
Tailor's scissors
- Threads. High-quality and dense threads are required. It is not recommended to use classic cotton threads, as they often break and stitch unevenly. It is best to use 100% synthetic polyester threads suitable for hand or machine sewing;
- Needles. Needles are used at the sweeping stage and during repairs. The sizes range from 1 to 12, where 1 is the thinnest. You should choose a needle based on the type of fabric, as is the case with machine needles.
This list can be expanded for a very long time, but these are the basics. You need to understand how and what to do and only then move on to purchasing more complex specialized tools.
High quality sewing threads
Teddy bears
These are all kids' favorites! Everyone knows, everyone wants! We are sewing a surprise for the kids.
It's so nice to sew this soft toy with your own hands. Below you will find toy patterns.
Traditionally, plush fabric or faux fur is used for these cubs.
- We already know how to transfer patterns onto fabric, go ahead!
- If you take fur into work, it is advisable to cut it at the allowances.
- We connect the parts of the upper legs and sew in the palms.
- We sew together the parts of the legs, leaving the sole open, where we sew in the heels and soles.
- By analogy, we make a tail and assemble the head. When assembling the body, leave the hole for the neck open.
- We stuff the Teddy in the lower sitting part more tightly for stability. The head is not too much, so as not to overweight.
- Let's mark the fingers with stitches made from floss or woolen thread. Embroider a mouth and nose on the face. The eyes are traditionally large with crosses.
- There is one secret to keeping your head stable. Take one empty wooden spool of thread and wrap a piece of your fabric around the middle. Insert into the hole for the neck and attach to it in circles using a hand stitch, first the body and then the head.
If desired, tie a ribbon around your neck and sew a small vest or panties.
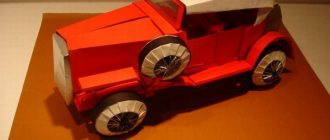
We sew a soft machine for a baby
We will sew a soft car for the baby.
Toys for children should be special - bright, easy to grip, useful and safe. And such toys must be sewn quickly - while the baby is sleeping 
Necessary:
- two types of fabric,
- filler,
- beads,
- needle, regular thread, Iris,
- buttons,
- pattern,
- sleeping baby and mood!
So, let's start with the appearance: we draw the cars on a piece of paper, choose the option we like, try to reproduce the drawn pattern in any graphic editor, print it and get started!
I drew this pattern:
We select fabrics: cotton for the body of the machine, another fabric for the wheels so that the baby can feel the difference. I took the flannel.
Transferring the patterns to fabric:
We are stitching . You can use a machine, but don’t forget that the baby is sleeping, so I sew quietly - with my hands. Be sure to leave a hole in the seam for stuffing!
We cut it out , leaving the fabric for allowances, and make cuts in the allowances. I would like to note that if you sew by hand and have little experience, the cuts can ultimately ruin everything - the fabric will unravel when you turn it inside out and stuff it. Therefore, we make the cuts carefully, not reaching the very seam!
Turn it inside out . If the baby is still sleeping, you can iron the parts. My baby doesn't sleep much, so I'm in a hurry and don't pet.
Let's try it on and admire it…
We stuff . I suddenly came up with the idea of filling the wheels with beads. A toy should be useful, and the development of fine motor skills is important! And as it turned out later, the toy is much more stable this way!
We go to the bins and find beads. If there are 4 wheels, then there are 4 types of beads! BUT REMEMBER: a child can only play with products with beads under the supervision of an adult! No matter how strong the seams you sew, no matter what tricks you use, children can easily swallow beads!
To further protect myself, I tried to find the largest beads.
The wheels should not have rounded sides; when stuffing, the largest beads should be placed in one layer, the rest - the width of the first wheel.
Sew with a hidden seam. We try to make sure that the stitches are small and tight, otherwise the wheel may go flat and the beads will run away.
We fill the body of the machine with padding polyester, padding polyester, holofiber - whatever is at hand. Let’s try it on again and admire it...
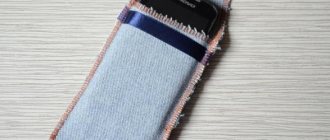
A window in a machine can be made in different ways: by sewing on an additional detail in the form of a window (by the way, you can sew a “russharka” there - again, a development), you can embroider it, or simply draw it with felt-tip pens/fabric paints. In the latter case, I’m not sure that the baby can safely suck on the toy: chemical paint. I have not studied this issue myself; I will refrain from giving advice on this matter.
I decided to embroider a window. More precisely, stitch along the contour. Everything is a plus for development and convenience: you get a kind of border that is convenient to pinch with small fingers, and fine motor skills work. First, in accordance with the pattern, we draw an outline using ordinary white thread. The window itself will be slightly larger. Next to the outline, we begin to sew both sides of the machine at once using bright Iris thread in one fold. We stick the needle from below, and hide the knot between the wheels of the machine.
Since we only basted on one side of the toy, when stitching with thread, we follow the back side. We try to pierce the machine with a needle perpendicular to the body.
We sew a “forward needle” stitch there, and then back. Be sure to tighten the thread to create a convex window. We remove the white basting.
Sew on the wheels . We will sew two wheels at once with one thread. We remember that the baby is learning to work with his hands and gums, so the wheels must be secured especially firmly. I decided that sewing them through the button was strong enough. Please ensure that the needle does not pass through the beads inside the wheel. Small beads simply will not fit through the eye of the needle.
We sew the first wheel (not forgetting about the button), bring the thread to the other side of the body and sew on the second wheel. Let's go back and forth with the thread several times and fasten the thread under the wheel, hide the tip in the body of the machine (to do this, tie a knot, bring the needle through the machine, pull the thread and cut it - the thread will “run away” into the toy). We sew the second pair of wheels in the same way.
Since the baby is still sleeping, we have time to decorate the car with headlights! We embroider triangles with stitches:
The machine is ready to use! Someone is in for a surprise...
I hope I didn't bore you too much! Thank you for reading to the end
Happy creativity!
Leopold the cat
During all the problems and crises, I always want to sing: “We are going through this trouble!” And to make this happen easier and faster, we can sew a toy with our own hands.
- Trace the templates, not forgetting the seam allowances.
- Let's start with the legs. We have 4 identical parts. We sew, turn, stuff. Leave the bottom open to connect to the body.
- We also separately assemble the tail and ears, which we sew into two folded parts of the head.
- To assemble the lower part of the cat, place one body piece face up. On the lower part we attach the finished legs and tail with pins, towards the center. Place the second piece on top and sew with one seam, without sewing up the neck.
- We insert the filler very well and tightly into the body and head of our textile toy.
- We connect them together with hidden, hand stitches in the neck area. We tie a bow, like in the cartoon, to cover the seam.
- All that remains is to design the face and Leopold is ready! It was such a pleasure to sew it.
You can also sew on an old sewing machine.
Almost any thing can be sewn on an old machine, if it is working and well-established. This will allow you not only to get acquainted with the history, with the machine on which your mother or grandmother once sewed, but also with the basics of controlling these mechanisms. After this course, it will be easier to switch to modern typewriters.
You might be interested in how a beginner can learn to paint on fabrics using acrylic paints
Important! Using an old machine, it is quite possible to make clothes from denim or leather, but there is one drawback: such devices can often only make straight stitches. For zigzag, you need to turn to later and more advanced examples of technology.
Zigzag stitching is an important feature of any modern sewing machine.
If sewing has already become an integral part of life, then you should think about buying a modern unit with many functions and supported modes. Today there are many solutions on the market at an attractive price. You can learn how to sew on such devices using the user manual or by finding the necessary information on the Internet. Here you can find the setup procedure and operating rules. If the initial practice was mastered on an old home machine, then there will be no problems with a modern one.
Operating a machine requires certain knowledge
Goby
And now the time has come to find out: how to sew a toy, the symbol of this year! We offer a pillow bull pattern for beginners.
- Scale this toy pattern for yourself.
- Transfer to fabric.
- We decorate the upper decorative part of our pillow. We sew all the elements on top of one upper part of the body: muzzle, spots, tail, paws with a decorative seam or stitch. It is advisable to use fabric for all small parts that does not require additional processing.
- Separately sew and stuff the ears, leaving the bases open.
- We connect the two main parts of our pillow toy, not forgetting to sew ready-made ears near the head. We turn it inside out, steam the seams, and close the holes for stuffing with hidden seams.
What to sew for a beginner
As already mentioned, you can start with the simplest shapes and patterns. It can be a rectangle: skirts, pillows, pillowcases, duvet covers and blankets. Simple tops or capes without any protruding or additional elements are also suitable.
Sewing tools
The simplest DIY dresses
The easiest way is to make a robe dress with a belt. It is worn at home and on the beach. The product is made from natural and breathable fabric. The fastening can be done with a zipper or buttons. The robe looks good on young girls, emphasizing both slender figures and curvy volumes. Sewing such an outfit will not only be an excellent practice, but will also save a significant part of the family budget
Dress-robe for everyday wear
How to learn to sew skirts
They usually start with skirts when simple products are already working out well. This is one of the easiest products to create your own pattern, take measurements and cut. It is advisable to choose a simplified version of a pencil skirt. It does not require a special set of tools and skills. First of all, they decide on the style of the product and its color. After this, you need to take all the measurements and build a simple drawing based on them, which should be transferred to the fabric. The fabric is cut out along the intended lines, taking into account allowances, and sewn by hand or on a sewing machine.
You might be interested in Beautiful and easy patchwork patterns for beginners
Easy to cut pencil skirt
Now it is clear how to start sewing clothes from scratch, as well as what is required to start sewing and cutting for beginners. There are many step-by-step instructions and tutorials on needlework, but it is important not only to get acquainted with the theory, but also to apply it all in practice.