Garden markers are a very, very useful thing. Few people bother with them, however, if you approach the issue wisely and organize everything logically and correctly, you will be convinced that this is a sensible and necessary solution, which you really lacked in your garden. You must admit, there have been situations more than once when you planted bulbous flowers and completely forgot about their location, and then reproached yourself for damaging their root system by digging up the ground. There have been misunderstandings when you bought seedlings, planted them in a flower garden, and then accidentally weeded them out, forgetting that it was a cultivated plant. Well, you definitely don’t remember the names of all those plants that grow in your garden. For all these and many other occasions, you need DIY garden markers ! It's cheap, beautiful and very useful!
How to make garden markers with your own hands - 5 master classes:
Garden markers made from wine corks
Cheap and cheerful - this is exactly the case! Wine corks don’t cost anything, and even if you don’t have the right amount of them in your house, you can always call out to your friends and acquaintances - don’t even doubt that they will respond and help. Well, when the necessary material is at hand, mere trifles remain: attach the sticks and make the necessary inscriptions. Agree, the task is not difficult.
How to make garden markers from wine corks with your own hands - master class from Tealarrowdesign
Practical use
Before creating markers, it is advisable to understand how to use them in the process.
Ring-shaped markers are suitable for counting stitches because they can be easily removed and put on the desired needle.
In the case of counting rows and recording the beginning and end of the pattern, markers are suitable that can be inserted into the yarn and removed at the end of knitting. Rings are not suitable for this type of work. Tags with a hook or lock are used here.
The first ones are simply strung in a certain place. They are convenient for knitting small items (hat, mittens).
If you plan to work on a large fabric, the hooks tend to fly out during the knitting process. In this case, fasteners that fit on the loops like a hook, but have a clasp on the reverse side, are suitable.
Markers with a lock can be considered universal, since they are suitable both for marking stitches in a knitted fabric and for transferring from knitting needle to knitting needle.
Related article: Scarecrow of Maslenitsa: crafts made from straw and paper with photos and videos
But such fastening implies an increase in the weight of the tag, which is not always suitable for loose knitting.
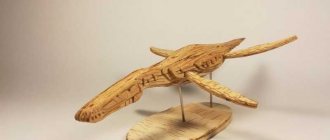
Garden markers made from wooden sticks
The material is available, the technique is not complicated. Yes, for the most aesthetic result you will need to work a little, however, the beauty and order in the garden are worth it, right? The main thing in this project is accuracy: if you manage to make the inscriptions so that you want to admire them, consider yourself lucky and you were able to achieve the desired result. Enjoy it and, if you wish, continue to improve: you will have many, many more plants in your garden!
How to make garden markers from wooden sticks with your own hands - master class from Makeandfable
PCB marker Edding 792
On the pages of the site there has already been talk about the so-called “pencil technology” for manufacturing printed circuit boards. The method is simple and accessible - a correction pencil can be bought at almost any store that sells office supplies. But there are also limitations. Those who tried to draw a printed circuit board drawing using a correction pencil noticed that the minimum width of the resulting track is unlikely to be less than 1.5-2.5 millimeters.
This circumstance imposes restrictions on the manufacture of printed circuit boards that have thin tracks and a small distance between them. It is known that the pitch between the pins of microcircuits made in a surface-mount package is very small. Therefore, if you need to make a printed circuit board with thin tracks and a small distance between them, then the “pencil” technology will not work. It is also worth noting that drawing a picture with a correction pencil is not very convenient, the paths are not always smooth, and the copper patches for sealing the leads of radio components are not very neat. Therefore, you have to adjust the printed circuit board design with a sharp razor blade or scalpel.
A way out of this situation may be to use a PCB marker, which is perfect for applying an etch-resistant layer. Unknowingly, you can purchase a marker for writing inscriptions and marks on CDs/DVDs. Such a marker is not suitable for the manufacture of printed circuit boards - a ferric chloride solution corrodes the pattern of such a marker, and the copper traces are almost completely etched. But, despite this, there are markers on sale that are suitable not only for applying inscriptions and marks to various materials (CD/DVDs, plastic, wire insulation), but also for making an etching-resistant protective layer.
Garden markers on stones
The stones themselves are a great decoration for your garden. When going on a trip to the mountains or for a walk to the shore of the river, be sure to bring a couple of stones as a souvenir - they can be used to lay out a beautiful hill, you can decorate the path leading to a flower bed, or you can simply use them as a basis to make such garden markers. Paint, brushes, paper - and go ahead to create your fairy garden.
How to make garden markers on stones with your own hands - master class from Mylifeatplaytime
Master class “Homemade pencil and felt-tip pen”
Tatyana Pivovarova
Master class “Homemade pencil and felt-tip pen” For children of senior preparatory groups.
Goal: to give children basic knowledge about the structure of a pencil and felt-tip pen , to develop interest in the world around them.
Educational: to develop knowledge about the structure of a pencil and felt-tip pen through experimentation with the creation of homemade felt-tip pens and pencils , to update knowledge about the careful handling of art objects. To give an idea of the historical changes in society through the idea of man's invention of writing and drawing utensils.
Developmental: create conditions for the development of such analytical abilities of students as the ability to analyze, compare, compare, generalize cognitive objects, and draw conclusions. Develop an interest in experimentation. Develop children's observation, interest and imagination.
Educational: to promote the development of interest in the structure of objects that we often encounter in everyday life. Cultivate respect for blue-collar professions - craftsmen felt-tip pens and pencils in factories .
Materials: clay, chalk, food coloring or gouache, cotton wool, sponge, self-adhesive film , knife, beets, syringes without needles, cups, water, paper.
Children are asked to guess the riddle of what the teacher has in the bag. It is suggested to determine by touch. Children guess what it is - a pencil and a felt-tip pen .
Explain how a pencil (graphite rod (simple pencil )
or compressed from an adhesive base and paint
(colored
pencil ) enclosed in a shell of plastic and wood. Tell that graphite is a mineral; geologists find its deposits underground in some places.
We invite the children to imagine an ancient person who needed to write something. Suggest to imagine how he took something that was colored and wrapped it in something, getting a primitive pencil . Guess with the children what he could wrap the rod with. We will try to make such a pencil People took paints from nature. For example, if it was necessary to dye fabric, it could be boiled in a decoction of nettles, beets, and blueberries. (Invite the children to guess what color the fabric will turn out in one of these decoctions).
Show children how to make a primitive pencil by simply cutting out a “rod” from a beetroot, and so that it doesn’t get their hands dirty, wrap it in self-adhesive . Let the children draw with a “beetroot” pencil .
Show another version of a pencil - a pre-made rod made of clay, chalk and paint, also wrapped in self-adhesive .
Conduct an experiment - deliberately drop one of these pencils , open it and show the children that the rod has broken. Explain that the rod in an ordinary pencil also breaks when the pencil , which we have observed many times - you try to sharpen a pencil , but it breaks again and again. Lead children to the conclusion that pencils need to be protected from falling.
Invite children to look at a felt-tip pen . We will find that the felt-tip pen rod is made of a material reminiscent of compressed thread or cotton wool.
Explain that the felt-tip pen is saturated with liquid paint.
Show how you can make a homemade “ felt pen ” by wrapping with self-adhesive tape . Pour the diluted paint on top using a syringe without a needle. Let the children draw with the resulting “ felt-tip pens ”.
Explain that the paint in our markers will dry out soon . Ask the children why the paint in real markers does not dry in one day. Bring to the conclusion that the felt-tip pen should always be capped immediately after drawing.
Invite the children to explain the difference between a pencil and a felt-tip pen . Distribute ready-made and make additional homemade pencils and markers for children's independent creativity .
Master class on making a bookmark from colored paper “Pencil” Master class on making a bookmark from colored paper “Pencil” How good are my pencils! Don't bother me, please: I'll draw it.
Master class with parents of pupils “How to encourage a child to hold a pencil correctly” Innovative forms of interaction between a preschool educational institution and the families of pupils in sensitive moments in the context of the Federal State Educational Standard for Preschool Education (from work experience during the adaptation period.
Homemade dolls for role-playing games and theatrical activities My homemade didactic development for preschool children. Promotes the development of the child's imaginative thinking and creativity.
Garden markers on jar lids
A creative person is one who can find a non-standard use for any thing. Look, here's a striking example: a jar lid. Regular metal screw cap. Well, it would seem, what can be done with it? She is boring, primitive and uninteresting. However, it’s worth looking at it from a slightly different angle - and voila, now it’s turned into a cool garden marker!
How to make garden markers on jar lids with your own hands - master class from Theprudentgarden
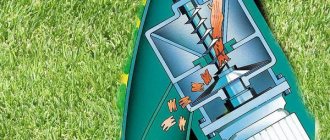
What is a laser marker?
A laser marker is a rather complex device that, using a laser emitter, removes the surface layer from the workpiece being processed. The cutting depth is set by the device operator, but it cannot be greater than the capabilities of the device allow. The laser is capable of working with various materials.
Delicate work previously required the involvement of specialists from different fields of activity. Now one device is enough. It can engrave and remove material from metal, plastic, wood, leather and various composite materials.
There are different types of markers. Some models may be mobile. These are compact devices that are not inferior in processing quality to large-sized analogues.
The design is based on a laser. The operating principle is to focus radiation into a directed beam. Due to this, the material is burned out.
Laser marker Raylogic Galvo X20 (price excluding VAT)
- Software EZCAD 2.12-2.14
- Resolution 12 μrad
- Maximum power consumption 750 W
- Laser wavelength 1064±4 nm
- Length/diameter of laser emitter (mm) 6-9 mm
- Pulse duration 90-120 ns
- Laser tube power 20 W
- Beam positioning repeatability 20 µrad
- Working field 200x200x180 mm
- Marking speed up to 5m/s
- Laser type Q-switched Fiber
- Power supply 220 V
- USB interfaces
- Air cooling
Go to product
Conductive glue
As can be seen from the brief descriptions, typical products in this category are created from a conductive base with binding fillers. Depending on the intended use, they improve resistance to high humidity and temperature changes. Standard technological requirements:
- good adhesion for reliable fastening on glass, plastic, and other surfaces;
- maintaining integrity when the temperature rises to +160°C or more;
- quick drying;
- reasonable level of density to create thin conductors.
Idea three: funny rings
Another interesting way to make knitting markers with your own hands. To do this, you will have to find all the old key rings and key pendants. Needed:
- Metal rings that, no, no, can be found in some pocket. The more you find, the more markers you will get in the end.
- Again, beads, beads, pendants and various trinkets that are a pity to throw away, but can be hung.
How are we going to use all this? Now we will tell you:
- Check the metal rings for rust so that they do not stain the yarn after work.
- After this selection is completed, we select suitable beads by size and string them onto rings. Yes, it may not be so easy to do, since you have to move one spiral away from the rest, but believe me, the result is worth it. Also, be careful not to bend the ring.
- Once the accessories are in the correct place, you can immediately put the markers to work.
We prepare a special dressing from simple ingredients
There are two ways to prepare a special dressing. So, what to refill the marker with?
For the first option, you will need: water, gouache, ink, powder, PVA glue, two tablespoons of sugar and a half-liter container.
First you need to fill the vessel one third with water. Next, gouache and powder are added to the water. Beat thoroughly and slowly add mascara. To prevent the dressing from turning out too black, it is important not to overdo it. After this, you need to add 20 drops of glue to the mixture and mix the mass thoroughly again. Sugar is added to achieve homogeneity. The mixture is whipped again - the dressing is ready!
For the second method you will need: two containers, a ballpoint and gel pen, a touch-corrector, nail polish, acetone, hairspray, brilliant green.
First you need to pour the bar corrector into one container and then let it dry. Grind the dried mass into powder and pour into another container. Ink from a ballpoint pen and ink of the desired color from a gel pen are also added there.
Add brilliant green and nail polish of a suitable color to the resulting mass. All this is fixed with hairspray and mixed thoroughly. Next you need to add nail polish remover or acetone. That's all. The gas station is ready!
The important thing is that these refills are moisture resistant.
DIY seedling markers: 22 original ideas
The first week of spring has arrived. This means that a new summer season is about to open, and the bustle with sowing and planting will begin. In order not to get confused in this diversity and not to forget where and what was sown, make markers for seedlings with your own hands.
Spring is already in full swing in my house. The radiators are filled with bowls with crops, the window sills are filled with growing seedlings that are waiting to move to the dacha... Personally, I always label the bowls and pots, so that later it does not turn out that petunia has grown in the garden, and tomatoes are in the hanging flowerpots. This is, of course, an exaggeration, but you get the idea.
This year I got the idea to make some unusual and bright tags for my seedlings. I started looking for examples for inspiration and put together a whole collection. Now I don’t even know where to stop! You'll probably have to try several options at once. After all, what else can you do before the summer season begins?
The simplest option for tags for seedlings is “store-bought”. Such markers are inexpensive, and you don’t need to make anything (especially if you have no desire or ability for this). Signed with a permanent marker, stuck it in the ground - and you're done!
If white markers seem too boring to you, then you can look for multi-colored label tags.
Another interesting option is loop tags. True, they are unlikely to be suitable for fragile seedlings. Rather, for seedlings of trees or shrubs. But it’s worth taking note of such tags.
If you love perfect order and strive for perfection in everything, you can look for these stylish markers - in the shape of the plants that you are going to grow.
As a lover of all kinds of handmade things, I like homemade tags the most. I think it's a great idea to turn old, unwanted teaspoons into fancy garden bed markers. Here are some interesting examples of how this can be done.
Markers that imitate road signs and signs will look quite funny. Together with them, a large tray with seedlings can be turned into a mini-street. I think it could be very interesting.
You can also paint flat stones. This option is perhaps one of the most budget-friendly, but original and fun.
Here are a few more options for tags using improvised materials. Ice cream sticks, caps from alcoholic drinks, caps from glass bottles - everything can be used.
Don't throw away coffee can lids either.
You can also use wooden spools of thread. Wrap them in beautiful thick paper (for example, for scrapbooking), stick them on wooden skewers - and you will get original vintage markers.
For those who love handicrafts, you can knit three-dimensional figures of vegetables, put them on skewers and stick them into bowls with crops. It will turn out very unusual. Or you can simplify your task and decorate the tags with embroidery.
If neither knitting nor embroidery is to your liking, try placing pictures of vegetables on a marker with beads. You don’t have to master complex weaving; just make drawings using the pixelation technique by “planting” beads on glue and attaching any sticks or skewers to the signs.
Embossed tags look quite impressive. Regardless of whether they are purchased or homemade.
What do you think of this idea? It couldn't be simpler. A fitting answer to spoon markers.
In general, markers for seedlings can be made from anything, even from ordinary clothespins...
... and wires.
If you get creative with the process, growing seedlings can be a lot of fun. Personally, I vote for a non-boring garden. And you?
Ready solution
If you do not dare to experiment, but at the same time do not want to buy new art supplies and are still wondering what to refill the marker with, we suggest you use a ready-made solution. The fact is that many manufacturers sell ready-made refills for markers. They are special inks of different shades and are supplied in convenient jars with a spout, and are also additionally equipped with a dispenser for more accurate measurement of the substance. This is a great solution for refillable markers.
What characteristics should a conductive adhesive have?
Manufacturers of ready-to-use compounds focus on the main function of conductive adhesive - high conductivity.
Making your own glue allows you to achieve an ideal balance between the quality of electrical conductivity and the reliability of adhesion. Moreover, depending on the task at hand, glue with different properties may be required, because in one case you need glue that maintains elasticity, in another the rigidity of the connection is important.
In any case, the glue must have the following characteristics:
- high adhesion (adhesion) to different types of surfaces;
- low specific electrical resistance;
- sufficient viscosity;
- high covering ability;
- connection strength;
- high thermal stability (resistance to temperature changes);
- water resistance.
In a matter of minutes, you can make your own conductive adhesive that will meet the required characteristics.
Drawing with air markers
Svetlana Sergeeva
Drawing with air markers
The guys in our group “Golden Cockerel”
St. Nicholas Kindergarten is very fond of drawing in unconventional ways.
We draw with them using tampons , a candle, a thread, the “monotopy”
, etc.
Drawing captivates children, and especially non-traditional ones; children with a great desire to draw , create and compose something new themselves.
One of their favorite drawing techniques is drawing with air markers . Felt-tip pens are unusual in that draw in an unusual way, and the image is obtained using splashes of blown paint and looks like the result of drawing with a toothbrush.
The child selects a stencil, places it on a white sheet, takes the necessary felt-tip pen , prepares it for work and, observing the rules for the duration of exhalation, blows into it, pointing the felt-tip pen at the stencil . To make a drawing , you need to place several stencils on a sheet, painting them with the desired colors; To finish the drawing , you need to draw the background.
It works very well with stencils; you can use them to make cards, gift wrapping and other beauty items.
In addition, these markers , like some special toys for the development of speech breathing in children, develop and strengthen the respiratory system.
The child selects a stencil, places it on a white sheet, takes the necessary felt-tip pen , prepares it for work and, observing the rules for the duration of exhalation, blows into it, pointing the felt-tip pen at the stencil ; to make a drawing , you need to place several stencils on a sheet, painting them with the desired colors; To finish the drawing , you need to draw the background.
The main thing in my work is that classes bring only positive emotions to children.
The work turns out beautiful, you can see for yourself.
Card file of non-traditional ways of drawing a winter landscape for working with preschool children Non-traditional ways of drawing with preschool children “Winter Landscape” Compiled by: first category teacher of MDOU d/s No. 174 “Alenky.
Source
Problems with use
How to create a long path with uniform thickness and width from glue? This problem is not easy to solve. Tire processing causes difficulties because the grease dries too quickly. It is more convenient to process relatively small areas with a marker than with a brush.
For what surfaces
It should be noted that silver powder activates corrosion processes upon contact with aluminum. The compatibility of other combinations of surface materials and mixture components must be checked.
Flaws
Factory-made mixtures based on silver and other valuable metals are expensive. Some binders release hazardous substances into the atmosphere. Therefore, it is recommended to carry out work in a well-ventilated area or in the open air. In some situations, the limitation is the incompatibility of the contacting materials.
Conductive glue can be purchased or made with your own hands. Homemade mixtures, if carefully followed the instructions provided, are quite capable of providing a high level of quality. Factory analogues imply uniformity of characteristics in each product batch and reliable guarantees.
When choosing the appropriate option, in addition to the main parameters, attention is paid to the following items:
- application technologies;
- resistance to external influences during actual operation.
How to restore a dried marker
A marker is a writing accessory that is quite affordable in price, and there is no shortage of it on store shelves. There are so many of them, choose to suit any composition, color and budget. However, there are times when, completely unexpectedly and, naturally, at the most inopportune moment, a marker leaves a barely noticeable mark on the surface instead of a bright line, and the work needs to be completed urgently.
We'll show you how to quickly restore a permanent marker
Then the advice of those who have already had experience with similar experiments in resuscitating an untimely deceased office tool and know perfectly well how to restore any marker comes to the rescue.
The main rule is to refill markers with the same composition stated on its packaging.
Restoring permanent markers
How to refill permanent marker? It all depends on what solvent was used in its manufacture. Modern manufacturers add isopropyl alcohol or acetone inside the rod. Therefore, you can use alcohol or nail polish remover as a dressing. Water is not suitable for restoring permanent markers. You only need 1 ml of the substance, which is injected into the marker using a syringe through the tip.
To find out which liquid solvent is used for the ink of your art accessories, you need to study the information on the packaging.