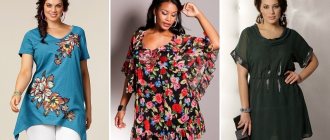
Choosing knitted fabric for women's sweaters
When choosing a knitted fabric for sewing women's sweaters, take it into account:
- thickness;
- stretchability;
- density;
- compound.
In the table you can see what these indicators influence:
| Compound | Density | Stretchability | Thickness |
| For tailoring; cut; care; shrinkage; ability to absorb moisture. | For assortment; shrinkage; combination; selection of sewing needles. | For tailoring; cut; construction of patterns; choice of style. | Choice of threads and needles; cut; determination of seasonality. |
When choosing knitted material:
- Pay attention to the composition: a good fabric should contain 70-80% natural fibers, but sometimes you can prefer one that has a 50 to 50 ratio with synthetics.
- Check the canvas for electrification and clinging to the fingers. High-quality knitwear does not have a synthetic shine and is pleasant to the touch.
- Observe whether the material returns to its original shape after stretching.
- Hold the fabric up to the light for uneven weaves. If there are any, then the knitwear is of poor quality.
- They look at the cost. Cheap fabric, as a rule, turns out to be completely unsuitable.
High-quality knitwear will:
- pleasantly heavy;
- dense;
- drapes well;
- moderately stretchy;
- expensive.
Fabric calculation
Knitted sweaters for women are often combined or decorated with other materials. Blouses made of stretch fabric often have satin or guipure inserts. Sometimes knitwear is even combined with polyester.
With a fabric width of up to 100 cm, it is calculated for a sweater of size 48 inclusive: folded together with hem allowances for the bottom of the length of the product (2 pieces) and sleeves. If the canvas has a width of 140-150 cm, then all calculations are the same as in the first case, only the length of the product is added by one.
The length of the fabric is increased if the model has:
- larger than 48;
- complex style;
- pattern that needs to be combined;
- pockets and collar.
Vest for a girl
We sew for children (for girls, patterns can be made by taking a ready-made sweater or jacket) a simple vest made of fleece fabric. In addition to the fleece, you will also need pieces of knitwear for finishing the edges and a zipper. The simplicity of this model is that there is no need to specifically calculate the pattern, and the product also has a minimum of seams.
Stages of work:
- It is necessary to take the child’s sweater and, based on it, make paper patterns for 2 shelves and the back, not forgetting about the armholes.
- To make the vest seamless, the fabric needs to be folded in half and the paper pattern placed as shown in the picture. When cutting out a part, allowances must be taken into account.
- Based on the resulting neck size, you need to cut a rectangle for the collar.
- You should make 2 blanks from knitwear for processing the sleeves.
- Next, the knitted strips need to be sewn on. To do this, fold the fleece and knitwear right sides together and stitch. Then the strip needs to be folded to the wrong side and sewn.
- The next step is to make the shoulder seams.
- The collar strip needs to be folded right sides together with the main product and sewn on.
- After this, alternately, first sew a zipper to one and then the other half of the shelf.
- The bottom edge of the vest must be hemmed together with the ends of the zipper.
- The collar needs to be tucked and stitched so that it is even with the zipper.
All is ready.
What do you need to sew a knitted blouse?
To work with any style of knitted sweaters, pre-prepare:
- sewing machine;
- overlock;
- pins and needles;
- soap or chalk;
- square;
- extended ruler;
- well-sharpened scissors for cutting;
- ready-made patterns.
How to cut knitwear?
Women can successfully create unique and original images by sewing their own clothes. For a beginning seamstress, if you have clear instructions and all the necessary tools, it will not be difficult at all to create a special item, for example, a jacket. Knitted products of simple and complex styles come out equally decent both with and without patterns.
When cutting blouses made of non-woven material, several nuances should be taken into account:
- the canvas must be cut exclusively with sharp scissors;
- patterns are taken with allowances marked on them;
- finished patterns are secured either with pins or something heavy;
- if it is necessary to fold the material in half, it is swept away not only around the perimeter, but also in other places;
- knitwear is cut lengthwise, except for the places marking the armholes and neckline.
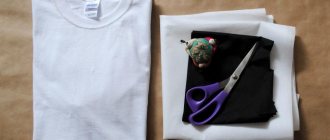
Processing the fastener - button straps
To make the sewing process more visual, I will show it using samples of contrasting fabrics and threads.
04. I cut out two strips for the fastener - rectangles with sides 6*20 cm, taking into account allowances. I fold them in half and iron them.
05. Starting from the middle of the neckline, I draw on both sides (on the front and back) a space for the strap equal to 2*18 cm.
06. From the front side I apply the strips to the cutout, baste, then stitch them on a sewing machine, making two parallel lines.
07. Using scissors, I make oblique cuts in the corners of the blouse detail, not reaching the stitching by 1 mm. No need to cut the plank!
08. I overcast the edges of the placket along with the edges of the blouse.
09. I turn the trim pieces inside out. I iron it. I sew them together using a sewing machine in the place indicated by the arrow.
I'm basting.
I cut off the excess fabric from the top and the placket is ready!
Building a basic pattern
To create a basic pattern for a knitted sweater, take the following measurements:
- chest semicircumference (SBC);
- product length (DI);
- shoulder length (HL);
- sleeve length (SL).
Before sewing knitted sweaters for women, it is important to take measurements and make a cut.
Algorithm for creating a pattern:
- The drawing begins with the construction of the front and back parts of the product.
- Draw a rectangle on thick cardboard, where AB is pog, AC is di.
- From A, a distance equal to r/3 is retreated downwards and G is marked.
- Horizontal lines are drawn from G and G1 is marked at the intersection with the side of the rectangle.
- AB is divided by 3 and marked A1 and B1.
- From them to GG1, vertical straight lines are drawn, obtaining G2 and G3 at the intersection.
- GG1 is divided in half and G4 is placed.
- From it they go down to the CD, drawing a vertical line. At the place of suppression they receive C1.
- For the armhole, bisectors with lengths of 2 and 1.5 cm are drawn from the corners G2 and G3, thereby obtaining G5 and G6.
- A1, G5, G4, G6 and B1 are connected using a smooth line.
- For the neck, a distance equal to dp is retreated from A1 to the left, A2 is marked.
- From A downwards put 2 cm and get A3.
- A2 and A3 are connected by a sliding line.
- On the front part, step back from B1 to the right, marking B2, and from B - 5-6 cm down, getting B3. The resulting points are smoothly connected.
- Everything unnecessary is erased.
Construction of a drawing for a set-in sleeve of a sweater:
- Build a rectangle with sides AB = linear/3 t AC = other.
- To obtain point O, descend from A to a distance equal to half a linear distance.
- A parallel AB is drawn from it. The intersection with BD is marked as O2.
- The resulting rectangle is divided by lines into 4 equal parts.
- The top and bottom vertices of half the rectangle are marked as B1 and B2.
- Points O2, B1 and B1, O are connected.
- A straight line is drawn from B1 downwards and the intersection with CD is marked as B3.
- To obtain B4 and B5, a distance equal to half the semicircle of the hand is retreated in 2 directions from B3.
- Next, according to the drawing, the details are shaped, after which the extra lines are erased.
- If the hips and chest are very different in size, then the bottom of the product is widened by the difference between them.
Blouse pattern for girls Marsella
The collar consists of two parts - the upper collar (departure) and the stand. The master class includes sewing both collars, choose which one you like. Please note that the collar patterns are on the fold (i.e. in half copies)
| Measurements (see) | Size = height cm. | |||||
| 122 | 128 | 134 | 140 | 146 | 152 | |
| Bust | 62 | 64 | 66 | 68 | 72 | 76 |
| Back length | 29 | 30 | 31 | 32 | 34 | 36 |
| The length of the sleeve | 43 | 46 | 48 | 51 | 53 | 55 |
| Neck circumference | 30 | 30 | 31 | 31 | 32 | 33 |
| Fabric consumption per product | 70 | 85 | 90 | 95 | 1m. | 1.10 m. |
Using ready-made patterns
The finished patterns are laid on the fabric and secured until immobile.
The image is outlined with tailor's chalk or a bar of soap, taking into account allowances for hems and seams. Next, all parts are cut out and basted. After fitting, the parts are machine stitched. If there is a collar, then 2 additional fabric strips with a width of 2.5 cm are prepared for it. They must be cut on the bias. At the very end, sleeves are sewn in, complemented by cuffs.
Old T-shirt as a pattern
Knitted sweaters for women are easy to design and sew. Having learned this, you can easily create various models for further combination with other clothes. The principles of making blouses from soft stretchable fabric are quite simple and understandable.
To sew a knitted sweater, a used T-shirt can serve as a base.
It is ripped open or circled whole. A T-shirt disassembled into parts will suit complex styles, and an ordinary one will suit simple ones. But with such an alternative pattern, the neckline of the future sweater is increased on the chest.
Setting up a sewing machine, installing a needle for knitwear
Before sewing a knitted product, set a stitch with a length of 2 mm on the machine and check the stitching on the flaps. In this case, you should also choose a needle with a rounded end.
Such a device will pass between the knitted fibers, correctly forming loops.
Processing the collar and stand
10. In the sample I will show the process of sewing the collar only on the shelf, but in my work the collar is assembled along the shoulder section, as in the photo.
I cut out the collar detail in 2 copies. I sew the parts together along the top edge, missing each edge by 1 cm.
11. I overlock the bottom edge using an overlocker.
In order for the collar to fit well when turned out, I make cuts along its rounded edge. I turn it right side out and iron it.
12. I attach the collar with the raw bottom edge to the neckline. In this case, the end of the collar on both sides should end flush with the fastener - bar.
I baste and then sew on the sewing machine.
13. I bend the collar in half. I iron the seam allowance up.
14. I sew the collar on a sewing machine, making a line along the front side, trying to get into the stitching seam.
15. Punching buttonholes. Then I sew on the buttons themselves; I have four of them on the clasp.
Features of working with knitwear. Useful sewing tips
Beginner seamstresses are recommended to begin their sewing work with basting. Machine processing of parts begins only after careful fitting of the temporarily hand-sewn product. With this approach, the risk of size errors is significantly reduced.
When processing the edges and neckline, the use of bias tape is allowed. For sweaters with an ethnic flavor, choose satin ribbons in rich colors or with ornaments. A product with a similar design acquires freshness and originality.
To prevent a knitted sweater from becoming too tight, the stitches are made with a margin. Be sure to try to make sure that the machine stitch matches the basted seam. The thread tension when sewing should be moderate (about 5). Suitable seam variations are selected by testing on scraps or scraps of fabric.
To maintain the elasticity of the knitwear, the cut parts of the future product are stitched with a narrow zigzag stitch with a width of up to 1 mm and a length of 3 mm. It is advisable to sweep away the details using thin threads. To finish the shoulder seams from the inside of the product, use bias tape or tape - this way they will not stretch. Seam allowances are sewn with an overlocker or a large zigzag stitch. For the same purpose, the lower hems are not done too tightly by hand.
To sew your first items yourself, choose light styles without:
- a large number of parts;
- unnecessary layers;
- folds
When the machine skips stitches under the knitted fabric when sewing, place thin paper, such as newspaper or wrapping paper. Fabrics with weak elasticity are slightly stretched when stitching. For crooked or gathered machine stitches, loosen the presser foot so that it puts less pressure on the fabric. To avoid pulled seams, the threads on the bobbin are wound slowly. Very thin knitwear is laid underneath with newspaper layers to give it the missing thickness.
Knitted sweaters for women have many styles and creation methods. Clothing made from tight-fitting fabric does not require ironing and fits even the fat ones. Blouses with excellent thermoregulation are worn in any season.
The details of the sliding knitwear, before placing them under the machine, are first sewn to each other by hand. It is very important to remember when working with knitwear that basting always goes in one direction, and subsequent sewing - in the opposite direction. With this technique, the displacement of parts is completely blocked.
An adhesive pad that saves knitwear from stretching when sewing is used for:
- neck;
- pockets;
- cuffs;
- below.
Starch or flour paste can also save the canvas from stretching. This sticky solution is used to treat the edges of the product before sewing. The finished item is subsequently washed to remove it from the fabric.
Instead of using paste under the knitwear, you can put:
- toilet or wrapping paper;
- paper towel;
- napkins.
The hems are sewn together with an overcast stitch.
The following machine stitches are suitable for working with knitwear:
- knitted;
- double;
- flat;
- zigzag;
- overcast;
- stretch;
- straight;
- universal.
Special Jersey needles are used for natural and dense fabric, and Stretch for thin fabric mixed with viscose.
Superstretch needles are suitable for working with:
- micro oil;
- lycra;
- biflex.
It is convenient to stitch and hem with a double needle:
- bottom of the product;
- armholes and sleeves;
- neck;
- collar stands;
- cuffs
Summer sundress for girls
We sew a sundress for children (for girls, the patterns are designed for 2 years of age) from light fabric in just 2 hours.
To prepare the pattern, you need to have 2 sizes: chest circumference and sundress length. It should be taken into account that if you do not allow for an increase in the freedom of fit, then wearing this model will be problematic. It is recommended to make an increase of 3.5-4 cm.
Cut:
- The bodice needs to be made double. To do this, cut out 4 rectangular pieces from fabric, 30 cm long and 16 cm high.
- To calculate the individual length of this part of the sundress, add 4 cm to the chest circumference for the freedom of fit and divide the resulting length in half.
- In the armhole area, the corners should be cut so that the bevel is 5-7 cm.
- For the skirt you need to cut 2 rectangles 33*50 cm.
- The details of the ties should be 3 cm wide, the length depends on your own preferences.
Stages of work:
- First of all, you need to sew the ties.
- Then the parts of the top of the sundress need to be folded in pairs - with the right sides of the fabric inward. The ends of the straps should be pinned to the upper corners of the armholes.
- Next, you need to make a bodice so that the details are stitched on 3 sides (side and top seam).
- The rectangular skirt pieces need to be folded right sides together and side seams made.
- The bottom needs to be hemmed and trimmed with lace.
- Then you should combine the top and bottom of the sundress. This is best done by aligning and pinning the parts along the side seam.
- Along the circumference of the skirt, maintaining symmetry, it is necessary to make folds, and then sew both parts.
The sundress is ready.
Master classes on self-tailoring sweaters for women with and without patterns
Presentations teach beginners how to sew any styles of knitted sweaters.
Off the shoulder style
A dropped shoulder on the product can replace short sleeves.
It also hides the fullness of the shoulders. Sleeveless models or patterns are taken as the basis for the manufacture of such a sweater. Lines on the sides and shoulder lengthen both the front and back of the product. The pieces joined together will subsequently create a new shoulder length. After cutting, the cut out parts of the jacket are ground to 3 cm in width at the neckline and armhole.
Short sleeve style with guipure
A summer version of a blouse with short sleeves made of fine wool and with a guipure insert is made as follows:
- They take measurements.
- Drawing a pattern.
- The upper part of the base to the level of the beginning of the chest will be intended for guipure insert, and the rest of the lower part will be for knitwear.
- When transferring the pattern onto the fabric, allowances for freedom of movement (10 cm) and for seams are taken into account.
- After preliminary overcasting, the cut out parts are sewn together on a typewriter.
Long sleeve style with buttons
For a sweater with long sleeves with buttons, the pattern differs in that the front part of such a product consists of 2 shelves. Additional details also include strips of fabric allocated for fastening strips. Sleeves can be one-piece or raglan.
If there is no pattern, then knitted items can be sewn without one by following the pattern according to the measurements taken directly on the fabric. One-piece sleeves are drawn together with the front, smoothly connecting the sides of the jacket with the bottom line of the part (sleeve).
Zip style
A model of a sweater with a zipper is made similar to a product with buttons, but instead of them, a fastener is sewn into the edges of the front shelves. The zipper can be the length of the entire product or only reach half of it.
Model with lace
A ready-made knitted sweater is often combined with lace. Inserts are made from it, which are sewn overlapping onto the knitted product.
Lace appliques on sweaters are found:
- ahead;
- behind;
- On the sides.
Model with lurex
Knitwear with lurex when making blouses from it does not require too large seam allowances and free movement. This material is cut without backing, directly on the fabric. To prevent it from slipping, it is spread not on bare surfaces, but on lined sheets, for example. The edges of knitwear with lurex must be machine stitched in a zigzag pattern so that they do not fray later.
Knitted sweaters for women can be sewn even without a pattern, using, for example, an old product as a basis. This technique will be especially useful for beginners who are encountering modeling for the first time. For the same purposes, ready-made patterns are used.
Algorithm for sewing a bat-shaped sweater from knitwear with lurex:
- They take measurements.
- The fabric is folded in half so that its wrong side is on top.
- For the neckline, set aside 3 cm from the fold downwards, and 9 cm to the side.
- The shoulder and sleeve lengths are set aside from the neckline.
- The waist and hip circumferences are divided into 4 and also plotted along their lines.
- The bottom of the model and the edge of the sleeve are smoothly connected.
- All lined parts of the product are cut out and sewn.
Sweater jacket
You can easily make a new sweater out of an old sweater.
For this:
- cut off and remake the neck;
- cutouts are made on the sleeves or shortened to a length of ¾;
- sew the product on the sides to achieve a fitted silhouette;
- parts made from other materials are inserted instead of the cut parts.
How to sew a blouse for a girl with your own hands in 20 steps
01. I cut out the details of the blouse, seam allowances are 1 cm. The front, back, and collar details are cut out on the fold of the fabric
- back - 1 piece
- front - 1 piece
- sleeve - raglan (front) - 2 parts
- sleeve - raglan (back) - 2 parts
- stand collar - 2 parts
- plank - 2 parts
02. I sew the raglan sleeves (front + back) together, overcast the edges with an overlocker; if you don’t have an overlocker, you can replace them with a zigzag stitch, which is available in any sewing machine.
I press the seams onto the ironing pad, directing the seam to the front. What does it mean? Raglan, like any sleeve, has a front and a back. There is a control point on the front of the pattern.
03. I sew the sleeves alternately, first to the back, then to the front.
How to decorate the finished product?
It is advisable to think through the decor for clothes in advance, even before the item is created.
Finished knitwear products are usually decorated with:
- crocheted flowers;
- fur or leather appliqués;
- rhinestones;
- sequins;
- beads;
- hand embroidery from floss.
Making knitwear yourself is not a difficult task. With the help of a sewing machine and tailoring skills, it will not be difficult for a woman to replenish her wardrobe with original and stylish sweaters.
Finishing the bottom of a blouse with a ruffle
16. I cut out a rectangle for the shuttlecock. The calculation of the sides is shown in the photo. Those. if my bottom length = 40 cm, the length of the shuttlecock will be 60 cm, width - 6 cm.
17. I process the lower cut of the shuttlecock with a roller stitch on an overlocker. The same seam can be replaced with a small zigzag with a twist of the edge.
18. I lay two parallel lines along the upper edge of the shuttlecock for assembly. To do this, I set the values on the sewing machine: stitch width - 4, straight stitch, thread tension 0 - 1.
A master class on making a beautiful assembly can be viewed here >>>
I assemble the flounce until its length is equal to the length of the bottom of the blouse.
19. I fix the flounce with pins at the bottom of the shirt. I connect the parts on a sewing machine, retreating 1 cm from the edge.
20. I direct the seam allowance upward from the flounce. I sew the seam allowance along the front side, retreating from the sewing seam by 1 mm.