Making a heater for the garage
To maintain a comfortable temperature in the garage, it is not difficult to make your own heater using waste oil. At the same time, the problem of its disposal will be solved, which is also a pressing issue for car owners. To assemble it, almost all the elements and spare parts can be found in your own garage.
When making a heater you will need:
- metal pipes;
- heating element (heating element);
- used oil;
- wire with plug.
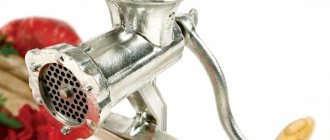
Structurally, the body can be made in any form convenient for placement in the garage. The photo shows one of the possible circuits of the device.
Diagram of a homemade oil heater
Metal pipes are used of any diameter. It must be taken into account that the thinner they are, the more of them will be needed. The temperature of the room will depend on the area giving off heat. The length of the pipes is also arbitrary, it is desirable that it be maximum, but at the same time ideally harmonize with the dimensions of the wall where it will be installed. The metal from which the pipes are made is not significant. The thickness of the pipe walls can be any.
The heating element is selected by power and voltage. Practice shows that 1.5-5 kW of heater is quite enough for heating. Here it is necessary to take into account that the comfortable temperature of the garage and apartment differ significantly. And such a wide power spread is given based on the size of the heater. The voltage for connecting the heating element is taken as standard - 220 V (we do not consider other parameters here).
When choosing a heating element, you need to consult an electrician on this issue.
Used oil. Most car enthusiasts change the oil in their car engines themselves almost twice a year. Therefore, as a rule, everyone has work off. All that remains is to collect the required quantity and begin making the heater.
Before pouring used oil into the system, it must be thoroughly filtered.
Smoothing out dents on a wooden surface
0
If the surface of wooden furniture has become worn out over many years and dents have appeared on it, then it is necessary to iron these places with an iron through a cloth or paper napkin using steam. The dents will disappear completely, since when heated with steam, the wood slightly swells and rises. This method will get rid of dents even on wooden floors.
How to remove stains from carpet
Stains on the carpet are not a problem if you have a cleaning product, a towel and an iron. You can get rid of large and old stains, even on fluffy surfaces. First of all, you need to spray the stain with a cleaning agent, moisten the area and place a towel on top. If the stain is large and the towel is small, you can simply move it around to treat the entire stain. Place a heated iron on the prepared area for a few seconds and watch how the stain from the carpet transfers to the towel. Of course, it will take some time and repeated attempts to remove all the stain.
Securing the edges of linoleum
An iron will help in repairs if there is a need to secure the edges of the linoleum so that they do not curl. To avoid calling in a professional or laying a new coating, just take an iron and a piece of foil. Warm up the problem area of linoleum with an iron: place foil and iron. After the linoleum leaves the floor surface, you can glue it again. After applying the glue, press this section of linoleum to the floor with a roller or the cooled surface of an iron.
Read also: What are cutters used for?
The master came up with a soldering station from an iron
Author of the YouTube channel “China G.” figured out how to use an old iron to make the work of radio amateurs comfortable.
Products for inventors Link to the store.
Made in USSR. 1982 The iron is new, was in reserve, and was never used. Remove the temperature control knob. Unscrew the two screws under it. We can assume that the iron is disassembled. I unscrewed three more screws to separate the metal part. Stone spacers can be used for legs. What you need is the heating element itself, the soleplate of the iron. What is the principle of action? 220 volts supplied. The sole begins to heat up to the set temperature. The plate bends and the contact opens. This is how the thermostat works in Soviet irons. Well, the sole cannot heat up too much, there are restrictions here. So we'll just remove it from here. Let's replace it with another element.
Radio components, IR soldering stations and others in this Chinese store.
Now, when we supply 220 volts here, the sole of the iron will heat up and it will not be limited by the thermostat. We are interested in the temperature range of approximately 200-300 degrees. Ideally, a thermostat would be suitable. Preferably with a solid-state switch, but I couldn’t find one in stores. I bought a 2.5 kW power regulator at an electronics store. Includes instructions and electrical diagram. The fee is one-sided. There will be no difficulties in assembly. All items are signed. The device costs 700 rubles. It includes an aluminum radiator for cooling. This is the most expensive part. Since the power regulator is designed for 2.5 kilowatts, the iron is 1 kW and will not get very hot. The elements are installed as follows. Dinistor, two capacitors, diode, two resistors. The denominations are signed. Light-emitting diode. You can also immediately install a variable resistor. Moreover, both on the board and separately on the case. We install a soldering mat, a third hand, and a soldering iron. Apply flux using a gun. The leads, or the variable resistor, were bitten off. The triac must first be installed on the radiator. You can screw the board to the radiator.
Let's return to the sole. I screwed 2 heat-resistant wires to it. Any will do. Installed ceramic insulators to preserve the style of the USSR iron. We tighten the screws and make the legs here. You can try gluing it with superglue. Well, let's take double-sided tape. Now the heating part of the station is ready. The electrical and electronic part of the soldering station can be considered complete. Let's check how it works. I unscrewed the resistor to the left position. Let's apply 220 volts and turn it quietly. There is a slight smoke coming from the sole. The iron lay in a dusty closet for many years and was never turned on. This is normal. Let's wait and see. It is slowly heating up. The thermocouple connected to the iron showed no more than 200 degrees in smoking mode. Continuation on the video of the China channel from 5 minutes.
DIY electronics in a Chinese store.
Hot sandwich
This method is often used by students in the dormitory; if they do not have an oven, an iron will always help out. Moreover, it is also very simple. All you need is bread, cheese, butter, parchment paper or foil and a hot iron. Place the cheese sandwich between two sheets of foil. After that, place the heated iron on top for 10 minutes. Then remove it, turn the sandwich over and put the iron back on. When the sandwich has acquired a golden color, it's ready!
How to cook eggs and bacon
If you don't want a cheese sandwich, you can prepare a full breakfast thanks to the hot surface of the iron, which can easily replace the stove. Take eggs and foil. Make an impromptu frying pan out of foil by folding the edges. Break the eggs directly into the resulting frying pan, place it on the iron surface heated to maximum and wait for breakfast to cook. In addition to eggs, you can also cook bacon. Place it on the foil and roll it up so that the edges are wrapped and the fat does not leak out. Place the heated iron on top.
Make a creative lamp
Not everyone can use “grandmother’s” iron as a cool homemade lamp. But if you make some effort and still create a “masterpiece,” then after that you can receive compliments from all your friends and acquaintances for a long time.
And to turn an ironing device into a lighting device, you need:
- remove the back cover;
- disconnect the connecting contacts going from the cord to the sole;
- drill two holes in the sole;
- display contacts in them;
- tape the wires using electrical tape to the plug of a small socket lamp;
- fix the lighting fixture in the holes;
- Replace the cover.
By the way, if you glue a small mirror to the sole of the iron, you can get not only a night light, but also a convenient mini cosmetic mirror.
What to make from thermomosaic: ideas for crafts, diagrams
Bookmarks
Together with your child, create colorful bookmarks for books from thermomosaic and large paper clips. Lay out the thermal mosaic according to the diagram (download here), iron it through thermal paper, glue the finished figures with hot glue to paper clips.
Source: perler.com
“Fruit” bookmarks made from thermomosaic and wooden sticks (diagram here). Sticks can be purchased on Aliexpress.
Source: perler.com
Accessories and decorations for children
Thermomosaic bracelets
Option 1. Place thermal beads in any color combination on the base. It is important that the ends of the future bracelet are made at different angles for proper alignment. Iron through thermal paper. Take the strip while it is still warm and wrap it around the glass, making a bracelet. Run the iron over the surface of the bracelet again to secure the ends.
Source: diycandy.com
Option 2. Even a 4-year-old child can make a simple bracelet from thermal beads. First, flatten the beads with an iron, wait until they cool down and invite your child to string them on an elastic thread.
Source: craftandcreativity.com
Option 3. Weave a bracelet from thermal beads in the same way as beaded jewelry is woven according to patterns. To do this you will need a beading cord (Aliexpress).
Source: diycandy.com
Thermomosaic headbands for girls
Source: perler.com
To make it you will need: a simple headband (from Aliexpress), a thermal mosaic (diagram here) and a heat gun for gluing jewelry to the headband.
Source: eighteen25.com
Summer earrings made of mini thermobeads
For work you will need: a thermomosaic with small beads, a diagram (download here), a base for earrings (from Aliexpress), metal rings for attaching figures (from Aliexpress).
Source: perler.com
Thermomosaic necklace
You will need: chain (Aliexpress) or beading cord (Aliexpress)
Source: thecraftedsparrow.com
Invite your child to draw their own design for a future necklace.
Source: blog.modcloth.com
Buttons for children's clothing
You can use thermomosaics to make bright buttons for a child’s outfit.
Source: makermama.com