The abundance and variety of assortment of furniture in the store is very large, but this does not always allow us to find the thing we need at a good price. We offer to make furniture yourself. So, many people prefer not to buy it in a store, but to make a transforming table with their own hands.
Transformable tables are great for saving space.
Lifting mechanism
There are three types of table lifting mechanisms used in enterprises and at home:
- Transformation of the tabletop. At the same time, its dimensions change - length, width, height, and in some cases, configuration. Perfect for the situation already described, when you need to make a large table out of a small one.
- Raising/lowering table top. In such models, the shape and dimensions remain unchanged; Only the height of the table changes, which allows, for example, to quickly turn a small coffee table into a dining table and vice versa.
- Widespread transformation. Suitable for complex structures that only professionals can make. Here, all parts of the table are movable - both the table top and the legs, which allows you to significantly expand its functionality.
Automatic pallet packers
The most widely used models on the packaging market, the main advantage of which is productivity and quality of work. The device is fully automated and does not require direct operator control - he just needs to place the load on the working platform, check for the presence of film and film and press a button on the remote control.
After this, the device turns on; at the same time, a movable mechanical “arm” begins to rotate, at the base of which rolls of film are fixed, carrying out a smooth and widespread winding of the load. At the same time, it is possible to adjust both the speed of movement of the “hand” and the level of film tension, which allows you to significantly reduce its costs (two to three times!). After which the load is removed from the platform, a new one is installed and the process is repeated.
Automatic pallet packers operate both autonomously and as part of a conveyor belt - this is especially beneficial when working in large industries with a large turnover of goods.
More on the topic: Design of lifting tables
The only disadvantages of this type of device are the inability to work with cargo of non-standard, too small and large dimensions, as well as the high price (however, this will not be a problem for wealthy enterprises - besides, the initial costs will undoubtedly quickly pay off).
We recommend to buy
Table saw
When choosing a circular saw, you need to be guided by the following characteristics:
- Saw power. If the amount of work is quite large, it is advisable to take a tool with a power of at least 1.2 kW.
- Cutting depth. The thickness of the material to be processed depends on this parameter. For hand saws it is 40–70 mm. But when installing it in a table there will be a decrease of around 10 mm.
- Button placement. The design of the sawing table must provide free and safe access to all control buttons, otherwise it will be necessary to modify the control system yourself.
- Rotational speed. For cutting wood, high rotation speed is preferred. This affects the cutting quality. For plastic, for example, this is not very good. Due to the high rotation speed of the circle, the plastic heats up. You need to choose average characteristics. 3-4 thousand rpm will be enough.
Types of structures
Transformable tables are found in various modifications. There are products for work, eating, reading. Each of these categories has unique characteristics and capabilities. According to their purpose, models are divided into the following types:
- Storage table. It has an unusual design and includes two or three drawers and a table top. This product is opened by rotating along the axis.
- Dinner-magazine. The model is recognized as the most common transforming table. When folded, the product is inconspicuous and does not take up much space. On ordinary days, it is used as a coffee table, and if necessary, the structure can be expanded into a comfortable, full-fledged dining table. With just a few moves, it can comfortably seat 5-7 people.
- Journal worker. This is a transforming table similar to the previous model, for the manufacture of which a different type of tabletop is used. There is no need to completely unfold it or change its shape. This design is used to transform a table into a desk with the ability to adjust the height. There are also additional storage drawers here. In addition, the coffee table top can be repositioned by changing the order of the fasteners.
- Picnic table. The product assumes the presence of two benches, by moving and unfolding which you can get full-fledged comfortable furniture. This model does not contain particularly complex devices; in fact, there is only one mount with a rotating mechanism and a bolt lock.
There is a turntable that has an interesting folding mechanism. Design schemes assume the presence of additional surfaces superimposed on one another. Special metal guides are used here. When unfolded, the top part moves and additional elements appear. Subsequently, all components are combined into a single tabletop.
A transforming rotary table involves the use of inserts responsible for extending additional parts of the tabletop. They come with gas lift or spring. The first insert is distinguished by silent operation, sliding is carried out thanks to internal processing, while the spring operates with little noise. At the same time, the gas lift has its own resource, after which the mechanism weakens and wears out. The spring is recognized as a more durable insert, however, it is also more dangerous, since it can fail and rupture.
Rotary tables are the most popular model. There may be additional parts of the tabletop on the sides. The design of this piece of furniture suggests that all its elements can be transformed. At the same time, there are products that can change height. As a rule, the regulation function is provided for tables with a more complex automatic device.
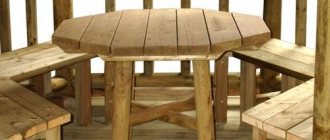
A fairly common model is a round table. Thanks to its shapes, it helps to “soften” the interior. After unfolding, round products become oval, which significantly increases their size. At the same time, up to 8–10 people can fit behind them. Such a transformer has many advantages: when unfolded, it increases significantly, accommodating many people sitting, and becomes a central, unifying element in the room. At the same time, a round table requires many times more space than similar rectangular structures. The ease of making a round version of transformable furniture yourself is a controversial issue, since cutting out a tabletop for it can only be done with the help of special equipment.
Designers do not recommend placing dark-colored furniture in a small room. Visually, it makes the room even smaller. It is better to give preference to a light table, for example, ivory.
Rectangular transforming tables are no less popular. This model is considered to be a classic option. Among the advantages are spaciousness and compactness. When folded, the product is small in size, and after unfolding it becomes a full-fledged dining table. There are various variations of sliding models; the size during transformation can change slightly or quite significantly. The easiest way to make a rectangular structure yourself is that even a novice craftsman can make such a table.
What are its advantages?
- You will choose specific dimensions (length, width) that are the most important for you, and the most profitable design option.
- It is possible to provide additional functions, make shelves, drawers for things, dishes, and so on.
- If you approach the assembly correctly, the table will last for decades.
Simple manipulations help turn an unobtrusive table into a dining table.
- This significantly saves space and is especially useful for owners of small apartments.
- A small transforming table instantly and without much difficulty turns into a spacious dining area; it can easily accommodate a large number of guests and relatives; it can be used in the living room, kitchen or children's room.
- By creating it with your own hands, you will have a unique item, made according to your parameters and designed in an individual style.
When folded, the transforming table takes up little space.
What materials will be needed?
- Wood - MDF, chipboard, fiberboard or regular solid wood.
The most popular and convenient option, easy to implement.
- Metal – in terms of service life, it is durable and has increased strength.
If the table is a structure made of glass and metal, then chairs on a wooden base are not suitable for it.
- Glass – laminated glass is used to create it, but making such a transforming table with your own hands will be much more difficult. It looks more aesthetically pleasing.
Glass can be ordered with excellent patterns, sprayed or frosted, which will add even more originality and beauty.
What are the types?
There are also quite a few options for execution, it all depends on your imagination and preferences, here are some of them:
- Round table – transformer;
You can come up with absolutely any form.
Ideal to take with you for a comfortable outdoor holiday.
- DIY table-bed, table-chest;
You determine the main role and second purpose yourself.
- Transformable computer desk;
Adjustable according to all specified parameters (width, height)
- Folding – can be used for children’s games or a portable table for a laptop; it is convenient because when complete it will not take up a large area;
It only needs to be disassembled upon request.
- A transformable coffee table will perfectly solve the lack of space;
Suitable for both the kitchen and living room.
- Console table and so on.
Having decided on the option you need, you need to think through every detail, additional functions, dimensions and main purpose.
It will not be amiss to study detailed information on the formation of the drawing and the design itself in order to accurately and correctly assemble the transforming table with your own hands.
Transformable tables can be made of different materials, from wood to metal.
The transformation mechanism can also be different, adjustment: only height, or one width, and both parameters. It’s better to buy it in a store; it’s not expensive and will make the task much easier.
Making it yourself is quite expensive.
Of course, the most profitable option is a coffee table, so below we will consider what materials and tools will be required.
Let's choose the sizes, for example, the most universal:
- Assembled 750*900 height 510 mm;
- Disassembled 1500*900*750 mm.
Depending on the mechanism, some tables may not be completely unfolded, but to the most optimal state.
Materials needed to make a do-it-yourself transforming coffee table with a double transformation mechanism:
- 2 chipboards (22 mm) 600*900 for the countertop;
- 1 chipboard slab size 350*720 for the auxiliary panel;
- transformation mechanism;
- special corners for furniture 4 pcs.;
- beams for supports 4 pcs. 510 mm each;
- screws, bolts, nuts, hinges and washers.
The tools you will need are a hammer, a screwdriver or a shaped screwdriver, an electric saw or a jigsaw.
How to make a transforming table
- All parts must be cut down to the nearest millimeter, otherwise you may have problems when unfolding the table.
- Using a tie, attach the legs of the product to each other, this will add strength and reliability.
- Make markings to secure the transformation mechanism.
- Drill holes through and insert bolts into them, attach the fastening parts.
- All that remains is to attach the tabletop to the holder platform using corners; most of it is attached to the large arms, and the small part is attached to the smaller ones.
A model with a mechanism that provides smooth height adjustment will allow you to achieve optimal working conditions in any place.
Initially, you need to fix the smaller panel. The transforming table with your own hands is ready, all you have to do is try to unfold it and make sure the assembly is accurate.
Impregnation and varnish intended for wood will help extend the service life.
There are various ways to decorate. It is important to consider the overall design of the room so that it does not stand out, but rather complements it.
Decoration options
- Using sandpaper, you can artificially age a product by first varnishing it or painting it with silver or gold paint.
Artificially aged transforming table.
- Use rope, shells, and sea stones to decorate the tabletop, legs, and edges of the piece. Think about an applique on a marine theme, or glue the material randomly.
Decor of a transforming table with seashells.
- The store has a lot of stencils for drawing; you can make them yourself. This way you can clearly and evenly apply any design or pattern, both in the center and along the edge.
Before applying the image, the surface must be thoroughly primed.
- Come up with an option for covering it with a mosaic of multi-colored glass or mirrors, create your own original composition that will add more unusualness to the table.
Mosaic tabletop decor.
- The store sells a special varnish, when it dries it cracks, creating the effect of old furniture. If you decide to use it, add sparkles and confiture.
Table top decor with craquelure varnish.
Making a transforming table with your own hands is not so difficult; it is important to approach the matter responsibly, slowly prepare all the details and carry out the process itself. With the right approach, two to three hours is enough, and you will save about five thousand rubles for your budget.
Thus, the problem of small space is solved, and a unique, multifunctional and original product is obtained.
VIDEO: Do-it-yourself sliding round transformable table
Transformable table in the interior – 50 photo ideas:
We recommend articles on the topic
Basic parameters for choosing a transforming table
The modern pace of life has thrown the calm hearth and home far away. Many people live in small one-room or two-room housing, which is much more profitable and practical. The kitchen is combined with the living room,…
We do the restoration of the table with our own hands
Sooner or later there comes a time when a wooden table loses its former attractiveness. Sending it to gather dust in the attic or throwing it out completely is not the right solution. The best way out of the current situation...
Making a folding picnic table with your own hands: drawings, tips
What materials are needed
The choice of materials for the countertop directly depends on what result is expected in the end. For a homemade table, it is important to choose those components that are more affordable. You can choose the following materials for work:
- Tree. The most common option. It should be noted that natural wood is not cheap. The table will have an attractive appearance. The main disadvantage is the large weight of the structure, which will cause difficulties with the installation of the sliding mechanism. A cheaper and more accessible option is to use wooden boards. To ensure reliable fastening, it is necessary to lay them closer to each other. The result will pleasantly surprise you.
Wood is the most successful and popular option, but natural material will be expensive. - Wood shavings. Plywood, MDF, and chipboard are often used. These materials are much cheaper. The main disadvantage is low strength, as well as reduced service life.
Plywood is cheaper than wood, but less durable and strong. - Plastic. Plastic sheets can be selected in a variety of colors. Among the advantages are the affordable cost and ease of assembly of the finished structure.
Plastic sheets are rich in shades, so you can choose the right color for almost any interior. - Glass. Glass countertops have a strong and modern look. At the same time, assembling such a structure at home will be problematic.
Glass countertops are very beautiful, but difficult to assemble yourself.
The choice of one material or another directly depends on the desired result. It is also important to choose a good material for the legs. It is best to make them from wood.
Materials
No less important than the drawings and mechanisms is the material from which the lifting table parts are made. Its strength and reliability, resistance to damage and climatic influences, weight and dimensions of the structure depend on this. So, the most popular types of materials in manufacturing are:
- Chipboard. Combines low price, functionality and pleasant appearance. The material is easy to process, the lightest working surface for a circular saw.
- Fiberboard. Choose slabs with at least a middle plane! Then the material will be as easy to process as chipboard, which will make it possible to produce parts of any shape and size. Environmentally friendly.
- Natural wood. Significantly more durable, although expensive, material. Suitable only for the appropriate interior.
- Glass. It looks original and stylish, takes up little space, and has ample opportunities for decoration. However, it is very important to choose durable glass, otherwise the final structure will be too fragile; Tempered glass is not inferior in strength to hard wood.
- Metal. The most durable and heaviest material, harder than others to process. Not recommended for home installation; although some small models are relevant for such modern stylistic trends as loft and high-tech.
Making a faucet with your own hands
Any user of forumhouse.ru will agree with the statement that one of the most necessary equipment during construction is a crane.
The steel hero becomes an indispensable assistant when the need arises to lift a large load. A lifting mechanism is usually associated with a huge structure tens of meters high. However, in private house-building, when compact mechanisms for construction come to the fore, one needs an option with a boom length not exceeding 5-7 meters.
But renting it is not a cheap pleasure, especially if the construction lasts for more than one month.
In this case, there is only one way out - roll up your sleeves and build a homemade mini-crane with your own hands. And our forum members will help you with this!
How to make a homemade faucet
Saving on your own health and trying to manually lift an unbearable load, especially if the construction of a house is carried out independently and without the involvement of hired labor, does not lead to good things. We have already told our readers how to build a vibrating table and vibrating plate on their own. Now we are making a crane with our own hands to build a house called a “ mini-pioneer”.
“Pioneer” is a mobile collapsible structure, with the help of which the load is lifted to a given height. Such a homemade crane can be used for digging foundations and construction work on building houses.
The basis of the mechanism is a supporting running frame, installed permanently or on a mobile chassis. The rotating part of the crane is mounted on the frame. The boom can be rotated manually or electrically. The crane design itself is made on a modular basis and can be disassembled into several parts for the convenience of moving the mechanism from one construction site to another.
The stability of the structure is ensured thanks to a counterweight and steel cable guys (turnbuckles), and the load is lifted using a winch and a block.
The experience of our forum member, who decided to build a mini “Pioneer” on his own, is interesting.
He needed this construction mechanism to build a private house from timber. Voldemort:
“I am almost single-handedly building a house from six-meter timber. It is impossible to lift and carry it alone. That is why I decided to assemble a mechanism in order to take the timber from the stack, place it at the sawing site and lift it to the plinth.
As the height of the building increases, our forum member plans to place a crane on the floor beams of the house.
A forum member assembled the frame from a corner 63x63x5 mm. The 5-meter-long boom was made from a pipe with a diameter of 50 mm. To strengthen the structure, two corners of 30x30x3 mm were used. Voldemort’s plans also include further lengthening the boom by another 2 meters.
Voldemort:
– The lifting capacity of the mechanism is approximately 150 kg, but the design can lift more weight, and in order to achieve this, it is necessary to increase the multiplicity of pulleys.
Translated from Greek, Polyspaston means “tensioned by several ropes.” A chain hoist is a construction device for lifting loads. It consists of several blocks connected to each other by a rope or cable that goes around the blocks in a circle. A pulley block allows you to lift a load with less effort than the weight of the load.
The simplest pulley allows you to get a three-fourfold gain in strength; we should not forget that friction losses are inevitable in this system. Even in the best block models they reach 10%. And the more you gain in strength, the more the distance over which the equipment can move the load decreases.
Making homemade car lifts
Standard car lift
First of all, when making a standard car lift, according to the drawing, I made a base from a profile pipe with a cross-section of 60 by 80 millimeters, but you can use pipes of a larger cross-section.
The base is made in the shape of a rectangle, the width of which should be slightly larger than the width of the vehicle that will be lifted.
Next, frames are made from channel or profile pipes, the width of which is equal to the width of the base of the lift, but the height is arbitrary and depends on your planned height to which the car will be lifted.
Then I installed two of these U-shaped rectangular frames on the base.
I secured one end of one frame with a hinge to the base
The second end of the same frame is also attached using a hinge with the upper end of another frame, whose lower edge is installed in special grooves in the base
This way the frame will move along the base.
To move in the gutters, a nut is installed at the end of the fixed frame so that the threaded rod can be easily unscrewed or screwed in during rotation.
The far end of the rod was secured using hinges with the lower edge of the movable frame.
The threaded rod is made from high-quality metal rod with a diameter of 2 inches.
The thread on the rod and on the fixed nut must be trapezoidal or persistent, because these types of threads are designed to withstand heavy loads.
Thus, the rod is fixed in a fixed frame and, when rotated, moves the movable frame on rollers, along which the frame moves in special grooves of the base - as a result, the vehicle rises or lowers.
As a result, you will get a homemade car lift
Source ad-cd.net
Don't be confused, this lift is not a screw type, as it does not have a vertical load on the screw along the axis.
DIY car tipper
In some cases, a previously manufactured lift can be replaced with a tipper that is easier to manufacture and operate.
First of all, observing all the dimensions of the drawing and, most importantly, safety precautions, a shoe is made that will serve as a support for the future tipper jack.
Next, you need to make two 1.5 meter long stands from the metal corners.
Their assembly is carried out in the form of squares, and they are fastened by welding with a welding machine.
When making racks, take into account the distance through which the beam will be fixed.
Afterwards, holes are drilled in one of the racks to secure the support pipe, as well as for the tipper locking mechanism.
The next step is to make a platform for the beam.
It is made from a sheet of steel, the edges of which are bent in such a way as to form a box, to which the sides must then be welded.
Next, start creating a structure to support the vehicle when it rolls over.
It is made from beams, a beam from a square profile pipe and an angle, the length of which is equal to or greater than the length of the car.
If you do everything correctly, you will have a high-quality homemade car tipper.
Source ad-cd.net
Machine engine lift
If you need to lift not the entire car, but only its engine, you can consider the following type of homemade lifts.
To make it you will need:
- Bolts, hooks for fastening, star-shaped dowels and other small items;
- The steel cable is about half a centimeter thick.
- Iron chains, links with a diameter of 2 centimeters or more (such a large diameter for the chain to withstand the load).
- Metal corners (size 8x8x1 centimeters).
- Steel plate with a thickness of 1 centimeter.
- Worm-type gearbox (for home-made products, you can take a similar gearbox from disassembly or remove it from an unnecessary or inoperative mechanism, but its load capacity should start from 350 kg, and the transmission force indicator should start from 60 kg).
The assembly of the structure must be carried out strictly according to the instructions in compliance with safety precautions.
First you need to attach metal corners to the walls that are located opposite the hood of the car whose engine needs to be raised.
Next, you need to install a steel plate on top of the corners; they should be connected using prepared bolts.
Afterwards, a worm gearbox is installed, which should be fixed with a key on the drive shaft, while a key of smaller diameter should be installed on the output shaft of the gearbox.
Next, you need to make holes in the steel plate, the diameter of which should fit your chain, and then mount the entire chain mechanism.
Finally, you should work on the locking mechanism, holes for which, after a certain distance, are made in the lift frame.
As a result, you should have the following homemade car engine lift
Source ytimg.com
The lift is operated as follows:
- First, the bolts, nuts and other fastenings of the vehicle engine are removed.
- Next, the loops of the steel cable are brought to the engine and the structure is coupled to it.
- With a little effort, the chains are moved, which rotate the drive shaft, causing the engine to rise to the required height, after which it is fixed.
I recommend the following video, in which the author independently makes a scissor-type car lift:
Wooden table
The most affordable material is wood, which is easy to process and install. In addition, it is one of the economical materials.
Designing a wooden table requires a fair amount of skill. Therefore, before making a wooden table with your own hands, you need to familiarize yourself in detail with the assembly diagram.
Dimensions
When building, you should adhere to certain parameters. The height should be 75 cm, length 120 cm and width 70 cm. The boards are first planed and then cut. They should be 40*140 mm in size.
Materials
We will need two beams with a cross-sectional diameter of no more than 40*60 mm and a length of 70 cm. In addition, self-tapping screws and 4 furniture screws 100 mm long with a cross-section of 8-10 mm may be useful.
Tools
To work, you need to prepare a hacksaw, plane, chisel, grinder, screwdriver, drills.
DIY transformer table. Folding coffee table
A folding coffee table is an extremely useful thing in the household.
It can serve as a bedside table, be an element of decor and at the same time quickly unfold when you need to serve tea to guests.
The choice of shape, folding method and size depend only on the imagination and skill of the master. If your woodworking skills are minimal, here are a few ways to make simple folding tables.
Simple folding chipboard table
If a table is needed only occasionally, and the apartment’s dimensions are quite modest, a coffee table may take up too much usable space. In this case, you can make it foldable, putting it under a bed or shelf when not needed.
It can be made from chipboard or natural wood. This is one of the simplest DIY table options.
Assembly instructions
- The table frame is assembled. It should be slightly smaller than the countertop. So, if the dimensions of the future table are 85x50 cm, then the frame needs to be made approximately 65x30 cm.
- Since the frame and tabletop will not be dismountable, the strips in the corners are screwed with self-tapping screws. It is better to choose planks with a rectangular rather than square cross-section. They are assembled with the narrower side facing the tabletop.
- Folding legs are attached to the frame. Select a bar for the legs of the same format as the frame. For example, if the frame is made of 2x6 cm slats, then the legs should be the same. This is done so that when folded the table takes up minimal space. The edges of the legs can be slightly rounded - this will give the table a neater look.
- The legs can be attached either to bolts of the required length or to simple metal tubes. In the first case, the end nut is screwed onto the bolt, and in the second, the ends of the tubes are flared. The place where the leg attaches to the frame should be 5 cm from the corner of the frame and 4 cm from the tabletop. The leg should also not touch the future tabletop, otherwise folding the table will be problematic.
- To prevent the legs from moving apart under the weight, “spacers” are attached at a distance of 15-20 cm from their edges. The shape can be any - rectangular or curly. In the frame, on one side, recesses are made along the width and depth of the spacers so that the legs lie tightly, and the second pair can cover them.
- Under the frame, stoppers are screwed onto the legs with self-tapping screws to prevent the legs from turning outward. If such limiting strips are attached a little lower, the legs will stand apart. You can experiment with the position of the legs before finally attaching the planks.
- The tabletop is attached to the frame with metal furniture corners. The chipboard sheet can be covered with wood-like film, and the edges with furniture tape. If the tabletop is made of natural wood, it is enough to sand it and cover it with several layers of varnish or stain.
You can modify the table if the legs are made X-shaped. By attaching stops under the tabletop, like in ironing boards, such a coffee table can not only be folded, but also adjusted in height.
Transformable table for a large company
If you don’t need to hide a coffee table, but sometimes you need much more space for plates and cups for a large company, you can make a transformable table, as in the photo.
How to make a wooden coffee table with a folding mechanism? It’s extremely simple, because the mechanism itself is sold ready-made. It is better to choose more expensive options - they are much more reliable than their cheap Chinese counterparts.
Manufacturing instructions
- A box is assembled in which the mechanism will be hidden. The length of the box is equal to the length of the mechanism, and the width can be any - according to the width of the tabletop. The main thing is to take into account the recommendations of the lifting mechanism manufacturer regarding the maximum permissible weight of the tabletop. The frame panels can be screwed using either self-tapping screws or confirmatories.
- The mechanism is installed and secured in the box. Its weight is about 8 kg, so it is better to fasten it using the through method, and hide the technical holes under the table legs. Through holes for bolts are marked and drilled. On the outside, it is better to use a Fosner drill to make recesses for the bolt heads. Connected in this way, the walls of the frame become “self-supporting”, and the structure is reliable and strong.
- Table legs are attached to the outside corners. They must withstand up to 50 kg of weight (the table itself and the dishes on it). The legs are fastened with ties for greater stability, and they are attached to the frame with metal bushings.
- Three tabletops are cut out - two external ones, which will be folded out into a full-fledged table, and one small one, which will serve as a stand. The outer ones are made 3-5 cm larger than the box, and the inner one should fit into the frame. Its width is the distance between the two mechanisms on which the tabletop-stand is attached, and its length should be slightly less than the length of the mechanism in order to fit into the box.
- The tabletops are screwed to the lifting mechanism with self-tapping screws from the inside. The length of the screws should be less than the thickness of the tabletop. External tabletops are connected with hinges. They should not only be beautiful, because they will be visible on the side of the table, but also strong. The hinges must hold both parts well, otherwise the table may begin to “diverge” in the future. The best option is a secretory loop.
- You can find various variations of such tables and mechanisms for them.
- In this case, you do not need an additional tabletop stand, but you need to assemble a frame on which the folding tabletop will rest.
Original and simple coffee tables
With unlimited imagination, you can make very beautiful and original tables. For example, from wooden boxes! By connecting four drawers in a circle with ordinary nails, installing them on a sheet of plywood with wheels and painting them, you can radically transform the interior.
Another option is to glue regular PVC pipes together with hot glue and paint them in your favorite color.
For such a coffee table, 4 pieces of 45 cm each and 26 pieces of 15 cm each were required. An excellent solution for a high-tech interior.
A simple way to make a beautiful wooden coffee table is explained in detail in the video:
(1
Source: https://SvoimiRukami.lesstroy.net/kuhnya/stol-transformer-svoimi-rukami/
What is the table transformation mechanism
The sliding table is well known to many from the last century. At the right time, it could be increased due to an additional section, which was manually inserted in the middle of the structure into the grooves of the side “wings” of the table. Usually it was a polished table that decorated the “hall” - a room that is now commonly called the living room.
An important advantage is its small size. This type of table will fit perfectly into a small apartment.
Then small folding kitchen tables appeared, the transformation mechanism of which was the installation of furniture hinges on which an additional section was attached. It could be lifted by securing it from below with the provided holder.
Due to their multifunctionality, transformers will fully satisfy the needs of the buyer.
Today, transformable furniture is quite in demand, especially with the advent of studio apartments with a small area or small-sized apartments built in the last century.
What material the table will be made of depends only on how much you are willing to spend on it.
With the development of technical thought, the mechanism for installing the transforming table changed its configuration and design.
Transformer tables are most often made to order, and therefore you can completely design the appearance of the table yourself.
Interesting in this regard is a book table, which can be turned from a coffee table into a dining table by carrying out simple manipulations using stepless height adjustment in the operating range:
- increase due to additional inserts;
- raise to the desired comfortable height;
- fold to minimum dimensions without instrumental disassembly of the structure using only the mechanism itself.
A mechanism is used for a folding table, which folds easily and does not take up much space, and when necessary, the tabletop can be opened and fixed.
A folding table-book in the living room is an excellent purchase for a small apartment.
It is generally accepted that the lifting mechanism is an accessory for a transformer table.
Today there are many such designs, and they can be used for drawer or drawerless tables.
Book tables have recently become very popular again. The table model contains a structure similar to a book cover.
Blueprints
The basis of any design work is a competent, carefully thought out and calculated drawing. You can get such a drawing in three ways:
- The first way (the easiest) is to find it on the Internet. However, just as the simplest path rarely leads to the desired result, so here, at the end of the work, you can get something that is not what you wanted at first - such drawings are rarely reliable and accurate.
- The second way (the most reliable) is to seek help from a specialist. At the moment, there are many construction companies, as well as individual craftsmen who are ready to provide you with any advice and services at your expense. Before contacting them, make a complete list of wishes, in particular regarding dimensions, material and design.
- The third way (at your own peril and risk) is to make the drawing yourself. Suitable only if you yourself are the master mentioned above. You can always find all possible help on the Internet, on forums and websites of construction stores.
After which comes the turn of the work itself - it is necessary to cut and saw the workpieces, treat them with stain and varnish, paint and dry them, then connect them according to the prepared drawing and install the lifting mechanism.
Frankly speaking, it is difficult to provide any universal instructions for making a lifting table - there are too many varieties, modifications and configurations, ranging from the simplest to complex multi-sectional structures with a large number of moving elements.
More on the topic: Features of the lift device
However, the transforming table is a reliable design that allows you to ergonomically use the workspace, providing comfort, ease of use and wide functionality.
What you need for work
Preparation for any furniture creation process consists of the following steps:
- drawing up a diagram or drawing of a future structure;
- preparation of materials and tools that will be required for work.
Creating a bed begins with constructing a box. The most optimal material for it is chipboard. It is also possible to use materials such as particle boards or OSB. This choice is determined by financial capabilities or personal preferences.
You also need to select the material for the insides of the bed and upholstery. Foam rubber is most often used for the interior. The cladding material is selected according to the overall interior design and personal preferences.
To build a bed with a lifting mechanism with your own hands, you will need the following set of tools:
- building level;
- marker (pencil);
- roulette;
- electric jigsaw;
- grinder equipped with a disc for working with metal;
- screwdriver with a set of different attachments;
- construction hair dryer;
- welding machine.
Tools
In addition to the listed tools, the work will require a special stapler for furniture, steel strips, self-tapping screws, and wooden slats.
It is also worth paying attention to the choice of lifting mechanism. There can be 2 options:
- mechanical type, in which work is carried out due to the operation of metal springs;
- gas type - work occurs due to gas spring-shock absorbers.
When installing a double bed, it is worth installing a gas-type lifting mechanism, since it is more durable and durable.
Lifting coffee table: models and selection rules / Photo
Home / Furniture / Tables / Coffee table with a lifting top: models and selection rules
Content
Creating an interior that meets all design requirements requires a serious approach. You especially need to try when the amount of free space is limited. The solution is items that can perform multiple functions. A coffee table with a lifting top falls into this category.
Advantages and features of coffee tables with a lifting top
The main feature of the product is the presence of a mechanism responsible for changing the height of the tabletop. Many models have several fixation points, which allows you to choose the optimal position as you wish.
A lifting coffee table provides the user with a number of advantages.
- Compact dimensions make it possible to leave more space in the living room for free movement.
- One design takes on the functions of a dining table, a work table and a coffee table.
- These models are distinguished by an unusual design.
- Transformation occurs easily and quickly.
- It is possible to lift a separate part of the surface.
- The products can be called affordable, taking into account their high functionality.
Elevator for a router: several DIY options
A lift for a router, which can be purchased in a serial version or made by hand, is a device that allows you to improve both the quality and accuracy of processing performed with hand-held power tools. The results of the latter strongly depend on how accurately and confidently the user manipulates such a device. In order to minimize the influence of the human factor on the results of processing performed with a manual milling cutter, special devices were developed.
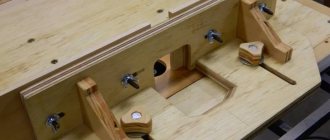
Homemade elevator for a manual router, made of plywood and timber
One of them is a mechanized lifting device for milling power tools, which, in full accordance with its functionality, is called an elevator. As mentioned above, such a device can be purchased in a serial version, but it will not be cheap, so many home craftsmen successfully make it with their own hands.