Do-it-yourself carpentry workshop: expectations and reality
Why make a carpentry shop at all? I don't have a definite answer. If you just want to make something with your hands from wood, then there are workshops where you can come, pay money to rent machines and a workplace, and do everything there. It is not necessary to have your own premises and your own equipment. If you want to engage in woodworking as a business, then the competition here is high, and it’s difficult to find your niche. So I'll start by explaining my own motives.
It all started in 2015, when I realized that my old shed at the dacha would soon fall apart and I needed to build a new one. I calculated the required area, amount of materials, estimated costs and construction time. I poured the foundation, bought wood the next year and started building with a friend. Initially, I did not intend to make a workshop. I was just building a new shed to replace the old one to store tools and equipment.
Naturally, everything went wrong during the construction process. A friend said: “We have such cool six-meter beams, why are we going to cut them?” And he suggested building a two-story barn. If you've ever built a frame structure, you can see that we've made a ton of mistakes. Now I am gradually strengthening and remodeling the barn. The next catch was the desire to make a basement: “We haven’t sewed it up yet, let’s dig it up and pour concrete?” In general, I spent a total of two calendar years on the basement. Because of it, I could not cover the floor on the first floor, although I already had a sheathed, fully finished barn. Only there was a floor on the second floor, and a pit on the first floor. It got flooded a couple of times, overall it was a lot of fun. So my advice is: don't make basements if you don't need them. There are now two boxes of apples in my basement; I don’t actually use it.
We wanted to make furniture, and this became the first obstacle that was not obvious to me. Woodworking is a rather difficult task. Here you need a lot of specific knowledge, which, on a whim, can take a very long time to acquire. Therefore, I advise you to read specialized literature or study somewhere. And then I didn’t understand this at all: “I have a machine, I have some money, I’ll buy other machines and do everything.” Naturally, it didn't work out that way.
I began to figure out what manipulations with wood I needed to do and what I needed to buy for this.
Features of curtains for the garden
Curtains for the cottage create a homely atmosphere and complement the interior. These products are designed to solve the following problems:
- Curtains for the dacha are practical. They should not accumulate dirt and fade.
- They are selected taking into account lighting and the location of window openings.
- The design for a dacha should be simple, without unnecessary elements.
- Designs are selected to be resistant to moisture.
- They are equipped with fastenings that allow easy dismantling.
You can purchase ready-made curtains for a country house, but the features of textiles are taken into account:
- fabric for curtains for the dacha is selected from natural materials with breathability, chintz: cotton or linen fabrics;
- textiles must be harmoniously combined;
- on the dark side of the house it is better to use light shades, and for the illuminated side you can use dense and dark variations;
- It is better not to use luxurious models and massive mounts.
Curtains for the cottage protect the room from midges and other insects.
A country house or dacha is a place of relaxation where you have the opportunity to be in nature.
A country house interior differs from the design of a city apartment. Therefore, at the dacha it is better to use time-tested styles. These can be variations of a rustic style: Provence, country. As well as English or Scandinavian interior.
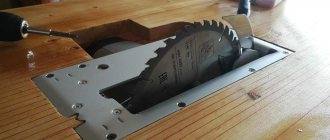
Sawing
First of all, the workpieces need to be trimmed
- make even cuts
perpendicular
to the workpiece. It doesn’t matter what kind of furniture you make, stools or cabinet sets. It is important to be able to cut accurately, ideally also at certain angles.
If you are a serious enthusiast, you can do this manually using a miter box. But still, a miter saw is a must-have in a carpentry workshop. It will be difficult without her.
It is desirable that the saw has a broach, that is, it allows cutting fairly wide workpieces. The tool is good and not particularly expensive. The main thing, as with any other tool, is that there are no backlashes and you can set the angles you need.
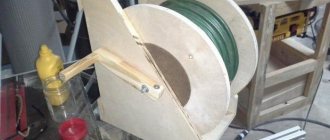
The tree also needs to be dissolved or trimmed
, that is, sawing
along
. To do this, you need a circular saw, preferably installed in a cutting table. You can also unravel using a manual circular saw with a parallel stop or along a guide rail, but it is much more convenient and productive to do this on a table.
With planing
For wood, the situation is more complicated, because it is not easy to plan a wide enough workpiece with a hand plane. To do this, you need to develop skill for a long time, remove wood in different directions, taking into account the location of the fibers, constantly monitoring the uniformity of removal across the entire width and length of the workpiece. Simplify your life - but do not improve the quality of processing! - can be done using jointing and thicknessing machines.
Important: a thickness planer does not replace a jointer, but complements it!
The jointer allows you to first obtain
one flat plane
of the workpiece, and the thicknesser,
based on this plane,
levels the opposite side. For beginners, this combination of two machines makes it easy to obtain even workpieces of relatively large length and width, uniform in thickness. This is very important when making furniture. But buying two machines is very expensive and often redundant for an amateur. Therefore, there are a lot of tutorials on the Internet on how to make a surface planer or jointer from an ordinary hand plane and two blocks.
Beautiful pillow made from leftover fabric
How to make a fabric craft using patchwork? You need:
Note!
Crafts for February 23: master class on creating interesting DIY crafts for Defender of the Fatherland Day
DIY crafts for February 14th step by step: a master class for beginners, with a description of how to make a craft for St. Valentine's Day. Valentina (140 photos)
- Crafts made from jute: 100 photos of beautiful options. Easy instructions with photos and descriptions on how to make a craft with your own hands
- Remains of any fabrics (however, it is advisable that the fabric does not fray too much)
- Sewing machine
- Any filler
Manufacturing instructions:
- Outline the dimensions of the pillow and patches. Draw a sketch (optional)
- From the remaining fabric, according to the sketch, cut out shreds.
- Process the edges of each piece with a zigzag machine. (This treatment is required so that the edges of the fabric do not begin to fray)
- Fold any two scraps with the right side inward and sew either side (it all depends on your sketch).
- Do the same operation with all the shreds.
Sewing is a very exciting activity that not only satisfies aesthetic needs, but also helps to create truly practical crafts.
Turning
The three operations described - trimming, jointing and thicknessing - will allow you to make only some very simple products. In a good way, you still need to master turning, that is, turning workpieces that are figures of rotation. For example, round legs for a stool or table, vases, bowls, or some other products. And in this case, you can’t do without a lathe. Of course, you can turn to the experience of generations and make an adapter from shit and sticks, with the help of which you can turn cylindrical blanks on a circular saw, but this is a dead-end path.
If you want to make something more complex than a cylinder, you will have to buy a lathe. Fortunately, this is one of the simplest machines; it consists of a cast iron frame, a motor, a collet and a stop for a chisel (rest). You can find many interesting models on the secondary market, and there are also quite a few new modern models.
In order for you to get high-quality furniture, if you want to make it for yourself or sell it, you will have to equip the workshop with many other equipment.
Sewing curtains in Mediterranean style
Another style that summer residents are happy to choose is Mediterranean.
Its characteristic features are the following:
- plenty of light in the rooms;
- large windows;
- preference is given to translucent or completely transparent fabrics;
- fabrics should be plain or with floral patterns.
We will prepare all the necessary materials for work:
- the fabric that we chose taking into account all the recommendations given above;
- fabric scissors;
- measuring tape or tape measure;
- pins and needles, threads;
- sewing machine
To sew curtains for a dacha with your own hands, you need to make preliminary measurements, which we will later use as a guide when cutting the fabric.
Curtains made of two panels with tiebacks
To begin with, you can simply apply the selected fabric to the window, check the location of the pattern and how the finished curtain will look in the interior. We measure the width of the window. We will need twice as much fabric as the obtained measurement value. That is, for a two-meter window you will need four meters of material.
Orange and other warm tones of transparent or translucent curtains are characteristic of the Italian trend of sunny and cheerful Mediterranean style
We determine the length of the future product by taking measurements from the point where the upper edge of the panel will be fixed to the level of the desired length. When calculating the parameters of the product, be sure to add 15-20 cm for the seams, hems and that part of the canvas that will be attached to the cornice. It is better to cut the fabric by laying it on the floor or on a large table. If the curtains consist of two panels, then fold the product in half in width and carefully cut along the length.
Stages of creating simple curtains: cutting fabric on the floor, fixing hems with pins, distributing and fixing folds in the upper part of the fabric, working with a sewing machine
On all sides of the panels, except for the top edge, we make folds, securing them with pins. We sew the made outlines on a typewriter. Now the canvas looks neat. Fold the top edge to the wrong side, secure with pins and stitch. The seam on the outside can be hidden with braid. We use the resulting hem on top to secure it to the cornice. Now we make grabbers from available material.
A more complex model can be sewn using the diagram below.
The best thing about this diagram is that specific dimensions are given. This means that by measuring your window, you can recalculate the diagram data in accordance with the actual parameters
Drying
The wood needs to be dried
, and dry
according to a certain method
. Wood is usually sold at “natural moisture content,” meaning it contains about 25–40% moisture. If you make something from such wood, then as it dries the product will warp and crack. Regardless of how many layers of varnish you apply to it. Generally speaking, wood is a living material and is subject to seasonal changes in air humidity, which is why its linear dimensions fluctuate throughout the year: in length (along the fibers) the fluctuations are extremely insignificant, and in width a piece of wood can swell and shrink by tens of millimeters, depending on the overall size of the product.
Therefore, the main rule is that the wood must first be dried to 8 - 12% humidity, only after which it can be used.
How to dry wood in an apartment? Carefully fold the boards as far away from the radiators as possible, arrange the layers with bars of the same width and press something on top. It is advisable to coat the ends with paint, since this is where moisture evaporates most intensively and cracks may appear along the boards. It’s great if you can buy chamber-dried wood that has already been dried; this will help you avoid numerous defects if you start drying it yourself.
Instructions for making a mini pond
Usually, when they plan to build a pond or reservoir at a dacha, specialists are brought in. In this case, this is not a budget project. But if you really want to, and have an old bathtub made of cast iron, acrylic or steel in your arsenal, building a reservoir will cost almost nothing.
If you need a large pool so that adults can splash around in it on hot days, we recommend that you read the step-by-step instructions for building a pool with your own hands.
Step #1 - preparing the area
In order to build a beautiful pond from an old bathtub, the main thing is to have patience, the necessary tools, and also follow the sequence of work without deviating from the plan.
It all starts with preparing the territory: the place must be selected carefully. Then the artificial reservoir, created with your own hands, will last for a very long time.
The soil on which the reservoir will be placed must be dry: the presence of groundwater nearby is unacceptable here.
It is preferable to arrange the pond in the shade so that the water does not spoil or bloom due to sunlight. But installing a mini-pond under the canopy of trees in the country is not recommended, in order to avoid falling leaves that subsequently rot.
Don't throw away your old bathtub - it will come in handy to make an artificial pond with your own hands. So you can build your own pond or swimming pool for a relaxing holiday by the water in your country house
After choosing a location, debris is removed from the site, and the soil is treated with special means.
Step #2 - selection of tools and materials
You need to stock up:
- a piece of chain-link mesh, the size of which depends on the area of the building;
- crushed stone, cement, clay;
- a piece of wire, waterproof glue, film or paint;
- level, tape measure, trowel, shovel.
For finishing and decoration, stones and small colored pebbles, clay, pebbles, sand, etc. are useful, at the discretion of the master.
Step #3 - digging a pit
Next, they dig a pit of the required depth, and install the old bathtub into it. A ditch is being dug along the entire pit: its depth is approximately 25-30 centimeters.
At the same time, its depth should be approximately 20-25 cm greater than the height of the walls of the old bathtub
In the place of the proposed drainage, an additional depression of a small area is dug - approximately 60x60 cm. Gravel and crushed stone are poured there. This is a drainage hole.
The bottom of the previously dug pit is covered with sand and small pebbles. One brick is installed along the edges; a bathtub will be installed on this pedestal.
Step #4 - installing the bathtub
Next you need to prepare the bath. First, the bathtub overflow hole is filled with cement mortar. Do not cement the lower drain hole.
The inside of the bathtub must be cleaned of dirt: degreased, sometimes primed, covered with self-adhesive film or paint of the desired shade. A special colored film for ponds is considered ideal - it looks beautiful, lasts a long time, and is not afraid of moisture.
Then the bathtub is installed on bricks. The drainage of the reservoir must be placed at the same level as the drainage system, the horizontal surface must be leveled. The groove near the walls of the bathtub is filled with pebbles, sand, and decorative stones.
Step #6 - decorating the pond
If the old bathtub has become your mini-pond and you plan to populate this body of water with animals and plants, then there are a couple more steps to be completed. A reinforcing metal mesh is lowered into the bathtub, followed by decorations: pebbles, shells, colored elements for decoration.
This will not only create an interesting appearance, but will simplify the process of cleaning the pond in the future. It will be enough to remove the mesh to get all the components that need cleaning and processing.
After all excavation work is completed, it’s time for decoration. If this body of water will serve as a pool, then you can start decorating it from the outside
A self-made pond in a dacha should look as natural as possible, without violating the integrity of the entire picture of the dacha landscape. Therefore, many people prefer to plant plants around it. If this is a pond, then it is good to use water lilies and water lilies, but not large ones, but small ones.
To revive the pond, duckweed is used. Some people prefer to breed fish, choosing unpretentious species that can take root in a wide variety of environmental conditions and climate zones. These are goldfish, dwarf catfish, crucian carp, veiltails and others.
There is no need to skimp on cleaning your pond. It is advisable to install in advance a high-quality pressure filter that can carefully and effectively purify the water in a homemade pond. And also regularly clean the walls from dirt.
Bend
Probably almost all of you have seen such beautiful tables and chairs with bent legs. It looks very impressive. If such legs are cut and sawed out, they will turn out to be much less durable, because the longitudinal integrity of the fibers will be damaged. It is best to achieve this shape by bending the wood. To prevent workpieces from breaking, you must first increase their ductility. In production, chemical plasticization of wood is used, and amateurs usually have only one method available: first moisten the wood and then heat it, after which they can gradually bend the workpiece.
agent commission when renting an apartment what is it
Milling
A very useful and often necessary operation in woodworking. If we are talking about furniture, then at a minimum, you will have to mill the edges of the products, rounding them (I do not consider the option of manual processing with moldings). To do this, you will need a manual router, which would be nice to complement with a milling table with a more powerful machine installed in it. However, at first, one medium-power router is more than enough, if necessary, placing it on a table or using it manually.
Application of garden varnish
How to apply garden varnish correctly
on tree wounds - consider the instructions for use.
Only healthy wood is treated with garden varnish. All rotted, damaged or infected areas must be removed from the tree before treatment.
The base and surface of the wounds must be cleaned, they should be smooth without growths.
Rinse wood wounds with running water and be sure to use clean tools when applying putty.
The best time to treat damaged areas is spring - early summer. If the damage occurred at another time, garden varnish can also be applied. Renew your garden varnish in the spring.
Before work, treat the tree hollow, tools and hands with a 5% solution of copper sulfate.
Veneering
Previously, this term was used to describe the procedure of gluing carpentry products with plywood - thin sheets of wood of other, more valuable varieties. Nowadays we understand “plywood” as multi-layer laminated boards, and we call thin wood sheets “veneer”. Accordingly, instead of “veneering” today many people say “veneering”. Using veneer, you can give a beautiful, even sophisticated look to products made from “simple” types of wood that grow in our latitudes. For example, oak veneer can be used to cover birch furniture. By the way, today many examples of furniture, including “elite” foreign ones, are actually covered with veneer of more valuable species and are sold as made from solid wood, at much higher prices.
I don’t recommend that beginners start gluing veneer right away, since this is a non-trivial task that requires skill, patience, and in the case of large parts, also serious equipment in the form of powerful presses or vacuum bags for uniform gluing of veneer.
Store-bought garden varnish or how we are being deceived
In the USSR, stores sold classic garden varnish, the basis of which was tree resin. But, since the 90s of the last century, entrepreneurs realized that they could make good money with this product if they lowered the cost and began to work miracles. Let's look at the composition of popular “garden brews” that can be found in online stores and on the shelves of shopping centers.
Is RanNet a garden variety?
It is positioned as a garden variety, but it is not. Online stores are silent about the full composition; they only talk about copper sulfate and dietary supplements.
I managed to find out that the basis of this product is 3M latacryl. This is a thermoplastic adhesive, which, moreover, is manufactured according to technical specifications, and not according to GOST. Widely used in construction and repair for gluing various materials.
According to reviews from experienced gardeners, for example in this article, RanNet is quickly washed off with water. This means that it is able to penetrate between the cells of the cambium and slow down the healing of wounds on the tree.
Robin Green is another representative
In online stores you can find such delights as Robin Green garden varnish. It is produced in the form of sausages and, according to the manufacturer, has bactericidal and wound-healing properties.
Let's study the composition of this miracle:
- petrolatum;
- vegetable wax;
- other dietary supplements.
The last point delivers. The consumer must wonder what it is, and the manufacturer must proudly remain silent about it. Vegetable wax also touches. It’s the same as vegetable oil, without specification, sunflower or soybean oil. It could be anything from carnauba palm wax to rice wax.
But most of all, the first substance (the main one) caused a bitter smile - petrolatum: a by-product of petroleum oil refining, consisting of paraffin and ceresin. This is a toxic substance that causes comedones in people.
Petrolatum is the basis of 90% of store-bought “garden preparations” due to its low cost and viscosity. But, if it is used in gardening, irreparable damage will be caused to the tree. In addition, it interferes with the normal fusion of tissues and slows down their healing.
Other wonders of commercial thought
I won’t torture you too much and go deep into the features of store-bought products. I will list those that, in my opinion, are not varieties and can harm your apple or cherry tree.
- "August". The basis of the composition is the notorious petrolatum.
- "Green Belt". Composition identical to Robin Green.
- "Gardener". There is tree resin, but the base is again petrolatum.
- "Fasco". The composition is the same as that of “Gardener”. They disguise it under the phrase “combination of paraffin-like compounds.”
- "Inta Vir" - again petrolatum.
Honestly, I was shocked when I was looking for a normal garden varnish and couldn’t find it. No benefit, total harm. So, we will prepare this remedy with our own hands. Not for the purpose of saving (it will cost more), but for your own safety.
Gluing and protective and decorative coating
These are the main operations after the manufacture and assembly of the parts themselves. And for their implementation certain conditions are required. A barn is not a house; it is not heated. When I started carpentry, I realized that I couldn’t glue or paint it, because it was already winter outside and the workshop was too cold; I couldn’t even store materials at that temperature. At the same time, it is uncomfortable to work in a cold workshop.
This, of course, upset me very much, because insulating the barn would have been quite expensive. I recommend that you either immediately take care of insulation, or during the cold season, do gluing and painting in other warm rooms.
Connections
In carpentry, there are many types of joining parts to each other, differing in practicality, strength, aesthetics and durability. I will not talk in detail about all types; this is a topic for a whole book. Most often, parts are mechanically connected to each other using tongue-and-groove or dowel joints, which are coated with glue.
Everyone knows about purely mechanical connections: parts are attached to each other using screws, self-tapping screws, eccentric connections, and other metal devices.
Setting up a workshop
After spending a couple of years on a barn with an unnecessary basement, I arranged all the machines around the workshop and made a dust removal installation: I took a construction vacuum cleaner and installed a cyclone filter on a two-hundred-liter metal barrel. Class! Now there will be no dust. And then I realized: the vacuum cleaner consumes 1.5 kW, the miter saw another 2 kW, not counting other devices, I looked sadly at the wire through which electricity was supplied to the shed, and realized that nothing would work out for me. I turned to electricians and asked them to install a three-phase line for me. These wonderful guys have been dynamizing me for a long time, and I think that I won’t be able to defeat them, I’ll have to go somewhere else.
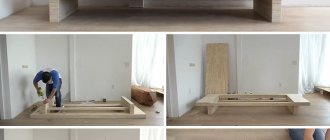
I started setting up the workshop with a workbench. Moreover, in the end, I did it in the wrong place where I placed the dust removal system, and I had to move the vacuum cleaner.
The miter saw is recessed so that its own table is flush with the workbench. Thanks to the folding tabletop, a whole sheet of plywood can be placed here, which can be conveniently cut.
Then I installed the vice and spent a lot of time on it. The stand for the drill is not yet fixed, but is also built into the tabletop, it is convenient to use for drilling end holes.
Due to insufficient power supply, I didn’t even start the machine, I will continue to fight with the power engineers.
But all I’ve managed to make with my own hands so far is a sand painting table for my daughter:
I made it quite quickly, in about 20 hours, because by that time I already had all the necessary tools and equipment. Moreover, it took about 6 hours to process the blanks to give them the shape of a parallelepiped.
The table is simple: a box containing 8 meters of LED strip, a controller and a power supply. First, I processed the boards, processed the edge with a milling cutter and glued the entire structure. It turned out very crooked. If you look closely, you can see in the photo that I filled the seams at the joints with a mixture of sawdust and PVA glue. But it holds strong.
The compartment for tools and sand is screwed on with four barrel nuts. It was here that I realized the usefulness of a drill stand, because drilling into the end is very difficult.
Here you can see the screen itself, which is installed under plexiglass.
An LED strip is glued to it, on top of aluminum tape, with hot-melt adhesive. I thought that the tape would act as a reflector, but it turned out that it “dilutes” the spectrum of light. Plexiglass is quite easy to install. After the initial priming and painting, I inserted metal dowels, laid the glass and filled it with epoxy. It sits there like it’s native and won’t go anywhere.
I want to make two more tables, I already have blanks for them, and try to sell them, because the cost is very low. The most expensive things about them are the controller and LEDs. At the same time, I will develop my skills in processing such small-scale parts.
Source
How to choose the right place for a workshop
It is advisable to choose a place on the site for the workshop in an open space so that shadows from trees or other buildings do not fall on it. Due to this, in winter it is possible to save a little on heating or it will simply be warmer to work, since on fine days the sun will help with heating. And all year round during daylight hours you won’t need to turn on the lighting fixtures or you can use them minimally, since there will be quite good natural lighting, which, by the way, is better for the eyes. In addition, this will save on electricity.
If possible, the workshop should be built away from the house and buildings with pets, since even if it is not intended to house too noisy equipment, almost any work will still be accompanied by sounds that are not the most pleasant for any ear. True, the farther from the house, the more extensive the supplied communications (electricity, heating and plumbing) are, as a rule, and these are additional costs.
Place for building a workshop
It is also recommended that the workshop is not in a low area. As a rule, rainwater and melted snow water accumulate there. Even if the workshop is not flooded, then excess humidity will become a serious test for the building itself, the tools of the machines and the supplied communications. All this will quickly become unusable. Even emergency situations, for example, short circuits in wiring or equipment, cannot be excluded. You can, of course, take protective measures against flooding and humidity. When building a workshop with your own hands, make the foundation higher and waterproofed, provide for drainage from it if possible, take care to strengthen the moisture insulation of the entire structure, and the like. However, all this will require additional financial costs, as well as effort and time for arrangement.
It is desirable that the chosen location has easy access to the workshop at any time of the year. So that in winter it is not too swept away, otherwise you will have to put a lot of effort into periodically clearing the path and the approach to the entrance doors, and in the spring you will have to push a much larger volume of snow away from the walls to prevent them from flooding. And finally, if there are places on the site that are not at all suitable or are of little use for growing any plants, then it is recommended to choose one of them for a workshop.
Do-it-yourself carpentry workshop (carpentry) at the dacha
February 20, 2014. Read 76089 times
In the process of building a summer house or a country house with your own hands, a desire arises to make it so beautiful and individual that your friends and neighbors will be jealous. But even you have the ability and desire to carpenter, you need a tool and a room in which masterpieces of wooden art will be born. We invite you to consider building a carpentry workshop as the embodiment of your hobby. Although maybe later it can become your small business.
In this article we will look in detail at how to equip a carpentry workshop on your own using a ready-made example. The area of the workshop presented below is approximately 400 m² (but you can make it small). The entire workshop is divided into two rooms where the working processing machines are located.
Kids toys
Many craftswomen also want to sew something interesting for their children. There are many different fabric crafts for children. They are simple to perform and absolutely safe for the child. For one of these DIY crafts, we will need felt, any filler and threads to match the color of the fabric. There are a large number of different types of fabric toys: animals, tilde dolls, pumpkin dolls, lullaby toys, etc.
Which is better: building a new one or using an old one?
The carpentry shop will look much more functional in a new free-standing building for a number of reasons:
There is an opinion that a workshop for carpentry work at home should occupy up to 6-7 m2, but this is catastrophically not enough. In such an area it will not be possible to fit the maximum amount of equipment. Moreover, the recommended length of the room should be at least 4 m. Even if, by a lucky chance, you fit everything you need, you will not have any room left for normal work. There is nothing to say about storing material and finished products.
DIY carpentry workshop
It won't work with a garage either. This is a specialized place for the machine and risking its integrity during operation is not a suitable option. In addition, the workshop requires normal temperature conditions, which are difficult to maintain in the garage. It is also necessary to allocate space for storing car parts and tools. The barn is closer, but still unlikely to fit. Rather, such a solution will require radical redevelopment and reconstruction, commensurate with new construction. Carpentry requires a reliable foundation made of slabs. If the equipment is installed unstable, it will vibrate, which will ultimately lead to its failure. Having considered all the options, we decide to place the workshop in a newly built building.
gas instantaneous water heater for a private home
Why is it better to rebuild than to adapt existing premises?
It is better to build the workshop anew, as a separate structure, and not as an extension to the existing buildings on the site. Of course, you can highlight a corner or room in the house. But in this case, you cannot count on the comfort of those living in it and the absence of reproaches on their part for the noise during work in the workshop and the garbage involuntarily carried into the living rooms. In addition, there is hardly enough space in the house to accommodate everything you need: tools, workbench, machines, etc. And you will have to work in very cramped conditions, when there can be no talk not only of comfort and convenience, but even of basic safety rules.
Although it is believed that the minimum sufficient area for a workshop is 5–6.5 m2, which can certainly be provided in a house, this is not enough. What is 6 m2? This is a closet or corner measuring 2x3 m. Such a space is only suitable for a darkroom or for a radio amateur.
When you plan to make a metalwork or carpentry workshop, then 6 m2 is almost the same as nothing. Even if it is possible to squeeze some useful and serious equipment into the space remaining after placing the workbench and the most necessary things for any workshop, it will be almost impossible to work due to the cramped space, at least with large and long parts. Again, where to store finished products, blanks, lumber in a home workshop?
DIY carpentry workshop
A garage is also not an option. You will have to drive the car out every time so as not to damage it during work. In winter, because of this, it will be difficult and very energy-consuming to maintain a comfortable temperature in the garage workshop. In addition, you will have to sacrifice some of the space for car parts and tools.
Converting a suitable-sized barn into a workshop is an option, but a dubious one. A workshop needs normal windows and doors, insulation, heating, light, ventilation and preferably water. This is probably not in the barn and will have to be done. It itself may be placed in an unsuitable location for the workshop. The barn may require redevelopment or the creation of separate rooms if they do not exist. This is exactly the case that they talk about - it’s easier to break it down and rebuild it.
In addition, the workshop must have a solid foundation, namely a slab foundation. Especially if floor-standing machines are installed in it. And especially if they are for a locksmith workshop. They often purchase decommissioned or simply old equipment, including from Soviet times. It is heavy, bulky and creates a fair amount of vibration during operation. In any case, the workshop is a place where the load on the floor is very high. Falls of heavy objects are inevitable; work may be accompanied by impacts of something (for example, a hammer or sledgehammer) on something (a part or a workpiece), which hits the floor. With the latter, sometimes you have to drag something along. And even the smallest tabletop machine vibrates at least a little, thereby making its contribution to the process of destruction of the base of the room.
A slab foundation can still be found in a garage, but it is unlikely to be in a shed and unlikely to be in a house. If the workshop is placed on the second floor of a residential building, an attic or an attic, then not all buildings there have a sufficiently strong and durable floor.
Workshop project: where to start
The first step in designing is to determine what specific workshop work you will be doing. It is advisable to think through and write down all planned work, both in the near future and in the future. Based on this list, it is necessary to compile a list of auxiliary equipment necessary to complete the assigned tasks.
Next, determine the availability of the necessary tools (from a chisel and hammer to a drill and jigsaw), nails and screws, blanks and finished products. Don't forget to complete your list with a powder fire extinguisher and a first aid kit. Then determine how to arrange all the above things, what cabinets, racks and shelves are needed for this. Let's move on to the list of main equipment. The list must be completed:
After this, you need to add cabinets and racks with items from the first list to the second. Next, we determine the place for future blanks. The recommended minimum size of such a rack is 1 m × 6 m; it also needs to be added to the second list. Such a detailed list will allow you to calculate the dimensions of the future joinery.
Decorative elements made of wood
The wicker fencing made of brushwood, made in country style, looks wonderful. A flower garden planted in an old stump, a bizarre figure carved from a dried tree trunk, and a well made of logs are eye-catching.
Good crafts can also be made from plywood. Some things require carpentry skills, some ideas are very easy to implement
It is important to correctly calculate your strengths and not take on something that you cannot yet handle. Gain experience first
Decorating a dacha area is a responsible task. Remember that the decor should emphasize the advantages of the landscape and hide its shortcomings.
In addition, all elements must be designed in the same style and be combined with the style direction in which the country house is decorated. Only then will you get a unified ensemble.
Subtleties in drafting projects
When all preparations are completed, it is time to design. The result of your efforts should be a document that is a project for the future workshop. For construction, there is no need to draw up construction drawings according to all the rules; detailed sketches indicating the actual dimensions of the future premises and the dimensions of the main and auxiliary equipment specified in the second list are sufficient.
There should be several sketches. It is difficult to indicate all the elements of a structure on one projection. Therefore, your sketches should include all the details down to the smallest detail. External and internal dimensions of the room and its elements are indicated without observing scale, but must reflect the actual position of objects and building elements.
An approximate calculation of the required area for a workshop will be the product of the area of all equipment, shelving and cabinets and a coefficient equal to 1.5-2. Still, if computer graphics looks like unplowed virgin soil to you, then the visual layout of the carpentry can be done using the old-fashioned method. Take a sheet of graph paper, draw on it the premises of the future carpentry on a scale of 1:20, agreeing with the approximate calculation and pre-made drawings.
From the same paper, cut out rectangles of equipment and auxiliary structures to scale, but according to real dimensions. This will make it possible to correctly place them in the workshop, taking into account workplaces and aisles. If necessary, you can move the rectangular layouts to determine the perfect workshop layout:
This will be your guide to further actions.
Crafts for the kitchen
Many housewives prefer a cozy, comfortable kitchen, so such beautiful, but at the same time light fabric crafts will make the kitchen of any housewife even better. The housewife's workplace will begin to play with completely different colors.
You can make beautiful cushions for seating in the kitchen, sew exquisite curtains and make various potholders and hot pads. And now you will learn how to create light and beautiful coasters.
Completion of the project: finishing touches
A few more necessary actions that must be completed in order to get a project that has the right to life. It is advisable to provide several rooms in the workshop:
These rooms will help divide areas of activity into zones and contribute to comfort during the work process. The diagram of the utility room with the dimensions of its furnishings must be made on the same sheet with the main workshop.
The storage area for long timber or lumber should be located opposite the front door for ease of storage. A machine for sawing workpieces should be placed near the rack. After receiving the layout of the carpentry, we move on to drawing up its sketch. We determine the material for the walls, their thickness and height. Select the type of roof and roofing material. Here it is recommended to rely on your wishes, budget and the ability to do it yourself.
An important issue in the design of a carpentry workshop is the development of a ventilation system. It must be forced, supply and exhaust. Such a system will ensure the removal of chips and harmful substances, complete air recirculation and microclimate regulation not only in the carpentry room, but also in the painting department. Draw on the sketch all the components of the ventilation, indicating the parameters and dimensions.
The final stage of design is the creation of a power supply circuit, lighting, both basic and individual for each workplace, and a grounding loop. Each workplace must be equipped with a grounded socket, each machine must be grounded. Upon completion, a sketch of the connection to the communications workshop building is made.
We sew country curtains in different styles
The style most often preferred by summer residents is called “rustic”. It is popular not only in our country, but also in Europe and even in America. It’s just that in different countries it acquires its own characteristic distinctive features.
Patchwork in the Russian spirit
To embody the Russian rustic style, we will need the simplest natural fabric. Usually this is “cheerful” chintz, linen or cotton. A plain material or one with a small pattern will do. A curtain made using the patchwork method looks great.
Patchwork curtains look very elegant, despite the fact that they can be sewn either from new fabric or from scraps left over from other projects
To sew curtains from rags, you need to measure the window, decide on the parameters of the fabric of the future curtain, and then make a pattern of its parts. In this case, preference should be given to large elements so that the curtains are not too heavy due to the abundance of seams. The patchwork technique involves the use of geometric shapes. Most often these are isosceles triangles or squares. The combination of dark and light details looks most impressive.
For a future patchwork fabric, you must make a pattern on thick paper or cardboard, carefully numbering all the details
We cut out the parts from thick cardboard without seam allowances and number them so as not to get confused when joining. We apply patterns to the wrong side of the material and trace them along the contour with chalk, soap or a special marker. We will cut out each element taking into account seam allowances - approximately 0.5 cm. In order for the seam to be on the wrong side of the work, the parts must be connected by placing them right sides together.
Be sure to iron seams stitched on a sewing machine or made by hand. To hide the wrong side of the product, it needs a lining. The edges of the resulting curtains can be decorated with braid, lace or ribbons.
Learn the secrets of patchwork sewing for loose fabrics from the video:
Curtains in Russian rustic style are used to decorate not only window openings, but also doorways, as well as sleeping areas.
Bringing French Country Style to Life
The rustic style in France was named after one of the provinces of this country. Namely Provence. To create this style, chintz is also quite suitable, but you can also use linen and even cambric. All these fabrics are natural and will serve well in the country.
When choosing fabric, you can give preference to plain fabrics in blue, light blue, lavender and white colors or use material with a pattern
In addition to fabric and a sewing machine, for work we will need:
- Accessories. To decorate the product, satin ribbons and threads to match one of the colors of the main material are well suited.
- Tools and material. Let's prepare paper for the pattern, a measuring tape, chalk or soap, pins and very sharp scissors.
It is better to buy fabric with a 10-15% margin in case of possible errors in measurements. The minimum width of the fabric should be 3 meters.
Be sure to measure the window and adjust the dimensions suggested below, based on the results of our own measurements. We have to sew a simple version of curtains in the Provence style from two halves with a transverse stripe. The width of each half is approximately 80 cm, and the width of the transverse strip is 15-20 cm.
Despite the apparent simplicity of the work, you should start with a pattern. To do this, place the paper, folded in half, on a large table or on the floor. We draw the outlines of the future canvases in half their actual size and cut them out.
When transferring the pattern to the fabric, do not forget to allow seam allowances. In the upper part of the product, which will be attached to the cornice using clothespins, the allowance should be at least 5 cm. For the remaining seams, it is enough to leave 1 cm.
In parts cut from fabric, we pin the edges that need to be stitched so that the seams are even and neat. After this, we decorate the edges with ribbon, and then assemble the finished curtains in the Provence style.
An attic in the Provence style looks very elegant, although simple. There is a lot of light here, a huge window decorated with a flowing translucent curtain
Don't forget about the tiebacks that hold the curtains when they are pulled apart. They can be made from pieces of fabric from curtains or in the form of decorative cords, ribbons, and flowers.
We sew curtains in American country style
Just like any other rustic style, country is characterized by simplicity and naturalness.
For country music, natural fabrics are most often chosen:
Recent Entries
Lilac perennials that are beautiful, compact and do not crowd out other plants Why when buying seedlings you should not take the sellers’ word for it and how to determine the age of the plant using 3 signs Tomato seedlings have turned purple or whitish: why the color has changed and how to save the plants
- not too bright;
- with a floral pattern;
- in the box".
However, you can also use synthetics that imitate natural fabric. Its advantages for the dacha are that it will not fade, will not turn yellow from the sun, will not shrink or wrinkle.
To correctly calculate the need for material, we take the necessary measurements. To determine the length of the product, you need to measure the distance from the cornice (top point of the curtain) to the window sill or the bottom of the heating radiator (bottom point). We add 6 cm to the result obtained for the hem of the product at the bottom and 3 cm for the hem at the top of the fabric. To determine the width of the product, you need to increase the length of the cornice by 1.5-2 times, depending on the thickness of the upcoming drapery.
This is what the curtains we sewed will look like. The only difference is that these are attached to the cornice not with braid, but with decorative loops
The simplest pattern is rectangular fabrics. Cut the fabric. To avoid using pins, you can set your sewing machine to the long stitch mode. It allows you to baste hems. We sew curtain tape to the folded top edge. Next, the side seams should be processed. The edges of the braid should be tucked into the seam, and the ends of the cords should be left outside. By pulling them, you can adjust the degree of drapery of the curtain. All that remains is to process the bottom and hang the finished curtains on the cornice.
Construction of a carpentry workshop with your own hands
The location has been chosen, the project has been prepared, and the construction of the carpentry workshop can begin. Construction should be divided into several stages:
Foundation
Walls
Wall installation primarily depends on the selected material.
If the structure is wooden, then to fasten the lower crown when pouring the foundation along its perimeter it is necessary to lay threaded rods. Further construction of walls comes down to the construction of a wooden structure. The room can be made of brick or foam concrete blocks at your discretion. After making the box, install the window and door blocks. Make the roof according to a pre-prepared sketch with your own hands. Floors in a carpentry shop play an important role. It is usually made from several layers. A base of 5 mm thick sand is made on the foundation, then it is covered with roofing felt and boards are laid on top or an armored mesh is laid and poured with concrete. The second option is more reliable and popular.
If the carpentry is made of wood, then it is necessary to impregnate the walls with fire retardant compounds. Next, you need to bring all communication networks into the room and perform the wiring. All cable lines in cross-section must correspond to the current load imposed on them during further operation. In a workshop, wood is placed in metal pipes for fire safety purposes in case of a short circuit; in other buildings, corrugated pipes made of self-extinguishing polymers are used.
Next, we install and connect the ventilation system and machines, arrange cabinets and shelving, install shelves, and lay out tools.
Heating in the workshop is provided using oil radiators or autonomous water heating. An electric boiler can be used as a source of heating the coolant, and if it is possible to equip a room for a boiler room, gas or solid fuel boilers can be used. It is better not to use solid fuel boilers in a wooden workshop; there is a high probability of accidental fire.
Fabric selection criteria
When choosing a fabric, the main attention should be paid to ensuring that its color and texture match the overall color scheme. A number of other important points should also be taken into account:
- Location of windows. On windows facing west or south, in summer it is best to hang textiles made of thick, light-colored fabric that can protect from bright sunlight. This will prevent your home from heating up too much. Windows that face north and east can do without special curtains. You can hang curtains made from thick fabric on them.
- Properties of fabrics. For your dacha, you can purchase textiles from any available material. It can be linen, cotton or synthetics, although products made from natural materials are better suited for a rustic style. Synthetic curtains are considered more practical because they are more durable, do not create problems in washing, retain their original shape for a long time and are resistant to fading. The final choice depends on the personal preferences of the owners.
- Room size. In a small room, it is best to hang curtains made of light fabric, which can be either plain or decorated with a small pattern. For a spacious room with large windows, any type of curtains can be used.
If the owner's attention is attracted by roller blinds or Roman blinds, then it is desirable that they be made of thick fabric that holds their shape. For a veranda or gazebo, it is best to purchase textiles made from the most durable material that can cope with the negative effects of precipitation and wind.
How to equip a carpentry workshop
General view of the workshop
Fig 1. General view of the workshop
In the center there is a sawing machine, near the wall there are blanking machines that allow you to end-process the board, make a cut, etc.
Figure 2. Procurement area
Prepared or processed wooden blanks, veneer, blanks for the façade of furniture, doors, etc. are stored here.
Fig 3. Cross-cutting machine
A cross-cutting machine is used to “cut” lumber. For example, 6 meter boards are shortened to 4 meters; the length is selected depending on the type of processing machine, the size of the room and the required dimensions of the finished product. Various waste after trimming lumber is stored at the bottom of the machine.
Fig 4. Drum grinding machine
Near the end machine there is a drum grinder, which is also made by hand.
Fig. 5. Hood - as an important factor in setting up a carpentry workshop
This drum sander hood is designed to collect all the wood dust after the sanding process.
Fig 6. Circular machine
Next to the drum sanding machine there is a circular one, which is also used for “rough” cutting of lumber.
In the center of the workshop there is a jointer, which was made in the USSR. The length of the table is 2800 cm and the width reaches 420 mm.
The thicknesser is located next to the jointer with a workpiece size of 420 mm.
Between the thicknesser and the jointer there is a powerful aspiration unit, which during the processing process collects all the wood dust into a special reservoir, which can then be easily cleaned.
DIY milling machine
The milling mechanism was borrowed from the factory machine, and the work table, frame, aspiration and control system were made independently. Milled titanium was used as a tabletop. The factory shaft from the milling machine was removed and a new one was machined according to the dimensions of the working part of the machine. The shaft turned out without any cones for the old landing cutters, which is very convenient.
poster for restaurants with a veranda in Moscow
Milling machine shaft
Fig 11. Milling machine shaft
Fig 12. Lathe
Figure 13. ShLDB machine
Figure 14. Cross-cutting machine
Do-it-yourself carpentry will require not only specific skills for fine-tuning and assembling machines, but also significant financial costs for purchasing the necessary materials.
Factory-made Corvette 33 band saw
Fig. 15. Factory-made Corvette 33 band saw
Angle cross-cutting machine
Figure 16. Angle cross-cutting machine
Sharpening machines: emery, diamond and felt
Figure 17. Sharpening machines: emery, diamond and felt
These machines are used for sharpening chisels, drills and other working tools.
Figure 18. Slotting machine
Some elements from the slotting machine were borrowed from the factory milling machine. The frame base, desktop, and controls were made independently. The motor is used at 380 volts with a bearing mounted at the rear. The bearing was installed in order to increase the power of the engine, which simply did not work under such a load without modification.
Sliding slipway on tripods
Fig 19. Sliding slipway on tripods
Homemade universal machine (plane, saw)
Figure 20. Homemade universal machine (plane, saw)
The countertops are made of high quality and durable titanium.
Sawing and milling factory machine
Fig. 20. Saw-milling factory machine with the ability to adjust the height and angle of processing lumber.
Figure 21. Drilling machine
The picture shows a factory-made drilling machine from the times of the USSR. The engine was modified and the pulleys were re-sharpened.
Rack with hardware
Figure 23. Rack with hardware
Cabinet for chisels near the workbench
Fig 24. Cabinet for chisels near the workbench
Cabinet for working cutters
Figure 25. Cabinet for working cutters
Second room of the carpentry workshop
Fig 26. Homemade press
The dimensions of the press are 900 mm in length and 2700 mm in width. The workpiece is placed on plastic stops, which is then compressed by a press.
Universal sharpening machine
Figure 27. Universal sharpening machine
Here is a jointer and emery for sharpening cutters and knives.
Drum grinding machine brand JET 16-32
Fig. 28. JET 16-32 drum grinding machine with a modified work table and feed roller.
Drum grinding machine brand JET
Figure 29. JET drum grinding machine
Factory machine with modified support plates, internal aspiration casing installed.
Figure 30. Painting room
At this point, processed blanks are installed on tripods, which are subsequently painted and painted using a spray gun and brushes.
Compressor for painting
Figure 31. Compressor for painting
One of the mandatory conditions in a paint and varnish room is the creation of effective supply and exhaust ventilation. It should be noted that in winter, this room where painting work is taking place must be well heated. Otherwise, you will not be able to properly paint or apply varnish.
The slipway is located in the assembly and grinding room, where the final stages of processing of wood products take place. The slipway is made of high-quality laminated plywood, which is mounted on a metal frame with the ability to be adjusted in height. This is done in order to create a perfectly flat surface in rooms with uneven floors.
Additional photos of the carpentry workshop
Trimming saws are used for cutting (dissolving) workpieces. Near the trim, you can immediately organize a place to store wooden scraps that can be used in the future.
In order to be able to produce any wooden product, it is better to equip the workshop with several trimming machines - with a six-meter longitudinal, with a transverse and with a rotating table.
3. Drum grinding machines
5. Electric jointers
7. Vertical milling machine
Vertical milling machine
Vertical milling machine
It is best to place a cabinet near the milling machine to store various cutters.
Cabinet for storing cutters
9. Grinding machines with reel and disk (ShlDB)
Grinding machines with reel and disc (ShlDB)
Grinding machines with reel and disc (ShlDB)
10. Band saws
This equipment is designed for cutting wood using a band saw. Unlike a circular saw and a cross-cut saw, this machine provides a lower roughness of the processed surface, which means that the surfaces (ends) obtained as a result of sawing do not require finishing.
It is better to equip your carpentry with two band saws - for sawing large and small parts.
11. Sharpening machines
12. Slotting machine
In woodworking, a slotting machine is necessary to create rectangular and oval grooves in wooden workpieces.
The work table, with the workpiece attached, can move along and across the body, as well as tilt at a certain angle, which allows you to create grooves of various configurations.
13. Sliding slipway
14. Drilling machine
A carpenter in the workshop cannot do without a drilling machine, which provides drilling of holes of various depths and diameters.
Near the drilling machine it is rational to place a cabinet with interchangeable tools - drills of various sizes.
Tool cabinet with replaceable tools
17. Place for metal work
The area for processing metal workpieces should be equipped with related equipment and tools (vise, anvil, hammer, pliers, etc.), which are best placed on the table and surrounding racks and shelves.
Place for metal work
The main equipment of a carpentry workshop is a reliable workbench for drawing, manual processing of wood products and other tabletop carpentry operations.
19. Area for painting and varnish work
The ideal option is to allocate not a zone, but an entire room for painting and varnishing wooden products. In any case, this place of work must be equipped with a good exhaust hood and have a window.
Paintwork area
20. Slipway for final assembly
Final assembly berth
Weights are used to facilitate the assembly and gluing of joinery products.
22. Storage space for carpentry tools
Shelves with tools (glue, tape, tape measure, screwdrivers, rulers, pencils, compasses, etc.) should be located close to the workbench.
Storage space for carpentry tools
Storage space for carpentry tools
To store chisels, it is better to select a cabinet where each tool will be in its designated place. Such orderliness will help improve work efficiency.
Storage space for carpentry tools
23. Space for storing hardware
It is better to package any metal fasteners (nuts, bolts, screws, nails, etc.) and accessories (handles, legs, guides, etc.) in separate jars and label each of them. Hardware distributed in containers is placed on shelves near the furniture assembly area.
Storage space for hardware
Before you make carpentry or a carpentry workshop at your dacha with your own hands, you need to purchase a suitable room, and then purchase all the necessary equipment. All of the above-described machines necessary for working in a carpentry workshop can be purchased from companies that sell metal-cutting and woodworking equipment on their websites or trading platforms. You can also visit special exhibitions and get acquainted in detail with the examples of carpentry devices presented in order to choose the best option for your carpentry.
Video tour of the carpentry workshop
Most of the woodworking carpentry machines used in the video were made independently using some ready-made factory elements that were refined and improved. Another important aspect in a carpentry workshop is effective suction. This article answers the question in more detail - how to make a carpentry workshop or carpentry shop with your own hands. As can be seen from the material described above, this is a labor-intensive and costly process. However, if you have all the necessary woodworking machines and tools, you can easily make not only wooden windows, doors, furniture and interior items, but also restore especially valuable wood products from past centuries. Good luck.
Source
Model selection
There are various styles of curtains for the garden. The choice of a specific model depends on the overall style of the interior. For the dacha, it is recommended to use rustic and ethnic styles.
Rustic style in the Russian spirit
Curtains for a country house in a rustic style are characterized by simplicity. The fabric used is chintz. The material is chosen with a small pattern and monophonic. Patchwork style products can be an excellent solution. The curtains are decorated with embroidered images of geometric shapes and birds.
Russian style involves the presence of curtains on the doors.
French fleur of Provence
The cottage can be decorated with elements of Provence style. For this purpose, curtains are made from natural materials: cambric or linen. Preference should be given to blue, white and lavender shades. In addition to curtains, the interior should be complemented by various capes, napkins and tablecloths.
The curtains are decorated with floral patterns and bunches of grapes. Beautiful frills and ruffles are also used.
Country from America
Choosing country curtains for your dacha means choosing a natural and simple interior. Curtains should be floral or checkered, but not bright. Linen products decorated with lace will create rustic comfort and a unique atmosphere.
Mediterranean style
This style is divided into several substyles. Greek and Italian styles deserve special attention.
Curtains for the terrace at the dacha in the Greek style are distinguished by a cool color scheme: blue and white.
The Italian style interior is warmer. It uses sand, beige and olive colors. Mediterranean style involves large windows and lots of light. The design of curtains for the garden with your own hands is made from translucent and flowing fabrics.
Curtains are decorated with floral patterns.