Master class “Time Machine”
Oksana Nikolaevna Molchanova
Master class “Time Machine”
When I participated in the “Ladder of Success” competition, I needed a “ time machine a plant sprout sprouts from a pot of seeds that I put in the “ Machine (I used a presentation with an excerpt of germination)
.
And at the end of the presentation, I pulled out the finished plant from my time machine .
To make a time machine you need to prepare :
- medium sized box
- colored paper (you can use self-adhesive paper for convenience,
- parts from a small designer,
- pictures of a clock mechanism and other suitable pictures.
First, cut out the doors on both sides of the box, then cover the box with self-adhesive film.
Let's paste the inscription time machine on both sides and the clock dial. It will be even better if you glue on metal mechanisms from old watches, so the time machine will look even more realistic.
Inside the box you need to make a partition so that it divides the box into two parts, then in one part of the box you can put, for example, an empty pot, and in the other with a plant.
Attach buttons and a handle, don’t forget to do everything on both sides.
Well, your “ time machine ” is ready. You can use it in games or for a surprise moment.
"Art is a time machine." A team educational game for grades 8–9, dedicated to art in a historical context. Game participants: students in grades 8–9. It is possible to play the game as part of an elective course or additional classes outside of class hours. Main.
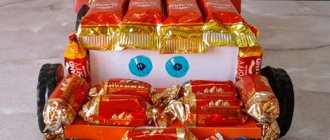
Master class "Transport". Application “Fire Truck” Today I offer a master class where I want to present a completely simple application. The boys especially liked this applique. And further.
Open integrated lesson “Orientation in time”. Modeling your favorite season Topic: Orientation in time. Modeling your favorite time of year. Integration of educational areas: “Cognition”, “Communication”, “Artistic”.
Celebration scenario for Mother's Day for the middle group “Time Machine” Entrance with flowers and leaves Presenter - So many smiles, shining eyes! What kind of holiday are we having today? Who will give me the answer to my question?
Graduation script “Time Machine” Graduation celebration “Time Machine”. The teachers come out: The day is cloudless, clear and clean, There are so many guests in our hall! Our children.
Graduation script “Time Machine” (preparatory group) Presenter: 1 slide (image of a kindergarten) - Not in a distant state, not in a wonderful overseas kingdom, Not near the golden palaces, but among.
Scenario for the graduation party for the preparatory group “Time Machine” Scenario for the graduation party “Time Machine” pre-graduate year 2022. Music sounds. “In the world of animals”, children run into the hall Child 1: There are different holidays throughout the year.
Graduation party “Time Machine” Graduation party in the preparatory group “Travel in a Time Machine”. Graduation party for children of the senior and preparatory groups.
Lesson “Timoshkina Machine” Lesson for the 1st junior group “TIMOSHKINA MACHINE” Published May 11, 2022 Equipment: toy goose, toy truck, red and.
Source
Project. Model of the "Time Machine" in mathematics. ( 4th grade )
The document selected for viewing is mashina_vremeni.docx
The document selected for viewing is proekt_mashina_vremeni_4a_kl..docx
creation of “Time Machines” based on materials from a mathematics textbook
4a grade according to the OS "School 2100"
Rtishchevo, Saratov region."
Teacher: Strokova R. S.
Project. Model of the Time Machine.
The curriculum for mathematics and literary reading in grade 4 is built on the study of material consisting of historical events of the past and future, in which facts, events, and terms are reported. Students were faced with the problem of why devices have not yet been created that could transport people to the past or present time in order to better study or understand the history of this time. In order to make it easier to convey educational material to children and to assimilate it, the game moment was chosen to create the “Time Machine” model. Imaginary actions will help to interest and attract the student to learn new material. While working on the Time Machines project, students must demonstrate knowledge, creativity, and a sense of teamwork.
Car made from boxes | Country of Masters
My first graders couldn't stand the photo session and started playing.
For work we will need:
So let's begin. Glue the two boxes together.
We glue the third box like this.
Or so. You can come up with your own idea. We used the first method.
Let's choose the color of the car. We decided it would be silver.
Let's start from the bottom of the machine. Let's outline the bottom of our workpiece. We get a rectangle the size of 2 boxes.
Let's glue it. This piece will hold our boxes.
Now we need to glue the top of the machine
To do this, cut out a strip of 4.5 cm (width of the box) by 20 cm (width of the cardboard f A-4). We used the machine's blank. A stripe was drawn along it.
We will paste a stripe over the top of the car. With the help of stripes you can form any car body. You can make it like a Lada or a streamlined shape, or…. Experiment.
Glue the ends of the strip from below.
Now it's time to tape the sides. Let's draw x with 0 on one side. So as not to get confused in the details later.
We need allowances so that there are no holes like this.
Now let's make the wheels. Let's circle 2 rubles on black cardboard - these are wheels. 10 kopecks on white paper are disks. You can use a stencil with circles.
The car is ready! We just have to wait until she can play...
Car out of the box | 100 CRAFTS
Place the box on its side and cut off the top part, moving 6-7 centimeters from the edge on one side and 3-4 centimeters from the bottom.
Punch holes in the lids and in the cardboard blank. Stretch the wire and attach bottle caps to its ends. Secure the junction of the wire and the covers with glue.
Paint the car. You can use absolutely any paint for this.
Use a knife to cut out the windows.
Glue the rear “lights”. It is best to use round rhinestones, but if they are not available, you can replace them with cardboard circles.
By the way, such a car would be a good gift for a dad-driver on his birthday or February 23rd.
You might be interested in:
Paper applique for small children
A car won't go far on three wheels, but it's a great way to brighten up the evening. Any manual creativity has a positive effect on motor skills. You can do this by having:
- An ordinary sheet of colored paper.
- Scissors.
- A little PVA glue.
A regular two-dimensional picture of a car is drawn on a large sheet of paper. Next, the child cuts it out along the contour. Using glue you can place windows and wheels of other colors. Such crafts for kindergarten cars are ideal for 3-4 years old.
Wall clock using decoupage technique (MK)
You can make a clock for the kitchen with your own hands from scrap materials. But, if you want to create an original product, then the decoupage style will be the ideal solution. These watches look elegant and will become a unique decoration for your home interior. We offer an interesting master class that will help you create your own wall clock at minimal cost.
You also need to prepare:
Making a watch with your own hands in decoupage style is carried out in a certain sequence:
1. The workpiece is processed. The base of the future product must be sanded using sandpaper and coated three times with white acrylic paint, it will serve as a primer.
2. When the paint has dried, retreat a couple of centimeters from the edge of the workpiece and mark the future frame.
3. The base is given a texture, a paint color is selected that best suits the interior. The paint is diluted and applied with a sponge in a chaotic manner to age the product.
Apply a second coat of paint
4. The frame of the future watch is highlighted in a darker color; brown paint is ideal for this.
5. A pattern is cut out from the prepared rice paper and applied to the workpiece. If a napkin is used, then it is soaked in water and applied to the selected place on the dial. Glue is applied over the image.
6. Now you need to use your imagination and make sure that the drawing fits organically into the surface. Paints of appropriate tones and a sponge will help here. With their help, a smooth transition is created from the pattern to the surface of the dial. It is important to be extremely careful; if you cope with this task, then you are a great master.
Volumetric figures of cars
Many people use paper. It forms volume perfectly. As a result, jewelry is made from pliable material.
- The product can be used as a toy in the future.
- An important aspect of inventory is density.
- A fake car is made from paper and cardboard. Stock up on glue to fit the pieces together.
- Using scissors, according to the template that needs to be placed on the canvas in advance, cut out the figure.
Crafts from matchboxes: robots and transformers
Crafts from waste materials: unusual crafts and toys from matchboxes - robots and transforming toys. Crafts for boys.
Amazing crafts from matchboxes
You can make many different crafts with your children from waste materials. Such creativity develops children's fine motor skills, imagination, spatial thinking, design and modeling skills, etc.
What crafts can be made with children or for children from matchboxes? Usually a mini-dresser and 2-3 other ideas come to mind. But it turns out that you can make very interesting toys from matchboxes. For example, robots and cars, and also transforming toys.
The author of these works is Sergey Pimushkin from Cherepovets.
These crafts made from waste material (matchboxes) are more suitable for boys, but my daughter and I really liked them!
Crafts robots and transformers from matchboxes
A samurai craft made from matchboxes glued together and covered with colored paper (or even simpler, colored tape). The samurai's swords are made of cardboard, attached to the box hands with ordinary paper clips, so they can be easily removed and attached in place.
Made from 14 matchboxes, this adorable yellow transformable robot can turn into a car.
The red fire truck can transform into a robot and back.
And this transforming toy can turn, in addition to the robot, into two different models.
The video makes it clearer how this happens. Amazing, right?
And in this video there is another transforming robot, it is not in the photo.
About creating these crafts from matchboxes and other waste materials
I asked Sergei Pimushkin, the author of these amazing works, to tell me a little about his crafts, which of them was the first, and how the idea to create them came.
Sergei replied that he used to be interested in modeling - gluing together models of military equipment. After they became more expensive, I began to come up with my own models from matchboxes and lids, because... This is a waste material that requires almost no material costs.
Once during his vacation, when he had a lot of free time, Sergei began making robots from matchboxes. Then he complicated them until he started to get transformers. Gradually I began to make crafts not only from matchboxes, but also from lids and other waste materials.
The first matchbox craft was this robot. Then other robots, transformers, cars and even a dinosaur appeared.
How to make robots from matchboxes with your own hands
Descriptions of making robots are in the book “Robots from Matchboxes”. This is a small brochure. Master classes on making transformers and other crafts will be in the new book, which should be released this fall.
And using these ideas as a basis, you can come up with your own crafts from matchboxes.
I suggest looking at other articles with master classes on crafts made from waste material, and in particular, articles about crafts from matchboxes.
Happy creativity!© Yulia Sherstyuk, https://moreidey.ru Copying site materials is prohibited and is punishable by law.
All the best! If the article was useful to you, please help develop the site by sharing a link to this article on social networks.
Posting site materials (images and text) on other resources without the written permission of the author is prohibited and is punishable by law.
Play Big Wash with your child
It will not be difficult for a child to play with a new washing machine - constant observation of adults will tell the essence of “washing”. However, mom and dad can diversify the activity and introduce developmental moments into it. So, it is recommended to give the child the following tasks during the game:
- sort laundry items for dolls by color before loading them into the machine;
- start the “wash”, measuring the time on the clock;
- load the machine with both hands;
- “wash” the washing machine with a dry cloth;
- hang clothes on the dryer, securing them with clothespins.
While playing laundry, your child will learn how to sort things, colors and timing, as well as learn to wait and care for equipment!
A cardboard washing machine will become an interesting and useful toy, the main thing is to help the child master its “functionality”. Then even a fake machine will allow your child to develop self-service skills, master sorting things, remember colors and types of fabric, and also learn to wait and measure time.
Interesting:
- DIY cardboard washing machine
- Detergents for children's dishes
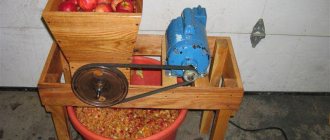
- Homemade lawn mower with an electric motor...
- Washing machine - a toy for girls
- Electrolux washing machine fault repair
- What can be done from an old washing machine
Reader comments
- Share your opinion - leave a comment
DIY time machine for plants
What should summer residents do who live in the city and work on their plots only in the spring-autumn season? The answer is simple, you need to think with your head, as always, and look for a rational solution to this problem.
The author, an avid amateur gardener, decided to invent something new, unknown to ordinary summer residents, a kind of time machine for plants. The name, of course, sounds loud and unusual, but if you take a closer look and figure it out, everything seems to be not difficult at all.
What kind of miracle device is this? Let’s consider the principle of operation and the structure of this machine. This equipment consists of a simple cardboard box, which is covered inside with foil or Mylar film, for maximum reflection of light and heat.
Materials
You can make a car craft for your son with your own hands from the most unexpected material; it depends primarily on the imagination of the parents.
The main and simplest material is paper, but also:
- cardboard box from household appliances and various boxes,
- remains of various lumber,
- cuttings of plumbing pipes,
- toilet paper roll,
- plastic bottles,
- stones can be an excellent material for crafts.
It all depends for what purpose the toy is being made, what age the son is and what material is currently at hand.