Replacing parts
Flickering can also be caused by a malfunction of the power supply, driver, or capacitor. If they cannot be repaired, they need to be replaced. Spare parts are available in offline and online stores.
power unit
The power supply is a voltage source consisting of a bridge rectifier and a current-limiting resistor. The main purpose is to convert current from 220 V to 12 V. Low-power LED spotlights with such power supplies are produced by Chinese manufacturers. If such a unit fails, its elements must be replaced.
Driver
A driver is a current source, a type of power supply. This is a mandatory element of powerful LED spotlights with modules or diodes without current limiters. If the lighting device stops burning, you can replace not only the driver, but also the individual spare parts included in its design.
Matrix
The matrix must be changed immediately if a whole line of LEDs does not work.
The driver cannot determine how many lamps are on, so the same power is supplied to the remaining bars. LEDs overheat due to increased load and quickly stop functioning.
Current limiting capacitor
Capacitors are used to reduce voltage ripple at the output of the converter. They are added when modifying cheap spotlights. The capacitance is calculated, one capacitor is installed after the rectifier, the second is installed at the input after the diode bridge.
Voltage converter circuit board
A printed circuit board is a plate with printed conductors onto which the converter elements are soldered. In an LED spotlight it is rigid, as it is made of aluminum and dielectric. The double design ensures that excess heat is transferred to the radiator.
Causes of malfunctions
The cause of the malfunction is:
- violations of assembly rules at the factory (for example, lack of heat-conducting paste under the LED module);
- incorrect connection;
- voltage drops in the electrical network;
- phase short circuit to zero or housing;
- overheat;
- ingress of water or dirt;
- incorrect setting of the motion sensor (if available);
- violations of operating rules.
If there is at least one reason, the power supply fails (a resistor or capacitor burns out), the LED module or its individual elements. If there is no repair, the lamp cannot function normally.
Spotlight assembly steps
The procedure for creating the finished product is as follows:
LED matrices
- Prepare the case, remove all excess from the old cases to make an empty box, trim the back with foil.
- If necessary, drill holes in the case for ventilation (when installing a radiator or cooler).
- Assemble all the LEDs together into one structure and secure them to the base (board).
- Bring the wires to the contacts and bring them out to the outside of the housing.
- Install the finished structure inside the body and secure it with glue.
- For a powerful spotlight, install the radiator together with the LED board (glue it).
- Pull the wires out and secure them with sealant (this will prevent moisture and dirt from getting inside).
To connect to the network, you must first place the power cables in the right place.
It is important not to reverse the polarity of the wires, otherwise the diodes may burn out or not work. A driver must be installed to stabilize the voltage
The joints of the wires are insulated with corrugation or a plastic cover. The finished structure is fixed on the street.
As a result of such actions, a homemade spotlight with directional lighting and high brightness will be ready. The downside is that with an unstable voltage, the reliability of the product will be lower, since surges can cause diodes to burn out. Mounting two resistors with a resistance of 1 - 2 Ohms will help correct this defect. This will allow you to get a truly high-quality design no worse than those sold in the store.
Features of corn lamp repair
In terms of ease of repair, the LL-CORN series models, that is, corn-type LED lamps, are the most profitable. The diode sources are located directly on the outer surface, which allows the technician to repair LED corn lamps without interfering with the internal structure. If necessary, the LEDs can be ringed and replaced - the technology is similar to the methods for repairing lamps with other designs. A faulty diode should also either be updated or short-circuited with a special jumper. This will not affect the stability of operation and reliability of the LED device, but in aesthetic perception the absence of one of the light sources will be noticeable.
LED matrix circuit
Since the LEDs are connected in series, it only takes one to break the circuit for them all to stop lighting.
LED series connection diagram
LED series connection diagram
A break occurs when the connecting wire burns out due to a significant excess of the rated current.
But there is another reason. Due to manufacturing defects or overheating, the crystal structure is destroyed and breakdown occurs.
The most unpleasant situation is when the contact between the crystal and the connecting wire does not completely burn out, but is broken (temporarily disappears). In this case, the spotlight shines normally for 1-2 days, and then suddenly starts blinking like a strobe light.
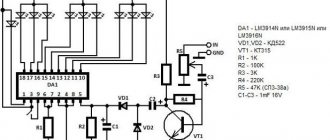
Why do you need a driver for an LED and how to choose it
What will happen to the spotlight if only one LED breaks down? Here is a diagram of a 50-watt matrix connected to a 1.5A current source
In normal mode, all current is distributed evenly between all lines. Each LED carries a nominal current of 300mA.
In the event of a breakdown, only one LED actually shorts out.
Due to the reduced resistance, most of the current flows into the line with the broken element.
This instantly leads to burnout of the connecting wires. After which, the entire line is turned off.
Now a current higher than the nominal current begins to flow through the remaining LEDs - 375 mA. This will certainly cause overheating and another breakdown.
This means that another line will turn off.
And behind her is another one.
And another one. Until they all burn out.
How to replace the matrix on your TV yourself
But unlike this simulation, in reality, the last line does not burn out.
This is because the power supply has overvoltage protection.
The driver increases the voltage to produce a rated current of 1.5A. But due to abnormal LED resistance, the voltage rises above the permissible level.
The protection is triggered and the driver is disabled. Soon the voltage drops and it turns on again. This is where rhythmic blinking occurs.
To be fair, it must be said that these matrices belong to the first generation. Today there are already modified models with modernized drivers.
On them, when one line burns out, the current in the others does not change. True, their price is many times more expensive.
Operating principle of a lamp inverter
The figure below shows a schematic diagram of a lamp inverter. The lamps in it are connected using a capacitive circuit, which guarantees their uniform illumination for a long time and allows you to control the brightness. Transistors Q1, Q2 provide switching on and off of the circuit.
The design of any backlight inverter can be represented in the form of the following blocks. 1 - supplies constant voltage to the autogenerator with transistor switches (4), which controls PWM signals. The functions of the brightness control unit (2) and PWM (3) are usually performed by only one specialized chip. PWM monitors the load in the secondary circuits and, when the lamps are not working, does not allow the autogenerator to begin the process of generating pulses, thereby protecting the transistor switches and the transformer.
The required level of luminous flux is created by cold cathode fluorescent lamps (R) located behind the LCD matrix and uniformly illuminating it.
The lamp inverter performs the following tasks:
When you turn on the TV from the power supply, after two seconds a signal arrives (at a level of 3-5 volts, most often 3.3 V), which allows you to exit the standby mode and the lamp backlight inverter circuit goes into working condition. The controller provides a “soft” start, as well as short circuit protection. If the short circuit lasts more than 1 second, the device turns off. PWM pulses follow to a converter consisting of a semi-bridge generator with self-excitation and thereby enable the operation of the DC/DC converter and the high-voltage voltage necessary for the backlight lamps is generated on the secondary winding of the transformer. In addition, the small winding performs a feedback function in the circuit.
At the moment of starting the CCFL lamps of the backlight inverter, the voltage of the DC-DC converter can reach a level of 1600 V, and only then the inverter will switch to operating mode. A burnt-out lamp, a swollen capacitor in the secondary circuit, or a short circuit in the secondary winding of the transformer will disrupt the generation of pulses.
Diagnostics of lamp backlight of the LCD matrix:
Basically, the input voltage of the LCD LED backlight driver is a constant voltage of 12 volts. The output can vary over a wide range and reach a level of 100 volts and depends primarily on the diagonal of the TV and the number of LEDs used to backlight the screen.
In modern TVs and monitors, if the LED driver malfunctions, the easiest way is to install a universal LED controller, which can be ordered from China for 2-5 green candy wrappers:
The main sign of problems in the backlight inverter of an LCD TV is the absence of a picture when there is sound. Although other less common options are possible:
In LCD TVs with LED backlighting, the diodes themselves most often burn out in the inverter. During repairs, you can replace the entire belt, or check each one individually. For example, in our television matrix there are three strips of LED strips with 7 LEDs each. From the documentation it is clear that their voltage is 70 volts. Divide it by 21 and we get 3.3 volts. We select one with a power of 1 watt and change it.
A quick method for checking LEDs is to apply separate power to each strip, immediately identifying the strip that has faulty backlight LEDs, and then you can test each diode individually, or replace the entire strip.
If all the light-emitting components of the inverter are normal, then the problem is only in the LED driver.
If the image on the LCD monitor or TV screen jerks or distortions appear, the cause of the breakdown may be a malfunction of the LED driver, as well as mechanical damage to the cables or poor contact, or a broken cable. If, when you click on the TV display, the picture temporarily appears or disappears, then the problem is only in the contacts or cable and the LED backlight has nothing to do with it.
The main symptom of the malfunction is that when you turn on the TV, there is sound, but there is no picture. The TV responds well to the remote control and buttons. If you look closely under a good external light source, you will see that there is an image on the matrix. In this case, with almost 100% probability we can say that the LED backlight driver is faulty or the LED in the serial line has burned out.
Probable causes of failure and ways to eliminate them
Current limiting capacitor
So, first of all, you need to determine the cause of the malfunction of your device. If the spotlight turns on, but when turned on does not burn evenly, but flickers and blinks, the current-limiting capacitor C1 has probably failed. Many Chinese manufacturers make the mistake of using a current-limiting capacitor that does not match the parameters of the driver when trying to achieve maximum brightness from a not very powerful spotlight. A current-limiting capacitor at 400 volts rated operating voltage will do just fine.
power unit
Another common cause may be a failed power supply. There are two ways out of the situation - go to an electronics store, where they will help you choose a suitable power supply (its characteristics are indicated on it, therefore it is advisable to disassemble the spotlight and take the unit with you), or select a power supply (may be suitable from a scanner or printer).
The second option is possible, of course, only if you suddenly have unnecessary and non-working office equipment lying around that can serve as a power supply donor. Check the power supplies so that they are similar in parameters. An exact match is not necessary, but the parameters should not diverge too much. As mentioned earlier, if you have the skills to use tools and understand electronics, you can easily change the power supply yourself.
Driver
If a low-power spotlight needs repair, it is likely that it may not have its own power supply, and the function of changing currents in it is performed by the LED driver. Since the LED cannot be powered directly from the network, requiring an alternating current that differs from what the network can offer it, the spotlight uses a driver that takes into account the variation in the characteristics of the LED depending on the operating temperature and time, adjusting the output current supplied to the LED . It is this driver that can fail.
To replace it, you will need to disassemble the LED spotlight and find out the driver markings in order to buy or order a replacement. If you are a confident user of power tools, you can find a failed driver element and unsolder it and replace it. If you are repairing a DIY LED floodlight, most likely it will be quite easy for you to find the problem in the driver or find a similar driver and make a replacement. It will definitely be cheaper than buying or assembling a new spotlight from scratch.
Matrix burnout
Another option for failure of the design of your LED spotlight, in addition to a malfunction of the driver, power supply or other small elements involved in the current conversion process, may be the burnout of the LED matrix itself. If the LED itself fails, you need to find and purchase a diode with similar characteristics. After disassembling the spotlight, you will need to carefully uninstall the burnt matrix by unscrewing the four fastening screws and unsoldering the conductive elements. Then you will need to evenly and carefully apply a layer of thermal paste to the new diode, solder the current-carrying elements and carefully screw the matrix. It is necessary to take into account that the shape of the matrix must remain intact, that is, it is advisable to use the same screws that were originally used. They should not have conical heads, because if you use them, if you tighten them with a little more force, they can damage the matrix and all your work will be in vain.
The spotlight stopped burning - how to fix it?
First of all, in this situation, you should check whether the device driver is receiving power with a voltage of 220 V. If this is all right, you should first diagnose and repair the driver. It can be checked without connecting an LED by applying electric current to the input. If the device is working correctly, measuring the output with a multimeter should show a DC voltage that will be slightly above the rated limit. For example, for a driver with an output voltage of 28-38 volts, when running idle, the multimeter will show ~40 volts. This is explained by the fact that an increase in load resistance (due to idle operation) leads to an increase in voltage.
However, this method does not help to accurately check all drivers. There are blocks that, in good condition, will either produce illogical data or will not start at all. In such a situation, a load resistor that simulates the consumption of an LED will help you check the device. It must be selected in accordance with the characteristics of the driver. For example, with a DC output current of 23-35V 600 mA, the resistor resistance should be in the range from 23/0.6 = 38 Ohms to 35/0.6 = 58 Ohms.
If the output voltage with the load resistor connected meets the specifications, the driver operates correctly.
The easiest way to repair an LED floodlight if the driver has failed is to replace this component. You can purchase a suitable model not only in specialized stores, but also on the Internet. For example, Aliexpress offers a wide variety of spare parts, although you need to be very careful there to choose a quality product (sometimes even the sellers themselves have little understanding of the issue). Sometimes suitable drivers can be found from craftsmen who professionally repair floodlights. And if the LED spotlight was made from diodes with your own hands, then understanding its structure and fixing the problem will be even easier than buying or assembling a new one.
How to select a driver if the power of the LED module is unknown
Many hobbyists have situations when it is necessary to work with a spotlight, the power, current and voltage of the LED chip in which are unknown. Accordingly, in such a situation it is more difficult to select a replacement and driver.
Here you need to count the number of diodes in the LED matrix and add up their indicators. Such LED modules use diodes with a voltage of 3 V, a current of 300-330 mA and a power of 1 W. Accordingly, the total matrix voltage is 27 V with a current of 300 mA (when connected in series). Accordingly, a driver with an output voltage of 20-36 V is required for operation.
Let's give an example with a more complex matrix, which consists of two parallel-connected rows of diodes. Each row has a voltage of approximately 30 V with a current of 300 mA. Due to the parallel connection, the driver must have an output of 30 volts and 600 mA.
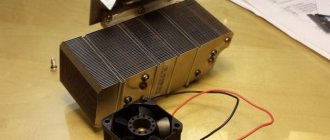
LED spotlight repair
To improve heat transfer, it is necessary to sand the two adjacent surfaces with P1500 grit sandpaper.
Then spread a thin layer of thermal paste. Excess paste will squeeze out on its own when heated or over time. The main thing is that there are no air bubbles inside.
Sergey ordered a 50 W LED on Aliexpress. It operates at 30-36V and consumes 1500mA during operation.
The luminous flux from it is 90-120 Lm/W. The color temperature of the light flux is 6000-6500 K, and the operating time is 100,000 hours. Good Chinese LED module.
When installing, the LED module can be slightly rubbed against the heatsink, because this makes it easier for excess thermal paste to come out.
When soldering an LED, remember that it is afraid of overheating, so solder quickly and accurately.
After repair, when assembling the protected LED spotlight, make sure that the rubber gaskets fit. Then the spotlight will work for a long time and reliably even for street lighting purposes.
Main conclusions
Not everyone can fix an LED spotlight. To perform repairs you need:
- knowledge in electrical engineering;
- ability to read diagrams;
- Skills in using a multimeter and soldering iron.
We've covered how to test components, and soldering requires focus and patience. It is advisable to carry out repairs yourself if for some reason it is impossible to buy a new device or restoration allows you to save money. Experts say that buying spare parts is on average up to 50% cheaper than purchasing a new spotlight. The exception is situations in which the LED module needs to be replaced.
Previous
FloodlightsSolar powered LED floodlight: free outdoor lighting
Next
FloodlightsHow to choose an LED floodlight with a motion sensor
Checking the LED matrix
To check the operation of the matrix, it is recommended to use laboratory power supplies. In this case, it is necessary to supply less voltage than is required for the operation of this unit. After this, it will be necessary to measure the current indicators, that is, find out how much of it our device is currently consuming. If there are no malfunctions in this case, the matrix should light up. Upon completion of this procedure, it is necessary to gradually increase the voltage supplied to the matrix to nominal values. When the matrix flares up to full power, then we can assume that this piece of equipment is working. Many people involved in such work miss important points that are associated with the correct installation of various parts, which over time leads to breakdown.
Connection diagram of the LED matrix.
If the LED burns out
If the power supply is working normally, then it makes sense to look for the problem among the LEDs. Before repairing LEDs by replacing non-working elements, you should check which diode requires updating. To do this, you need to use a 9 V battery and use a resistor (resistance 1 kOhm) to check all the diodes one by one.
When a defect is detected, you need to close its outputs. As a rule, the connection of sources is carried out according to the chain principle, so short-circuiting one of them will not lead to loss of function by other elements - perhaps their light will be even brighter. At this stage, repairing LED lamps with your own hands is impossible without a soldering iron. All old diodes are soldered off, after which the board is turned over - then new elements are soldered to the contact tracks.
LED spotlight design and typical faults
An LED spotlight (LED) is a bright lighting device consisting of:
- LED emitting light;
- driver that controls the operation of the device;
- housings;
- a diffuser that increases the efficiency of the device;
- lenses that determine the shape, color and other parameters of the light flux.
The most common malfunctions in the spotlight are driver failure or LED burnout. The latter greatly lose brightness or burn out due to the fact that the thermal energy they generate is poorly removed into the atmosphere. This problem is typical for budget manufacturers who skimp on radiators.
Combustion or unstable operation of the driver is a problem typical for Chinese-made floodlights, in which manufacturers also save on literally everything. However, using these products can be beneficial if you know how to organize electronics. Chinese spotlights are very cheap and work well after the driver has been restored.
Solving driver problems
Driver problems are a fairly common problem with LED lamps. Most often, a resistor or capacitor burns in the driver.
Using the measuring instruments available to the home craftsman, it is quite problematic to determine the level of performance of this element. Therefore, it is recommended to simply replace it with a working one with similar parameters.
The reasons why a capacitor fails may be an initial manufacturing defect or regular overheating of the module as a result of poor-quality heat dissipation.
It is not always possible to find a suitable part in lighting stores. It is better to immediately go to the radio market or to a place where radio electronics are sold and try to find the thing you need there.
When it is purchased, you will need to dismantle the faulty unit and put a working element in its place.
To correctly disassemble and repair LED light bulbs, you do not need complex, expensive equipment. A minimal set of simple tools will help you troubleshoot problems.
A multimeter will allow you to check the presence of voltage in the circuit, make it possible to detect the presence of breaks and show how efficient the remaining parts of the circuit are.
A multimeter is a universal device designed to measure the main basic parameters of various electronic products. With its help you can find out what condition the LEDs of any LED product are in.
The heating temperature at the time of soldering should not exceed 260°. A simple soldering iron heats up more, so you need to wind a piece of copper wire with a cross-section of no more than 4 mm onto its tip in a tight spiral. The more you can lengthen the tip, the lower its operating temperature will be.
A soldering device with rosin and solder will be required to repair breaks found in the circuit and subsequently replace damaged parts and elements.
With a small screwdriver you can carefully separate the control elements from the lamp body, and with a thin, durable stationery knife you can delicately detach the parts from the circuit board.
Users also often encounter problems such as blinking light bulbs and burning lamps when the switch is off. What causes these malfunctions and how to eliminate them we discussed in our other articles:
- Why LED lights blink: troubleshooting + how to fix
- Why LED lamps burn when the switch is off: reasons and solutions
Electrical circuit of LED floodlight
The photo shows a typical electrical circuit of an LED spotlight driver. The operating principle of any spotlight driver circuit is the same.
Voltage from the household network is supplied to the driver input through fuse F1, filtered using LC elements and rectified by a diode bridge. Next it is smoothed out by electrolytic capacitor C13. A DC voltage of about 280 V is created at the capacitor terminals.
From capacitor C13, voltage is supplied through current-limiting resistors to zener diode D12 and pin 6 of the microcircuit. The zener diode provides power to the microcircuit with a voltage of 9 V, which is the reference for the operation of the driver as a whole. From capacitor C13, voltage is also supplied through the winding of transformer T1.1 to the output of field-effect transistor Q1 operating in switch mode.
The driver works as follows. From pin 5 of the microcircuit, high-frequency pulses are sent to the gate of transistor Q1, due to which the resistance between its drain and source becomes close to zero. At this moment, a current passes through the primary winding of the transformer, due to which voltage appears on the secondary winding. It is rectified by the high-speed diode SF28 and smoothed by the electrolytic capacitor SC1. The amount of current flowing through the LED matrix is determined by the resistance value of the resistors installed from pin 3 of the microcircuit to the common wire.
The most common ones that fail are electrolytic capacitors (they are easy to identify by their appearance - they are swollen), bridge rectifier diodes, a field-effect transistor, a high-frequency diode and a zener diode (if it breaks, the microcircuit fails).
The reason for the burnout of the LED matrix in the spotlight
Typically, LED matrices fail due to overheating. I decided to figure out why the LED matrix in this spotlight, despite the thick-walled duralumin body, which is also a radiator, burned out.
The first thing that caught my eye was that the matrix was secured with two screws, and not four, which is provided for by its design. The screw heads were conical, which could lead to deformation of the matrix substrate if the screws were tightened too tightly.
After unsoldering the current-carrying conductors and unscrewing the screws, the matrix was easily separated from the spotlight body. The photo shows the appearance. Recesses in the corners of the substrate instead of holes reduce the likelihood of it being evenly pressed against the radiator.
The reason for the burnout of the LED matrix became obvious after examining its reverse side. The area of the substrate opposite the burned-out area with LEDs was not covered with heat-conducting paste, although the paste on the body of the spotlight was applied evenly.
Typically, the section of the radiator to which the fuel element is pressed is ground. In the spotlight, this rule is doubly violated, since the area of the body to which the LED matrix is pressed is not polished, and is also painted with shagreen paint, which significantly reduces heat removal from the matrix.
Based on the above, we can conclude that the LED matrix failed due to overheating due to its poor pressing to the spotlight body during assembly.
Before installing the matrix into the spotlight body, the contact area was sanded with sandpaper until the aluminum and aluminum shined.
The easiest way to check a lamp's LED circuit
Let's look at the easiest method for checking an LED circuit. First, fix the lamp using a cut plastic bottle with a smaller diameter. The lamp is inserted into it. To supply power, use an auxiliary power supply (if we are talking about a 12 or 24 V device).
Instead of ringing every LED in the circuit, you can resort to a simpler method. In turn, install a jumper between the contacts of each diode using tweezers. If there is no jumper, then take any wire, first stripping both ends and tinning the contacts.
It is important that the lamp is connected to the network at this moment. As soon as you close the contacts on the burnt out LED, the device will light up. If this does not happen, then more than one diode may have burned out.
Continue visual inspection of the circuit and look for burnouts, swollen capacitors, and examine each trace on the board. If broken contacts are found, perform soldering. If the circuit consists of 10 or fewer elements, then under no circumstances replace a burnt-out LED with a wire or jumper. This can overload the coils and burn out the diodes.
Eliminating flickering LED spotlights
Sooner or later, every owner of an LED floodlight faces the problem of flickering. The reason for this behavior may be improper operation of electronic components or loss of performance of LEDs. In this section we look at how to repair an LED floodlight with a power of 10 W. This power is most common, and the general design of the devices is similar, so the solution to the problem is universal.
The LED is a matrix of 9 crystals, each of which has a power of 1 W. These crystals are connected in three sequential circuits and filled with phosphor - a substance that converts the received energy into light. A 10 W LED consists of three lines of crystals, which are connected in parallel to the power coming from the driver.
Burning out one of the crystals in the LED will cause it to blink during operation. The nature of blinking can be either periodic, with equal pauses, or chaotic. For various reasons, matrix combustion can lead to a complete shutdown of the LED element, or to the failure of one or two lines of crystals.
Why does the matrix blink or does not light up when it burns out?
The crystals, filled with phosphor, are connected to each other by leads, which in the case of high-quality products are made of gold, and in budget devices - of copper. Heating the matrix and connecting contacts too much causes these filaments to peel off from the crystals. Therefore, the entire matrix or part of it is turned off. After cooling, the thread returns to its original position and work resumes. After reheating to a critical point, the contact is interrupted again and the matrix goes out. This cycle continues endlessly during operation, and to the observer it looks like a flashing lamp. Complete LED failure occurs when one of the filaments overheats so much that it falls off the crystal.
Knowing about this behavior, you can check the condition of the matrix of diode spotlights with your own hands. To do this, you need to arm yourself with a not too sharp object and press on those places in the matrix where the connecting threads pass. Of course, the spotlight must be on at this time. If the device lights up when pressing on one of the paths, the problem has been found. In this case, all that remains is to correctly replace the damaged chip.
This happens because the crystals are connected in a parallel-series matrix, and the power from the driver is supplied in the form of direct current. Therefore, after one line burns out, the remaining two receive a current strength 1.5 times higher than the rated one. Working under increased load leads to even greater heating of the matrix and rapid combustion of other threads.
Repairing the matrix
Replacing an LED when the crystals on the matrix burn out is not an overly complicated procedure. After purchasing a component with similar characteristics and the special thermal paste required for installation, you need to:
- Disassemble the spotlight body by unscrewing the mounting bolts on the body.
- Remove the lens or glass.
- Remove the diffuser.
- Unscrew the matrix mounting screws and carefully unsolder the conductive leads. A non-contact soldering station with a hot air gun is best suited for this.
- Lubricate the new LED with thermal paste.
- Solder the contact pins of the LED and screw the fasteners back on.
When connecting an LED, it is extremely important to maintain the polarity of the terminals. Experienced installers also recommend replacing the wiring when replacing an LED in inexpensive Chinese floodlights
Manufacturers, as a rule, use material with a minimum cross-section, which is not entirely reliable. In this case, it is better to use heat shrink tubes. They retain their insulating properties even when exposed to heat emanating from the diode.
Upgrading the lamp during repairs
There is little good in the fact of repair, but forced intervention in the device provides some advantages. In addition to the fact that a beginner can learn how to repair an LED lamp without the help of specialists, it makes sense to use this opportunity to improve the quality of the lamp. For example, during repairs it is worth experimenting with LED diodes. Often, boards and the housing itself with a heat-dissipating function are not suitable for “native” LEDs - as a result, with a more or less high-quality base of the device, the light sources do not reach the possible maximum in radiation characteristics. Therefore, in some cases it is worth completely updating all diodes.
The opposite situation is also common, when the base itself lacks a capacitor and a rectifier. As a rule, this defect is caused by Chinese lamps, which implement a series connection of pairs of “counter” diodes with a ballast capacitor, which leads to frequent blinking. Of course, repairing LED lamps will eliminate this flaw, but such revisions of circuits at home will not ensure the durability of the device, although the quality of lighting will undoubtedly increase.
Article on LED driver circuits and their repair
Sasha, hello.
Your site is very good. I would like to share the diagrams of some electronic devices that I copied from the devices themselves.
In particular, on the topic of lighting - diagrams of two modules from automotive LED spotlights with a voltage of 12V. At the same time, I want to ask you and the readers a few questions about the components of these modules.
I am not good at writing articles; I write about my experience in repairing some electronic devices (this is mainly power electronics) only on forums, answering questions from forum participants. There I also share diagrams that I copied from devices that I had to repair. I hope the LED driver diagrams I drew will help readers with repairs.
I paid attention to the circuits of these two LED drivers because they are simple, like a scooter, and very easy to repeat with your own hands. If there were no questions with the driver of the YF-053CREE-40W module, then there are several of them regarding the circuit topology of the second module of the LED spotlight TH-T0440C
Diagnostics
Before starting repairs with your own hands, you need to check the wiring for kinks and burnt insulation to make sure that there are no wire breaks. It is also advisable to carefully inspect the case in order to identify cracks, deformations, and chips. It may turn out that the problem will be solved by eliminating these problems; you will not need to think about how to disassemble the LED spotlight and determine why it stopped working.
Diagnostic sequence after opening the case:
- checking the integrity of the lamps in the module;
- measuring the input voltage with a multimeter (must be 220 V)
- output voltage measurement (DC 12 W).
If there is no voltage at the input, you need to look for burnt-out driver parts, oxidized contacts, or cracks in the coating. If the board and the elements soldered to it are in order, the functionality of the module must be checked. It stops functioning if several LEDs burn out.
Spotlight repair
Eliminating broken wiring does not create problems for most home craftsmen. Repairing internal elements is much more difficult. A certain amount of knowledge, experience in similar work and the availability of diagnostic instruments and a soldering iron are required.
You can repair or replace:
- power unit;
- capacitor;
- matrix (SMD diodes);
- driver.
Diodes in LED spotlights are:
- COB – when combined, you can get a power of up to 50 W, the disadvantage is the relatively high cost;
- SMD – the most affordable price, no complex heat removal system required;
- powerful - 350 mA (1.3.5 watts).
The latter type is gradually being replaced by COB diodes.
Low power
To repair an LED spotlight with your own hands, you need:
- disconnect the device from the power supply;
- remove from fastenings;
- unscrew the bolts that secure the glass;
- remove glass;
- remove the diffuser;
- inspect the matrix and ring the converter elements.
Reference! It is possible to disassemble and repair with your own hands even a non-separable spotlight. The glass is removed after heating with a hair dryer.
Powerful model
The powerful LED spotlight also needs to be disassembled and the parts on the board inspected. Their failure is indicated by the presence of deformation or carbon deposits. It is advisable to ring the resistors, capacitors, transformer. Repairing LED spotlights is the same as repairing small lanterns due to their similar design.
How to choose a driver if the power of the LED module is unknown
There are 2 types of drivers offered in stores:
- designed for any number of LEDs;
- designed for a strictly defined number of lamps.
The driver can be equipped with a resistor and capacitor or a low voltage input.
To replace it, you need to know the power of the LED module (most often it is not indicated). It is known that the power of an individual diode is 1 W, the current is 300-340 mA. If the module consists of 9 light bulbs connected in series, its power is 27 volts. This means that you need to buy a converter with the same voltage and current of 27 V.
Algorithm of actions during repair
So, the algorithm of actions will be as follows:
- First, you need to unfasten the cover of the device to ensure that you can work with the internal mechanism.
- Then you need to remove the glass protection and light diffuser.
- Then you should unsolder the LED source from the matrix.
- And finally, solder it to a new, already operational crystal panel.
After carrying out the above steps, securely fasten each bolt and check the spotlight with a multimeter. If the test shows the working position, then the flashlight can be mounted in its original place and enjoy its operation.
It is important to note that when installing a new matrix, the polarity must be observed.
In the same way, you can repair a 220-volt LED spotlight with your own hands. Beginners should also know that after troubleshooting is completed, they must proceed in reverse order. By the way, it is possible to identify problems during operation by the following signs:
- flashing light;
- insulation violation;
- wire deformation;
- changing LED shades;
- dim burning.
LED spotlight design and common faults
Regardless of the type of LEDs, shape and size, their structure is unchanged:
- frame;
- lens and reflector;
- LED matrix (SMD diodes) with a radiator (sometimes a fan);
- driver (printed circuit board with transistors, capacitors, zener diode, bridge rectifier);
- wire terminals;
- fastening elements.
The housing can be made of steel, aluminum or plastic. Lenses and reflectors shape the angle of light flow. In order for the equipment to serve for a long time, the temperature should not exceed +80°C. The fulfillment of this condition is ensured by a radiator (rectangular or round) made of aluminum or ceramic-aluminum material and thermal paste at the installation site of the light bulbs. If the power of the LED spotlight exceeds 100 watts (W), the radiator is replaced with a fan.
Elements that provide light supply: LED module (diodes soldered to the substrate) and driver. The number of LEDs can reach several dozen (the bulbs are connected in series-parallel). The module has 2 outputs: plus and minus.
To stabilize the current, a driver is used (in street lighting fixtures it is filled with sealant). A voltage of 220 V (volts) is supplied to it, and a voltage comes out with a value determined by the manufacturer for a specific type of diode.
Preparing for repairs and what is required for this
You need to prepare everything you need for work. Some items may be on hand, others will have to be purchased, but this will not cost much. List of tools and accessories:
- A small soldering iron with a small tip. The contacts in the lamps are small, so the standard option will not work. It is best to buy a special model with different types of tips (flat and point). We must not forget about the materials for soldering - solder, rosin, etc.
Soldering iron with a thin tip and USB charging - Set of tweezers. The tool store sells sets of tweezers for small jobs; they have devices of suitable shapes and sizes.
- Holder for a lamp or other unit (the so-called “third hand”). A good solution is a device with a magnifying glass to simplify the work. You can adapt available elements - cut off a plastic bottle or pick up something else.
- Small gas burner. Models from tobacco kiosks that are used to light cigars are suitable. If you can’t find such a device, buy a so-called “turbo lighter” that does not go out from the wind.
- A set of screwdrivers of different sizes to remove and disassemble the lamp. Most often, Phillips-head screws are used as fasteners.
Set of tools for repair.
Some fixtures use hex head screws, so you may also need a set of wrenches. Repairing LED lamps is a scrupulous job, since the products contain many small parts, and if handled carelessly, they can be damaged.
Where to buy drivers for LEDs
The cost of the driver can reach 300 rubles and more
Selling companies offer a huge range of drivers for LEDs, the technical characteristics and prices of which can be seen in the price lists. As a rule, product prices are indicative and are specified when ordering from the project manager. The range includes converters of various powers and degrees of protection, used for external and internal lighting, as well as for illumination and tuning of cars.
When choosing a driver, you should take into account the conditions of its use and the power consumption of the LED design. Therefore, it is necessary to purchase a driver before purchasing LEDs
So, before you buy a driver for 12 volt LEDs, you need to take into account that it should have a power reserve of about 25-30%. This is necessary in order to reduce the risk of damage or complete failure of the device due to a short circuit or voltage surges in the network
The cost of the converter depends on the number of devices purchased, form of payment and delivery time.
The table shows the main parameters and dimensions of 12 volt voltage stabilizers for LEDs, indicating their estimated price:
| Modification LD DC/AC 12 V | Dimensions, mm (h/w/d) | Output current, A | Power, W | price, rub. |
| 1x1W 3-4VDC 0.3A MR11 | 8/25/12 | 0,3 | 1x1 | 73 |
| 3x1W 9-12VDC 0.3A MR11 | 8/25/12 | 0,3 | 3x1 | 114 |
| 3x1W 9-12VDC 0.3A MR16 | 12/28/18 | 0,3 | 3x1 | 35 |
| 5-7x1W 15-24VDC 0.3A | 12/14/14 | 0,3 | 5-7x1 | 80 |
| 10W 21-40V 0.3A AR111 | 21/30 | 0,3 | 10 | 338 |
| 12W 21-40V 0.3A AR11 | 18/30/22 | 0,3 | 12 | 321 |
| 3x2W 9-12VDC 0.4A MR16 | 12/28/18 | 0,4 | 3x2 | 18 |
| 3x2W 9-12VDC 0.45A | 12/14/14 | 0,45 | 3x2 | 54 |