You can buy almost everything today. But it’s quite difficult to find a wooden barrel that’s really high-quality and solid, and it’s also expensive. There is one more point that not everyone takes into account - it is not a fact that the finished barrel will be suitable for a specific purpose. The reason is the mismatch of wood species. The conclusion is clear - make the barrel yourself. And if you understand the drawings and nuances of the work in detail, then it will not turn out to be in any way complicated or impossible to do with your own hands.
Cooperation craft - how to become a master
If you are in a decisive mood, have skills in woodworking, and your hands are always growing, why not try to realize the idea of becoming a home cooper (cooper)? Cooperation is a difficult craft that comes from ancient times. Nowadays there are very few masters of this craft, and there are only a few highly qualified craftsmen. Therefore, cooperage products are rare on the market, and even if you can find them, either the price or quality does not please the buyer.
Barrel assembly process
How to achieve mastery?
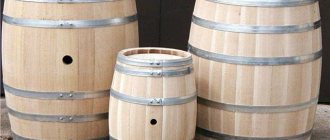
Wooden barrel
If you are determined to achieve your goal and are not afraid that you will have to modify the product to the desired state, then you can make your dream come true and make a wooden barrel yourself. Cooperation is a difficult profession that came to us from past centuries. Today there are few masters of this craft, and there are even fewer highly qualified specialists in the manufacture of barrels, so barrels on free sale are rare, and not everyone can afford the cost of the product.
What tools are needed to assemble barrels?
Having decided to make your first barrel, keg or tub, you need to equip your workplace and stock up on the necessary tools, fixtures, and available materials. In addition to the usual carpentry kit, you will need to stock up on special cooperage equipment, fixtures and tools. This:
- carpentry workbench equipped for cooperage;
- cooper's long jointer, circular humpback plane;
- a device for planing the edges of the boards from which the product is assembled);
- devices for tightening rivets (frame machine-gate, chain tie, post gate);
- plow, stapler, stapler;
- hand-made patterns and templates;
- metal or wooden clamps for assembling the barrel frame;
- morning maker (a device for cutting a morning groove into which the bottom of the product is inserted);
- heels (metal, wood, combined), tension for hoop;
- cooper's bracket.
Fixtures and measuring instruments
It should be taken into account that coopers make a significant part of the devices and tools themselves, “to suit themselves”, ensuring that the handles of the tools are held in the palm like a glove, and that the machines and workbenches are of the same height.
On the left is a two-handed, on the right is a one-handed morning drill and how to work with it
Roasting an oak barrel
- Place the barrel on its side and place fruit tree shavings in it
- Set it on fire
- Roll slowly from side to side so that smoldering occurs evenly
- Do not fan the fire inside, the barrel should be charred, not burned
- Do not use lighter fluid!
Barrel firing option
Process with a tool - grinding, cut off uneven ends, drill a filler hole.
In order to start using a barrel, it is soaked and steamed, read the article on how to prepare an oak barrel for the first use.
Watch a video of how an oak barrel is made.
What you need to know to make cooperage products
A distinctive feature of cooper's ware is that it is assembled from wooden planks prepared in a special way, called rivets (otherwise known as frets). The shape and dimensions of the product are completely determined by the configuration of the planks, which are pre-made by the cooper. And the consumer qualities of wooden containers depend on the type of wood used.
Therefore, it is not enough for a cooper to simply be able to master the tools perfectly. He must feel the “soul” of the tree and know the properties of each type of wood from which he plans to make this or that household item.
Staves are the main element for making a barrel
An experienced cooper will not make an oak barrel for storing honey - when stored in it, the honey will darken and acquire an unusual aroma. But oak barrels are indispensable for aging wine and other alcoholic beverages: oak wood gives them new aromas and flavor shades.
The second element, without which cooperage products are unthinkable, is a hoop that holds the elements, tightens them tightly, thanks to which wooden barrels do not leak. Hoops are made of metal and wood. There is an opinion that metal hoops are stronger, and the hassle of making them is much less than with wooden ones. However, some craftsmen think differently and make the most beautiful products using wooden hoops.
Planter on wooden hoops
The procedure for calculating barrel parameters
Based on its purpose and installation location, dimensions and design features are selected. There is some confusion with the concepts in everyday life. In principle, both a tub and a barrel are containers of a certain capacity that are assembled by hand from separate boards (rivets, frets in the language of professionals). The only difference is in geometry. The pictures explain everything well.
What is defined for a drawing:
- Barrel height
- Diameters (large and small).
- The bending angle of the rivets and their number.
To simplify calculations, it is advisable to focus on standard data that is used by specialists when drawing up drawings of barrels.
Main details and manufacturing principle
It may seem that the task of becoming an amateur cooper is too difficult, and one can only quietly dream about how to make a barrel out of wood. But if you're serious about making your dream come true, it's time to roll up your sleeves.
First of all, you need to choose the type of product that will become your first-born. With all their diversity, there are three types: with a conical, parabolic and cylindrical frame. As already mentioned, the shape of a cooper's product is completely determined by the configuration of the staves from which it is assembled - the more complex the shape, the more difficult it is to make the treasured wooden barrel.
Impact of configuration on product type
The figure above shows the types of cooperage utensils and the corresponding types of staves:
- Grooved, made in the form of a quadrangle, the long sides of which have the form of parabolic curves. Used in the manufacture of cooperage utensils with convex sides: barrels, kegs. Such rivets are the most difficult to make, which determines the complexity of making barrels in general.
- The base of the container is a cylinder. They are easy to manufacture because they are rectangular grooved boards. It is easy to make such frets, but it is difficult to connect them with hoops with a constant diameter. When the wood dries out, the hoops no longer hold the rivets. Therefore, cylindrical cooperage products are practically never found.
- Utensils are made from straight grooved frets in the shape of an elongated trapezoid, the frame of which is a truncated cone. When the hoop is stuffed onto the wide part of such containers, a very strong tightening of the rivets is achieved. This feature has found application in the manufacture of various tubs, tubs, and jugs.
A mini-bath is built using the same principle.
For the first experiment, it is advisable to choose the manufacture of a small tub, commonly called a barrel.
What types of flowerpots are there?
They can be outdoor or garden; they differ in the manufacturing method and materials used. The principle of operation is to place the main pot with the plant inside the decorative shell.
Kinds
Outdoor pots are divided by:
- form;
- material.
The shape of the shell can be different: round, square, oval and irregular (polygonal).
Materials
Pot stands can be made from plastic, metal, foam, stone, wood, and even cast from concrete.
Stone and wood are natural materials, so their use is advisable when creating landscape design for a private area with an architectural structure made of wood and stone.
To extend its service life, wood should be treated with antiseptic compounds. To give an aesthetic appearance to stone structures, surfaces can be coated with wet-effect impregnations and varnishes that give a glossy or matte shine to the structure.
Metal flowerpots for the garden are purchased in stores and have different shapes. The most diverse of them are forged multi-tiered structures in the form of flower petals, butterfly wings, on which flower pots are installed.
Forged containers include simple containers painted in different colors.
In addition, the stands can be cast yourself from concrete mortar. The laboriousness of the process pays off in the result: the manufactured products can be decorated to your taste, decorating the walls with paintings, ornaments, and various images.
How to make a country tub for pickles
A tub is the simplest cooperage product with a conical frame. Having achieved success in building a tub, you can try on how to make a more complex barrel at home. The creation process consists of three large stages:
- production of blanks (components) of the product;
- assembly of the structure;
- finishing.
Planter for beginners
Wood selection
The first important task is to choose the right type of wood for making the container. Let's look at the main varieties used, as well as their pros and cons.
First on our list is oak. It is rightfully considered the most suitable, so to speak, classic material used in cooperage.
Its wood is strong, flexible and rich in special tannins that act as an antiseptic. It is noteworthy that under the influence of moisture, oak barrels only become stronger over the years, so their service life is quite long. Another feature of oak is the pleasant aroma with notes of vanilla, which it gives to the substances stored in the barrel.
Oak is the best material for barrels
Spruce and pine can also be used to make barrels. These are soft woods that are easy to cut and process, but their strength indicators are average. The main disadvantage of such wood is its characteristic resinous smell, which is why it is not often used to create containers for food.
Of the coniferous species, cedar is also popular in cooperage, although it is more widely used in those areas where its plantings are extensive. Its characteristics are similar to pine and spruce, but there is practically no foreign odor from cedar barrels. Containers made of this material are suitable for storing food; it is believed that it is especially good to store dairy products in them.
Another material from which a barrel can be made is linden wood. It is a fibrous wood and, due to its structure, lends itself well to cutting, chiseling and processing. The material is durable, practically does not dry out and has no odor, so barrels made from it have won recognition as one of the best for transporting and storing honey, caviar, pickles and other delicacies.
A budget-friendly but durable option is aspen.
This tree is durable, resistant to moisture and has antiseptic properties. Aspen barrels are ideal for storing various pickles. A feature of aspen is its tendency to swell greatly, but in cooperage this is rather an advantage, since it allows for very tight closure of the staves.
Independent preparation of rivets for the tub
The reliability and durability of a wooden barrel depends on how carefully the rivets are prepared. The most suitable are considered to be blanks chopped with an ax from logs and logs of sawn wood. Only the lower part of old tree trunks is suitable for this.
Oak wood, most often used to make barrels, is very durable. But oak logs (blocks) are quite easily split with an ax in the radial direction. In general, the process of preparing staves from different trees is approximately the same. There are single-row and double-row pruning methods. The single-row one is suitable for splitting thin logs, the two-row one is suitable for massive logs.
Double-row punching of blanks
The procedure for cutting rivets from a ridge:
- Split the ridge into 2 parts so that the split line passes exactly through its center.
- Also split each block in half - you get quadruples.
- Split the quadruples into 2 parts, obtaining octagons. For a thin block of wood, the pricking process usually ends here. It is the eighth part that will serve as a rough blank for future riveting. This is a single-row prick.
- If the ridge is thick, make a two-row split: split each octagon in half along the annual ring (perpendicular to the medullary rays). The resulting logs are called gnatinniki.
- Split each gnatinnik in the radial direction. In this case, you will get 1-2 riveted blanks from the smaller one and 2-5 blanks from the larger one.
- Perform a small processing of the workpieces: cut off the wedge-shaped protrusions from the core side and the sapwood (frail young wood from the bark side).
- Send the workpieces to dry. In summer, they need to be dried in the open air for at least 3 months or resort to artificial drying.
Sequence of making rivets
Stages of making barrels
Modern capabilities make it possible to automate almost any production process. However, the manufacture of barrels can be done manually, without the use of chemicals or welding. Everything we need was given by nature itself.
First you need to decide on the optimal type of wood. To this day, the production of oak barrels remains the most popular. This is the material most often used by skilled coopers.
In general, the process of making barrels is complex only at the stage of creating blanks. The following work will be required:
- production of rivets; drying; hydrothermal treatment.
At the initial stage, splitting of oak blocks occurs.
After this, they are split into separate sectors, from which the rivets themselves are subsequently produced. Thanks to this technology, it is possible to achieve more attractive material characteristics compared to sawn analogues. Therefore, skilled professionals support the production of wooden barrels using traditional methods.
Finished rivets are stored outdoors for about two years.
Since oak barrels are made with a long service life in mind, it is necessary to make the material resistant to the negative effects of various factors. Long-term preparation of rivets helps prevent future deformation of the barrel, the appearance of cracks and chips, and rotting. The result is a high-quality and durable material, which is also easy to process.
Before assembling the frame, the barrel production technology involves softening the rivets, which become very hard over a long drying period. To do this, the workpieces are heated and moistened. This scheme eliminates possible breakage of the rivets during the bending process.
To bend the frame, use a grill with an open fire, on which the material is heated for just over half an hour. The advantage of this method of heat treatment is the “awakening” of the aroma of wood, since under the influence of open fire the sugar contained in the preparations is caramelized. Next comes installation of the bottom and scraping.
Making rivets from blanks
Before making rivets, it is necessary to make templates and patterns in accordance with the shape and dimensions of a particular product.
To make rivets for a tub or barrel, you need:
- Make markings.
- Perform rough processing of each riveted blank: slightly round the outer surface and bevel the edges with an ax.
- Start finishing the outer surface with a straight plow or planer, controlling the process with a template.
- Plan the inner side with a fillet or humpback staple.
- Use an ax to trim the narrow edges of the frets, checking the accuracy with a template.
- Level the surface of the edges with a jointer.
To determine the required number of rivets, you need to find the largest perimeter of the tub: multiply the diameter by 3.14. This value will be equal to the sum of the widths of all elements. For simplicity, so as not to have to measure the width of each part (and it can vary), you can lay out a straight line segment on a flat surface equal to the largest perimeter of the barrel. Lay the finished rivets across the line until it is closed.
Sheet metal hoop
Making a hoop
Another detail is the hoop. It helps to connect all the rivets, creating a single whole; stainless steel is used to make the hoop.
Modern barrels have three hoops:
- Farts (closer to the center)
- Morning (closer to the edge)
- Neck (if the barrel has a large volume, additionally placed between the first two)
The size of the hoop depends on the volume of the container (thickness*width):
- Up to 25 l – 1.6mm*3cm
- 25 – 50 l – 1.6mm*3.6cm
- Up to 100 l – 1.6mm*4-4.5cm
- 120 l or more – 1.8*5cm
Stainless steel hoops for barrels
You will need temporary metal hoops, which are made according to the following algorithm:
- Cut the required size strips from a sheet of steel
- Make holes at the ends of the strips and fasten them with rivets.
Making metal hoops for tubs
The cooper has to deal with both wood and metal, because the hoops that hold the dishes together have to be made independently from a metal sheet. But it’s easier to make hoops from hot-rolled steel strip. To do this you need:
- Determine the perimeter of the tub at the location of the hoop, add double the width of the strip to it.
- Using a hammer, bend the strip into a ring, placing the ends of the strip overlapping. Drill or punch 2 holes with a diameter of 4-5 mm, install steel rivets.
- Flare one edge of the hoop from the inside with hammer blows.
Frame Assembly Steps
To make a small barrel at home, two hoops are enough, corresponding to the perimeters of its upper and lower parts.
We are informing you:
Skillful hands
How to make a wooden barrel or tub?
Dnny
| 27 318 | 18-02-2014, 09:13 |
Barrels and tubs are in great demand in households. They keep lard and hams in brine, ferment cabbage, and soak apples. What can be compared to, for example, a cucumber or a tomato pickled in an oak tub? And in a linden barrel, honey and apple juice are perfectly stored, and you can make kvass in it.
Finally, an oak tub with a lemon or laurel tree today will not spoil the interior of even a city apartment. You just can’t find these simple products either in the store or on the market. But you can do it yourself, and although this task is not an easy one, an amateur craftsman is quite capable of handling it. Let us tell you in more detail about the manufacture of these containers needed in the household.
First of all, you need to choose wood. Oak and pine are unsuitable for storing honey - honey darkens in an oak barrel, but in a pine barrel it smells like resin. Here you need linden, aspen, and plane tree. Poplar, willow, and alder will also do. But for pickling, pickling or soaking, there is nothing better than oak - such a barrel will last for decades. For other needs, you can use sedge, beech, spruce, fir, pine, cedar, larch and even birch.
The following table will help you determine the size.
| External dimensions | Width and depth of the morning groove | Distance from the morning groove to the end | |||
| Barrel capacity (l) | Height | Bunch diameter | In my head | ||
| 15 | 345 | 295 | 262 | 3*3 | 20 |
| 25 | 420 | 340 | 300 | 3*3 | 20 |
| 50 | 535 | 420 | 370 | 3*3 | 25 |
| 100 | 670 | 515 | 450 | 3*3 | 25 |
| 120 | 770 | 525 | 460 | 3*3 | 25 |
Please note that the dimensions of the barrels are given here to select the size for the tub, the height and diameter of the head remains the same. The diameter in the barrel bunch (diameter in the center) for the tub goes into the diameter of the bottom.
When the size is chosen, you need to start preparing the stave, the main component of the barrel.
I will give the sizes of the rivets
| Capacity | Rivet width | Rivet thickness | Thickness of the bottoms | Bottom width |
| 15 | 40-90 | 14 | 16 | 50 or more |
| 25 | 40-90 | 14 | 16 | 50 or more |
| 50 | 40-90 | 17 | 19 | 50 or more |
| 100 | 40-100 | 18 | 19 | 50 or more |
| 120 | 40-100 | 18 | 19 | 50 or more |
There is another way to determine the size. The ratio of the diameter of the height of the tub or barrel should be in proportion, for example, 350:490 mm (Fig. 1-6). By increasing or decreasing the height, the diameter of the container is changed. The number of rivets for a barrel or tub is calculated using the formula 2*Pi*R/W, where R is the radius of the tub in the lower section (for a barrel - in the middle); “Pi” is a constant value equal to 3.14; W - the width of the stave at the bottom of the tub (for a barrel - in the middle).
Rivets
Usually the lower part of the trunk of old trees is used for rivets; it is called “riveter”. But a tinkerer will choose blanks from ordinary firewood and adapt a thin trunk to the job. It is best to make rivets from raw wood. First, the log - it should be 5-6 cm longer than the future stave - is split in half, gently tapping the log on the butt of the ax. Each half is then again split into two parts and so on, depending on the thickness of the chock, in order to ultimately obtain blanks 5-10 cm wide (for sweet clover - 15 cm) and 2.5-3 cm thick. You just need to try to split went radially - this will protect the riveting from cracking in the future.
The chopped pieces are dried in a room with natural ventilation for at least a month. To speed up the process, you can use a dryer. The dried workpiece is processed with a plow or sherhebel and a plane.
Rivet marking.
Take a board with a width of 30 to 100 mm, draw a line along the outer side dividing the stave in half along the width (for a barrel, and along the length). For the taper of the tub (barrel), it is necessary to maintain the taper of the riveting. It should be about 8°. This means that if the riveting width at the bottom of the tub (for a barrel - in the middle) is 100 mm, at the top it should be 8 mm narrower, i.e. 92 mm. And for the barrel at the top and bottom - 92 mm. Fix the established width of the riveting with dots and connect 4 dots with lines - for the tub and 6 dots - for the barrel. These are the riveting planing guidelines that determine the taper. The plane of the radius segment on the template, its direction towards the center, together with the already determined slope of the future frame of the barrel or tub, is the main requirement for the fit of the riveting to one another during sharpening. Therefore, you need to more often apply the template to the riveting being processed, checking the correctness of planing.
Riveting edge.
They plan the staves with a plane, adjusting each one according to thickness, and immediately determine which side will be the outer one. To do this, the left and right sides of the riveting are half-lengthened. Using a sherkhebel with an oval base and a piece of iron, plan the inner side clean according to the template (Fig. 5) and draw a line with a pencil dividing the riveting in half along its length. Then, use a hacksaw to trim the stave to length and draw a dividing line at the ends. The outer and side sides of the riveting are cleaned with a semi-jointer (jointer), and the correctness of planing is checked with a template. It is made according to the radius of the assembly hoop for the tub, and for the barrel - according to the radius of the umbilical hoop, made in advance. For a barrel with two bottoms, two pairs of hoops are prepared - 2 persistent and 2 umbilical. The umbilical hoop should pass freely through the thrust hoop.
Especially carefully check the correct sharpening of the sides of the riveting for the barrel. The template should fit snugly against the side and outer sides of the stave, especially at the center line dividing the stave in half along its length. When planing the sides, deviations from the line drawn at the end and dividing the riveting in half should not be allowed.
HOOPS
Barrel hoops are made of wood or steel. Wooden ones are not so durable, and they are a hundred times more hassle, so it is better to use steel ones. The hoops are made from hot-rolled steel strip with a thickness of 1.6–2.0 mm and a width of 30–50 mm.
Having measured the barrel at the place where the hoop is tensioned, we add double the width of the strip to this size. Using a hammer, we bend the workpiece into a ring, punch or drill holes and install rivets made of soft steel wire with a diameter of 4-5 mm. One inner edge of the hoop must be flared by striking the pointed end of a hammer on a massive steel stand.
Frame assembly
The assembly hoop is made in the middle between the top and bottom of the tub and with a slightly smaller diameter along the center line for the barrel. On a clean wooden base, we place the assembly hoop vertically and place 5-6 rivets inside it with the outer side facing the hoop. On the left, we clamp one of the rivets and the hoop with a clamp. Raise the hoop slightly and arrange the remaining rivets. Let's clamp the hoop. The tight fit of the rivets along the entire length (for the tub) and to the center line (for the barrel) is the result of careful sharpening and adjustment. In the same way we assemble the frame for the barrel, but here we remove the assembly hoop after attaching the umbilical hoop, then we fill the persistent hoop. If it packs tightly, it means we planed correctly and selected the last rive correctly in width.
The frame for the barrel from the middle or slightly above fan-shapedly diverges to its bottom. Various methods and devices are used to tighten the loose end of the frame. The end of a multi-core steel cable with a diameter of 6-8 mm is secured to a fixed support. The second end is thrown onto a hot, steamed, loose frame, put on the protrusion of a post made of earth dug for this purpose, or a raised part of a log, and using the “noose” method, using a strong stake inserted into a loop at the end of the cable, the frame is “twisted” and put on umbilical and then stubborn hoops.
After assembly, the frame is checked for horizontality and verticality and all hoops are finally seated. From the inside of the frame (barrels or tubs) the sag is cleared, and at the ends of the staves they are cut off by 1/3 of the thickness (Fig. 6) and by 2-3 mm from the outside. The outer and inner sides of the frame are finally cleaned, and the upper and lower ends are hollowed out.
Installing the bottoms into the frame
To do this, several operations are performed.
1. Cutting a morning groove in the frame.
We will cut the morning groove with a morning knife. The width of the teeth of the steel file is 4-5 mm. Therefore, the width of the cut groove should be 4-5 mm. The file protrudes from the half-filled mound block by 4-5 mm. Therefore, the depth of the chimney groove cannot be different. The thickness of the chimney block is the limiter of the distance of cutting the chimney from the top of the frame to the bottom of the plank on which the block is fixed, i.e. 40-50 mm. Be sure to chamfer 2-3 mm or a little more on both sides of the morning groove to prevent the frame rivet from chipping when inserting the bottoms and compressing them with hoops.
2. Assembling bottom panels
. They are assembled on wooden or metal (preferably stainless) pins and nails from 4-6 planks. The extreme ones are called shoals, the middle ones are called grouse. Wider planks are used for the jambs. We do not yet know the diameter of the circle by morning. We take a compass (Fig. 4) and spread its legs approximately to the radius of the intended circle along the chime, insert the tip of the compass leg into the chimney, and divide the circle into 6 parts. Thus, we will determine the radius of the circle from the sides for the bottom. We transfer the resulting radius to the bottom shield and draw a circle.
3. Sawing out the bottoms.
Using a bow saw or a circular saw, we cut out the required bottom. In this case, the cut should be along the inside of the line drawn in the circle when the saw teeth are set apart by 2-2.5 mm. This will reduce the diameter of the circle by 0.14 of the constant value “Pi”.
4. Processing of the Donets.
Place the bottom of the circle on a workbench, sharpen both sides cleanly, and draw a line 3-4 mm thick on the end with a pencil in the middle. With a radius 25-30 mm smaller than the bottom, draw a circle on its two sides. These are the boundaries of chamfering. Use a chisel or plane to remove the chamfers and make sure that the chisel groove and the chamfered bottom fit well. We leave the line at the end of the bottom untouched.
5. Installation of bottoms. This is the final operation of making a barrel or tub. We turn the frame of the tub over with the wide part facing up and slightly knock down the lower hoop. We knock down the persistent one at the barrel, and move the umbilical hoop so that the bottom fits into the morning groove. A nylon thread tying the bottom crosswise will help keep the bottom in a horizontal position when installing it in the morning. When the bottom is installed in the chimes, the thread is pulled out and the hoops are put in place. Before installing the second bottom into the frame of the barrel, two tongue-and-groove holes are drilled in it opposite each other and 4-5 cm from the inner side of the frame with a diameter of 20-25 mm, into which tongues are placed so that debris does not get into the barrel. After installing the second bottom, the hoops are finally stuffed and make sure that the bottoms are pressed together with rivets in the chimes, and that the rivets have no gaps between each other. If the rivets were planed correctly and the slope was maintained according to the template, and the bottom was cut out carefully, the product will be of high quality.
Take note.
1. Before assembling the frames for a barrel or tub, the finished stave must be dried to 17-20% humidity.
2. Oak, spruce, pine, aspen barrels and tubs need to be soaked for at least 10 days, changing the water every 2-3 days. At the same time, the jambs and planks are soaked, with which the fermented product is pressed.
3. To reduce the formation of mold on the staves of the tub when stored in the cellar, wipe it with a swab dipped in calcined vegetable oil. The jambs, planks and pressure stone are washed with hot water once a week.
HOW LONG DOES THE BARREL SERVE?
First of all, it depends on the operating conditions. But it is important to remember that you should not paint filling containers with oil paint: it clogs the pores, which contributes to the rotting of the wood. It is advisable to paint the hoops - they will not rust. For decorative purposes, a barrel or flower tub can be treated with mordants.
The brown color of oak is given by slaked lime mixed with a 25% ammonia solution. A black solution of iron sulfate or an infusion of iron filings in vinegar for 5-6 days.
A decoction of the rhizomes of woodruff (Asperula odorata) colors linden and aspen red. The red-brown color comes from a decoction of onion peels, and the brown color comes from a decoction of walnut fruit. These dyes are both brighter than chemical ones and more stable.
It is also important to remember that wood is better preserved at constant humidity. Therefore, dry containers should always be kept dry, and bulk products filled with liquid. Both of them cannot be placed directly on the ground. It is better to place a brick or plank under the barrel than to subsequently get rid of rot by cutting the chimes.
But no matter how long a barrel made with your own hands serves, all this time it will be a pleasant reminder to the owner of the difficulties overcome in understanding the secrets of the ancient craft of a cooper.
© finished barrels in the photo Sergey Yarushin
Source: https://bondar.at.ua/
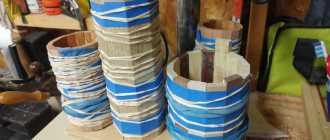
Stages of assembling the frame of the tub
Side rivets, tightened with hoops, form the skeleton of a wooden barrel. The skeleton should be assembled like this:
- Attach 3 support rivets to the small hoop with clamps at approximately equal distances from each other, which will allow you to install the structure vertically.
- Inserting the frets one by one, fill the sector between the two support rivets, fill the space around the entire perimeter of the small hoop.
- Using a hammer and heel, press down on the small hoop so that the parts fit securely together.
- Place the lower hoop on the frame and also attach it with a heel.
- File the ends of the frame along the line drawn with a thicknesser.
- Use a scraper to remove any irregularities inside the frame.
- Plan the ends with a humpback plane.
- Using a straight plow, chamfer the inside of the frame from the ends. This will prevent them from chipping and make it easier to insert the bottom.
- Using a morning tool, cut a groove (morter) into which the bottom will be inserted.
Cleaning up irregularities with a scraper
Preparation of rivets
To bring the workpieces into proper shape, they must be planed with a plane to equalize their thickness. The inner side is planed using sherhebel, and then divided in half lengthwise with a pencil. This is necessary for trimming the workpiece using a hacksaw with fine teeth.
Using a jointer, both the outside and sides of the workpieces are finished. The correctness of actions is checked using a pre-prepared pattern. It is made focusing on the lower hoop of the product. Ideally, the template will fit snugly to the sides and front. Please note that one hundred strict sides cannot deviate from the lines that divide the workpiece in half.
To achieve a cone-shaped product, it is necessary to strictly observe the proportions: the width of the riveting at the bottom should be greater than at the top.
Assembling and installing the bottom of the tub
The fewer joints there are in the bottom, the higher its reliability. Therefore, for the bottom you need to select the widest and thickest blanks. The procedure for making the bottom of a wooden barrel with your own hands is as follows:
- Sand the edges of the boards and temporarily seal them together on a workbench.
- To determine the radius of the bottom, place the legs of the compass in the groove. Using the trial method, select a compass solution that divides the perimeter of the chimney into 6 equal parts.
- On the solid rivets, draw a circle with the resulting compass solution.
- Within the circle, make marks at the locations of the studs.
- Release the planks. Drill holes in the edges at the marked locations and drive in wooden or metal pins.
- Place the planks tightly together on the studs.
- Plan the bottom on both sides.
- From the center, again draw a circle of the same radius as before.
- Use a circular saw to cut out the bottom, leaving a small margin outside the circle.
- Use a straight plow to chamfer both sides so that the thickness of the wood at a distance from the edge equal to the depth of the chimney remains equal to its width.
- Knock down a large hoop with a heel, loosening the fastening of the rivets. Insert the bottom into the morning.
- Carefully turn the tub upside down and place a large hoop on it.
Now the homemade tub is almost ready. All that remains is to make the lid and circle. This will not be difficult - you can focus on making the bottom. After checking the barrel for leaks, you can begin preparing pickles in it.
You may also find it helpful to watch a training video.
Video: How to make a wooden tub
Using the techniques described, you can make tubs for indoor plants or flowerbeds for landscape design.
Flowerbed tubs will decorate the garden landscape
Beaded oak in a step-by-step master class with photos and diagrams
Let's continue the beading theme. In this article we will learn how to weave oak from beads, and will also pay a lot of attention to the formation and design of the stem part of the product. With the help of a training master class, you can make a beautiful and neat craft with your own hands.
Beaded oak in a step-by-step photo master class
Here is the following list of materials that will be needed during the work process:
- copper wire;
- green and yellow-brown beads;
- ribbon for floristry or floss threads;
- masking tape and scissors;
- wire cutters with pliers and a file;
- plaster solution and PVA glue, dark acrylic paint, varnish with a brush, stand and decorative material for decorating the craft.
Before you start beading, you must mentally reproduce this tree for yourself in your head or transfer the sketch to paper in order to understand what you want from this craft. So, cut the wire and put green beads on it to weave foliage. These blanks are easy to make using the loop technique. The first buttonhole should consist of 5 beads, and the next one should already have fourteen elements. Start weaving from the top leaf. Sometimes among these blanks there should be a brown bead that will imitate an acorn. For a lush crown you will need to make about two hundred branches with your own hands. Connect the finished elements in pairs, and twist the resulting branches in three or five pieces together. At the end, each design should be wrapped with floral tape or floss threads.
Now you will need a wire slightly thicker in diameter than the previous material. You should cut it in an amount that matches the finished branches. Using adhesive tape or tape, attach the bead blanks to the made sections the way you want or as your imagination tells you. Now you should have a real oak crown, which we will form step by step. In the photo you can see how it should look.
Choose the best twig as it will become the core of the trunk. Next, we begin to attach the remaining pieces, simultaneously wrapping them with tape. To make the oak look more natural, you should bend each element a little at your discretion or according to a pre-prepared sketch.
Glue the structure to the stand with glue. Check how firmly it is attached. Now cover all visible gaps with tape again, and you can say that the tree is ready for plaster and the weaving is finished.
Dilute the plaster with water and glue so that the solution has the consistency of liquid sour cream. Take a soft brush and apply a thin first layer to the entire stem surface, as well as to the branches. Let the product dry after this. Then thicken the solution and take a wide, stiff brush. Apply the solution again and immediately use a knife to make irregularities in the bark. The dried product must be processed with a file. The next stage of the master class is painting. You can use only one color of paint for this or combine several colors to make the oak look more natural. Apply broad strokes very carefully and in a dense layer so as not to leave visible gaps anywhere. When the first coat dries, you need to apply several more of the same. Finish the job with silver paint as shown in the photo.
The bead craft will be completely ready when you make a decorative decoration with pebbles and cover everything with varnish.
Video: Do-it-yourself oak tree made of beads
Beaded oak weaving pattern
handmadefrom.ru
Selection of material and production of rivets
The material for the body of wine barrels is exclusively oak wood. The rivets for them are prepared in the same way as for the tubs, that is, split rivets are used. For an experiment, you can make a wooden barrel from boards (oak, of course). In this case, the barrel will last less than one made from chopped frets. It must be taken into account that the boards for riveted blanks should only be straight-layered, otherwise the walls will crack.
Selection of boards for riveted blanks: a) such boards are unsuitable; b) these boards are suitable
Frets for the barrel have a complex configuration. Each of them is thinner in the middle than at the ends, the outer surface is convex, the inner is grooved. And the side edges look like gentle parabolas. Accordingly, it is more difficult to make barrel frets than tub frets.
Stages of making barrel frets
First of all, you need to make a template, a pattern. Stages of making staves for a barrel:
- Rough hewing with an ax with a semicircular blade until it is shaped into a prism. Reducing the thickness of the middle part by 15-20%.
- Beveling the side edges with an ax. Rounding of the outer edge (control with a template). Using a template, measure the width of the stave in the middle, determine its dimensions at the ends, and apply marks.
- Beveling the workpiece towards the ends along a slightly curved arc. Chamfering the side edges with a template check.
- Planing the outer plate with a plane or straight scraper.
- Processing the inner surface with a humpback plane or humpback scraper.
- Joining of edges.
How to choose a place for flowerpots?
The most common location for pots is the porch of a house. Planters with lush flowering living decorations will decorate the entrance, emphasizing the architectural style of the house.
The second most popular installation location is occupied by terraces, gazebos, and wells.
For private buildings with a wide blind area, it would be appropriate to place flowerpots along the house - they will emphasize the line of the foundation and make it more contrasting.
When choosing a location, you should follow some tips:
- Oversized forms will look awkward in a small area, just as small pots will get lost in a spacious area.
- When installing flowerpots, their mobility plays a role: portable types should be lightweight, and stationary ones should be positioned in such a way that the plants feel comfortable in them.
- When selecting structures, it is recommended to pay attention to the material of the architecture. For example, tubs are suitable for wooden log houses, while garden flowerpots cast from concrete will be inappropriate.
Assembling the tub
Making tubs with your own hands does not involve making all the hoops at once. First you need to make the middle ring. After it has been made from a strip of hot-rolled steel, 3-5 cm wide, the hoop is placed vertically on a clean wooden base. About 6 rivets are placed inside it, one of which (far left) is clamped with a clamp. After this, we install the remaining blanks and carefully lift the structure. They will only fit snugly with careful fitting and care.
Next, we make the remaining hoops and stuff them onto the product. The final touches are internal processing. Using a plane with a false blade and a chisel, you need to make a chamfer inside the lower end, removing 1/3 of the thickness of the workpiece. Next, process the end part of the frame and half-fill the upper end.
You might be interested in our tubs
- for test
- oak
- fake
How are they classified?
With all the variety of shapes and sizes, tubs are most often classified according to the following parameters:
- Volume;
- Shape and proportions of the container;
- Tree, its species and variety. The tubs are made of oak, linden, aspen, pine;
- The material from which the hoops are made (stainless steel, galvanized or bast);
- Purpose. They can be intended for storing food, pickling, or as bath accessories;
- The presence of handles, faucets or pressure.
Not only the price, but also the service life of the product, as well as the area of application of the reel on the farm, depend on the listed parameters.
For example, pine tubs are not used for salting or storing food substances.
DIY tub drawings
DIY tub, drawings and construction diagram.
Cooperage product in the form of a truncated pyramid, the base of which is a regular polygon. It is made from wooden staves of oak, aspen or linden. You can ferment and salt vegetables in it, as well as soak fruits.
The tub consists of several components:
- Wall rivets.
- Bottom rivets.
- Metal hoops.
The construction of the wall riveting is shown in the figure
d1 – circumscribed circle diameter of the upper polygon d2 – circumscribed circle diameter of the lower polygon h – height of a regular truncated pyramid φ – angle that determines the number of sides of a regular polygon a1 – side of the upper polygon a2 – side of the lower polygon
By substituting the given dimensions:
φ = 15° (number of rivets 360 / 15 = 24 (pcs.)) a1 = 50 (mm) a2 = 45 (mm) h = 400 (mm)
we get the riveting of the product shown in the drawing
Construction of bottom rivets.
Features of the operation of the pickling tub
Pickling tubs have their own operating characteristics. Since food products are stored in this container, mold or rot may appear on the walls of the container, even if it is washed well after use.
In addition, when fermenting there is practically no water in the tub. This can lead to drying out and loss of seal of the container. To prevent this from happening, you need to follow some tricks:
- Oak tubs need to be soaked for at least a month to remove excess tannins.
- Aspen or linden – 1-2 weeks;
- Before laying, pour boiling water over the inside of the tub to disinfect it;
- Placement of products into a large container (30 liters or more) should be done where the tub will be stored. Since after filling it will be very difficult to move, and during transportation it can be seriously damaged;
- The container must be filled to capacity, otherwise mold will appear on the walls and in the space free from food;
- Store unused containers in a dark and cool place. The container must be empty. Some housewives, fearing that the tub will dry out and lose its seal, fill it with water during storage. This leads to the appearance of mold and mildew. To prevent the tub from drying out, it must be lubricated with vegetable oil before long-term storage;
- The tub cannot be placed on the ground without placing bricks, a board or a sheet of iron under it, otherwise it will quickly begin to rot, since the earth, especially in the basement, is very wet.
Containers made from spruce or pine are not suitable for culinary delights, since their wood is very resinous, and the smell and taste imparted to the products is not very appetizing.
A container made of aspen is suitable for sauerkraut. In an aspen tub, the cabbage turns out crispy and aromatic. But salting mushrooms, vegetables or meat is best done in an oak or linden container.