the revs increase, the lamp burns brighter
Having found the ideal point for the placement of the magnet, glue it.
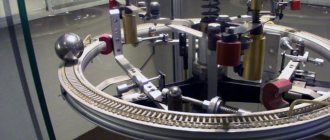
Now you can start the perpetual motion machine with a push of your finger...
Project Charge
In this article I will tell you how to make an engine - a Bedini generator from a computer cooler. This device model is one of the lowest power, but at the same time it is very convenient to use, cheap and easy to manufacture. It is very convenient to conduct experiments with the model. It takes up very little space and is easy to maintain. I will tell you the best, in my opinion, way of making it.
You will need:
Transistor 2N3055 TO-3; Diode 1N4001 and 1N4007; Resistor 47 Ohm - 100 Ohm (I recommend 51 Ohm, 1W -2W); Trimmer resistor 1kOhm (I recommend R-17N1-B1K, L15KC or 3296W-1-102LF potentiometer 1K (SP5-2VB)); a cooler for a computer (I took JF0925S1H, 12V fan, 92x92x25mm), but in general it doesn’t matter what kind of stickers there will be on the cooler; terminals, crocodiles. You can buy all this at a radio store, electrician, or take it out of radio devices; I bought it at the Voltmaster store. I really liked the store, their prices are an order of magnitude lower than others. You also need a neon light bulb NE - 2. Take it out of the starter for the fluorescent lamp, a radiator (you can take a piece of aluminum, you can take it out of some unnecessary radio equipment), a piece of plywood or organic glass 16.5mm * 15.5mm and other small fittings( single-core and stranded wires, bolts, nuts).
Here is the diagram to assemble:
Here is a visual diagram:
First, mark the location for the cooler. Next, glue the terminal blocks with superglue, as in the diagram.
Now attach the transistor to the heatsink and the heatsink to the base.
Next, we attach all the electronic components according to a visual diagram.
The next step is to prepare the cooler. Remove the sticker, then the rubber plug on the back. Using a small screwdriver or tweezers, remove the cotter pin (circlip). Remove the blades.
You will see 4 coils attached to the chip with three legs. Grab the core of the coils with pliers and insert a small screwdriver into the space for the blade axle. Holding everything firmly by the core, hit the screwdriver with a hammer. The microcircuit with coils must separate from the entire structure.
Unsolder the coils from the microcircuit. The chip has 3 pins, you must insert a cutoff pin as the fourth pin. There are 2 wires soldered to one of the legs, unsolder one and solder it to the new leg so that there is one wire going to each leg.
Place the coil assembly back onto the axle, solder 4 different colored wires and lead them out.
Drill 2 holes in the base and attach the bag with clamps.
Connect the wires from the coils to the terminal block according to the visual diagram.
Do the wiring. Attach 2 alligator clips to two pieces of wire.
Ready. In the near future I will make several videos on setting up and using the engine generator. I also have an article in my project about another Bedini model. I wish you success.
Questions on or in the comments.
Mikhail1997
Discussion of assembling a Bedini generator from a cooler on the Charge project forum
Use of wind power generators at home
Based on the above factors, the question arises: why not install a windmill in every house? The answer consists of two main points:
How it works and why a wind generator is needed: types, design and choice of equipment
- Price. The cost of devices with sufficient power is very high. For example, the cost of a unit with a power of 2 kW and a voltage of 24 V ranges from 75,000 rubles;
- The average wind force in most regions does not reach 4 m/s.
Map of average annual wind speed in Russia
That is, the use of wind turbines as the main source of energy is irrational. In a standard house, with the simultaneous operation of all household appliances, up to 1 kW per hour is consumed, and when operating powerful power tools, this figure increases, increasing the required voltage in the network.
Installation of the entire system will cost at least 400,000 rubles, and with variable wind speeds, this method of power supply loses its relevance.
A clear example of a circuit with a high power device
It is advisable to use self-assembled 220-volt windmills as an alternative source of energy. In combination with solar panels, a fuel generator of sufficient power or a central power grid.
Diagram of a wind turbine and city power supply
Electrical system using three sources
How to make a windmill from a computer cooler with your own hands?
Updated: May 4, 2019
When it comes to wind generators, the imagination pictures serious high-power installations capable of supplying energy to entire cities. At the same time, it is quite possible to use this technology for applied, everyday purposes. This is useful for illustrating the issue, helping to evaluate the possibilities and prospects of wind energy using a simple and understandable example. The creation of small devices will not solve the problem of energy supply, but it can contribute to the development of technology and awaken interest in this method of generating electricity.
How to make a mini wind generator with your own hands from an old computer cooler?
Publication date: May 24, 2019
The computer “system unit” gathering dust on the balcony deserves a more worthy use. For example, the capabilities of the old cooler, which recently cooled the processor, are very interesting. With a little ingenuity and patience, you can use it to make a mini wind generator with your own hands. Of course, it will not be enough to power the entire house, but it will be enough to power small appliances or devices. A normal 12km/h wind will easily cause the generator to produce about 2V for a small radio, lamp or clockwork.
3 pin cooler connector pinout
The most common type of fan is 3 pin. In addition to the negative and 12 volt wires, a third, “tacho” wire appears here. It sits directly on the sensor leg.
- Black wire – ground (Ground/-12V);
- Red wire – positive (+12V);
- Yellow wire – revolutions (RPM).
What do you need to make a USB fan?
To do this, you will need any unnecessary electric drive, the most relevant is an old cooler. Since it already has blades and is powered by a nominal voltage of 5V received from the USB connector. Also suitable for this role is a motor from a children’s toy, which can be powered from the same 5V. From these two devices you can make both a forced cooling system and a mini-fan.
In addition to the engine you will need:
- Stationery knife and jigsaw;
- Old cord with USB connector;
- Electrical tape, bolts or screws, glue and devices for its use;
- Soldering iron with solder;
- Plywood or plastic for the body;
- Laser discs for blades and stands.
The last two points will be used as a choice - plywood or plastic will be useful in situations where you need to assemble a stand case for a netbook or laptop of sufficient strength. And laser discs for a mini desktop fan. Let's consider both options for making a USB fan at home.
2 pin cooler wire pinout
The simplest cooler with two wires. The most common colors: black and red. Black - working negative of the board, red - 12 V power supply.
Here the coils create a magnetic field, which causes the rotor to spin within the magnetic field created by the magnet, and the Hall effect sensor evaluates the rotation (position) of the rotor.
PC cooler design and repair
In order to disassemble the fan, you need to remove the sticker on the side of the wires, opening access to the rubber plug, which we remove.
We pick up the plastic or metal half-ring with any object with a sharp end (a stationery knife, a flat-head screwdriver, etc.) and remove it from the shaft. The view reveals a motor operating on direct current using a brushless principle. An all-metal magnet is attached to the plastic base of the rotor with an impeller in a circle around the shaft, and a magnetic circuit on a copper coil is attached to the stator.
Then clean the hole under the axle and drop a little machine oil there, put it back together, install a plug (so that dust doesn’t get clogged) and continue using the much quieter fan.
All such fans have a brushless rotation mechanism: they are reliable, economical, quiet and have the ability to adjust the speed.
In modern coolers, the connectors are much smaller, where the first contact is numbered and is “minus”, the second is “plus”, the third transmits data about the current rotation speed of the impeller, and the fourth controls the rotation speed.
Mini wind generator from an old computer cooler
A small model of a wind generator, quite functional and capable of performing useful work, can be a failed computer fan. Almost any cooler will do, but it is best to choose the largest one, since the engine in its current form is not suitable for generating electric current. The reason for this need is that the motor windings are wound with double wire and in different directions, so it creates alternating current.
The most you can count on when making a wind generator from a computer cooler is powering several LEDs , which require constant current. Therefore, it will be necessary to make a rectifier, which will also take a little power. Therefore, the engine is unable to light even a single LED without modifications. For modernization, you will need to make more powerful windings capable of delivering higher voltage.
Important! You should not expect to create a device that can charge a cell phone battery or power a laptop. The energy obtained in this way is only enough to power the LED flashlight. The whole idea is useful from an educational or cognitive point of view.
Making crafts from improvised means
It takes 15-30 minutes, no more, to make a simple but working table fan. Such a device will cope with its main function - to blow, but from an aesthetic and practical point of view it is still worth complementing it with a beautiful and practical case with a stable stand.
To work you will need: a stripping knife, a USB cable, electrical tape. Optional: a piece of plastic or plywood, thick wire, pliers, soldering iron and glue.
- We remove the cooler from the old power supply, case or central processor.
List of required materials
In addition to an old cooler of relatively large size, for work you will need:
- thick plastic bottle;
- wire designed to operate under low voltage;
- small wooden block 1.5 inches in diameter;
- metal tubes that fit into one another;
- epoxy and superglue;
- unnecessary CD;
- tightening clamps.
All of the above can be easily found in your home pantry or purchased at the nearest market.
The first method of reconstructing a cooler into a current generator
The first way out of this situation is to try to cure the original motor, that is, rewind the stator with a new wire. Of course, this procedure is very painstaking, but for those who know how to work with their hands, it is quite feasible. And it’s even useful for educational purposes. The main thing now is to alternate the directions of winding the wire on each core. Thus, we get the simplest single-phase alternating current generator. The coils are connected to each other in series. The higher the number of turns and thinner the wire, the better. The beginning of the first coil and the end of the last will be the terminals of our generator, respectively. Now you can assemble everything and check it. But do not forget that the voltage will be variable. Therefore, you need to make a simple straightener or buy a ready-made one. After this entire treatment procedure, the indicators certainly improved, but not radically. The reason for this may be either too large a gap between the stator and the rotor, or a weak magnetic field of the ring magnet. It would be a stretch to call it a magnet. Plus, the rectifier still consumes from one to two volts. Unfortunately, such a rework did not justify itself.
You can buy it ready-made in this Chinese store.
How to connect a 3-pin cooler to a 4-pin
To connect a 3-pin cooler to a 4-pin connector on the motherboard in order to be able to programmatically adjust the speed, use the following diagram:
Useful: Pinout of car radio ISO connector
When a 3-wire fan is directly connected to a 4-pin connector on the motherboard, the fan will always rotate, because the motherboard will not have the ability to control the 3-pin fan and adjust the speed of the cooler.
Manufacturing examples
From a children's toy battery-powered fan
Making such a wind generator is as easy as shelling pears. The toy uses an electric motor most often of 1.5 or 4.5 volts with independent excitation from permanent magnets. There is a ready-made screw. You need to take out the batteries, connect the wires to the + and − contacts, place the fan in the air flow, turn it on, and you can measure the characteristics of the generated current at the contacts.
In order for such a wind generator to work better, it would not hurt to add power to the propeller blades, for example, with linings cut from a plastic pipe in the shape of petals. Well, you will have to equip the unit with some other elements required for an electric windmill.
The fan will have to be protected from precipitation with a special casing and mounted on a movable frame. The movable fastening of the frame to the mast must include a contact-brush mechanism (without it, the current cannot be transmitted down). The opposite end of the frame is equipped with a stabilizer; its task is to turn the wind generator towards the air flow.
What you can count on if the engine is 4.5V is 2.5...3V maximum, not even enough to charge a phone (usually 5V). But such a device, with sufficient wind, is quite capable of providing power to LEDs, which, for example, can be used to mark the boundaries of an entrance gate or illuminate the boundaries of a garden path.
From the CPU cooler fan (cooler)
This fan most often has a 12V motor, as in the previous example with permanent magnets, and its transformation into a wind generator occurs in the same order.
The differences are that:
- the cooler blades are no good initially - the propeller needs a new one;
- the generated current at a certain wind speed is quite enough to charge an Android or 5V tablet (using a controller in this case cannot be avoided and a regular car charger is best suited).
We build a mini wind generator from an old computer cooler
Do you have old and unnecessary computer components lying around? Look there and look for a fan for cooling the processor, the so-called cooler. Eat? Great. Now I will tell you how to make it work in a mode that is not entirely familiar to it. Now it will not absorb energy for subsequent cooling of the processor, but, on the contrary, will generate it. Yes, I didn't make a mistake. I used it as the main element in my mini wind generator. With a wind of 12 km/h, or 3.3 m/s usual for meteorology, it allows you to generate electricity with a voltage of 1.5 - 2 volts and a current of 20 milliamps.