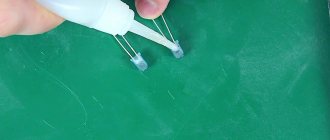
This tutorial will show you how to create your own zoom lens using simple components.
This lens will be able to change shape, and therefore focal length, depending on the amount of liquid inside it. It will also have a soft surface that we can press on to distort whatever we see through the lens! Warning: It took me several attempts to make a lens that didn't leak. I hope this guide works the first time, but if it doesn't, please comment! Also, the photos in this tutorial were taken over several different attempts, so they may not exactly represent what you end up with. Finally, this tutorial uses laser cutting and solvent acrylic welding, so always use proper safety precautions when working with hazardous or unknown substances and tools!
Video instructions for production and demonstration of work
(in English)
One of the undeniable advantages of LEDs over traditional light sources is the ability to create almost any distribution of light flux for the most efficient use of energy. This formation is carried out using secondary optics - a reflector (reflector) or lens.
To denote the shape of light distribution in lighting engineering, the term “luminous intensity curve” or abbreviated as LSI is used. LEDs in most cases have a primary lens (transparent silicone or glass), which forms the CSS shown in the figure below.
As can be seen from the graph, the light intensity gradually decreases with increasing angle of deviation from the central axis. To obtain a different type of distribution, a lens or reflector of the appropriate type is superimposed on the LED. Hence the name – secondary optics. Reflectors have a rather limited scope of application - they allow you to work only on the concentration of the light flux, i.e. decreasing the radiation angle. Lenses provide a wider range of possibilities, so it’s worth considering them in more detail.
The most common materials for making lenses are polymethyl methacrylate (commonly known as plexiglass) and polycarbonate. They are manufactured by injection molding, in strict compliance with technological standards. So making your own lenses is out of the question. When you try to mechanically process these materials, all you can achieve is a dull, scratched piece of plexiglass.
Communities › Car Audio › Blog › DIY acoustic lens
Slowly, little by little, I continue to rework my acoustics in the car. In my spare time I carved pyramids into the door to avoid standing waves. P.S. Sorry for the quality of the photo, I took it on a potato tuber.
Comments 130
What if it's made of polystyrene foam? And what is the overall result?
Is there really no money for gemerton? *hand face*
is this sarcasm or a joke?
One small note and one question. Note: this is not a lens, but just a diffuser) Question. I haven’t held this material in my hands, I’m wondering if anyone has assessed its reflectivity? After all, it will only work if most of the wave front is reflected from the surface and a smaller part passes through. Well, for example, foam rubber is definitely not suitable, but I don’t know this material and am waiting for an answer)
ok, diffuser. The material feels like very hard foam, with very small pores. It may be similar in structure to slaked polyurethane foam...
Foam allows low frequencies to pass through, unfortunately (you need something denser
You can always cover it with varnish, putties, paint, etc.
in home acoustics it is clearly noticeable that even drywall under putty allows bass to pass through. but this is for very low frequencies. It's made of some kind of solid, hard plastic. I am not criticizing, I am reasoning, please understand me correctly. to unambiguously answer the question about the reflection of sound from the material, you just need to obscure the singing speaker and evaluate how quiet it will become in the shadow of the material)
Put it on black glue for gluing car windows) and so it’s ok...
yeah, I thought about that too
why cut them out, I bought myself straight sheets with pyramids and glued them
Source
Gravity lens at home
The space lens is working!
This photograph shows the result of an experiment to create an analogue of a gravitational lens using a material with a variable refractive index. As you can see, the experiment was a success: two images appeared of a light source located behind a piece of plexiglass. Below is a detailed description of what is happening.
Anyone who watched the movie “Interstellar” remembers how gravitational lensing works. A rotating black hole acted as a lens (see video with brief explanations, as well as another example of a simulation of such lensing), and an entire galaxy acted as an object of observation. You can read more about the scientific background of the film Interstellar in Kip Thorne's book, The Science Behind the Scenes.
Let's remember how this works. Suppose that between the observer and some distant star there is another, very massive object. It could be a black hole, a galaxy, or even an entire galactic cluster (cluster of galaxies).
Scheme of gravitational lensing. In the figure we show the rays in a certain plane and get two images of the star. It is clear that if we draw the same thing for all planes passing through the line “observer - star”, we will get a circle
According to the general theory of relativity, a massive object deforms space-time in such a way that rays of light seem to be deflected in its direction. You could say that the massive object acts like a kind of lens on a cosmic scale. Therefore, we see not one, but several images of a distant star. If the gravitational field of the “lens” is spherically symmetric, and it itself is located exactly between the observer and the star, then the star will turn into a circle - the so-called “Einstein ring”.
The photograph taken with the ALMA telescope shows an image of the distant galaxy SDP.81, located at a distance of 11.7 billion light-years from us. Lensing occurs due to a cluster of galaxies located 3.4 billion years from Earth. Photo from eso.org
In more exotic cases, the result of lensing can be an arc or even a cross formed by several or heterogeneous “lenses”.
On the left is
the so-called Einstein Cross, a lensed image of a quasar (8 billion light-years from Earth) located behind a massive galaxy (0.4 billion light-years from Earth).
On the right is
an almost perfect arc formed by a blue galaxy; a cluster of galaxies near the object LRG-4-606 works as a gravitational lens, photo from spacetelescope.org
It turns out that all this can be simulated quite accurately at home. To do this, you will need a piece of plexiglass, an old mobile phone with a flashlight (the new flashlight is too bright) and dry ice. Dry ice is freely sold in big cities or obtained from a carbon dioxide fire extinguisher (it turns out more expensive, but very educational).
Plexiglas block ( left
) must have polished plane-parallel edges, and a hole is needed in the middle.
On the right
you can see that the edges are well polished: through them you can read the text and notes of a famous song without distortion
Place the light source and a piece of plexiglass as shown in the diagram (top view).
Experimental design: a plexiglass block is placed between the observer and the light source
Place a rag or crumpled paper in the hole and make sure that the flashlight is not visible from the observation point.
We look at the light source through a plexiglass block. Only the diffused light of a flashlight is visible
Now, using dry ice, we will make a massive galaxy from a block of plexiglass. To do this, remember that the refractive index of plexiglass increases as the temperature decreases. This means that if we cool the middle of the block quickly and strongly enough, creating a temperature gradient, we will get an inhomogeneous medium in which a beam of light will deviate from the edge to the cold middle. Read about why this happens in the article “Mirage in Plexiglas”.
This medium will be very similar in its optical properties to the inhomogeneity of space-time near a massive space object. This is easy to verify.
Having received dry ice, we quickly fill the cavity in the plexiglass with it and cover it with something on top. Without changing the position of the flashlight and the block, we observe again. Very soon we will notice that our lantern star has split into two: in the topmost photograph it is clearly visible on both sides of an opaque cavity filled with dry ice. The home analogue of a gravitational lens is working!
Gradually, the dry ice will evaporate, the temperature of the block will level out, and our “gravitational lens” will again turn into an ordinary piece of plexiglass with a hole.
The attentive reader will notice that we did not obtain the Einstein circle, since our experiment was actually done on a plane. In fact, it is not at all difficult to obtain a circle from a star using improvised means. Write in the comments what such an experiment could look like, and after a while we will publish our version and compare. Good luck!
Photo © Mikhail Kukharenko.
Mikhail Kukharenko
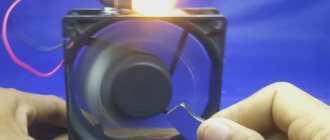
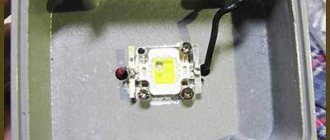
What is a pyro sensor and how to make an IR motion sensor yourself
Motion sensors have long become commonplace in the security of premises. A pyro sensor that responds to infrared IR radiation is mainly used as a motion detector-sensor. The white and spherical one in the photo is a Fresnel lens, more on that later.
First you need to find out what a pyro sensor consists of and how it works. The pyro sensor in my version has three outputs, this is an 834S IR pyro sensor. The black window is an infrared filter that transmits IR waves and blocks others.
There is a protrusion on the case, near it there is a plus power supply pin. Next comes the output pin and minus power supply.
Behind the IR filter you can see a fragile plate, it is this plate that detects the temperature change and changes its polarization value and an electric field appears. It is called a pyroelectric plate. Behind this plate there is a field-effect transistor that enhances this electric field that appears on the pyroelectric plate when the temperature changes (moving).
The Fresnel lens is used to focus infrared rays onto the pyroelectric.
Based on this pyro-sensor, you can assemble a simple motion sensor; its sensitivity will be very low, but it will do for an experiment. A microammeter is connected to record changes. When turned on, you need to wait until the arrow reaches the middle of the scale. Now, if you turn on the light next to the sensor lighter or wave your hand, the arrow will deviate slightly and return to its original position.
Source