Today we want to share with you ways to make a magnet with your own hands. Making a craft from coffee beans is not difficult and does not require much time.
In addition to the magnet, you can make a candlestick from coffee beans and also in the shape of a heart.
You will need:
- coffee beans;
- thermal gun;
- hard cardboard;
- black gouache;
- brush();
- multi-colored beads;
- artificial leaves;
- magnet.
Stages of work:
To make a heart from coffee beans, first cut out any heart template you like from thick cardboard.
Using a brush, cover the heart with black gouache.
You need to cover it with gouache on both sides. Once the heart is dry, you can start gluing the grains.
Glue the grains along the perimeter of the heart, smooth side up.
On the back side we glue a magnet evenly.
Pay attention to the photo of a heart made of coffee beans; for decoration we use beads of different sizes and colors. We glue them in the shape of a flower and complement them with artificial leaves. Well, that's all.
Magnet “Coffee Confession”
The best gift is one that is given with love and from the heart. We invite you to learn how to make a heart-shaped magnet with your own hands. It’s these kinds of surprises that are so nice to give to your loved ones!
You will need:
- dark brown felt;
- scissors;
- vintage wallpaper;
- silicone glue (stick);
- lighter;
- coffee beans (2 pcs.);
- magnetic tape;
- thin green ribbon;
- decorative enamel (paint) of gold color.
Stages of work:
At the first stage of our work, we give the coffee beans a golden shine. Fill them with paint and leave to dry for 10-15 minutes.
While the grains are standing aside, we will cut out our hearts.
The main thing is that they turn out symmetrical. To do this, take felt, fold it in half and draw the outline of half the heart. Cut out identical parts. So we got neat hearts. We work with wallpaper using the same principle. Only in this case, the details of the hearts will be larger along the contour by 0.3-0.4mm. And most importantly, we cut out the letters. To do this, we use some of the wallpaper with small text.
We prepare letters. We twist them tightly along their length and tie them with a ribbon. To maintain proportions, we make the bow small. The delicate green color of the ribbon will add color to our fake. Using silicone glue, glue the felt hearts to the wallpaper. After that, we need to connect all the parts together. To do this, we put one part on top of another and fix it with glue.
By this time the coffee beans had just dried. We place them on the glue on the left side of the felt piece. We drip just a little bit of glue so that it doesn’t come out from under the sides of the coffee beans.
We attach prepared letters to the right.
We glue magnetic tape to the back of our fake. The magnet usually already has an adhesive side, but this is not enough for good adhesion to the surface. For this reason, it is better to place it on silicone glue. And now our “Coffee Confession” magnet is ready. It looks simple and elegant, without unnecessary details. As an idea, you can attach a real note of recognition to the hearts and give it to your loved ones. So everything is in your hands and it’s not difficult at all!
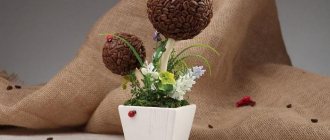
A coffee tree
Our master class on coffee crafts offers a look at two main techniques for creating a tree and gives instructions on how to make a “coffee tree” craft to suit your taste. The “coffee tree” craft is the classic and most common version of topiary in coffee art.
Tools and materials:
- Coffee beans
- Pencil, stick or twig
- Pot or cup or any other container you like
- Alabaster
- Ball.
- Pot filler. (small pebbles or glass, moss, etc.)
- Brown acrylic paint
- Leg-split
- Hot glue
- Scissors
- Additional decor for decorating topiary
First you need to paint the sphere and the future trunk of the craft brown and let it dry. Coffee beans need to be sorted into several groups, after weeding out the broken ones.
- Round
- Beautiful
- Regular
- Small
Beautiful beans are suitable for the most visible part of the crown of the coffee tree. The less noticeable lower parts of the crown are decorated with ordinary ones. Small ones can be used to cover grain gaps when they appear. Round ones are suitable for finishing the topiary pot itself.
Raffia magnet for March 8
On the eve of spring, everyone is fussing and thinking about who to give what on this wonderful holiday that the entire beautiful half of humanity is so looking forward to. I would like to please everyone with a pleasant surprise for mothers, grandmothers, sisters and friends at work.
Many people do not know what raffia is. It is a natural fiber from the leaves of palm plants. Raffia is painted in different colors after processing, it is quite often found in decoration, we will use natural-colored raffia. It can be purchased at a craft store.
You will need:
- natural color raffia;
- coffee beans;
- cardboard blank in the form of the number 8;
- scissors;
- glue;
- magnet.
Stages of work:
So, we prepare all the materials and begin the creative process. I printed out the number 8 on a printer, cut it out of paper, transferred it to cardboard and thus I got a cardboard blank. We take the raffia fiber and glue it to the workpiece, then we begin to wrap it tightly. So we wrap the entire number 8 tightly, and do not forget to periodically coat it with glue so that the raffia does not move in the future. We determine the front side and glue the coffee beans, glue them as your imagination allows.
Glue a magnet on the back side. I had an ordinary flat magnet, I cut off as much as I needed.
So, in principle, the raffia magnet for March 8 is ready. Nothing complicated, quite fast and accessible. You can please all your loved ones with your creation.
Craft rooster from egg trays
This is what you can make a rooster from. This is completely waste material, but it makes wonderful crafts. To work you will need:
- egg trays;
- acrylic paints;
- thin white paper;
- cardboard;
- newspapers;
- scissors;
- glue gun;
- tassels;
- pencil.
From the protruding parts of the tray, cut blanks that are similar in shape to elongated petals.
When you make the rooster's head, they need to be glued together with thin white paper to create a semblance of a flower. Cut out the bird's beard from the side of the box. The rounded triangle will become its beak; this blank needs to be glued on the side. For the beak you will need 2 such parts. Cut out bird wings from cardboard using a glue gun and cover them with leaf-like blanks from egg trays.
Most of your time will be spent waiting for the papier-mâché rooster's body to dry. Therefore, it is better to start working with its formation. Cut newspapers into strips, dilute glue with water in a 1:2 ratio in a container. Dip the paper here and stick it onto the inflated balloon. It will take more than one hour for this part to dry. When this happens, pierce the ball with a sharp object and remove it through the small hole left.
This rounded piece needs to be cut into two unequal parts, insert the smaller one into the larger one to increase the strength of the part. Glue these elements together using a glue gun.
While the papier-mâché was drying, you had enough time to form the head and neck of the rooster. To the part that looks like a flower with elongated petals, made using petals from an egg tray, glue two triangular beak blanks and a comb cut out of cardboard.
Insert a second one of the same type into this flower blank, then a third, fourth and fifth. The head and neck of the bird are ready. Glue this piece to the side of the papier-mâché ball half. To do this, use a glue gun to attach a strip of cardboard inside the neck so that it looks out from below. We glue this label to the papier-mâché half of the body.
To make the tail, draw semicircular lines on the egg lid and cut along them. Glue the tail to the back of the body. That's it, you can paint the cockerel with acrylic paints, when it dries, hand the craft to the recipient or place it in the most prominent place in your home as a bright attribute of the holiday.
You can make a rooster with your own hands not only for the New Year, but also for Easter. Then you will put colored eggs in its semicircular body, thus decorating the festive table.
How to make a “Horseshoe” magnet with your own hands
I would like to invite you to make a very original and fragrant souvenir with me - a magnet made of coffee beans in the shape of a horseshoe, which will not only delight you, your friends and relatives, but will also be pleasantly fragrant with its aroma. The Horseshoe magnet is a great gift for any occasion.
You will need:
- cardboard,
- scissors,
- sackcloth,
- simple pencil,
- regular white A4 sheet,
- glue “Moment Crystal”,
- coffee beans,
- cinnamon stick,
- magnet,
- leg-split,
- various dried flowers.
Stages of work:
First we need a horseshoe template.
You can find a picture on the Internet and print it. There is also an option to save the picture on your computer, enlarge or reduce it to the desired size, attach the sheet to the screen and redraw it using a simple pencil. We cut out a horseshoe from paper with scissors.
Now we transfer the template onto the cardboard using a simple pencil. Cut out a horseshoe from cardboard. The basis for the future magnet is ready.
Cut a piece of burlap slightly larger than the horseshoe. We coat the horseshoe on one side with glue and apply it to the burlap. Press down a little so that the parts stick together.
We cut the burlap along the contour of the horseshoe, leaving an edge of about half a centimeter.
We cut the burlap and glue it. We glue the edges in a circle. Now you need to cover this part with burlap.
To do this, cut out another piece of burlap, slightly larger in size than the horseshoe. We glue the horseshoe with glue and glue the burlap.
We cut the burlap along the contour of the horseshoe. Thus, the cardboard blank is carefully covered with burlap on both sides. Burlap can be purchased at any floral supply store.
We glue it onto the top of the horseshoe on both sides using a magnet.
Glue the coffee beans tightly to each other. The grains can be glued on any side as you like.
I alternated the grains and glued them on different sides; you can also glue the grains on one side.
Thus, we glue the entire horseshoe.
After all the beans are glued, we begin to cover the end with coffee beans. You will need to glue it on the inside and outside. The magnet turns out to be quite voluminous.
Glue a cinnamon stick to the upper left part of the horseshoe. We tie a bow from twine and glue it on top of the cinnamon.
Just to the right of the bottom of the center we glue the dried flower.
I used a set of scented mixture purchased from Ikea. That's all, the Horseshoe magnet is completely ready and the coffee smells pleasant.
DIY refrigerator magnet made from coffee and sisal
Be sure to take advantage of this wonderful opportunity to express your feelings - give the magnet to your loved ones, no matter whether you made it yourself or bought it in a store. Any gift and your attention will certainly be appreciated.
You will need:
- very thick cardboard,
- sisal,
- linen or jute twine,
- coffee beans,
- magnetic vinyl,
- glue gun (hot glue).
Stages of work:
Using scissors (a paper cutter) cut out a heart from thick cardboard. In this case, the size of the heart is approximately 10cm.
We cut out a heart from rolled sisal, the same size as the cardboard base, and glue them together. In the same way, we glue another 3-4 layers of sisal, so that the cardboard base does not show through.
We glue the end of the heart with linen or jute twine. You can replace the twine with knitting threads of a similar color.
Stepping back a little from the edge, lay out a heart made of coffee beans and fix it with hot glue.
Glue the second coffee heart along the edge, as shown in the photo.
Glue a twine bow in the center of the composition. We turn the Valentine card over and glue a magnet (magnetic vinyl) on the back side.
So, in general, it’s not difficult, you can make any magnet with your own hands and give it as a gift for any occasion.
Irina
Hello, I'm Irina. I have been a coffee expert for over 15 years. Over the past 6 years, I have tried every coffee there is to try and even opened my own coffee shop. Join me on this journey to learn more about coffee at Pokofemanim.ru
