Painted vase from a plastic bottle
You will need: plastic bottles, primer, scissors, electrical tape, spray paint.
Master Class
- Cut off the top of the bottle.
- Cover the edge with electrical tape.
- Apply a coat of primer to the bottle.
- Paint the bottle with spray paint.
- Wait for it to dry completely!
The painted vase from a plastic bottle is ready! I recommend watching this video!
DIY vase from a plastic bottle
Plasticine vase
A vase made from a bottle and plasticine is an ideal activity for children. The difficulty tends to zero, but there is enough entertainment for the whole day!
The bottle just needs to be cut to the required height. Then it should be primed with PVA and water in a ratio of 1 to 3. That’s it, you can sculpt figures from plasticine and sculpt them onto the bottle.
A vase made from a bottle and plasticine should be stored in the shade. Otherwise, all the decorations may “float”. It is also recommended to take sculptural plasticine, as it is much harder.
Hanging vase using decoupage technique
You will need: napkins for decoupage, scissors, brush, glue, glue gun, hole punch, plastic bottle, decorative braid with pom-poms or ribbon, rope for hanging.
Master Class
- Cut off the top of the bottle and work from the bottom.
- Glue the decoupage napkin to the bottom of the bottle.
- Use a hole punch to make two holes for the rope at the top, opposite each other.
- Tie a rope.
- Glue the ribbon to the top edge of the vase using a glue gun.
A hanging vase made from a plastic bottle using the decoupage technique is ready! I recommend watching this video!
DIY vase made from a plastic bottle.
Manufacturing examples with detailed descriptions
These master classes will surely inspire someone to create an interesting vase for flowers, fruits or sweets. They are made simply, mainly from what is found in any home. You can involve children in the process - they really like such joint activities, and the craft can be useful at school or kindergarten.
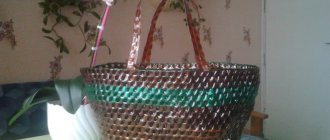
Vase with wicker rim
Vase with wicker rim
Let's start with the simplest. This vase is made using scissors; no other tool is needed.
| Step by step photos | Description |
| Step 1 | We cut off the top part of the bottle at the place where the narrowing begins. |
| Step 2 | From the cut to approximately the middle of the height, we cut the walls into thin strips of the same width. And bend them outward. |
| Step 3 | We bend one strip inward so that it intersects two adjacent strips, and tuck its tip under the third. |
| We do the same thing one by one with all the other strips. |
| Step 5 | We repeat these steps in a circle and get a beautiful carved side. If desired, the finished vase can be painted with spray paint. |
Advice. You can paint the bottle before making the vase by simply pouring a little paint into it, screwing on the lid and rotating the container in different directions so that all the paint spreads along the walls.
Designer vase
This option will appeal to fans of non-standard solutions and abstractions. In addition to scissors, you will need such an unusual tool as pliers or tweezers, and decorative materials - metallic paint and a little patina.
| Step by step photos | Description |
| You can make a vase from a bottle of any size. First, the plastic needs to be softened well, for which the bottle is immersed in boiling water or boiling water is poured into it. |
| When the plastic warms up and becomes elastic, the containers are given a crumpled shape using pliers, making folds in any order and direction. |
| Step 3 | While working, you need to make sure that the bottom remains flat and the neck does not tip too far to the side. If you did not have time to crush the container before the plastic cooled, the procedure with boiling water can be repeated. |
| Step 4 | When the bottle is dry, it is painted with a brush or spray paint, without particularly trying to distribute the paint evenly. And left to dry. To completely mask the original material, it is better to apply the paint in 2-3 layers. |
| Step 5 | The final stage is the application of patina or tint paint. It creates only highlights on the most prominent places, and the paint is applied with an almost dry brush. |
| All that remains is to place dried flowers or decorative twigs in the vase. |
Vase made of patches
Vase made of patches
Prepare the following materials:
- one and a half plastic bottle;
- cutting tool;
- paper masking tape;
- shoe polish and brush;
- acrylic lacquer;
- glue gun;
- cloth napkin;
- thin braid.
Step 1.
Cut off the bottom and neck of the bottle. We cut a round hole in the center of the cut bottom.
Cutting off the bottom
Open the bottles
Removing the neck
Step 2.
We cover both parts with torn pieces of masking tape. The smaller they are, the thicker the pattern on the walls of the vase will be. Each piece should slightly overlap the adjacent ones, forming a double layer of tape at the junction.
Gluing pieces of masking tape to the bottom
And for the main part of the future vase
Step 3.
Thickly coat the parts of the future vase with shoe polish using a brush.
Applying shoe polish
The bottom must be lubricated without affecting the central recess
Step 4.
We wipe off the excess cream with a soft cloth and get a contrasting pattern on the surface.
Step 5.
Glue the cut bottle to the inverted bottom with hot glue and wait until it sets.
Applying hot glue
Prices for glue guns
Glue guns
Connecting elements
Step 6.
Using the same glue, glue the braid to the edge.
Fixing the braid
Step 7
We cover the product with acrylic varnish.
The varnish can be taken in the form of a spray
Vases with relief patterns
You can create a relief on the surface of a cut plastic bottle in different ways, thereby completely changing its shape and hiding the base under a layer of decor. The simplest one is to stick any materials available in the house on the walls.
Vases with relief patterns
It can be:
- buttons and beads;
- pasta;
- coffee beans;
- cereals;
- salt dough decor;
- bamboo skewers;
- shells, etc.
Green bottle vase
Options for decorating vases
After this, all that remains is to cover the vase with spray paint, and no one will ever even guess what it is made of.
Multilayer flowers from plastic bottles
Another unusual way of decoration suggests using old nylon tights for this. This thin and elastic material is perfectly formed into any of the most intricate patterns, from waves to chic roses.
In the following example, a liter plastic bottle from household chemicals is used to make a vase.
Step 1.
We cut off the neck of the bottle, and one leg and toe section from the tights.
Prepared materials
Step 2.
Thickly lubricate the walls of the container with PVA glue and immediately pull the nylon pipe onto it. While the glue has not hardened, we form intricate folds and patterns from it. This is very easy to do on a slippery surface. Cover the top of the dried product with glue again.
Nylon sticks to the bottle
Step 3.
We decorate the upper edge of the vase with random drips. They can be formed from salt dough or hot glue.
Edge decoration
Step 4.
You can stop here and paint the vase in the chosen color or varnish it. Or you can continue decorating by gluing any decor from the examples listed above to the walls.
Vase after painting
Floral decoration for added sophistication
Openwork vase
Using a soldering iron or an awl heated over a fire, you can burn openwork patterns into the plastic walls of used containers of amazing beauty. They can be a repeating pattern, individual patterns, or randomly located holes of different sizes.
Openwork vase
Step 1.
We take a clean bottle, heat up the soldering iron, and, without removing the lid, begin to burn holes in the bottle, stepping back a little from the part that tapers upward. If the drawing needs to be clear, it is better to apply it in advance with a marker.
Burning holes
Step 2.
Having finished with the creative part of the work, use the same soldering iron to cut off the top part of the bottle with a cap according to the design.
Cutting off the neck
Step 3.
Apply spray paint to the item. The original openwork vase is ready.
Product coloring
It looks good even without decorative coating. And you can use it as a flowerpot for flowers on the street or on the balcony - plastic is not afraid of either humidity or sunlight.
Other decoration methods
If you look around carefully or rummage through your handicraft bins, you can find a huge number of options for decorating a vase from a plastic bottle. Let's give a few examples.
Lace, pearl beads and small roses made from salt dough can turn an ordinary bottle into an elegant and delicate vase, in which you would not be ashamed to place even a bride’s bouquet.
Decoration with beads, ribbon flowers, lace
Video - Romantic vase made from a plastic bottle
Twine, thick threads or knitting yarn, with which the container is wrapped in a circle, turn after turn, can also become an excellent decoration. To prevent them from slipping, the walls are lubricated with glue during the winding process.
Example of decorating with threads
A very original wicker winding is obtained if the walls of the vase are first vertically cut into an even number of petals. Then the thread is tied to the bottom of one of them and braids all the petals, going around them from the outside, then from the inside.
Blank
Soft vase made of plastic and threads
Of course, such a product will not be airtight, but it can be used for dry bouquets, artificial flowers or pencils.
Decorating a vase with knitted items does not require any time or effort: the sleeves of old knitted sweaters or children's leggings, the tops of socks.
Knitted covers for vases
Another popular decoration method is decoupage. For decorating plastic vases, ordinary three-layer table napkins are most suitable. Or rather, their top layer is with a pattern. Individual decorative elements are cut out or torn out by hand and glued onto pre-painted walls with PVA glue. And the finished product is varnished in two or three layers.
Video - Do-it-yourself vase from a plastic bottle
And, of course, hand painting or drawing using a stencil. You don’t need to be a good artist to draw a funny face, colorful squares or rainbow stripes on the walls of a vase.
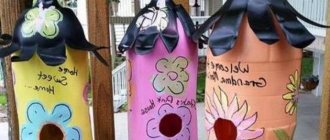
Vase “Cat” from a plastic bottle
Vase on a concrete base
Talking about products using mortars, let's start with a simple but rather original option.
Vase on a concrete base
Step 1.
We cut the bottle to the desired height and melt the cut with an iron.
Edge processing
Step 2.
We mix the solution from a ready-made dry cement mixture or from sifted sand and cement in a ratio of 4x1. Pour some into a cardboard box of a suitable size to cover the bottom with a 2-3 cm layer.
Pouring the solution into the mold
Step 3.
Place the cut bottle on the solution in the box, align it in the center and pour in the remaining mixture. Level the surface.
Filling with solution
Step 4.
When the mixture hardens, cut the box and remove it, and sand the concrete part of the vase until smooth.
Grinding
Step 5.
We decorate the base in any way. In our case, segmental staining was chosen. Painting tape is placed along the border of areas of different colors to prevent the paints from mixing.
Coloring
Vase made of plastic bottle and threads
You will need: knitting threads of any colors (thick yarn), a wide plastic bottle, scissors, a strip of fabric, threads, a needle.
Master Class
- Cut off the top of the bottle and work from the bottom.
- Cut the sides into an even number of equal strips, for example 10.
- Tie the end of the yarn to the bottom of any strip.
- Start weaving in this way: braid the strips through one - the first in front, the second in the back. From below, gradually rise up, weaving around the entire vase.
- Secure the knot to the inside of the vase.
- Sew the fabric strip with large stitches onto the edge of the vase.
A vase made of plastic bottles and threads is ready!
Making a decorative vase master class
Let's start making a vase. For a vase, take 2 jars, remove the bottom of one jar with a can opener to make a cylinder.
Glue the jars together with hot glue to create a vase.
To ensure that the twine sticks well and easily and to make the joint less noticeable, cover the vase with several layers of masking tape. If the tape is wide, you will get 4 layers.
Cover the vase with twine, gradually coating it with glue. Start pasting with twine from the inside, make several turns of twine.
Without cutting the twine, cover the vase completely.
Also, without cutting the twine, cover the bottom.
You can cut the twine and start gluing the bottom from the middle, it will be easier. Let the glue dry. Hot glue a lace ribbon along the top and bottom edges of the vase, with an overlap of about 1 cm.
Let's start making roses and leaves from burlap. The burlap must be prepared in advance, dipped in PVA glue, and squeezed out the glue. Allow the glue to dry completely. Using a ballpoint pen, trace around the tin jar from which the vase is made, or make a template out of cardboard with a diameter of 8 cm. Cut out 5 circles from the burlap, from which to make roses.
Cut the circles in a spiral, since the diameter of the circles is small, there are 2-3 turns and the turns should not be narrow.
Twist the spiral into a flower. Coat the bottom edge of the spiral with hot glue when twisting. Make 5 roses.
Draw 5 leaves on the burlap using a template or by hand. Since the roses turned out to be small, the leaves should also be small: the length of the leaves is 5 cm and the width is 2 cm. Cut the leaves from burlap.
To give the leaves volume, make veins on them using twine. To do this, cut 10 pieces of 4 cm each from twine, 2 per sheet. Coat the twine with instant glue and stick it onto the leaves to create veins, cut off the excess twine.
For each leaf, cut 8 cm of twine. Coat it with glue and stick it on the leaves in the middle.
Cut 5 pieces of 15 cm each from the twine and glue along the edge of the leaves. Instead of cutting the twine into pieces, you can glue it from a reel and cut off the twine at the end. Allow the glue to dry each time you glue.
Roses and leaves are ready. Let's start decorating the vase. Hot glue the leaves onto the vase. The upper and lower leaves cover the seams on the lace.
Also hot glue 5 roses near the leaves.
Decorative vase made of twine
ready for storing combs.
You can put combs in it.
Head: Natalia Aleksandrovna Tarasova
Trushina Lida Tarasova Natalia Aleksandrovna
| Comments to the news “Decorative vase made of twine. Master class” is already 0:
Interesting on the web:
E-book “The best handicraft master classes.”
After that, click the “Get book” button.
"Masterclasses" 2011-2017
. All articles on the site are copyrighted, copying is strictly prohibited. In case of partial citation, a direct indexed link to the “Masterclasses” website is required.
Attention! It is forbidden to use expressions in the form of obscene and insulting. HTML tags and URLs are not allowed
Set of vases made from plastic bottles
You will need: 6 identical square plastic bottles, rubber band, colored tape.
Master Class
- Gather the bottles together, placing them side by side, 3 pieces in 2 rows.
- Put a rubber band on them.
- Carefully secure the structure with tape.
- Remove the rubber band.
A set of vases made from plastic bottles is ready! I recommend watching this video!
Vase made from a plastic bottle
Flowerpot
Everyone loves cats (or at least most of them). Decorate your apartment with this cute vase and it will bring a smile to your face every time.
Necessary materials:
- Large plastic bottle (2 liters)
- Stationery knife
- Spray can with white paint
- Markers (black and light pink)
- Flowers
Step-by-step instruction:
Step 1: Cleaning the Bottle
Remove the label from the plastic bottle and wash it thoroughly (so that there are no traces of sweet water in the middle or glue from the label on the outside).
Step 2: Mark the location of the drawing
Mark how tall you want your vase to be and draw a horizontal line around the entire bottle. It should not be too high for the cat to turn out nice.
Step 3: Draw a cat
On one side of the bottle, above the horizontal line you just drew, draw two ears, as shown in the photo.
Step 4: Cut it out
Now cut out the bottom of the plastic bottle along the outlined contour. Be especially careful with the ears so that they are even and uniform.
Step 5: Preparing for Painting
- Cover the floor with newspapers or boxes to avoid getting dirty while painting.
- Before painting, you can apply a coat of primer to help the paint adhere better.
Step 6: Painting
Apply white spray paint to the bottle. Make sure that the layer is uniform and there are no transparent areas left.
Step 7: Draw the cat
Now the fun part: drawing the cat. You can copy from a photo or come up with your own.
All that remains is to put the flowers in the vase; it is low, so a small bouquet of short-cut flowers will do. You can also add soil and plant a houseplant.
Look how beautiful it turns out, I am absolutely delighted with this vase!
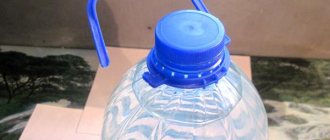
Hanging vase for the garden
You will need: a plastic bottle of detergent, scissors or a craft knife, a hole punch, a permanent marker.
Master Class
- Cut part of the bottle as shown in the picture.
- Use a hole punch to make a hanging hole in the top of the bottle.
- Draw a pattern on the vase.
A hanging vase made from a plastic bottle for the garden is ready!
Historical information about vases
The first vases were used to store bulk materials and liquids. These vessels were made exclusively from clay. For greater strength, finished products were fired in special ovens or dried in the sun.
Vases were used to decorate the tombs of rulers and rich city dwellers. In Ancient Egypt, funeral amphorae were filled with fruits, gold and precious stones. The Egyptians believed that the pharaohs would need food and familiar luxuries in the afterlife. Already in ancient times, Greek and Egyptian potters decorated their amphorae with everyday scenes, plant ornaments and images of animals. Archaeologists use such finds to recreate scenes of everyday life, military battles, and festive rituals.
Vase “Cat” from a plastic bottle
You will need: a two-liter plastic bottle, a stationery knife, black and pink markers, a can of white paint.
Master Class
- Mark the height of the vase by making a horizontal line around the bottle.
- Draw two ears above the line.
- Cut out the cat along the intended contour, carefully and slowly cut out the ears.
- Spray paint the vase.
- Wait until completely dry.
- Draw a cat's face with a marker and color the ears.
A vase in the shape of a cat from a plastic bottle is ready! I recommend watching the video master class!
Crafts from plastic bottles: “Cat” vase. Crafts for the garden and garden from garbage. Video lesson
Step-by-step instructions for decorating with twine
Twine is a strong thread made from natural or chemical fibers (or a combination thereof). Decorating a bottle with twine is a fairly simple type of needlework. You can buy this kind of twine at any hardware store or shops for hand made craftswomen. A few simple manipulations, a minimum of tools, materials and an ordinary glass container turns into an original gift. It does not lose its practical purpose. This decorated vessel is used for different purposes:
- Container for cereals. Decorating a jar with twine, as well as a tag indicating the name of the products (salt, sugar, rice, buckwheat) is a great idea for decorating kitchen shelves.
- Vase. Simple wildflowers and exquisite roses will look good in handmade flowerpots.
- Interior decor element. Bottles decorated with twine are perfect for an Eco-style interior. Thanks to the designers who came up with interior design using natural materials and beautifully played with the idea of exquisite simplicity. All we have to do is complement their idea with cute little trinkets made by ourselves.
- A beautiful container for drinks. Homemade lemonade, liquid sorbet, juice - all these wonderful drinks will seem even tastier if they are served in a beautiful vessel.
Advice. It’s not just empty vessels that are decorated with twine. A gift in the form of a bottle of wine decorated with twine is another option for a holiday souvenir.
To decorate bottles with twine yourself, you need to stock up on the following materials and tools:
- Bottle for decoration;
- A piece of twine;
- Acetone or alcohol;
- Moment glue or thermal glue;
- Scissors;
- Glue gun.
This type of needlework is not difficult. Even a child can do it:
- Wash. You need to start decorating bottles with twine after first washing them, peeling off the stickers and drying them.
- Degrease. In order for the glue to adhere well to the bottle, and the rope to adhere well to the glue, it is necessary to treat the surface with acetone or alcohol.
- Wrap. Next comes decorating the bottles with twine.
Original vase made from a plastic bottle
You will need: a plastic bottle, scissors, a stationery knife, a colored napkin.
Master Class
- Cut off the neck of the bottle.
- Cut the top of the bottle into equal strips.
- Bend the strips outward from class=”aligncenter” width=”722″ height=”512″[/img]
- Fold the strip in half and turn it to the side so that the strip crosses the next two strips and reaches the middle of the third.
- Do this process with each strip.
- Insert a tissue paper into the vase for color.
The original vase made from a plastic bottle is ready!
How to make a floor vase yourself
A floor vase successfully complements the interior, but, as a rule, such products are not affordable for everyone. Therefore, creating it yourself is a good way to save money and demonstrate your talent as a decorator.
- Pasta vase
. As a basis for the product, you can take cylinders of thick cardboard, on which linoleum is wound. We cover it with glue and thickly paste it with different types of pasta. Apply gold or silver paint from a spray bottle and let the vase dry. It turns out very impressive and unusual. - Vase made of newspaper vine
. We make newspaper tubes from old newspapers by winding paper on thin knitting needles. The basis of our vase will be a tube of paper towels; we will tightly cover it with tubes. In order to give the vase a beautiful shape, we cut the tubes at an angle and make a smooth transition. Mix wood varnish with the selected paint color and coat the product. We decorate the vase with flowers made from ribbons, braid and beads. - Vase made of buttons
. If you have accumulated a lot of different buttons, you can use them as vase decoration. A rectangular base works well. Apply universal glue, glue buttons and cover with acrylic paint. A unique handmade vase is ready!
Openwork vase made from a plastic bottle
You will need: a plastic bottle, a soldering iron or nail, a can of paint, a marker.
Master Class
- Cut off the neck of the bottle.
- Draw a pattern with a marker.
- Heat the soldering iron or nail.
- Carefully work with the soldering iron, making a hole according to the pattern.
- Paint the vase and wait until it dries completely.
The openwork vase made from a plastic bottle is ready!
How to properly wrap a glass container with twine?
Decorating bottles with twine with your own hands is not done in any order. When “winding” bottles you need to follow several rules:
- You need to start from the bottom. Apply glue to it and simply roll the thread “snail” from the center to the edges of the bottom. The twine must be laid tightly and evenly so that it turns out neatly and looks beautiful. You also need to put a thread on the edge of the bottom so that the container does not lose stability.
- Then the bottle is decorated with twine from the bottom up to the neck. In this case, the rope should lie parallel to the bottom. If at least one layer “tilts,” then the rest will be laid more crookedly each time. Twine decor will be a disastrous idea.
- The neck is wrapped last. The thread must be secured well so that it does not unwind later. The twine decor is ready.
Advice. Do not glue the entire surface at once. It will be difficult for you to work. It is better to coat the glass with glue in stages, in parts. Then the glue does not dry too quickly and does not stick to your hands.
The decor of a container decorated with twine can be supplemented with pieces of lace, buttons, and fabric flowers. Using glue, twist circles from threads of different colors and glue them to the workpiece. You will get a wonderful vessel for a kitchen in the style of American “country” or French “Provence”. Decorating bottles with twine and coffee is another idea for designer decoration of glass containers. Coffee beans are glued on top of the threads. Here you can fully express your creative inclinations. Fragrant grains are simply “scattered” over the surface or glued in the form of an ornament, design, or composition.
Exquisite vase made from a plastic bottle
You will need: a half liter plastic bottle, a candle, a needle, scissors.
Master Class
- Cut a hole in the bottom of the bottle equal to the diameter of the cap.
- Cut off the bottom of the bottle.
- Place the bottom part with the hole on the neck of the bottle and screw on the cap.
- Think over the drawing.
- Light a candle, hold the needle for 10 seconds and poke holes in the plastic at the top. The needle should go in like clockwork.
- For one flower you need to pierce 5 holes, the length of 5 petals. Cut out the petals with scissors.
- Make 6 flowers this way.
- Make a vertical strip of holes from the middle of the vase, almost reaching the neck.
- Make 15-20 strips of holes in the same way.
- Decorate the bottom of the vase by making figures of eight and holes.
An exquisite vase made from a plastic bottle is ready! I recommend watching this video!
Romantic vase made from a plastic bottle
I recommend viewing a photo gallery of ideas for creating creative vases from plastic bottles!
Making a vase from a plastic bottle is quite simple. Choose the best idea and follow the step-by-step master classes. Try to create with your own hands and undoubtedly everything will work out!
DIY floor vase decor
Of course, floor vases differ from ordinary ones in their size. These are often quite large items. Therefore, making them yourself can be difficult. In this case, we recommend paying more attention to the decor. This requires no less effort and imagination. But rest assured that the result is really worth it.
Perhaps the easiest way to decorate a vase is to paint it with acrylic paints. For this you will also need varnish, brushes and tape or stencils. Before work, you must protect your work surface, so we recommend placing sheets of paper or newspaper on it. Only after this can you start working.
First you need to paint the vase white. This will create a background against which the design or decor will stand out much more clearly. If necessary, you can apply two or three layers. You also need to wait until it dries so as not to ruin all the coloring. Next, apply a stencil to the vase or glue it with tape in vertical lines. Paint the intermediate space with contrasting paint. Once the stencil or tape can be removed, you will get a truly stylish and original vase.
Recently, eco-decor has become quite popular. Absolutely anyone can decorate a vase in this style. To do this, you just need to prepare even cuts of branches. Sand them with sandpaper to avoid any roughness. After this, you need to glue them onto the vase in any order. Agree, the process is quite simple, but the result is worthwhile.
A rather unusual design of a floor vase always looks advantageous. In this case, we recommend using coins. Of course, you first need to prepare the vase. That is, paint it in a suitable shade and wait until it dries completely. Only after this can you proceed to the next stage. Using a small amount of hot glue, fix the coins on the surface of the vase, making small indentations.
In fact, you can use pieces of mirror, small pieces of wood, mosaics, shells and much more for this. It all depends on your imagination and willingness to experiment.
If you are looking for a simple option for decorating a vase, then use twine or a not too dense rope as decoration. Simply wrap it around the vase and secure it with glue.
Despite the simplicity of execution, such products always attract attention and raise questions from guests.
Themed decor looks great during the cold season. To do this, you can use an unnecessary knitted sweater. Depending on the size of the vase, cut off the sleeve or another part of the sweater. If necessary, you can sew the parts together. The result is a very beautiful, cozy DIY decor for a floor vase.
By the way, it is not at all necessary to decorate the outside of the vase. Fill the transparent product with sand, shells, various twigs, pebbles or even beads, wine corks. Each of the options looks original in its own way. Often, sticks, artificial flowers or cotton sprigs are placed in such vases. You can also decorate the composition with a garland. In the winter season, this indoor decor looks amazingly beautiful.
Decorating bottles - decoupage
Decoupage is a handicraft technique that has long been loved all over the world. It looks like an applique. It involves transferring a paper picture to almost any surface. With the help of decoupage, faceless objects become real objects of art. Old, unnecessary things get a second life. The same transformations apply to empty glass containers. Transparent or painted vessels, bottles, half decorated with linen cord, will become much more attractive with elements of decoupage.
What will you need to decorate a bottle with decoupage?
- Clean bottle;
- Napkins for decoupage;
- Acetone, alcohol;
- Acrylic paint is the basis for the primer;
- Decoupage glue or PVA;
- Synthetic brushes;
- Multi-colored acrylic paints;
- Varnish (acrylic);
- Decorative elements;
- Small scissors (you can use manicure scissors).
- Prime the surface with acrylic paint using a sponge. This will be the background for the future composition. If you need to make it more saturated, make several layers. Set aside until the paint dries completely.
- Cut out a picture from a napkin. Remove the part from above (the one with the image).
- Place the picture on a dry surface. Cover with decoupage glue using a brush from the center to the edges. It is important to ensure that there are no bubbles left under the napkin. If PVA glue is used, it is first diluted in equal proportions with water.
- When the picture is dry, apply varnish on top of it. It will protect against damage, as well as exposure to water and moisture. At least 3 layers should be applied. Only in this case will such a container last a long time.
- Crystals, decoupage elements, painting, burlap, jute, twine - ideas for decorating bottles are truly inexhaustible. Using improvised means, craftsmen managed to turn unnecessary glass containers into an extravagant decorative element. Now this designer transformation is within the power of anyone who strives to make their life cozy and extraordinary.
Source