Using simple tools that everyone has at hand, you can create a fashionable, eye-catching interior element from an ordinary and inconspicuous glass vase. The main thing in this case is to think through exactly what the new thing in the house should be and what materials to use to make it complement it.
Autumn vase decor with applique
Vase decor with sparkles
How to make a clay mug with your own hands step by step
Materials: clay, brush, water, spatula.
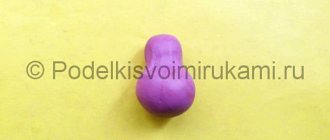
1. Using both hands, form the finished clay into a ball the size of an orange.
2. Press the center of the ball with your thumb, pinch it, and rotate the material around your finger with your other hand.
3. Start sculpting the cup from the bottom up.
4. The spatula will smooth out the edges and inside of the product.
5. You need to rotate the cup to smooth its bottom (it is convenient to do this on a sturdy cake stand). Smoothing is done with wet hands.
The following video shows how to make a clay mug with your own hands step by step:
Where is the vase?
The plant was founded in 1966 in the city of Tolyatti, where the headquarters and main production are located.
Interesting materials:
How to properly lay tiles on a wooden floor? How to properly lay tiles on the stove? How to properly lay underlay under laminate? How to properly place a pipe in a ditch? How to use a foam canister correctly? How to properly use a diffuser at home? How to use an electric oven correctly? How to use a gas boiler correctly? How to use construction foam correctly? How to use pool tablets correctly?
How to make a clay plate with your own hands, step-by-step instructions
And now step by step about how pottery is made.
To make your own plate, you need: kneaded clay, a rolling pin, a cup of water, a wooden spatula, a sheet of paper and a flat surface. Knead the clay until it does not stick to your hands: it should be elastic and pliable.
The plate is made like this:
1. Roll a ball with a diameter of 8 cm. Make a depression in its center.
2. Gently press the indentation with your fingers: the ball rotates clockwise. Each movement stretches and enlarges the ball. Place the workpiece on a sheet of paper: this makes it convenient to rotate it. You will end up with something like a bowl, which can be given the desired shape.
3. Use a wooden spatula to form smooth edges (if you don’t have a spatula, just wet your fingers with water). Rotate the sheet in a circle, and a spatula or fingers applied perpendicularly will work for alignment.
4. Wet your fingers with water and smooth the inside of the product.
The plate is molded! The first test may be far from ideal, but only with experience the plates will become smoother and more pleasing to the eye.
Photo of vases in the interior
AB8=0O AB8=0O ;o > [email protected] >3> > [email protected] >3>
Sources
- https://design-homes.ru/idei-dlya-doma/napolnye-dekorativnye-vazy-v-interere
- https://vgostinoy.ru/vazy-v-interere-gostinoj-effektnyj-dizajn-v-55-foto-proektax/
- https://vyborok.com/rejting-luchshih-vaz-dlya-czvetov/
- https://www.domfront.ru/2012/12/vazy-v-interere/
- https://ogokuhnya.ru/sovremennye-vazy-2021-modnye-tendentsii-i-idei/
- https://proffstroygroup.ru/dekor/napolnye-vazy.html
- https://dekormyhome.ru/remont-i-oformlenie/napolnye-vazy-v-interere-vse-tonkosti-ispolzovaniia-77-foto.html
- https://all-designstroy.ru/vazy-v-interere/
- https://happymodern.ru/bolshie-vazy-v-interere/
- https://www.dizainvfoto.ru/dekor/napolnye-vazy-v-interere-sovremennye-i-klassicheskie-formy.html
- https://cornas.ru/napolnye-vazy-dlya-interera-foto-dekora/
- https://dizainmetrov.ru/vazy-v-interere/
List of required materials and tools
Before starting the work process, you need to prepare the following materials and tools:
- tools for working with clay parts;
- relief grip tool;
- knife;
- extruder for clay;
- clay;
- water;
- sponge;
- paints;
- brushes
Since my friend makes clay products, I was lucky that his workshop had a clay extruder. With the help of it I was able to make simply amazing pipes. If you do not have this machine, then you will need to struggle a little to make a similar shape. This is not so easy to do, but it is possible if you have a great desire to learn something new. You need to roll out the clay into a thick “dough” and roll it into tubes. The more interesting the shape, the more beautiful the design looks. Beauty can even lie in irregularities and careless curves.
Is it possible to add decoration to clay products?
Yes, you can! There are several ways to decorate clay products:
- Stamps with counter-relief. They can be found in specialized stores. Use them on slightly damp clay to make markings that are great for patterns or even "signatures".
- Tools: Forks, knives, needles, combs or the like can create amazing designs and textures that your pottery will benefit from.
- Imprints: leaves, stones, branches or similar. Press them gently into the clay to create an impression before firing or drying the piece.
The decoration really looks good, and unless you are creating pottery that requires glazing, these little decorations will make your pottery even more attractive.
How to make a vase from clay
There are several main stages along this path:
The working raw material must be thoroughly kneaded so that it is homogeneous, without air bubbles inside. If necessary, add water if the clay is too dry. Working with the material at this stage is reminiscent of kneading dough. The end result should be neat and dense.
Important! For tall shapes, including a vase, use denser clay. When preparing working raw materials, do not add a lot of water so that it does not turn out to be too liquid.
- Centering clay on potter's wheel
Place the resulting clay ball in the center on the potter's wheel and start the mechanism at maximum speed. Then wet the workpiece, your hands and start leveling the mass.
To do this, position your right hand so that the palm, perpendicular to the potter's wheel, touches the clay. Using your left fingers, first press the workpiece from above to flatten it. Then, applying pressure to the bottom of the clay piece, lift it up.
It is necessary to flatten and raise the working mass again until it is exactly in the center of the disk. A novice potter will need about 5 minutes to do this; a master, of course, will do it faster.
Usually, for the first time, until this stage, it is not completely clear how you can make a vase from this clay. Many people think that they won’t succeed - it’s hard to imagine how to create a finished product from the lump of blank lying in front of you.
Choosing a shape - what kind of vases there are
Before you start making a clay vase, you can study existing examples. Greek amphorae and dinos, simple Russian jugs and jugs, elegant multi-colored Chinese examples - all of them can serve as a source of inspiration.
However, it is not necessary to think through the form in advance. Improvisation while working is also a very interesting and promising path. This way we get truly unique, inimitable products.
Let's get started: step-by-step instructions for making a vase on a potter's wheel.
Making a vase from clay
Before you begin creating the main structure, you need to form a base. To do this, you will need to take a small piece of clay and knead it thoroughly until the formation has the same density. Then the resulting mass rises and drops onto the prepared piece of fabric. In this way it is possible to achieve a uniform and homogeneous thickness. After this, you need to cover the layer with a cloth and start rolling it out using a rolling pin.
After rolling, you need to inflate the balloon to the approximate size of the desired vase. The ball is placed exactly in the middle of the resulting layer. Modeling a vase from clay is a fascinating and inventive activity that requires the use of imagination. Therefore, it is necessary to imagine that the ball is the filling of a candy, which is wrapped in a clay wrapper. It is with these turning movements that the ball is gradually covered with a clay layer. Then the wall of the future vessel is carefully smoothed with your hands. If necessary, joints are formed, cracks and irregularities are corrected.
In this simple way it is possible to form the desired shape. Then you need to start creating the top part or neck. At this stage, you can begin to show your fantasies or preferences. Using a stack, you can make a triangular cutout that looks like a jug. Those who want their own clay vase to show off on the table along with flowers can form a perfectly even neck using manual smoothing. However, it is important to distribute the material evenly to maintain the same wall thickness.
The shape of the future vessel is ready. All that remains is to decorate it with patterns, appliques and any other decorations at your discretion. Can add:
- Butterflies;
- Flowers;
- Leaves;
- Letters and whole words;
- Various geometric shapes and much more.
To ensure that the vase becomes stable and does not fall after drying, it is better to place it in a plastic bowl that has a similar shape. Using a stack, you can decorate the vessel with additional patterns and add realism to the applied designs. If we are making a clay vase as a gift, we can add memorable phrases, names or wishes to it.
Vases in the interior of rooms are power
Vases can serve several functions in the home.
They create a festive mood - according to tradition, they are extracted from the depths on the days before the holidays. Depending on the date, flowers, branches with barely opened buds, Christmas or New Year fir branches with decorations are placed in them.
A voluminous vase with transparent sides can be filled with toys or fruits, which also brings a feeling of celebration.
Thanks to the vases, such a pleasant atmosphere can exist on weekdays. The dining table will only benefit and improve everyone’s mood if it is decorated with a lovely vase. This results in a kind of transparent zoning. If the dining table is large, then instead of one you can take several vases at once.
Another job that vases do well is filling voids. Of course, you shouldn’t force all the empty spaces, but a too stingy and empty interior won’t bring joy. To avoid the overflow effect, special interior vases are used.
They will look everywhere: in corners, on shelves, empty countertops, alcoves and niches. In a space where furniture no longer fits, you can add a vase and it will add coziness to it. A group of vases will perform this function even better. It can be placed under the stairs, on shelving and in the niches of false fireplaces.
A specially selected vase can emphasize or set the style. Metal or glass is ideal for high-tech. They complement the space with sparkle and light, although they attract the eye, but are minimalist in their form.
For the ethnic style, they take products with ornaments and paintings in the national spirit. The forms are usually simple, if not primitive, and the materials are traditional.
Interior. Those related to marine, environmental and other themes require vases made from natural materials: shells, bamboo, wood, wicker.
In any case, a vase is a good element to create style.
Accent formation. Vases can be compared to blankets and sofa cushions in their ability to create bright accents in the interior. Down with boredom! Long live juiciness and effectiveness. Another plus: you can have bright accents at a variety of levels, depending on where the vase itself is placed.
Living room
Large voluminous interior flowerpots would look appropriate in a spacious hall or living room. Depending on the style, these can be elegant porcelain models with smooth lines or brutal plaster vases with imitation concrete.
The photo shows a living room, the corner of which is decorated with a white ceramic vase with fresh flowers.
Hall
A vase in the hall/hallway looks unusual and beautiful. Calm tones will emphasize the restraint of the room, rich colors or fancy shapes will show the originality of the taste of the owners.
Dark vase with green plants in the interior of a rustic house
Kitchen
In the kitchen or dining room, floor decor will succinctly decorate the interior. It can repeat the colors of the kitchen set or other decorative items. The best location is along the wall, window or at the end of the bar counter.
Bedroom
A floor lamp vase or lamp would be not only a cozy, but also a useful idea. The color scheme can be combined with the textile part or some decor.
Hallway
The vessel can take up empty and unused corners in the hallway. The shape and height of the product must correspond to the characteristics of the room.
Children's
For a children's room, you should use safe and unbreakable materials. In addition to the aesthetic part, decorative items can become additional storage space, such as toys.
Bathroom
For the bathroom, it is better to choose a product that is not afraid of changes in humidity. Floor decor will look appropriate in a spacious bathroom and can be complemented with decor in the form of branches or greenery.
Floor vases discreetly decorate the interior of the house, giving it individuality and completeness. The variety of materials and shapes allows you to choose the option that is ideal for your apartment design.
Baking
Use extra baking pans, wire and aluminum foil to hold the joined pieces of clay on the baking sheet. See the polymer clay packaging for baking time. Be sure to check during the process because the piece may shift in the oven and will need to be repositioned immediately or the clay will set in a crooked position.
Once the clay has cooled, you can fill a glass with water and select one or more flowers to place in a new vase. Be sure to water the flower with fresh water every day to extend its lifespan. Ready!
Found a violation? Report content
New Year's shares
Sign of the year. Animal figures can be made in the form of figurines, magnets, and Christmas tree decorations. You can decorate mugs, spoons, keychains with funny animals:
- Christmas trees, snowmen, snowflakes, mittens and socks for gifts, etc. Everything that is associated with winter and the New Year can be made from clay. The functionality and size of crafts may vary.
- Decorations: snowflake earrings and icicle pendants, beads and bracelets for fashionistas. Imagine!
Several centuries ago, working with clay was a daily necessity, but even then people saw how calming this material was. Now there is no need to sculpt household items, but the desire to see and create something with your own hands has increased.
Working with clay, a person becomes a real creator. From the origin of an idea to its implementation is a magical process in which talents are revealed and dreams are born.
What will motivate you to experience making your first piece? A desire for creativity or an opportunity to relax and redirect attention? This is not important. The main thing is that you will plunge into a mind-blowing world that will reveal you in a new way.
Decorating the product
To decorate means to decorate, with color or relief, glaze or painting.
There are a lot of decoration options:
- relief;
- painting;
- glazing;
- inlay;
- embossing;
- seal;
- reservation;
- openwork;
- silk screen printing, etc.
Ceramic paints can be applied to the product by hand painting. The drawing can be drawn as an outline for decoration, or you can work impromptu, which is more difficult, of course.
Combining vases in the interior
Groups of vases are always impressive and original. By forming a group, you show your rich imagination and good taste. You can group absolutely identical vases. It’s not very original, but it’s trouble-free, and most importantly, it’s very eye-catching.
Mixed groups look fresher and more creative. For example, they mix vases that are identical in shape but different in color. Or identical in design and color, but different in shape. By the way, manufacturers themselves often combine such products into pairs and groups and sell them in sets at once.
Vase made of self-hardening clay
Self-hardening clay is very easy to use. It resembles dough, is easy to mold, does not stick to your hands or get dirty, and has almost no smell. It contains water, which evaporates within a day.
Some types of clay become hard in 10 minutes in the microwave. After this, the product can be drilled, sanded, painted and varnished.
This material is easier to work with than baked polymer clay, so it is ideal for sculpting with children.
In our master class we will show you how to quickly and easily make a vase using a glass or similar container.
Required materials and tools
- Self-hardening clay FIMOair light
- Texture sheet FIMO "Baroque"
- Roller for rolling out clay
- Acrylic paints blue and gold
- Brush and sponge
- Dummy knife or blade
- Sandpaper if necessary
Basic rules for quality decor
In order for the decor created on the vase to be pleasing to the eye and for a long time to ensure that nothing falls off or comes unglued from the surface being decorated, you should remember some rules. The most basic of them is the use of a special degreaser before decorating. In this case, the glue will have good adhesion to an absolutely smooth surface, and even with an accidental mechanical impact, neither the flower nor the threads will come off the vase.
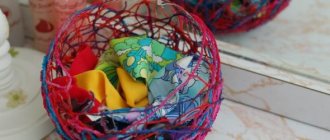
Vase decor with fabric
Thus, having spent very little time, you can make a very interesting element from ordinary glass vases that will decorate the interior of the room. There are a lot of advantages in this work, starting from the availability of all materials and a huge number of ideas, and ending with the fact that this vase will be exclusive, and it will simply not be possible to find the same one.
Knitted vase decor
You can keep a vase decorated with your own hands or give it to a loved one, since everyone knows that the best gift is a gift made with your own hands.
Vase decor with gold paint
Features of different types of clay
The first part of the job is choosing the right material. That is, one of the varieties of pottery clay for modeling. Variations of this raw material in the store differ from each other in color, firing temperature, fraction size, and the presence of additives.
You can often see in the description such an item as “clamotte content”. Chamotte is clay that is fired and then finely ground. Added to pottery raw materials, it serves to increase its strength characteristics. That is, a vase made from fireclay clay will be more reliable and durable.
What to put in a vase
Since vases were primarily invented for flowers, even the largest of them can contain an object of plant origin. Flowers of this size, of course, will not be found, but dry branches decorated with rhinestones, lighting and other beautiful things will be quite appropriate.
Small vases will accommodate both standard flowers and ears of wheat and rye. This is especially true for country and Provence interior styles.
The long feathers of rare birds, such as peacock feathers, look rich in painted vases, as in the photo below.
The final stage
After the shape has been formed and all decorative elements have been applied, you need to place the resulting masterpiece in a room at room temperature and wait 12 hours. During this period, the clay should finally get stronger. After waiting for this time to end, it is important to immediately burst and take out the balloon. If you leave it inside, then as it dries, the clay walls will begin to shrink and explode the ball. As a result, the vessel may be damaged or even burst.
The final touch is painting the masterpiece you created with your own hands. For this you can use ordinary acrylic paints. There are no restrictions on colors, so you can safely decorate the vessel in any shade.
Knowing how to make a clay vase, you can not only create a memorable and touching gift, but also decorate your home with an amazing thing. The process of creating it helps you relax, take your mind off bad thoughts and completely immerse yourself in sculpting. The result will definitely please not only you, but your loved ones!
If you are interested in the article, we invite you to visit the Kolokol pottery school
The best flower vases in 2022
The quality rating included models that received the best characteristics and user reviews. They are divided into groups according to the material from which they are made. The review includes a brief description of each product and its possible application.
Pasabahce Flora 102.5 mm
A simple vase is designed for bouquets of wildflowers or small ornamental plants with bright inflorescences and many leaves.
The Turkish company Pasabahce first launched a line for creating glass balls in 1935 and began producing simple-looking products: cups, vases, aquariums.
The Pasabahce Flora model is manufactured in different sizes. Transparent containers are made of durable material that is difficult to break.
Advantages:
- suitable for any interior;
- looks good;
- stable;
- durable;
- cheap.
Flaws:
- small.
Nachtmann Petale
The German company Nachtmann was one of the first to master the production of lead-free crystal and entered the world market with decorative tableware, including vases for cut flowers. Product location: desktop, height 28 cm.
The Petale model has the classic shape of a tapered cone that widens towards the top. The upper edge is wavy. The entire outer surface is embossed, the inner surface is smooth. Production is manual. High quality vase made of transparent crystal with increased refraction and shine.
Advantages:
- multicolor play of light;
- beautiful ringing;
- original look;
- Eco-friendly crystal without lead.
Flaws:
- fragile.
Carolina 40 cm
The Carolina floor ceramic vase, 40 cm high, has a wide range of functionality. It is an independent decor that fills an empty corner, an element of interior style, suitable for decorations in the form of branches, a container for large flowers. In a room decorated in Japanese style, you can put bright sun umbrellas in a vase. For the New Year - eat a branch and decorate everything with a garland.
The manufacturer makes the home interior more comfortable and warmer with such products.
On a beige ceramic background, a light floral pattern is applied by hand. The masters do not repeat themselves in their works, so each vase is unique and inimitable. Soft warm colors create an atmosphere of calm and comfort.
Advantages:
- unique painting;
- low price;
- creates comfort;
- fits any style;
- with decorative function.
Flaws:
- for floor placement low.
Lefard 699-301
The Chinese company Hebei Grinding Wheel Factory has created a collection of luxurious ceramic flower vases under the Lefard brand. Model 699-301 is a round-shaped vessel with a variable cross-section. The surface is made in the form of three-dimensional hexagonal honeycombs, elongated in length.
The embossed surface of a golden color gives the product a luxurious look. The maximum diameter is 16 cm with a height of 37 cm, the weight of the model 699-301 is 2.12 kg. Placement: desktop.
Advantages:
- luxurious look;
- original design;
- stable;
- universal, for any interior;
- for all types of flowers.
Flaws:
- heavy.
Diamante Rama Ahura
The Italian company Ahura is known around the world as a manufacturer of original decor. The company creates flower vases decorated with stones and painted with precious metals. Designers created original designs for porcelain vases with Swarovski crystals and came up with beautiful shapes for the products.
Model s1623/45/NOVD-RM from the Diamante collection attracts with its luxurious appearance. Transparent stones shine in a circle on a black or white gloss. Golden flowers rise up from the base. The height of the product is 45 cm.
Advantages:
- stable;
- original design;
- luxurious look;
- has a basis;
- can be used as floor.
Flaws:
- Expensive.
Wrapping clay around wire
Wrap some clay around the wire you cut in the first step. Then roll out to create a smooth surface. Make one small and one large ring the same thickness as the long clay thread wrapped around the wire. Don't make these pieces too thin or they won't hold up. My pieces were about one and a half centimeters thick.
When you make the small and large ring, you will need to use your finger to seal the seams. You can also use tiny pieces of wire inside the clay to stabilize the connection points of the rings. The size of the large ring should be wide enough.
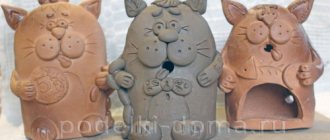
Features and uses of pottery
Clay dishes are used for cooking in the oven (gas or electric), in a Russian oven. Some examples are also suitable for microwave ovens, but it’s not worth the risk. Ceramics are afraid of sudden temperature changes: if you put a cold pot in a hot oven, it can quickly crack.
Contact of pottery with open fire is also undesirable - cracks will appear in the product. Only Russian clay frying pan latka and Georgian ketsi can be safely used as frying utensils. Or rather, boldly but skillfully - they are placed on low heat, which gradually increases.
You can brew tea in a clay pot, but first you need to thoroughly pour hot water over it from the inside. The most delicious green tea is brewed in products made from red clay, according to the Chinese. Remember that the porous structure of clay perfectly absorbs odors, fats and tastes. Therefore, make roasts in one pot and serve salads in the other. You should not use the same dishes for polar dishes.
You need to wash pottery in warm, barely soapy water (you can use soda instead of soap). But it’s better not to use cleaning chemicals: you shouldn’t risk leaving the chemical composition in the porous structure of the clay. After washing, the dishes are thoroughly dried and air dried without covering with a lid.
1) Remember what the man-made world is.
The man-made world is everything made by human hands.
2) What items do you need wood to make?
Wood is used to make furniture, pencils, rulers, souvenirs, paper, and packaging.
In the drawing we will cover the images of a book, pencils, and a chair.
Metal objects - knife and scissors. Clay is used to make dishes and bricks. Wool scarf and mittens.
3) Familiarize yourself with the production of various products using the textbook. Prepare a message to the class.
Message “Production of various products” for grade 2
The production of any product is a long process in which many people take part.
First of all, the production of any product requires raw materials. It can be extracted in different ways, for example, in quarries as clay, or by cutting down forests.
Raw materials go through several stages of processing, which results in a product blank. This blank is brought to its final form, it is painted, processed, and given a beautiful appearance.
Only after this can the finished product be used.
Making from a glass jar
to make such a product with your own hands. Even a piece of burlap, a coarse rope rope, a music notebook and beautiful shiny accessories can be useful for this. The required amount is cut from a piece of canvas, measuring the length and width along the central diameter of the jar. The jar is wrapped in cloth, fixed in two places with special glue.
20-30 petals of the same size are cut out of a music notebook and a flower is formed from them. For the middle, shiny round-shaped fittings are used. The resulting flower is glued to the junction of the linen fabric, closing the joint.
A rope thread is tied to the neck of the jar, tying it with a small bow.
Doll box
You will need: 1.5 liter plastic bottle, Barbie doll, scissors, stationery knife, glue gun, crepe satin fabric, satin ribbons, lace, thread with a needle, narrow polystyrene foam, iron jar lid.
Cockerel
This is the kind of Christmas gingerbread rooster you can make with a child over 7 years old. Such an item will be a good gift or source of income. Because extra income won't hurt anyone.
- snow-white and dark brown polymer clay ;
- breadboard knife;
- Toothbrush;
- liquid polymer clay ;
- knitting needle or stack;
- cardboard cockerel template;
- cylindrical object for rolling;
- tea spoon.
Mash the brown plastic and roll it into a layer 4 mm thick. Attach the cockerel template and cut it out with a sharp knife. Smooth the cut slightly with your finger. To make the surface slightly rough, tap it with a toothbrush.
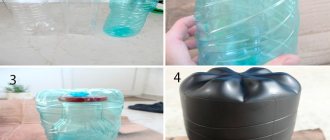
From a tall glass
If you have acrylic paint, modeling gel and glitter at home, creating a unique vase from an ordinary long glass will not be difficult. Making such a product will take a minimum of time, however, you will need to be careful: first, it is important to evenly glue small-width tape to the glass surface at regular intervals.
Using a sponge, apply modeling gel mixed with glitter and paint to the exposed surface. As soon as the paint is applied, immediately remove the strips of tape, because doing this later will be problematic (it can stick to the gel).
Apply the paint in a thin layer; if desired, the vase can be decorated with small half-shaped beads.
Drying and firing of the product
Drying is needed to remove physical moisture. The product should be dried for a day, no less. Next, the future dishes or decorations are fired in the oven. And here are several options - a Russian stove, a special muffle furnace and even a fire. But the latter method is dangerous, because firing lasts 8 hours, and you will have to watch the fire all these hours.
Usually, beginners start with an oven, but it’s worth saying right away that utility bills will increase. For craftsmen, muffle kilns work for days, and the ceramist includes these expenses in the price of the product.
From paper modules
You will have to spend more time on crafts using the origami technique, since you first need to prepare all the necessary elements-modules, from which the product will later be assembled according to the scheme. It is easy to assemble the parts using the triangular modules shown in the photo. It is necessary to prepare such elements as 433 white and 211 yellow. The first row is formed into a circle of 20 white elements; when they are combined with 20 yellow ones, the second row is obtained.
For the third row, take yellow ones (20 pcs.) and turn the resulting circle in the other direction. By inserting 30 yellow elements into the pockets of the third row, they form the fourth row.
To be able to increase it by 10 pieces, the first of them is put on in the usual way, and the adjacent pockets of the second and third are left empty. Next, add the modules of subsequent rows (from 5 to 16), using 30 elements for each row and taking into account the selected tone scheme.
READ Which paint is better to paint wood
After the 16th row is completed, the 17th is made white, and then on the 18th the modules are put on backwards in relation to the previous row. The penultimate row is the top of the vase; it requires 40 modules, which are placed in the previous elements, evenly adding 10 pieces per circle. The last row is performed slightly differently: one corner of the module is inserted into the left pocket of the second module, the right one into the space between the elements of the previous row.
The bottom can be made from modules or regular thick cardboard. If desired, you can add handles to the vase.
Mixing clay
Mix clay of different colors to achieve the desired tone. I used mostly white with some ocher and granite grey. Gray granite has some mottled texture, which helps tone down the ocher. As a result, the surface becomes less physical and more reminiscent of baked clay.
In Russia they are asking to cancel the mandatory fee for choosing a seat on an airplane
They don't see water: unexpected things that are difficult for cats to do
The man thought he got a mini-pig: it turns out he was wrong (photo of the pet)
Papier mache
Making a papier-mâché vase at home is easy if you follow the step-by-step instructions. You can leave a jar or bottle inside it, which will make the product not only decorative, but also functional. You will need a form, old newspapers, white paper, PVA glue, stationery brushes, cling film, varnish and gouache.
- The mold is wrapped with cling film on the outside.
- The glue is mixed with water in a 1:2 ratio, the newspaper is torn into pieces and placed in the glue solution for soaking.
- The prepared material is tightly pasted over the outer area of the mold, covering it with several layers, drying each previous one. In this case, the form is pasted over to the limits of decreasing its diameter at the top, so that in the future the papier-mâché can be easily removed.
- After several layers of newspaper have been glued and dried, the product is covered with white paper, dried and removed from the mold.
- You can add another layer of white paper and leave the future vase to dry for about a day.
- Next, it is covered first with gouache and then with varnish.