What is a chain saw
An electric chain saw is essentially an analogue of a chainsaw, which can be used to trim any type of wood. The tool is in demand in small farms and industry. The device includes the following elements:
• cutting part (saw);
• electric motor;
• chain, drive sprocket;
• chain tension system;
• direct drive or bevel gear (depending on the location of the motor);
• brake unit, including a thermal relay and a safety shield;
• lubrication system;
• power cable;
• pens.
There is a solution - converting the screwdriver into a network one
Yes, this loses one of the advantages of a cordless tool – mobility. But for work in rooms with access to a 220-volt network, this is an excellent solution. Moreover, you are giving new life to a broken instrument.
There are two concepts on how to turn a cordless screwdriver into a corded one:
- External power supply. The idea is not as absurd as it might seem. Even a large and heavy step-down rectifier can simply sit near the outlet. You are equally tied to the power supply and to the plugged-in power plug. And the low-voltage cord can be made of any length;
- Power supply in the case from the battery. Mobility is maintained, you are limited only by the length of the network cable. The only problem is how to squeeze a sufficiently powerful transformer into a small package. You don’t have to ask questions about how a store-bought compact screwdriver works from the mains. A 220 volt motor was initially installed there. Let's remember Ohm's law again and understand that a powerful 220-volt electric motor can be compact.
Accordingly, a 12-19 volt power cord should have a larger cross-section than a 220 volt one.
Do-it-yourself screwdriver conversion
Consider the option with a remote power supply
Using a power supply from a personal computer. On the radio market, you can buy an old power supply from a personal computer for a small price. We needed a variant of the “AT” format, which had to be turned off with a key after exiting the operating system.
Experienced users remember such system units. The advantage of such a power supply is that the honest power is indicated there. If it says 300W, it means you can safely remove 15-16 amperes from the 12-volt output (again we turn to Ohm’s law). This is quite enough to power an average screwdriver.
Such blocks are equipped with a power button. Another advantage is the presence of a cooling fan and an advanced overload protection system. If you hide the power source in a beautiful case, do not forget to leave a hole for ventilation.
The connection is very simple. Black wire (-), yellow wire (+12V).
Limitations – a screwdriver with a supply voltage higher than 14 volts will not work.
Using a car battery charger. The principle is the same as using a computer power supply. You need to purchase an old charger for starter batteries.
The modern fashion for compact pulse chargers has left behind analog linear devices with manual adjustment of voltage and charge current.
Therefore, such a device can be purchased on the automobile market for a symbolic cost.
It’s good if the voltage can be adjusted smoothly - in this case, your improvised power supply will fit any screwdriver. Converting it to a network tool comes down to connecting the electric motor input to the power terminals of the charger.
Making a homemade power supply. If you are familiar with the principles of constructing electrical circuits, you can make your own power supply. A diagram giving general concepts is shown in the illustration.
The transformer can be picked up from an old tube TV or other household appliances. Power at 220 volts 250-350W. The main thing is the power supply - the donor should not be pulsed.
The voltage on the secondary winding is 24-30 volts. The secondary winding is made of wire of the appropriate cross-section. However, if the output winding current is at least 15 amperes (see the transformer specification), there is nothing to worry about. After losses on the diode bridge (1-1.5 V per diode) you will get the required output value.
If you have an electrical engineering education, do the calculations yourself. Or in a practical way: by connecting a 220 volt 100W incandescent lamp as a load, measure the voltage at the output. If it exceeds the needs of the screwdriver, reduce the number of turns of the secondary winding of the transformer.
Mains power supply for a screwdriver in a battery case
If your tool is not very powerful, you can place the power supply in the handle or case from damaged batteries.
We install a ready-made power supply. To do this, you need to purchase a ready-made block with suitable characteristics and dimensions. There is plenty of such goodness in the radio markets. Take the case with you and go for a fitting. When the desired power source has been purchased, carefully separate it from the case.
We place the screwdriver in the battery box. All components must be securely fastened. If necessary, extend the wires connecting the control board and the transformer. If the circuit touches the metal parts of the transformer during operation, a short circuit will occur.
As space in the case allows, space the board and transformer for better cooling. No matter what quality power supply you choose, the load will be high and overheating is possible.
It would not be a bad idea to attach additional radiators to the power control microcircuits. Operate the screwdriver for a long time, unplug it and touch the radio components on the control board.
You yourself will understand which elements need heat removal. Holes can be made in the housing for air circulation.
Remaking the power supply with your own hands will not take much time, and the cost of the purchased module is incomparable to restoring the functionality of the battery.
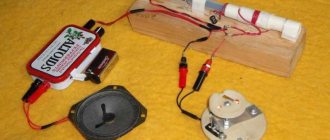
Homemade power plan. If you are familiar with a soldering iron, this material will be useful as instructions.
The circuit is implemented on a donor, in the form of a ballast for a 150W halogen spotlight. The added components are indicated on the diagram with colored inserts.
Source: https://obinstrumente.ru/elektroinstrument/shurupovert/peredelka-shurupoverta-na-setevoe-pitanie.html
Chain saw installation steps
• remove the saw blade from the grinder;
• make holes in the lower part of the metal casing of the device;
• cut a bracket from a sheet of metal (thickness 5-7 mm) (the shape of the part is a circle with one beveled side, two holes for bolts for fastening the saw and one large hole corresponding to the diameter of the angle grinder shaft);
• using bolts, secure the bracket to the protective shield of the angle grinder (where the holes were previously made);
• screw the sprocket onto the motor shaft;
• fix the guide behind the bracket ties;
• put on and straighten the chain, tighten the bolts on the bracket tightly, weld the connections to increase strength;
• do a test run.
Why do they resort to a homemade option?
Often, homemade versions of tools or improvement of existing ones are done out of a desire to save money. Using improvised means and parts left over from equipment or machinery that has fallen into disrepair, craftsmen skillfully make various devices, such as, for example, a chain saw from an angle grinder.
The second reason can be considered the desire to have a multifunctional tool that will help facilitate numerous tasks on the farm. The undeniable advantage of such a homemade device is the space saving. After all, an additional attachment takes up much less space in a shed or garage than a full-fledged device.
For remodeling, you can use absolutely any brand of grinder. The only point worth paying attention to is that the factory attachments may only fit a limited number of models, so when purchasing, be sure to check whether your angle grinder is suitable for the selected attachment.
Advice from professionals
• Craftsmen advise choosing a transverse engine placement when assembling an electric saw. This option allows you to cut wood comfortably and is less tiring during the work process.
• When choosing engine power, the purpose of the electric saw is taken into account. A motor of 1800-2000 W is suitable for carrying out work on a dacha and small farm. A more powerful device is appropriate to use in large-scale construction. If the power indicator is small relative to operating conditions, then the tool will overheat during operation.
Types of sawmills
The sawmills that are sold in the store are excellent productive devices with great functionality, designed for large volumes of wood. Such a tool can pay for itself in 2-3 months, but it is not advisable if used exclusively for domestic purposes. In this case, you can make it yourself using a small electric saw.
Currently, three types of sawmills can be found on the tool market:
- disk;
- tape;
- tire
Circular saws are one of the most common saws on the farm. Their disadvantage is the high cost of high-quality discs, as well as the relatively large amount of waste. Band saws are the most economical, they are not afraid of bad weather, leave little waste, but at the same time they have a complex structure, which makes making them at home a very difficult task. The simplest version of a sawmill made from an electric saw is a busbar; they are distinguished by their elementary design and can also process large volumes of wood of any thickness.