How to make a paper horse: step-by-step master classes for children. A paper horse on clothespins, a jumping rope horse, a bookmark horse and a paper horse using the origami technique, simply and quickly.
Today we will make a horse together with the children. In this article you will find four master classes on making this fun toy with children:
- Paper horse on clothespin x: making a horse with preschool children.
- Horse - jump rope. We make a toy for playing with children.
- Horse - bookmark . Master class for children of senior preschool and primary school age.
- Horse - a mask made of paper using the origami technique.
Master class 1. Paper horse on clothespins
The author of the master class is Vera Parfentyeva, reader of “Native Path”, technology teacher, and head of the children’s art group.
Materials and tools for making toys - horses
To make a toy you need:
- thick white cardboard,
- acrylic paint stamps,
- yarn,
- bamboo clothespins,
- hole puncher.
How to make a horse with children: step-by-step description
Step 1. Cut out the horse part from cardboard according to the template.
Step 2. Use stamp paint to paint the part on both sides. Move the stamp from top to bottom abruptly, imitating wool fibers.
Step 3. Draw the eye, the point on the nose (nostril) and the frenulum.
Step 4. Use a hole punch to make several 2-3 holes in the mane area and one in the tail area.
Useful idea. I have a homemade hole punch - a part of a nail is welded to one side of the inside of the pliers, and a hole to size is drilled on the other side. You see this tool in the photo.
Step 5. Cut yarn for the mane and tail.
Step 6. And at this stage we will learn how to tie knots. Using a hook, pull the yarn through the holes and tie knots.
Now the mane is ready!
Step 7. Tie the tail in the same way.
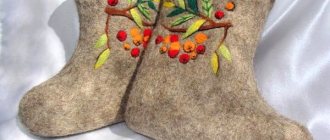
Step 8. And the last step - the horse needs legs! Let's take clothespins. They can be painted the same color as the horse itself. Or you can leave them as they are. Attach clothespins to the horse's body. And the toy is ready!
Clothespins allow our paper horses to stand on their own.
This is what kind of horses the children got.
This is the kind of hippodrome we have!
When making a paper horse craft with your children, remember the poems that describe its appearance, stroke the mane and tail, and tap the clothespins with its hooves. The following poems will help you in making crafts with children:
Skok-skok, skok-skok, tail and mane on the side. How smooth you are, my horse. I will brush with a brush so that your fur shines.
Clack, clack, clack, clack! I am a horse - gray side! I'll knock with my hoof, if you want, I'll give you a ride! Look how beautiful I am, both my tail and mane are beautiful. Clack, clack, clack, clack! I am a horse - gray side!
The horse will ask the foal: “Tell me, my dear, Who has such a mane? Who grows up so beautiful? And he will answer for him: “You, my sweet, yoke!”
I love my horse, I will comb its fur smoothly, I will smooth its tail with a comb, and I will go on horseback to visit.
Creative task for children
What other animals can you make using cardboard and clothespins? And to use knotted yarn?
LiveInternetLiveInternet
Materials:
three-strand wire (marked in the photo) - 30 cm, 22 cm is enough for a foal;
any thread except synthetic, preferably linen twine or wool blend; glue Moment Crystal; beige or red threads for decorating the head ~ 50 cm; 2 pieces of black leather - one for eyelashes 4x1 cm, the second for ears; scraps of decorative fabric or leather for decorating hooves and saddle pads; a piece of leather for a saddle; fur for the mane; braid for bridle and saddle fastening. Tools:
pliers, scissors, sharp knife or blade, file.
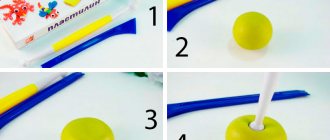
(Collapse) 1 Cut the edges of the wire from each end to 12 cm.
2 Separate the wire.
3 We form the design of the horse, leave 3-4 cm for the tail, cut off the rest. 4 Cut off the insulation by 1 cm from the ends and bend the wire by 8-10 mm. If there are sharp ends of the wire, then they must be filed with a file until they feel completely safe. 5 Straighten your legs until they are completely stable. 6 We wrap a little thread around the chest so that the legs are not joined together. Three windings need to be made: for the head and front legs, for the chest and hind legs, and the third for the chest and tail. The length depends on the horse. For mine it turned out to be 25 cm - head and front legs, 22 cm - chest and hind legs, 45 cm - chest and tail. The number of turns depends on the thickness of the threads, so be guided by yourself, usually it is from 30 to 40 turns, for the tail half as much.
7 We tie the head wrap in the middle and hide the knot inside.
8 We bend the head over the bandage.
9 Clamp. 10 We make the second dressing, holding the wire tightly inside the threads.
11 It is better to divide the threads equally in any way, so as not to count equal parts later.
12 Fold a strip of black leather in half and cut out the ears in the shape of a leaf. 13 Take a clothespin and glue. 14 Lubricate the middle with glue, fold it in half and clamp it with a clothespin.
15 We cut the skin from the edges into 10-12 mm in very thin strips, we get eyelashes.
16 Lubricate the middle with glue, glue the eyelashes under part of the folded threads from the forehead.
17 Stretch well and select the threads.
18 We bandage it tightly.
19 Similarly, glue the ears above the eyelashes.
20 We tie the blue thread behind the ears with 2 knots.
21 We begin to wrap the neck turn to turn.
22 It is better to fasten the ears so that they stand vertically.
23 We also divide the threads for the legs in half.
24 We continue to wrap the leg round by round.
25 Having wrapped the wire to the end, no lower, we cut off the excess threads.
26 We also wrap the second leg.
27 Take the next winding - chest and hind legs.
28 We tie two knots tightly under the neck and begin to wrap the body, plus the hind legs.
29 We also wrap the tail.
30 We do not break the thread.
31 We also fix the winding for the body and tail (the longest) at the base of the neck, preferably tighter, and again we wrap the body turn by turn, reaching the tail, lubricate it with glue.
32 Place it exactly in the middle of the threads and crimp.
33 Temporarily secure with a clothespin.
34 Align the tail.
35 We try on and cut out the mane. On the head we make the mane sharper. 36 Lubricate the mane with glue and glue it tightly, carefully squeezing it from the edges.
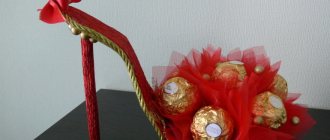
37 We prepare and decorate the hooves. Height as you wish. It is better to fasten them with an overlap, but if the skin is thick, then you can butt them, in which case the skin must be cut exactly according to the volume of the leg.
38 We admired it, let's move on.
39 Trying on a saddle pad and a saddle.
40 To secure the saddle on the horse, we will use braid.
41 We thread the bridle before the second crochet tie.
42 And they ran!
43 Done! We prance and rejoice.
Make the foal in the same way, but without a bridle, saddle and with a small tail.
Master class 2. Horse - paper bookmark
In this video master class you will see how you can very quickly and easily make a horse - a bookmark for books out of paper. The horse is made from a small square of paper using the origami technique. It can be done very simply and quickly. And such a horse can be used not only as a bookmark, but also to decorate a holiday table and home.
The video is in English, but it shows the making of the horse step by step in great detail, so everything will be clear. Very simple and original! This horse will appeal to both adults and children. The author of the video is Leyla Torres.
Video on how to make a twitch horse
If you wish, you can decorate the horse by gluing sparkles and stars on it. The twitch horse is ready. Let's go get an A!
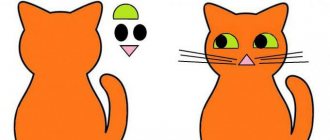
Such a cute horse can be made not only for a technology lesson, but also just so that you can have an interesting and useful time and please your parents or younger brothers and sisters with your craft. And if you get creative, you can come up with a whole sea of different twitching animals, drawing instead of a horse’s head, for example, a dog or cat’s face and changing the tail.
Master class 4. Horse - a paper mask using the origami technique, simple and quick
Another great idea is a paper horse mask. The video shows in detail how it can be done. The mask is made using the origami technique, and its production is accessible even to children and beginners in this technique. Video author: Origami 4ik.
Get a NEW FREE AUDIO COURSE WITH GAME APPLICATION
“Speech development from 0 to 7 years: what is important to know and what to do. Cheat sheet for parents"
Click on the link or course cover below to subscribe for free
The author of the course is Valasina Asya, candidate of pedagogical sciences, author of the website “Native Path”
Fabric horse with saddle
The principle of sewing this textile horse is similar to those described above. But in this video master class you will find 2 useful tricks) Namely: how to tint ordinary cotton fabric using black tea and how to make a decorative saddle from suede (this saddle, by the way, can be used to store rings). So be sure to watch!
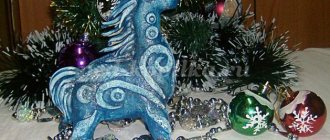
By spending very little time and materials, we can make wonderful New Year gifts for our family and friends. By the way, you can sew a green or blue horse: the symbol of 2014 prefers these colors!
SHARE! "Cross" will not give bad advice! 
From paper (origami)
Let's try the simplest thing: make a paper craft. The process will not take much time; if it doesn’t work out, you can always redo it, and, in addition, this is a very interesting pastime with the child, who will definitely join the process.
Paper crafts, or origami, are widely known and popular today. Let's try to make an origami horse with our own hands. To do this, select a sheet of paper of the color you want your horse to be. Fold it four times to make four equal stripes. When folded, we make cuts, marking places for the legs, back, front paws and head. Of course, in this case we will deviate somewhat from the rules of origami, where figures are made without a single cut or gluing. We make horse ears from squares of paper folded in half. Long strips of paper folded in half will serve as paws. We attach the paws to the body using glue or buttons. The horse is ready.