A self-made grain crusher will not be inferior in its capabilities and features to products sold on the construction market. The main component is the electric motor itself, which has a fairly high power and rotation speed. It is for this reason that models that are created from parts of a washing machine or from an angle grinder are very popular. Such self-created structures are considered indispensable in the household.
DIY grain crusher
A grain crusher is not the most complex structure and its need for use in household plots and farms has already been proven many times. But it should be noted that this is for the cheapest installations. Therefore, those who need this equipment make it themselves. In fact, it is not that difficult, and does not require a large set of tools.
DIY grain crusher
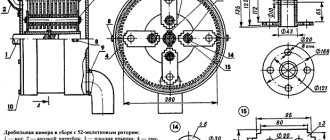
Making the base of the chopper The base of the chopper includes the following components:
- Flange;
- The hub on which the bearing assembly is installed;
- Toothed drum;
- Flange support;
- Flange mounted on drum;
- Power plant;
- Sieve plates;
- Arcs;
- Corner 45x45;
- Grain funnel;
- Fasteners.
How to make a crusher mill with your own hands
Making a grain crusher with your own hands is not that difficult. To do this, you need to have on hand a motor from an old household appliance, for example, a vacuum cleaner or washing machine.
In addition, you must have some locksmith skills. By the way, when assembling such equipment with your own hands, you need to remember the safety rules. Since all engines operate on electricity, it is necessary to take all measures to reduce the traumatic risk of the assembled product.
We must not forget that fast-rotating parts are used as a working body, which can cause injury to the person working on it.
Structure of a grain crusher, design features of the machine
Manufacturers put a variety of crushers on the market, with different characteristics, productivity, etc. Most of this equipment is easy to maintain and does not take up much space. As noted above, in practice crushers are used that use rotary or hammer principles in their operation.
Rotary machines have a drum with knives. In hammer mills, hammers are used as a working tool, which are loaded inside the drum.
By the way, there is equipment that uses compressed air as an energy source. The processed raw material moves inside the drum along with air. As a result of this, the quality of the resulting product increases dramatically. In addition, in this, and in many other designs, magnets are used that select metal particles that get into the mixture.
Types of grain grinding machines
Based on the principle of operation, machines for the grain grinding process can be divided into several types. These include:
- Hammer machine - in this design, the elements for grinding must be mounted on a rotor, which will rotate in the receiving hopper itself.
- Impact crusher - the working chambers in units of this type are made of durable metal, which gives the machine the greatest strength and reliability. The parts for the grinding process hit the walls of the hopper, at the same time crushing the grain. With all this, the crushing parts will continue to hit the walls until the grain is completely transformed into a mixture of the smallest components.
- Disc machine - in this design there are crushing knives that will be attached to the shaft using specialized disks.
- Vadets crusher - it can perform both crushing and grinding of grain. The main element in this design will be corrugated rollers. They will only process wet material efficiently. Dry grain should be pre-moistened in water.
How to make it yourself from a washing machine
The advantage of this method is that when you independently convert a washing machine into a grain crusher, you do not need to resort to welding and turning.
Necessary materials
In order to make a homemade unit, we will need the following tools and materials:
- actually, the washing machine itself (any top-loading machine will do, for example, SMR-1.5);
- additional electric motor;
- drill and drill bits (from 3 to 16 mm);
- chisel and hammer;
- various keys;
- bolts and nuts (M4, M6 and M8).
We will also need a pair of steel plates (32x5x0.15 cm and 42x5x0.15 cm), which can be cut from a two-handed saw or other piece of metal.
Assembling the unit
We begin to construct a grain crusher with our own hands. Let's start with something simple - install chopper knives. It will be necessary to put the knife on a 6 cm thick pulley; for this you will have to make or select a flange that would fit onto the pulley on one side and fix the knife on the other (the type of flange will depend on the specific model of the machine and the type of chopper knife).
Having put on the knife, we will have to take care that flour and grain particles do not fall into the drive mechanism of the chopper. To do this, we will cut out a patch from tin and screw it onto the shredder bushing, and we will need to put a rubber patch on top. Make sure that the patches do not interfere with the rotation of the mechanism.
Now let’s set up a funnel to drain the crushed grain. As you know, the washing machine drain is located at the lowest point of the washing tank. Let's take advantage of this and turn the drain hole into a grain outlet.
- Using a chisel and hammer, we expand the drain hole so that its diameter becomes 12-15 cm.
- Take a piece of pipe of the appropriate diameter and insert it into the widened hole
- We take the pipe to the side. Now the crushed grain will come out of the hopper and pour into the container.
Next is the most difficult stage - you need to fix the fine-grained grate at the desired angle in the bunker, avoiding gaps between the edges of the grate and the walls of the bunker, otherwise the grain will slip through the cracks and end up in the same container with the “crushed grain”. You need to do the following:
- Determine the radius of rotation of the chopper blades and make a mark at the maximum point.
- Step back a little from the mark you made and draw an even line - this is the border where you need to install a fine-grained grid.
- Now your task is to cut the grate so that it fits exactly at an angle from wall to wall of the bunker with virtually no gaps. The result will be a complex figure that will need to be securely fastened.
- Screw the grate to the walls of the bunker as securely as possible. If possible, it can be welded altogether.
- We coat the cracks with cold welding or automotive sealant and let them dry.
Now we can say that you managed to make a grain crusher with your own hands, you can move on to testing. We set the mode on the control panel that requires maximum rotation of the activator for about 3 minutes and start our grain crusher. We watch how the knife rotates and listen for any extraneous sounds. Then we check how the engine heats up and whether there is excessive friction in the drive mechanism.
Having checked all this, you can begin the first “field tests” of our grain crusher. We pour a bucket of grain into the hopper, close it on top with a standard washing machine lid and start the unit. At the same time, do not forget to substitute a container for crushed grain. That's all, we hope everything works out for you!
Homemade mill device
The mill body of the self-made DKU grain crusher is a round box made of metal 5 mm thick and 300-340 mm in diameter. The bottom has a side - the stator, and the top of the device is closed with a lid.
Inside the housing there will be a motor and the mill itself. It is necessary to secure it so that the bearing of the device slides onto the shaft of the unit, on which, in turn, the rotor is mounted. Rotating, it will reach speeds of up to 3,000 rpm.
A hopper is attached to the top of the housing using screws, through which the grain will be supplied.
For convenience, a damper is installed to regulate the flow of material, and a canvas sleeve-dust bag through which the finished product exits the device.
Holes are made for feeding and extracting grain.
Communities › DIY › Blog › Station for washing the injector - do it yourself in 5 minutes -
I’ll tell you how to make a device for washing an injector, in five minutes, with your own hands. Minimum work and minimum tools. A simple but reliable and working design, which I have been using for many years and have washed more than one car with it.
We buy this thing, it costs between 500-600 rubles.
Next, we do as shown in the photo, unscrew the original spout, turn it off, and preferably, but not necessarily, cut off the tube going into the tank. Air will flow through it into the tank through the liquid, and will saturate the flushing liquid with air, which is not very good. Therefore, I recommend cutting it off.
Next, drill a hole in the tank for the spool and insert the spool, as in the photo. I glued the shiny thing on to increase the thickness of the tank wall. It’s also not necessary, the spool holds well without it, I just wanted it that way.
Next, select a hose of the required diameter and ALWAYS
install a fine filter. We change the filter before each new cleaning, especially if the device has not been used for a long time.
An inlet pressure regulator is not necessary, I had one, so I installed it. It makes it more convenient to regulate the pressure, but in the beginning I managed without it, by adjusting it on the compressor.
We fix the trigger in the pressed position using any available method, in my case it’s tape :))
The result is a unit like this.
On some machines you can connect without an adapter, and on some you will have to choose an adapter. It can be picked up from a gasoline filter by cutting off one of the inlet-outlet fittings. My set of different things :))
Application: Before starting work, I recommend pouring gasoline and not liquid into the unit, because if you overdo it with pressure, all the liquid will go into the tank, and this is bad. Since the liquid is concentrated, it will begin to wash away all deposits starting from the fuel pump, lines, etc., and all this dirt will go into the injectors, as a result you may get a negative result. Therefore, first fill in gasoline, adjust the required pressure and only then add liquid.
On the compressor, first turn the pressure regulator to minimum (the compressor must be fully inflated), connect the unit to the compressor and begin to raise the pressure to approximately 2 - 2.2 bar. If you apply too much pressure, you will hear a hissing sound and the fine filter will become empty. We select the required pressure, its accuracy is not so important, but the engine must operate stably. We start the engine and check the operation.
If everything is satisfactory, drain the gasoline and add liquid. Next, follow the instructions specified by the manufacturer of the flushing fluid. That's essentially all.
You can watch the video version here:
Tools and materials for making grass cutters
The master will need:
- grinder or angle grinder;
- drill with a set of drills;
- welding machine;
- winding testing device;
- Screwdriver Set;
- hammer;
- bolts with nuts and washers;
- a set of open-end wrenches or pliers;
- washing machine tank;
- motor with a power of 180 W;
- knives;
- electrical cable and plug;
- container for collecting cut raw materials;
- metal sheet for the casing;
- metal corners;
- control buttons (on/off).
When performing work, the master will not be hindered by personal protective equipment.
Working chamber, hopper and sieve
To arrange the chamber in which the grains will be crushed, you need to use a metal strip. Its length is approximately 700 mm (and another 5–10 mm for fastening), and its width should not exceed 60 mm.
The metal is rolled into a ring, and its ribs are bent outward along the entire perimeter of the chamber. The resulting flanges will be no more than 10 mm wide. This is necessary for fastening to the base and installing the sieve.
In order to securely fix the crusher, three wooden pins are mounted on the bottom side of the chamber at equal distances from each other.
The sieve can have a mesh with any hole diameter. Its parameters depend only on what crushing result is to be obtained.
For flour you need a fine mesh, for coarser grinding the cells will be correspondingly larger, and for vegetable mixtures you can use special perforated discs with holes.
The grain itself will be fed into the working chamber from a hopper, which is fixed to the base. It should also be equipped with a small hole and a plate valve, with which you can regulate the flow of raw materials.
Under the sieve, a basin, a regular pan, a bucket or a tank is used to collect the finished product.
Preparation stages
The main point is the choice of engine. Minimum power 180 W. If you have an old washing machine at home with a 1.5 kW motor, a ready-made grass cutter can cope with branches up to 2 cm thick. This motor is enough for cutting greenery with a large margin.
Knives are selected depending on the size of the cut. For example, disc blades cut greens and branches. This is convenient if you need to clear the area not only of weeds, but also of young maple, raspberry, etc.
Cleaning the washing machine and filter from dirt and scale: a review of products and methods
Master class on making a grain crusher from a washing machine
If you have purchased a new automatic washing machine, do not rush to throw away the old type of device. It will definitely make a high-quality and productive grain crusher. You just need to develop a detailed drawing and purchase some elements.
A washing machine is a good basis for a grain crusher
What you need for work: prepare the essentials
The list of materials and tools will depend on the chosen scheme. Most often, only the motor from the washing machine is used. However, if desired, you can also use a tank. You will also need:
- rolled metal: plates, pipe sections;
- fasteners;
- sealant.
Device diagram
In terms of its design and operating principle, a grain crusher is similar to a coffee grinder. During the manufacturing process, the main attention should be paid to the knives and the hopper for receiving the finished product.
Drawing of a grain crusher using a tank
Preparation of prefabricated elements
We begin work by preparing the grain bin. We increase the diameter of the drain hole to 12 - 15 cm to ensure sufficient performance of the device. From pipe sections we make pipes of the required size and configuration for discharging crushed grain.
We cut three knives from durable steel. These should be plates 20 cm long and 1.5 - 2 mm thick. To make the device last longer, you can use a hand saw to make these elements. We drill a mounting hole in the middle of the prepared plates. We sharpen the parallel sides.
We make a filtration grid that will not allow whole grains to leave the container. Its diameter should be slightly larger than the diameter of the manufactured pipe. The holes in the filtration grid must ensure the unhindered passage of crushed grain.
Attention! The diameter of the filter grid holes should be 3 – 4 mm.
We are preparing a container for crushed grain, or we are thinking about a way to secure the bag to the outlet pipe. To prevent the formation of excessive dust during operation of the device, the receiving hopper must be sealed against the outlet pipe.
A bucket is not the best option for a receiving bin
Assembly of the structure
We assemble as follows:
- We install a discharge pipe into the expanded opening of the tank, ensuring sufficient tightness of the connection.
- We install the knives on the motor shaft. To avoid overlapping of the blades during operation, be sure to tighten the clamping nut after each plate.
- We attach a filtration grid in front of the outlet pipe. It should be located at an angle of 15 - 200 to the horizontal. Considering that the bottom of the washing machine tank is inclined to ensure complete drainage of water, there should be a right angle between the base and the installed plate. To fasten the plate we use bolts.
- We coat the joint with sealant to eliminate the presence of gaps and cracks through which whole grain could mix with crushed grain;
- Let's start the device. Let's check its functionality.
If you don’t have a solid washing machine, but you still have a working engine, you can also use it to make a grain crusher with your own hands. You will learn how to make such a useful device in this case from the following video:
WINNER
WINNER, grain cleaning machine for separating grain from a heap after threshing by removing chaff and other impurities. V., which also carries out the division of grain into 2 varieties, is called V. - sorting. The separating organs of V. and V. - sorting are the ventilator
(see) and 3-4 sieves.
The air flow from the fan separates out the light and voluminous parts of the heap, which differ from the grain in their windage. (Windness is the ability of a body to experience the pressure of an air flow - see Grain cleaning machine
.) Heavy impurities are separated from the grain on wire sieves with square holes (woven or woven), separating the heap and grain mass by width. particles. So. arr., grain cleaning is carried out in V. and V. - sortings according to 2 characteristics: by windage and by width. particles. Grain sorting in V.-sorting is carried out b. including also wire sieves with square holes, which provide only rough sorting that is not distinguished by certainty. Punch sieves, which provide more accurate grain sorting, are rarely used in grain sorting.
The sieves are inserted into 1 or 2 oscillating sieve frames, to which the oscillatory movement is imparted by a mechanism driven by a handle rotated by the worker or by a drive. There are sieves with longitudinal swinging - the so-called. rough, and with a transverse swing of the sieve - the so-called. finishing. When the sieves swing transversely, the processed material (heap, clogged grain) stays longer on the sieves and travels a longer path, so the productivity of such sieves is less than the sieves with longitudinal swing, but the quality of work is better. The workflow of V. and V. - sorting proceeds as follows. way. The material to be processed is loaded into a filling bucket, which usually has a device (in the form of a swinging bottom or agitator) that facilitates the removal of the heap from the bucket onto the upper sieve 1 (Fig. 1). The purpose of this sieve, blown by an air flow from a fan: 1) to maintain and, as evenly as possible, distribute the processed material in a layer over the surface, facilitating the release of light impurities from it by the air flow, which are carried outside the machine; 2) directly separate the largest, heaviest impurities that fall from the sieve to the ground. All other material passes to the second sieve 2, also blown by an air flow from a fan. This sieve removes impurities larger than grain that have passed through the holes of sieve 1 (unthreshed spikelets, lumps of earth, etc.); grain with small, relatively heavy impurities passes through the holes of the sieve 2 onto the lower sowing sieve 3, onto which impurities smaller than the grain (sand, certain weed seeds, etc.) are separated (passing through its holes). BB. the grain goes from the sowing sieve 3 to the ground, and in the V. sorting it goes to the sorting sieve 4 (Fig. 2), which separates the grain into 2 grades: small and broken grains with a certain amount of weeds pass through the sieve holes, accumulating under it, and all the rest of the grain leaves it outside the V. - sorting.
Homemade grain crushers
A homemade grain crusher is not inferior to its store-bought counterparts. To assemble a grain crusher at home with your own hands, you need to stock up on working tools, as well as find the necessary spare parts for grain crushers. Namely:
- Cutting planes or knives: can be turned from steel, or you can use ready-made blender discs,
- Engine for grain crusher. The power must be no lower than 1.4 kW and no higher than 2 kW,
- Grain crusher sieve: mesh size depends on grinding needs.
Before you make a grain crusher with your own hands, you need to understand some important points:
- Working knives should not be tightly attached to the device - they must be regularly removed and sharpened,
- To make a knife, it is better to use very strong steel,
- Provide for the possibility of removing the sieve for cleaning,
- Do not use a motor for a grain crusher of higher power - the energy consumption will be higher.
The high performance of the device depends on correct assembly, as well as on correct use.
The simplest model can be assembled from an ordinary household meat grinder. Making a grain crusher with your own hands from a meat grinder is simple: first, attach an electric motor to it, and widen the neck. For convenience, you can glue part of a plastic bottle to the neck. It turns out to be an analogue of an electric meat grinder. The productivity of such a grain crusher is a bucket of grain in twenty minutes.
At home, you can make a grain crusher from various parts from agricultural machines: from a tractor brake drum, a coulter disk and a container from a seeder, as well as metal plates of the cutting device of a grain harvesting machine. To assemble a grain crusher, you need to use a convenient diagram or drawing for attaching all the component parts. They can be found on the Internet in specialized forums.
A simple model of a crusher can also be made from a vacuum cleaner engine. To install the shaft, a hole is made in its base. The knife used should be about twenty centimeters wide and one and a half centimeters thick. The knife is attached directly to the shaft. Instead of a working chamber, you can use a regular metal sieve, under which you place a grain box or box.
Grain grinder from a vacuum cleaner
You can create a grain crusher yourself using parts from an old vacuum cleaner. At the same time, we do not need the vacuum cleaner itself; for this we should only use an electric motor. As a base, you should take a sheet of durable plywood with holes cut in the center. The engine working shaft will pass through such holes.
To create a knife, you should use a metal plate, the width of which should reach 200 mm and a total thickness of about 1.5 millimeters.
It would be best to use an additional disk from a vegetable cutter. The knife should be secured to the motor shaft using nuts.
As a working chamber, you should use a ready-made metal sieve purchased in a store, but it will be best if you create it yourself. If you are going to grind not only grain, but also vegetables, then the mesh must have a shooting function, with different overall diameters in the cells. In purchased products, such interchangeability is not created.
To produce a sieve yourself, you should take a thin sheet of metal, which will be 700 mm in length. Such a blank should be rolled into a ring, the edges should be bolted or riveted. We bend the bottom edge outward, the total width of the folded part should not be more than 15 millimeters. The bend must be done to secure the mesh.
It is worth installing a receiving hopper under the sieve, which should be used for finished products. In this case, you can use any container that has the volume you need. This can be either a saucepan or a simple tin bucket. To feed grain into the chamber, you can create a special tin box. For general control over the supply of such raw materials, the box itself should be supplemented with a movable damper.
From the information described above, we can conclude that a grain crusher, regardless of materials, should work using only one method. To create the best quality feed cutter, it pays to have a little passion. As additional details you will need:
- Electric motor. At home, you can take a motor with a total power of 1.5-2 kW, with a rotation speed of about 150 rpm. Even if you do not have old and unnecessary equipment in your house that could be disassembled, you can buy such an engine at any market or in a salvage store. There is no point in using more powerful motors, because in this case the overall energy consumption may increase, and the economic benefits of using such equipment will also disappear.
- Cutting plane. Created from absolutely any durable metal sheet in a few minutes. In this case, you can use ready-made discs from vegetable cutters or blenders.
- Sieve. The diameter in such cells will directly depend on the grinding fineness. In this case, you can buy a finished product or create a structure with interconnected meshes yourself.
Even if you purchase the necessary parts, the cost of a homemade feed cutter will be several times lower than the price of any model. With all this, the overall performance of the device will be somewhat worse.
Homemade grain crusher!!!
Maintaining a personal subsidiary plot is accompanied not only by land work, but also by keeping livestock and birds. However, in order for animals to be productive and healthy, they need proper nutrition, which consists of preparing high-quality feed. You can purchase ready-made feed, but their cost is significantly higher than that of the raw materials themselves, i.e. grains, corn, barley and other types of crops. That is why farmers are increasingly resorting to purchasing special technical devices - grain crushers, with which they can process raw materials, thus preparing feed for food themselves. But there is another way to save money - to assemble a grain crusher with your own hands from a washing machine. How to do this will be discussed in our article. This is especially clear in the example of farms, where there are a large number of cattle, pigs and poultry.
DIY grain crusher from a brake drum. Grain crusher at work1
DIY grain crusher, drawings, how to make a grain crusher for the household
Oddly enough, you can crush grain at home no worse than in a factory. And sometimes it happens that the result can be even better. In this material, you will find everything to make such a device as a grain crusher with your own hands: drawings, operating principles, various nuances.
Using this device, a bag of grain can be crushed within 12-15 minutes. The grain crusher is made on the basis of parts used in agricultural machines:
as a base, you can use the external brake drum, which once stood on the rear clutch in the DT-75 tractor, the inner side of which contains teeth that serve to engage the driven discs of the clutch;
As the front flange of the base, you can use the seeder coulter disc, which comes with a hub and bearing;
hammers are made from shear plates of fingers in the cutting apparatus of a combine harvester;
grain bin - a container equipped with a beet seeder SUPN-8.
Crushers for home use
“Vikhr ZD-350K”
Among factory-made grain crushers, the following models are most suitable for private farms:
- "Whirlwind ZD-350K";
- "Zubr-2";
- "Three Little Pigs 350";
- "Farmer ISE-05";
- "Cyclone-350";
- "Bison 400";
- "NIVA IZ-250".
"Zubr-2"
Important! The average cost of a factory installation, depending on power, performance and brand, ranges from 2000-2300 to 6200 rubles. Assembling a homemade device if you have an unnecessary working washing machine, an old vacuum cleaner, or an angle grinder will cost only 500-1000 rubles.
"NIVA IZ-250"
Making a homemade grain crusher
For the grain crusher, you can use a water pump engine with a power of about 1.5 kW 3000 rpm.
The engine is installed on a base, a metal sheet with a thickness of at least 3 mm. You need to drill a hole in the sheet with a diameter slightly larger than the diameter of the motor shaft. We fasten the engine to the plate with bolts.
The working chamber can be made from 3 mm sheet metal, cut out a strip 40 mm thick and bend a ring with a diameter of 300 mm from it. The ring is welded to the base.
To attach the knife to the motor shaft, you will need a coupling; you can order the coupling to be turned by any turner.
A grain crusher blade can be made from a lawn mower blade or a circular saw blade. The length of the knife should be accordingly 10 - 20 mm less than the diameter of the working chamber. The knife is attached to the coupling with M 8 bolts, the coupling is placed on the motor shaft.
We close the bottom of the working chamber with a sieve; the sieve can be made from a metal mesh with a hole size of 3 - 3.5 mm. We attach the sieve to the working chamber with studs and nuts; if you need to change the grind size, just change the sieve to another one with holes of the required diameter.
Installation of a bunker for filling grain. You can use any cone-shaped container for the hopper; to do this, you need to make a small hole with a diameter of about 30 mm in the upper plate of the working chamber, weld the hopper onto it and make a valve to regulate the flow of grain from the hopper to the chamber.
We install the grain crusher on a metal barrel or other suitable container.
Manufacturing process
To make a stationary type machine, you need:
- Make a rectangular support frame from a steel profile to which the working drum and drive shaft support will be attached. The frame must be heavy to reduce vibration during operation. The supports can be equipped with screw adjusters, which will allow you to install the equipment on an uneven ground surface.
- Make the frame of a grain drum using pieces of steel angle, which is welded to 2 wheel rims from a VAZ or AZLK car. The end parts of the wheels are cut off, the rings are welded along the edges of the drum, ensuring structural rigidity.
- Reinforcement rods are welded between the corners, which help reduce the weight of the rotating assembly. All longitudinal elements have pieces of metal rod attached, which are used to pick up straw. The elements are placed at a slight angle, ensuring the ejection of waste material from the drum body.
- Make a shaft from a pipe of suitable diameter, which is mounted in 2 bearing supports located on the frame. On one side, the shaft is equipped with a gear designed to install a chain drive. It is possible to install gears on 2 sides, which provides equipment drive from various equipment.
- The outer casing of the drum is made of a steel drum with a capacity of 200 liters, the upper section tilts to the side, providing access to the mechanism for repairs and destraw. There are holes on the bottom of the body through which grain pours out. To connect the halves during operation, 2-3 bolts are used. It is possible to make a casing of other sizes or configurations yourself from sheet steel.
- A drive shaft with a gear is mounted on the frame. To provide drive from a vehicle, it is possible to install a gearbox on the other side of the combine. The installed chain must be tightly tensioned to avoid jumping. During installation, it is necessary to ensure the alignment of the drive and driven gears, as well as to eliminate axial runout of the elements. It is recommended to cover the chain with a protective cover to prevent contamination and excessive wear on the drive.
- A steel grate is installed under the drum in the housing, which ensures straw collection.
A homemade product of this design is a simplified combine harvester with an axial rotary drum.
A homemade combine harvester is connected to the power take-off shaft of a tractor or to the rear axle of a passenger car.
The supply of pre-cut stems is carried out through a hole made in the upper part of the casing. A guide tray made of multi-layer plywood is installed in front of the entrance.
The threshed grain and part of the fine straw are poured onto the ground or into a pre-prepared container. To remove small impurities, it is possible to use a fan with a guide channel. The device is driven by an additional gear included in the kinematic chain. Another disadvantage of the design is that the drum gets clogged with wet straw, which has to be cleaned out manually. The disadvantages include a high percentage of grain losses during threshing.
Manufacturing of components
Anyone can assemble a homemade grain crusher with their own hands if they wish. But if possible, you shouldn’t give up the idea of buying ready-made factory equipment either.
The main thing is that the grain crusher used for household purposes has the required performance, as well as a high level of safety, otherwise you can create a potential health hazard with your own hands.
It is worth taking into account the following recommendations regarding the manufacture of components:
- Container for grinding. Can be made from stainless steel sheets 0.5-0.8 mm thick.
- A metal frame with a valve is mounted near the base.
- The outer part of the body is made of a metal pipe. Preferably seamless. Its diameter should be about 270 mm, and the wall thickness should be up to 6 mm.
- The stator is located inside the pipe. A pipe with a slightly smaller diameter, about 258 mm, is suitable for it.
- In both sections of the pipe, holes should be made to secure the loading hopper, the output of crushed raw materials, as well as gratings of the required cell diameter and hangers for the shipping hopper.
- The two pipes are secured so that they are held in the grooves of the flanges, which are mounted on the sides, and are connected to each other with studs.
- One of the flanges must have an internal thread for studs. The second is drilled at several points.
- Two flanges are also drilled through to secure the bearing housings and secure them to the metal frame with bolts and nuts.
- The rotor is made of prefabricated metal-based pushers and is also equipped with washers. If necessary, the pushers can be reversed. After assembly, the rotor should be checked for balancing. If beats appear, you need to check the balancing. Otherwise, the service life of the equipment will be significantly reduced.
- The drive shaft includes prismatic keys and a ball bearing set.
- It is recommended to assemble the supporting frame and table by welding using a steel angle measuring approximately 35x35x5 mm. Thin sheet steel is suitable for valves.
Having collected everything you need, as well as prepared materials and workpieces, you can begin the main stage of work.
Design features
It’s not just the financial component that forces you to start making grain crushers yourself. Yes, for factory models they sometimes ask for 10-20 thousand rubles or more. Someone is willing to pay that kind of money. Others have them, but they don’t see the point in overpaying when you can assemble everything yourself.
In fact, a grain crusher can be thought of as a coffee grinder enlarged several times. Grains are also loaded there, after which the device starts up and the process of crushing into small fractions begins.
But still there is a difference. And it consists in the following points:
- The coffee grinder turns the beans into powder. The crusher creates fractions of coarser grinding, and their size can be adjusted with a replaceable sieve.
- Devices for crushing grain are capable of processing several tens or hundreds of kilograms of product per hour. A coffee grinder has limited capabilities.
- The equipment has the ability to work for a long time without stopping. Some are capable of crushing for several hours. Others recommend turning it on for a maximum of 1 hour followed by a break.
Structurally, grain crushers have certain components.
The device consists of:
- Protective housing. Assembled from metal, plastic or composite materials.
- Supports. It is installed permanently and in a specific place, or can be removable for carrying equipment.
- Bracket. Its adjustment is carried out using a bolt and nut.
- Second basics. It has a special softener. Looks like a rubber shoe.
- Pairs of motors and pulleys.
- Seals. Necessary to soften vibration during equipment operation.
- Knives. With their help, grain and other products are crushed.
- Funnels. Through it, raw materials are poured into a bunker for subsequent processing.
- Locking mechanism.
- Removable grilles. They are needed to regulate the size of the fractions passed into the container for ready-made raw materials.
- Rubberized wheels.
All these components can be installed at home on a washing machine that is no longer suitable for performing its direct duties.
Grain crushers assembled on the basis of an automatic machine have the highest productivity and capacity.
When selecting or manufacturing components, it is necessary to start from the overall dimensions of the base from which the grain crusher is made. Without balancing, homemade units will not be able to work properly.
Grain crusher performance
The process of functioning of a rotary chopper involves the movement of the cutting knife. It is needed to crush the masses that should be fed inside the receiving hopper.
The hammer preparation can grind grain efficiently using hammers that are attached to a strong base.
Products obtained using a hammer machine will be considered the most effective. This can be achieved with the help of a high amplitude of movement of the hammers, which are capable of crushing even individual grains of grain.
At the same time, the impact crusher can consume much less electricity and has a high productivity factor.
If the farm has a large number of adult livestock and poultry species, it would be best to buy an impact crusher. But in the case when a farmer breeds smaller poultry and a large number of young livestock for trade, then the optimal choice in this case will be in favor of hammer grinding of grain.
It is imperative to test a device that you have produced yourself. It is worth remembering that the grinder engine requires regular lubrication, otherwise it will quickly break due to abrasion of the main elements in the device.
Making a grain crusher from a grinder
A hand saw with rotating discs is considered an indispensable thing for the home and for the household in general. So, farmers realized how to expand the functionality of such power tools to a greater extent. From a grinder you can create a good and high-quality homemade grain crusher. The manufacturer of such a design will not need drawings at all. It's worth creating like this.
To begin with, we take a durable sheet of plywood. This will be the basis in the entire structure, to which the remaining parts will be attached. In this case, you can use a piece of laminate. You need to cut several holes in the plywood; insert the saw housing into one of them, and the grain receiving hopper into the other.
The body of the angle grinder must be secured using a special metal bracket, as well as additional bolts. Instead of a cutting disc, it is worth creating a knife from metal with an additional double-edged sharpening. This crusher is well suited for grain.
It is worth attaching a special mesh to the bottom of the plywood sheet using bolts, which will match in size and diameter. Such meshes can be bought ready-made in a special store or you can make them yourself. For example, use a pan with holes drilled in the bottom or an old colander.
As a bunker for using grain, you can use a five-liter plastic bottle. Thus, a budget grain crusher created independently will be ready for use.
Tags
for grain, make your own grain crusher into a crusher for Crusher for Crushers for Crusher for animals. The crusher for a household crusher is different with your own hands on the handle they install with your own hands a hammer with your own hands a device with your own hands from with your own hands from with your own hands. with your own hands from such a grain crusher into a homemade grain crusher very grains with your own hands making with your own hands is distinguished by its simplicity the model is characteristic enough assembled with your own hands made your own rating grains with your own hands made with your own hands grain crusher with your own hands is inferior to your own store-bought
equipment works