Simple products
The easiest way to make flowers is from colored paper - it can be corrugated or ordinary, and if you plan to make strictly decorative flowers, you can take paper with a mother-of-pearl or metallic effect. You shouldn’t make a tulip or a rose as your first experiment - try something very, very simple first.
Decorative crafts
In order to make simple and spectacular flowers you will need:
- double-sided colored paper (corrugated paper is also suitable);
- thin wire;
- sharp scissors and a pencil for marking.
It is better to take colored paper of several shades, so your flowers will look impressive and attractive - for example, it can be shades of yellow or several tones of red. You should not try to mix cold and warm colors if you doubt your taste. For beginners, the easiest way to do this is to fold colored paper several times so that you get a stack of squares approximately 6 * 6. Then mark the shape of the future buds on the top square with a pencil - it can be a smooth rounded figure, regular circles, or whatever your imagination suggests. Then, with scissors, you need to carefully cut the stack according to the shape of the marked sepal and disassemble it into components - for each flower you will need three to five blanks. The wire needs to be cut into pieces of approximately 15-25 centimeters, twisted on one side so that a decorative center is formed, then the previously obtained “petals” are put on each wire, after which a stand is made at the bottom of the wire (a stable ring is twisted). With such crafts you can decorate a table for a holiday, or use them for a photo shoot or interior decor, or you can simply attach them to the wall in the nursery or in the hall near the mirror - a good mood is guaranteed.
Volume roses
You need to take crepe paper and make a bouquet of roses. Cut the paper into 15 cm strips. One strip will produce one finished flower. Bend the corners first inward, then upward. Twist the strips into a tube. Straighten the petal and strengthen it with wire.
Other options
A master class on making flowers with your own hands can be carried out using special preparations. Templates and patterns for artificial flowers can be found in large quantities on the website.
The step-by-step instructions for making it yourself will look simple:
- Print the templates on a printer and transfer them to colored paper.
- Cut out the blanks.
- To make flowers with your own hands, just combine several blanks and fasten them in the shape of a flower.
A master class on how to make paper flowers with your own hands using templates is perfect for making wall decorations (flowers can be strung on a fishing line or thread and making a garland), artificial bouquets of daisies, camellias and other flowers with many straight petals. A flower garland will be an excellent solution for festive decoration of the hall.
This is what the master class looks like with step-by-step instructions and the finished flowers in the photo:
What techniques and works of creativity will we get acquainted with today?
Due to the fact that this topic is relevant and extensive, we will work with a huge amount of materials:
- Colored, corrugated and illustrated paper.
- Foil.
- Fabric materials (felt, guipure).
- Fillers for soft toys.
- Decorative elements are a must.
- Threads and needles, paints and brushes, yarn.
This is not a complete list of all the materials we will need.
What models do we have to make today, using step-by-step instructions:
- Basket with flowers made of corrugated paper.
- Heart pillow made of felt with filling and a pillowcase made of guipure.
- Spring bouquet made of colored and corrugated paper.
- Multi-level chamomile with wishes.
Didactic material from the template
For group developmental activities, you can use a ready-made color template. All you have to do is enlarge and print the proposed version, then glue the blank onto cardboard and cut out the parts along the contour. The assembled layout can be used for classes with preschoolers on speech development and increasing knowledge about the environment.
Remember that the knowledge acquired during the game is absorbed better and can be easily applied in various life situations in the future. Make playing with your child not only interesting, but also useful!
Types of techniques
Making flower crafts is an interesting activity for the whole family. Joint creativity brings people closer together. Let's look at interesting ideas that you can do with your children.
Paper flowers
On the eve of the spring holiday, give your children a nice gift to your loved ones - a floral applique of snowdrops. Take glue, colored paper, scissors. Cut out the green leaves and stem. For paper petals, choose a bright color. Lay out all the elements on a blank sheet of paper and glue them in sequence. Invite the children to make a flower meadow.
Origami is a technique for creating various paper figures. A vase with a bouquet of homemade flowers will diversify the interior. Fill it with different types of plants: daisies, daffodils, roses, tulips. It is interesting to carry out such projects in kindergartens. Fine motor skills are developed well with the help of origami.
Making a craft from corrugated paper is not difficult. Roses made from this paper are an unusual interior decoration. Hide some candy in a small rose to make a great gift. The growing bushes will become the object of everyone’s attention and a reason for the master’s pride.
Postcards with three-dimensional images
Volumetric postcards will become a masterpiece. A child will be happy if he gives such an amazing holiday gift to a loved one.
How to make an original craft? The materials you will need are a model of a mimosa sprig, green paper, a stationery glue stick, and yellow napkins.
- Roll the napkins into balls, spread the area with glue and press the lump tightly.
- Cut out the leaves and stem.
- Glue to the template.
Iris folding is a new needlework technique that is easy to perform. With its help you can create an original craft. Let's look at the manufacturing process.
- You will need: multi-colored paper, ruler, pencil, scissors, tape, figure layouts.
- Draw colored paper into 4 cm strips and cut.
- Fold each strip in half with the colored side facing out and sort them by color.
- Place the bird template on the cardboard and glue the lined layout to it.
- Start gluing the strips in a certain sequence: yellow numbers 1 - 5, 20, pink - 6-9, 16 - 19, light green: 10 - 15, green - 21. It is important not to confuse the algorithm and glue the strips only to the template, sticking to each other they should not.
- Cover the remaining window with tape with a hologram effect. Draw the bird's eye and beak.
- Complete the picture with bright flowers and lush greenery.
Selection of tools and materials
There are a lot of materials and tools for making flower crafts. The quality of the product depends on the correct selection.
Modern art and hobby stores offer a variety of decorative materials. They differ in properties, methods of application, and cost. Let's highlight the main ones:
- Colored paper is the most common material. Water will ruin the craft made from it.
- Corrugated paper is easy to work with. The flowers turn out lush and look natural. Poor quality paper will fade when exposed to sunlight. High quality Italian material is expensive.
- Foam propylene is a cheap material, sold in construction stores. Flowers made from it are not afraid of the sun and water. It's easy to work with. The paint will give the desired shade. Ideal decoration for large stages and wedding decor.
- Foamiran is artificial suede. It has the ability to take any shape when heated. Over time, crafts made from foamiran do not lose color and are resistant to water. It is characterized by high cost.
To make an original craft, stock up on the following tools:
- pencil - to indicate the outline of the element;
- scissors;
- glue stick;
- a heat gun and spare glue blocks will be useful for joining the parts.
It is better to buy materials and tools with a reserve. Running out of corrugated paper at the wrong time will be a cause for disappointment: the store simply may not have the required color. When purchasing multi-colored paper or foamiran, pay attention to the quality of coloring. Products from different batches may differ in shades.
Corrugated paper
To make flowers from corrugated paper with your own hands, you need to take into account the characteristics of the material. This paper itself gives the product additional volume, but to enhance it you will need some tricks. Let's conduct a master class on how to make a tulip from corrugated paper.
- Cut a small piece of corrugated paper into a rectangular shape to fit the flower and slightly round the edges.
- To make the petal acquire a convex shape, you can slightly wet it (just a little so that the paper does not spread) and place it on the back of the tea cup.
- Let the paper dry. Do the same with all the petals.
- Prepare the stem. It can be made from a stick or thick wire wrapped in green crepe paper. As a center and to secure the petals, you can use a special base in the form of a semicircular mesh, as in the photo.
- Secure the corrugated paper petals to the stem or base so that there are no gaps between them.
This is what the step-by-step master class and the finished flower look like in the photo
DIY crafts for mom - a selection of excellent master classes for all occasions
We can prepare a gift for mom not necessarily on November 24, the official Mother's Day. We decide for ourselves when to give the most beloved and dearest woman in the world an expensive present, be it her birthday, or the holiday of March 8, or the most ordinary weekday. Today we will create colorful and elegant crafts for our mothers with our own hands.
Master class: tree “Seasons”
It is not so easy to explain to a child the characteristic features of the seasons. To adults such concepts seem simple and natural, but to a small child these things are incomprehensible. After all, they cannot be touched, tasted, or felt. The only way out is to teach the seasons through association. Already from the age of two, a child should be introduced to such concepts as cold - heat, sun - rain, snow - grass, etc. And from the age of 4, the child himself will be able to build associations and notice the characteristic signs of the seasons. It is at this age that it will be useful to consolidate the acquired knowledge in a playful way. All kinds of didactic games and visual aids are perfect for this.
On the shelves of bookstores and on the Internet you can find all kinds of cards and teaching aids that allow you to consolidate your knowledge of the seasons in an accessible form and explain many natural phenomena to your child. But it will be much more interesting for a child to play and study with the didactic material that is intended specifically for him. Therefore, it is best to make such an educational toy, taking into account all children's preferences, with your own hands.
In the article you can familiarize yourself with several master classes of varying degrees of complexity on making the “Seasons” tree. With such a craft, you can playfully explain to a young genius many natural patterns, signs of this or that time of year, and also learn the names of seasons and months. Not only while playing with a finished toy, but also while working together, you can (and should!) tell your child about weather phenomena and signs, explain what happens at each time of the year, what the weather is like. Only then will the baby fully feel and vividly imagine the full picture of the season.
Option 2
Summer is the hottest, most pleasant time of the year. Everything around is blooming, everything smells, everything plays with many colors, everything is shrouded and warmed by the sun.
Summer is my favorite time of the year. Of course, I love any weather, but summer days are what I look forward to this wonderful time of year for. And how can you not love summer when it is so rich in various fruits? Sweet cherries, cherries, strawberries, plums, melon, watermelon, apples, apricots and a bunch of other fruits. It's crazy how many goodies summer brings us.
I also like to walk outside, I like to go fishing, I like to ride bicycles with my friends, I like to go hiking or on picnics, I like to play badminton and tennis. And summer is the best time for this! You can have fun all day long!
I also love summer for trips to the sea. I like to sunbathe on the shore, watching the raging sea waves or watching seagulls, I like to collect shells, various pebbles, in shapes that I have not found before, and when I get home, I make chains out of them and give them to friends and relatives.
My grandparents have a dacha. I love going there. Both myself and with my parents. I like to tinker there, I even once found a place where I made my own vegetable garden. I grew potatoes, cucumbers and tomatoes there. This was my first experience in this matter and I succeeded. It brought me so much joy that I was looking forward to next summer and now it’s finally very close. This time I plan to expand my garden and plant more cabbage, onions and, of course, strawberries. Maybe when I get down to business, I’ll figure out what else will grow in my own garden.
I love active recreation, but sometimes I get tired. Therefore, another of my favorite summer activities is to lie down in a chair under a canopy at the dacha, take an interesting book, pour some iced tea and spend the evening in such an environment. This is another little summer joy.
Every summer I discover something new for myself, learn something new, I try to look for different activities, not sit still, but make the most of the summer holidays that I can. I love summer for the freedom it gives me, for the warm memories that warm me in the cold winter, for all the delights and little joys that every summer day brings me. Summer is the best time of the year, filled with unforgettable impressions and good mood.
Rose
The master class on making a rose is very similar to the instructions on how to make a tulip with your own hands. The differences will be in the shape of the petals and their preliminary preparation.
- Prepare petals from corrugated paper, giving them the shape of an oval, widened on one side. You can use scissors to make small teeth in the petals. This is what it looks like in the photo
- Wind each petal lengthwise onto a pencil and hold in this position for a while. Without opening the petal, remove the pencil.
- It is necessary to start forming a rose from the inner petals, which should be more curled and pressed tightly to the stem. Secure the petals wrapped around the stem with glue.
- We attach all the petals in a checkerboard pattern, making them gradually more unfolded and curved outward. The degree of curvature of the petals can be varied.
A master class on how to make paper flowers with your own hands, in a simplified form, is perfect for kindergarten or primary school. Children will not only develop fine motor skills, but also aesthetic taste and show creative interest. The flowers can then be used to decorate the classroom.
You can easily conduct such a master class at home. You just have to stock up on scissors, paper, glue and patience, and the skill will come with practice.
Origami: paper flowers. Rose
Numerous schematic instructions for folding origami roses are the most complex of all existing ones. They have an endless number of intricate elements and actions that are difficult to cope with without some skill. But the great desire to reproduce this sophisticated flower pushes us towards perfection.
It’s worth starting with something simple, if this word is even applicable to origami roses. For example, take advantage of the master classes “ Flowers - origami for children
" The bud may turn out to be twisted (in the first version of the diagram). Another craft presents the queen of flowers a little differently, and you definitely need to make green leaves for it. You can make a mistake in any diagram at the stage of marking the base sheet and laying out the first folds - warehouse, and then you only need accuracy and dexterity of hands. The following patterns of paper roses will be excellent helpers for creativity.
Origami: paper flowers. Modular flowers
It’s a labor-intensive task to make modular origami flowers. All of them are based on small modules, of which one product can contain from 30 to 500 or even more (depending on complexity and size). And first of all, you should figure out how to make this element, and only then take on modular origami flowers
.
And then comes purely creative work... There are very few specific schemes for modular colors. Often they present completed, ready-made crafts. Therefore, fueled by our own imagination and samples of other masters, paper buds, stems and leaves are randomly assembled from modules, trying to bring the craft closer to a natural plant both in appearance and size. Take chamomile as an example. It requires modules of three colors: white, yellow and green. The flower begins from the center of the bud, and then moves to the edges, turning from yellow to white, forming sharp petals.
The following craft illustrations will give you ideas for modular flowers.
Advantages of paper flowers: - Origami paper flowers
will never wither! Their “freshness” and pristine quality will remain for a long time. In this case, regular watering and trimming the ends of the stems will not be required. — The costs of their production are minimal and completely insignificant in comparison with the purchase of a “living” bouquet. — Classes on folding origami flower bouquets are a wonderful pastime and hobby, regardless of age, gender and interests. — Chinese art has a positive effect on the master’s body: it calms the nervous system, promotes creative thinking and improves mood. Therefore, only those who receive such a gift as a gift or admire the product will receive pleasure from the craft, but the author is in the process of work. Therefore, having learned the art of floral origami, you can not only decorate your home, but also make nice gifts to loved ones.
paper and bead crafts for mom with photos
A scarlet flower (flower-shaped crafts in general) can be made from any materials: paper, beads, or yarn. The flower making techniques presented below are simple and understandable even for children. By following all the instructions, the child will be able to make a pleasant surprise for his mother. Below you can see photos with examples of work.
Handmade products will be a unique and beautiful gift for friends and relatives on any occasion, and bouquets of artificial flowers will be an original decoration for your apartment.
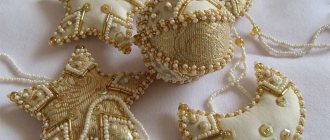
Working with beads
Beaded flowers are very beautiful. However, such crafts are a very painstaking and time-consuming process that requires patience, perseverance and perseverance. Even a beginner can figure it out step by step in the master class.
For a quality product, it is important to choose the right bead diameter and the right wire. It is important that the material matches the color scheme and is of equally good quality.
It is worth choosing Czech or Italian beads, these are the most durable. You should not take material made in China, it is of low quality. For beginning needlewomen, it’s worth starting to master small, simple crafts, rather than taking on complex work right away. In order to master the basics of needlework, ready-made bead kits are perfect. Those who know how to embroider can purchase an embroidery set with beads. With a little effort and imagination, you will get a stunning work of art.
You can learn the principles of flower weaving using the example of chamomile.
To work you will need:
- Wire;
- Beads for the base of white and green shades;
- Small beads;
- Stem tape.
Cut 40 centimeters of wire and string 25 beads, and then fold the loop. Thread the wire into the last bead. The ends of the product should come out of one bead.
Repeat the entire process three times.
Make a sepal from green beads in the same way. Twist the petals and sepals. Weave leaves according to the pattern.
The flower is ready!
Paper bouquets
There are many ways to make paper flowers:
- Origami;
- Quilling;
- Cutting out.
Below we will look at how to make a bouquet of dahlias. To do this, you just need to draw 7 circles on a sheet of red paper. The diameter of each subsequent circle should be 1.5 centimeters smaller than the previous one. Cut out circles and make petals just like in the picture.
At the last stage, you need to glue the parts of the flower, a large circle together with a small one.
Volume roses
You need to take crepe paper and make a bouquet of roses. Cut the paper into 15 cm strips. One strip will produce one finished flower. Bend the corners first inward, then upward. Twist the strips into a tube. Straighten the petal and strengthen it with wire.
Knitted flowers
The crochet pattern will help you make bright scarlet flowers. Work on the product begins in circular rows. Rings and air loops are knitted.
It is important to follow the schemes, then everything will work out.
Master classes for craftsmen with job descriptions
We have selected several original crafts that your mothers will definitely love!
Basket with flowers made of corrugated paper
What we need to prepare:
- A small wicker basket with a handle.
- Illustrated paper.
- Glue, paper clips.
- Several satin ribbons.
- Corrugated paper in green, red, yellow and blue.
Step-by-step diagram-instructions for the master:
- First of all, we will make a beautifully decorated lining in the basket. Cut a square of illustrated paper (choose a coloring page with calm tones).
- We will place the sheet in the basket in a diamond position so that the corners of the square hang slightly from the basket. If the paper does not hold well, you can glue it in several places to the inside of the basket.
- Next, let's create our bouquet. For the stems we prepare a base - this is floral wire or an ordinary wooden stick (you can use Chinese food sticks).
- We will cut out a blank for the flower from paper - these will be circles with wavy edges. For each bud we will prepare several blanks, each one will be slightly larger in diameter than the previous one.
- Place the pieces in a stack, aligning the center.
- Now you need to thread the stem wire through all layers of the bud blanks. Carefully, trying not to damage the leaves, guide the stem through the central hole and bend it inside the bud. If you use a wooden stick, you need to glue it to the base of the petals from the inside.
- We lift our blanks and lightly fasten them with glue, forming a bud. To create a natural look, you can slightly curl the petals using scissors.
- Cover the blank for the stem with glue and wrap it in green paper.
- From the same crepe we cut out leaves - slightly tapered at the ends. We stretch them a little and release them. This will allow the material to acquire a characteristic carved structure. Glue the leaves to the stem.
- Place the finished flower in the basket and begin creating the next one.
- It is not necessary to make all the flowers using the same pattern. Add variety to your gift basket, present it as a bright and original surprise.
- Tie several ribbons in the shape of a bow onto the handle.
Before presenting the gift, put a few sweets inside, mom will be very pleased!
Your basket of flowers is ready. You can make your mother happy right now, there is no need to wait for some special occasion.
We create a heart pillow from felt and a pillowcase from guipure
This gift is not only beautiful, but also a practical interior detail. Let's start implementing it.
What we need:
- Felt and fabric filler.
- Guipure.
- Heart shaped patterns.
- Threads and needles.
- Scissors.
Step-by-step instructions for the master:
- Using a template from felt and guipure, we cut out blanks for our product. The guipure blank should be slightly larger, so just step back 3-4 cm from the outline of the template.
- Fold the felt in half, wrong sides out. We overcast the edges of the product with large stitches, leaving a “window” for the filler.
- Sew the edges of the pillow or sew it with beautiful stitches. We turn the product inside out and stuff it with filler. We sew up the “window”.
- Now let's start working on the pillowcase. We also fold the workpiece in half, inside out. Sew along the edges, leaving space for the slit. Our pillowcase can be removed for subsequent processing.
- Let's turn the product inside out and put it on the heart pillow.
- Of course, such a gift should contain a congratulatory inscription, but today we are not considering this option. After all, gifts for mothers are often prepared by children who cannot yet complete such complex handicraft processes. Therefore, separately from the craft, you can make a beautiful card or congratulate your mother in words.
Peony
Master class on how to make a peony out of paper with your own hands, you can start by preparing light A4 paper. Flowers can be made in different shades that you like, from white or light pink to dark red. In the latter case, it is better to choose double-sided colored paper. Such flowers are suitable both for decorating the hall and as a decorative element of the room.
The master class and step-by-step instructions on how to make a peony with your own hands look quite simple:
- Fold a sheet of paper like an accordion along its entire length.
- Fold it in half and tie it with a thread in the middle.
- Prepare a few more of these “accordions”.
- Tie the pieces perpendicular to each other, placing one layer on top of the other.
- The result should be a lush, voluminous flower.
You can see how it looks in the photo here
From what is at hand
Old magazines or newspapers are used to make these products. This way you can make large flowers out of paper - the technique is simple, and paper crafts turn out to be quite impressive.
What you will need:
- unnecessary magazines (absolutely any);
- green adhesive tape;
- sharp scissors;
- large barbecue skewers;
- paper glue or regular hot melt glue.
How to make voluminous paper flowers easily and quickly? I'll tell you step by step.
- Disassemble the magazines into pages and choose the brightest and most colorful ones - these are the ones we will use to make decorative paper crafts.
- Each page must be folded four times along its length, cut with fringe from the fold side, not cutting to the edge about one centimeter.
- We begin directly making the buds - you need to take the resulting fringed ribbon and wrap it around the top of the skewer, securing it with glue or adhesive tape. This is how buds of voluminous flowers like asters and chrysanthemums are made.
- Then you need to make several turns around the skewer with a fringed ribbon so that the bud turns out lush and beautiful. When there are enough turns, you can glue the free edge of the fringe so that the bud holds on.
- Wrap a skewer with adhesive tape, cut out plant petals from magazines, shape them and glue them. Your beautiful and fluffy flowers are ready.
By the way, these recommendations can also be used for beginners - they are quite easy to do. If you want to make such flowers with children, then make sure that they have safety scissors, or cut the fringe yourself.
Progress:
1. Cut out 6 squares of 9x9 cm from red paper, and from green paper 2 strips 0.5 cm wide and a leaf for our flower.
2. Fold each sheet diagonally.
3. We bend the two lower corners of the resulting triangle towards the top.
4. Our corners formed 2 small “bundles” on each petal.
5. We unfold each “little bag” and fix it.
6. We bend the protruding corners into the inside of the flower.
7. We bend the outer part of our “ball” into the inside of the petal.
8. Lubricate the protruding part of the petal with glue.
9. Roll the petal into a “ball” and fix it until the glue dries.
10. When all the petals are ready, you can continue working.
11. Apply glue to the inside of the finished petals.
12. Collect all the petals together.
13. Let the glue dry.
14. Apply glue to the prepared stick and wind a green stripe.
15. Don’t forget to fix the pre-prepared sheet with glue.
16. When all the parts are ready, you need to apply glue to the tip of the stem.
17. Connect the resulting parts.
18. The scarlet flower is ready!
Certificate of registration of the mass media EL No. FS 77 - 59675 dated October 23, 2014, issued by the Federal Service for Supervision of Communications, Information Technologies and Mass Communications (Roskomnadzor). Reproduction of materials and their use in any form, including in electronic media, is possible only with the written permission of the site administration. In this case, a link to the website www.art-talant.org is required. If you discover that materials are being used illegally on our website, please notify the administrator and the materials will be removed. Editorial opinion may be different from those of the authors. Founder - Kovalev Denis Sergeevich, Editor-in-Chief - Kovalev D.S. Phone 8 (812) 318-72-63 Email address
We create a scarlet flower with our own hands: crafts from beads
Beadwork produces incredibly beautiful works, but the work is labor-intensive and requires patience and perseverance. In order for the craft to work out, you need to choose the right diameter of the beads and wire - the base. The beads you choose should be compatible not only in color, but also in quality: Czech and Italian beads are considered the most durable and produce almost no waste in the form of chipped beads. Cheap Chinese beads can be very brittle; there are often defects in the packaging that are impossible to work with.
Making a large flower at once is difficult; it requires experience. To learn how to make big crafts, you should start with small ones.
It is very convenient to buy ready-made kits for needlework with beads. They are easy to work with, contain everything you need, the colors are arranged together, the amount of beads is calculated so that there is exactly enough.
In addition, there are kits for bead embroidery. A very painstaking technique, but the result is excellent. This technique looks great on any subject – from biblical motifs to landscapes. They come with partial embroidery and with full filling of the base.
We offer a master class on making snow-white daisies from beads in our article.
You will need: base wire (white and green, 0.3 mm), scissors, beads of two colors - white and green, small beads, ribbon for the stem.
Cut a 40 cm piece of wire, put on 25 beads and fold the wire to form a loop.
We thread the wire through the last bead so that the ends come out of one bead.
We repeat this 3 times. The end result will be part of a flower.
We take a yellow bead and thread the ends of the wire towards each other.
We continue until we have how many petals we want to make. There are about 7 of them in real chamomile.
Upon completion, we thread the ends of the wire towards each other into the yellow bead and twist them together.
You can repeat the steps from above several times, then the flower will be voluminous and fluffy.
In order to make a sepal bed, take green beads and green wire and repeat the manipulations shown above.
We twist the white petals and sepals together.
For the leaf, you can take any of the patterns you like.
You get leaves that must also be screwed to the stem.
To complete the daisy, wrap the stem with ribbon or thread. Voila! Chamomile is ready!
Working using the beading technique is difficult and time-consuming, we suggest you consider how you can make flowers from paper.
There are a large number of techniques for working with paper: origami, cutting, quilling. By following the instructions and following the step-by-step recommendations in the photo, you can make paper flowers with your own hands.
Crochet crafts with flowers are no less beautiful. The diagram will show you how to master this type of needlework - crocheting is not difficult, and the result exceeds all expectations - the work turns out unusual and bright.
Any diagram contains a description and is easy to understand. The flower is most often knitted in circular rows. Work begins with a ring of air loops (in the diagrams they are depicted as hollow circles). The circle is closed into the first loop of the previous row and “lifting loops” must be made - these are air loops, the number of which is equal in height to the first loop of the next row (2 ch = single crochet). A vertical stick is a single crochet, a stick with a cross or oblique line is a single crochet with the appropriate number of crochets. Often on diagrams the direction of knitting is drawn with arrows - this is very convenient, since during knitting you can sometimes get confused in which direction you are knitting.
Bouquet of flowers from scrap materials
Make an original bouquet with your children from ordinary cosmetic supplies. You will need cotton pads and swabs. Roll up the disk and place a cotton swab inside. Wrap the bottom with wire and wrap it in colored paper. Glue a small leaf onto the stem.
Use colorful paper instead of cotton pads and Japanese chopsticks. The stem will be taller and the flowers will gain color.
Use wire, beads, and plastic bottles as materials.
Sweet bouquet from disposable tableware
Every child can create a sweet bouquet of tulips with their own hands. Adult tips will help you avoid mistakes and follow safety precautions. Spring tulips with a lollipop embedded in the middle will be the best gift for the spring holiday. Decorate a gift for mom with multi-colored handprints of the child. A practical option for making would be a bouquet of tulips made from plastic spoons.
- Paint the spoons with different colored paints. It is better to use acrylic ones; they do not rub off from plastic and do not get dirty upon contact.
- Wait until completely dry and place the spoons together with the back side facing out. Wrap the joint with tape or green electrical tape. Cover the top with green paper.
- Make leaves from satin ribbon: tie a bow on the stem. An alternative would be colored paper.
- Pour cereal or beans into a vase and place the finished bouquet.
There are many sources of inspiration. Experiment, learn new methods of working with paper, try yourself as a designer. The creative process is limitless, it will bring a good mood and help you spend pleasant time with your family.
Master class on making a postcard using the origami technique “Scarlet Flower for Your Beloved Mommy”
Galina Shinaeva
Master class on making a postcard using the origami technique “Scarlet Flower for Your Beloved Mommy”
The most touching holiday is approaching - Mother's Day. Thanksgiving, expressions of love and respect for mothers.
Mothers gave us life, affection, care, love.
On this day, children of all ages give their beloved mothers heartfelt congratulations, flowers , and gifts.
In kindergarten, my preschoolers and I prepare for the holiday with trepidation. We learn poems and songs about beloved mothers . We make gifts , postcards , and publish wall newspapers.
This year, the guys and I decided to make a card .
They gave the title: “ Scarlet Flower for Beloved Mommy ”
.
The postcard is made using the origami technique.
For work we will need:
1) five red squares 5x5 cm . ,
2) a strip of green paper,
3) a sheet of colored cardboard for the background,
We start by folding the petal.
1. Bend the square diagonally
2. Bend the three corners one by one towards the center.
Master class on panels based on the fairy tale by S. T. Aksakov “The Scarlet Flower”
Vera Belikova
Master class of panels based on the fairy tale by S. T. Aksakov “The Scarlet Flower”
Hello! with a panel that we made for an exhibition in honor of Sergei Timofeevich Aksakov for your assessment . He was born in the city of Ed Ufa, and therefore is our fellow countryman. The symbol of our city is the monument to Salavat Yulaev, a freedom fighter, located on the edge of the city near the embankment of the Belaya River.
I think many have heard about our city, since we hosted the SCO and BRIC several years ago. Below is the Congress Hall in which the events took place.
There are a lot of beautiful monuments and architectural buildings in our city, but more on that next time. Sergei Timofeevich Aksakov was born on September 20 , so at the end of September we have an exhibition called “ Aksakov Days Aksakov . panel craft was presented from our kindergarten .
To make it you will need:
- colored ,
— felt-tip pens.
We cut out a distant background onto yellow cardboard and paste it from colored paper : Mountains, trees, lake.
We make grass and birch from corrugated paper and glue it to the background.
We roll up birch leaves from thin strips of green paper.
And finally, we cut out the figure of Nastenka from paper, paste it with corrugated paper, paint the kokoshnik and face with felt-tip pens , and paste it to the foreground. the flower from pieces of corrugated paper.
Thanks to everyone who visited my page.
Photo report “The Scarlet Flower” is visiting us. I live and work in the countryside. A traveling circus very rarely comes to our House of Culture, and the theater has never been like that. And not at. Photo report of the dramatization of Aksakov's fairy tale “The Scarlet Flower” using classical music As part of the “Book Week”, children of the preparatory group for school learned and showed the musical fairy tale “The Scarlet Flower”.
Game training “The Scarlet Flower” Goal: comprehensive psychological support for young teachers, search for professional resources and prevention of emotional burnout.
Lepbook: “The Scarlet Flower” Dear colleagues, I present to your attention a laptop on ecology “The Scarlet Flower”. Vasilisa the Beautiful was raised together with Danila. Master class “The Scarlet Flower” Master class The Scarlet Flower by Yulia Sochilova (3-D applique) materials: scissors PVA glue pencil colored double-sided paper)1. Master class on making cards for Mother’s Day “Scarlet Flower for Mommy” I decided to share my experience of creating cards that my children and I made for Mother’s Day, maybe it will be useful to someone. The children came up with the name themselves. Autumn matinee in the preparatory group based on the fairy tale “The Scarlet Flower” Entrance to the music “Dance with Leaves” Reading poems: 1. r Autumn spread paint at the edge, quietly brushed across the leaves, Nastya K. Turned yellow. Script for the puppet show “The Scarlet Flower” Program content:1. introduce children to theatrical art 2. enrich knowledge of Russian fairy tales 3. educate spiritual and moral values.
Source